I finally started working on the station area. Spent a couple of days getting the clearance correct for the platforms. I hope I have it right.![]()


|
|
I finished the wire drops on the outside loop yesterday. Today we drove up to Whippany New Jersey and took a ride in a caboose. This evening I dug out a transformer and connected a couple sets of wires just twisting them together and ran a GP35 pulling a bulkhead flat and a caboose to check for final clearance.
Matt and Jon were here today.
Matt continued working on locomotives and got 3 more into the fleet. One was a simple replacement board on a Williams Genesis. The Digital Dynamics board that I put in it, had given up the ghost. Here are the other two, both Rail Kings, now with TMCC.
Jon and I started by clearing the last of the junk from the upper deck on the south wall.
Jon does his best Wilson (from Home Improvement) impression, as he looks for the stud to mount the bracket which will support the last 2x4 for the lighting.
With the 2x4 in place, Matt grabs the camera, as Jon and I plot our next move.
I cut and bent the conduit, and Jon hung and wired it.
Jon also hung 42' of track lighting. This side of the room is so close to being done!
Looks like Patrick will be back tomorrow. I'm thinking we can do some backdrop and finish the last of the benchwork.![]()


Your making some real headway, Elliot. I'm excited to see what you and Patrick accomplish tomorrow.
worked a little on the transfer table again finally adding the opposite side tracks got 3 down but need to cut custom size tracks to get it as tight as I can to the wallhad to remove the upper track to get to it also decided to remove my homemade bridge and add the lionel trestle Bridge. and make brick wall abruptments . also worked alittle on the fuel storage area. here are the photos I feel I went backwards alittle today but sometime you have to go backwards to go forwards. also waiting on the tanks so I can finish final placement of the tanks


OK, I have not posted about my layout for a very long time because for personal reason I have been away from it for a couple of years. But, for the last few weeks I have been back into it when ever I have free time.
Today I fixed a switch at the top of my viaduct. The switch was fine but because I did not mount the motor properly it would cause issues from time to time. Today I cut an access hole so as to get at it and better see what I am doing. I also did some work on the viaduct so it will except mounting screws. I don't wont to tell you how I rigged it up before, trying to avoid the obviously needed work because I already called myself a dumb *** in a number of ways and I really don't need to read from you.![]() Well all is good now.
Well all is good now.
I even washed and waxed my car so as to get it ready for this winters snow/ rock salt. All said and done it was a wonderful day!![]()
Nothing complicated, just good fun running trains.
It's nice to finally see Elliot in a layout update
Another busy day...
Patrick and I started off by finishing the last section of the upper deck along the south wall.
We had to shim up the plywood in order to make the transition to the fiber board. Just as well that I have ruled out switching to Kadees, I don't think they could handle the vertical curve. We did everything we could to minimize it. The "lobster claws" should do just fine. I love 3 rail trains. They're more forgiving. ![]()

Then it was on to backdrops again. The first piece took a bit of work with a notch at the top to allow for the 2x4s, as well as the two openings for the wye.
The second curve also took some extra work to fit.
The wye openings close up. I'll try and get the tracks through there this week.
After that Patrick was off to the races, all the way down the wall...
Until we ran out of Masonite.
Patrick took this shot looking down the wall from inside the helix.
The Ross double slip that ordered last week showed up today.
It always feels strange taking something brand new, and cutting into it, even if it was only the tips of a couple of ties.
I seem to work harder when the guys come over. My pedometer tends to confirm that. I should sleep well tonight. The plan is to lay more track tomorrow.


Nothing today. Waiting for the weekend.
Nice progress, you guys got a lot done.
I'm wondering if Patrick found the graffiti?
Needed some storage for my now growing (yet still young) collection. Came up with a simple design thanks to the forum. Still need to cut the plastic for the doors.

I'm going to have to build another. I still have 17 freight cars, a diesel and caboose sitting on the layout.
I'm proud of how it turned out. Good first attempt.![]()

Thanks Jon.
Yup, but I never saw it.
Thanks Jon.
Yup, but I never saw it.
I didn't figure that you would. ![]() You have your hands full now with laying track. The double slip looks great, nice solution.
You have your hands full now with laying track. The double slip looks great, nice solution.
redesigned the ramp between levels to give more room to the transfer table and still kept the same incline. so I tore it all out today. then decided to put decals on a MTH rugged rails F3 it looks like a yellow bonnet without any graphics it is a Ronald McDonald House engine. need to pick up decal paper and resize and print a blue nose decal. but here it is in it's current state.


I'm wondering if Patrick found the graffiti?
Nope, never saw, was too busy focused on backdrops work.
I'm wondering if Patrick found the graffiti?
Nope, never saw, was too busy focused on backdrops work.
Well, you covered one, but there's still another. Look for it when you paint.
Yesterday while running some trains I looked at a section that I had left open because I was leaning toward putting in some scenic express flexible walls. I had done that further up the grade. Well I changed my mind and instead I added more pink board in that area and got the plaster wrap on it last night. So today once I get home from running some errands I'll put the coat of plaster on and maybe by tonight will be able to start coloring it........Paul
Got both the turntable pits assembled, painted and weathered. I just did both of them to look pretty much the same way as this one photo:
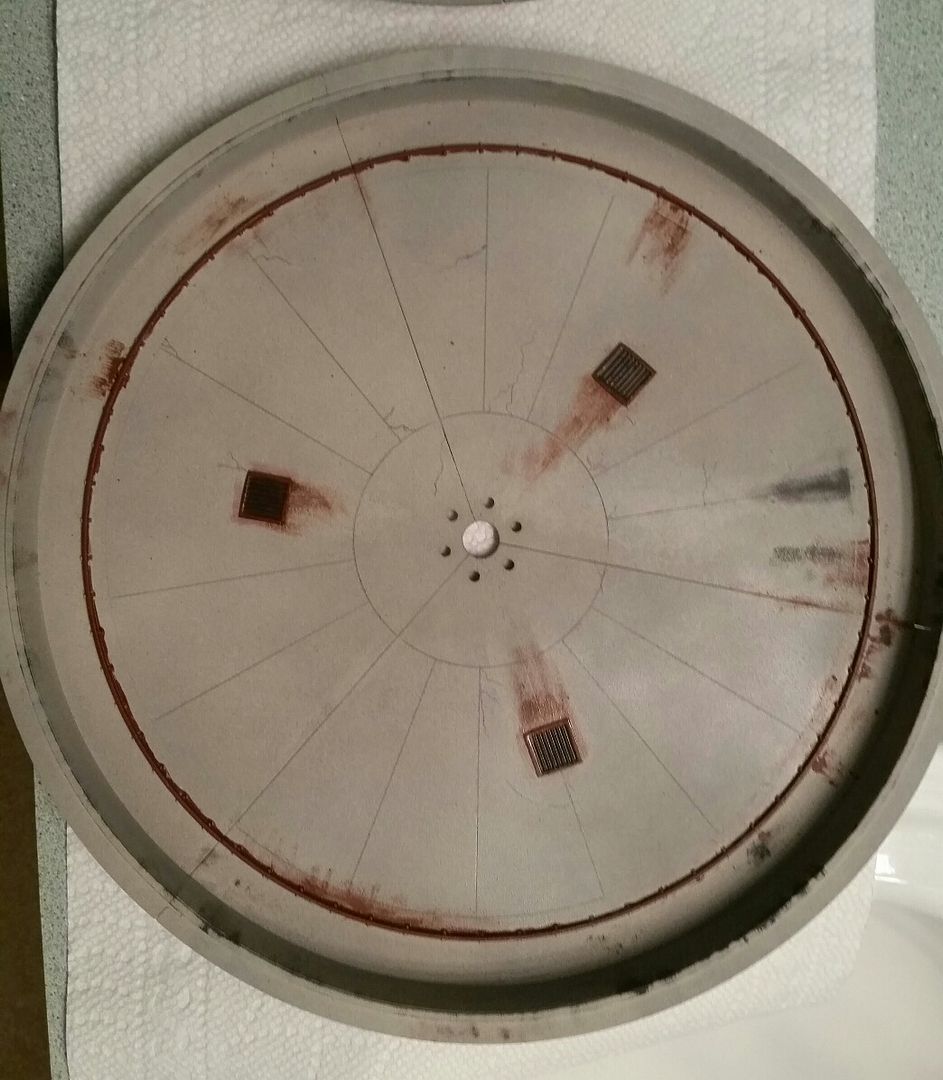
I painted them with alternating layers of grey primer (for a ‘pebble’ looking finish to appear as rough concrete) and light tan spray paint. The rest was dry-brushed with various hobby paints. The bridges will be started tonight.
At least I saw it. Working on the Streets book, website, etc., there have been days when I didn't. I ran a track cleaned car, rotated the four locos on the layout to a new set, etc., tested that everything ran fine, and now am taking a lunch break.
Got the yard office ready to put on the layout. My Dad built it and I added the LEDs, and we both did some weathering on it. Gotta find the "appropriate" spot to put it on the layout now. Actually we don't have a "yard" so it will be the engine facility office.


Threw a rear traction tire on my MTH Aerotrain over the weekend. You know what a bear that is to replace! Fortunately I had some Bullfrog Snot. Followed directions using a small paint brush, put on a layer Tuesday morning, followed by another layer Wednesday morning. It rolled on and dried as advertised. This afternoon I ran the Aerotrain with no hiccups! I would have rather installed another traction tire, but the Bullfrog Snot stuff worked.
The only thing I don't like about the SNOT, is when you leave the engine sit, it will get flat spots very easily.
Thanks! I'll have to watch out for that. So, right now it's back in the cradle. Don't know what will happen long term. Will let everyone know!
Finished the bridges for my two On30 turntables last night. Going to wash them with detergent and warm water tonight, dry them overnight, and paint them tomorrow.
tried my hand at making a backdrop and painting one. my wife is selling a few of my trains so this will work for that for photo's ![]()
my replacement mth car showed up for the broken one then I figured I would try to fix the old one and I was able to with a little heat and superglue. third is the stripped down layout for the ramp rebuild . and forth is the tank farm I got today it was broken when it arrived but superglue fixed what I could.


Well I made it out to the garage today & I pulled some wire to the breezeway of my house. Then I went to shoot some photos of the real trains. And as I type I can hear the trains running. But today was a no show for the trains Well there is always tomorrow.
Very nice scenery, Jerry!
I finally bit the bullet and painted my ceiling black. I also installed black track lighting with 5000K LED flood lights on dimmers. Started putting the layout back together.
Now I have to learn how to have my camera take night shots that actually look like night!
Chris
LVHR


I finally bit the bullet and painted my ceiling black. I also installed black track lighting with 5000K LED flood lights on dimmers. Started putting the layout back together.
Now I have to learn how to have my camera take night shots that actually look like night!
Chris
LVHR
Chris,
The ceiling and lights look great! I like the clouds on your backdrop also. Nice and wispy looking. It will be fun doing night photography, looking forward seeing your results.
I've been working on the track almost every day this week.
The crossover is in and I've started 3 out of the 4 curves.

The double slip is in, and the yard is started.
The bypass track is done.
Side view
Looking the other way.
I'll be back at it again tomorrow.![]()


Elliott,
Look good!![]()
Elliott,
Look good!![]()
Thanks Patrick. I should have this side mostly done by the time you come over.
Elliot, it does the heart good to know that your in your element and laying track. incredible progress, considering this is what it looked like several weeks ago.

Keep going, buddy.
Gee Jon, how far back did you dig for that shot? July maybe?
Telltale signs:
Got the yard office ready to put on the layout. My Dad built it and I added the LEDs, and we both did some weathering on it. Gotta find the "appropriate" spot to put it on the layout now. Actually we don't have a "yard" so it will be the engine facility office.
That building has a dignity about it which is charming. It seems to stand there proud and tall, ready for its purpose.
FrankM.
The guys have been working on this neat harbor scene for awhile. Jerry created the freighter form a discarded child's boat toy and added the superstructure. Ed has run some lighting to it (not visible) and Harold did the trackwork. They have a RR car barge that can park at the edge where the spur ends too.


Sam,
Nice group effort to make a very believable action scene.
I continued to fine tune what is currently running on the layout. Getting close to where we want it.
However this is a continuing process as new equipment gets added. ![]()
I resuscitated the Razorback Traction Co.'s "Red Rocket One" using parts from a donor Lionel 627... :-)

Also took delivery of some new signs and figures...

Mitch
I actually went up this morning, turned everything one,checked it out, and ran the cleaning and vacuum cars, and set up four 12-car trains for visitors this afternoon. I decided it would be all LC+ today - at only 13 volts though: we will have visitors with kids so they will have remotes to use, and I'm limitng top speed a bit to be on the safe side.
This all took two hours, you understand, because I spent so much time playing and running trains. ![]()
After getting tired of dealing with finicky postwar switches, I took down my postwar layout and started over. I had six reverse loops and when it worked, it was great. However, it was hard to reach trains when the switches went haywire. I am going to simplify the setup with no reverse loops.
Bob
GF might be a keeper. She spent the past three days helping me clean up the basement. She cut and hung a black fabric curtain to hide the underside of the table. It looks nice. We went to 5-below and got some 1/43 cars ($3-$5 each) to add some more flavor to the layout. Party next weekend. Gotta get the layout presentable for the kiddos.
I purchased my first FasTrack Friday. Just enough for an oval of O36. Today I set it on the floor and ran the Polar Express on it, because it was handy. While I like the looks of MTH FlexTrack better, I like hoe the FasTrack snaps together easier. It also was a better fit, I think. Also, I bent several of the slid fingers that make contact underneath the MTH track. It is also easier than GarGraves. I like the look of GarGraves best, but I like how easy FasTrack was, because I have pretty bad arthritis for my age, 58. I also like the clickety clack of the rail joints which you don't have as much on the longer sections of flex. Also, bending the GarGraves was a terror with arthritis. As a last note, it was fun seeing the PE run.
Mark, I found it easier to put the wire connectors on the FasTrack with a pair on needle nose pliers. So far I have connected over 50 pair of power drops on my layout. I bent a few the first try.

Well, in addition to remotoring a Bowser Birney, I brought my MTH Electroliner out of mothballs and mounted an M1 Abrams tank to an MPC flat car (drilled holes in the deck and fastened the tank down using the screws that came with it; the orange tiedowns are actually wire salvaged from a barcode scanner cable)...
Mitch
I purchased my first FasTrack Friday. Just enough for an oval of O36. Today I set it on the floor and ran the Polar Express on it, because it was handy. While I like the looks of MTH FlexTrack better, I like hoe the FasTrack snaps together easier. It also was a better fit, I think. Also, I bent several of the slid fingers that make contact underneath the MTH track. It is also easier than GarGraves. I like the look of GarGraves best, but I like how easy FasTrack was, because I have pretty bad arthritis for my age, 58. I also like the clickety clack of the rail joints which you don't have as much on the longer sections of flex. Also, bending the GarGraves was a terror with arthritis. As a last note, it was fun seeing the PE run.
For the first time since late June I actually ran trains today! I wanted to give my MTH Proto 2 engines some battery charge time. Ran my N & W Y6b, Pennsy Aero Train, B&O SW9. All three fired right up and got ample track time. Being with my trains again was fun!!!
I finally finished my two turntables. One, I left pretty much as-is, and weathered it to represent a relatively new bridge in an older pit.
The other, I didn't like the bridge decking as it looked to toy like to me. So, I added new real wood decking*, then weathered it with various shades of grey inks, then weathered with grime, rust and oil stains all over the deck. I like how it turned out.
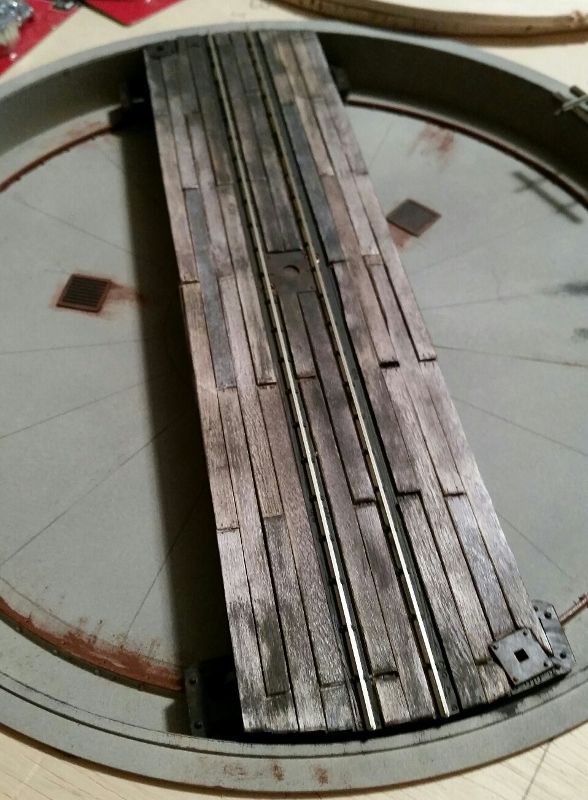
* I had bought a huge box of cheap birch coffee stirrers. They work great for O scale lumber!
That's one sweet turntable! ![]()
Mark, I found it easier to put the wire connectors on the FasTrack with a pair on needle nose pliers. So far I have connected over 50 pair of power drops on my layout. I bent a few the first try.
Sounds good. Practice makes perfect.
Mark
Yes it is running very nicely. I am glad to hear about the Texas Special, Kenny.
God bless you, too!
Mark glad to hear your getting a small oval together![]()
That's one sweet turntable! ![]()
Thanks, its a Peco On30 one. Here's what it looks like if you just build it out of the box:

They actually make one for OO/HO, but it uses the exact same pit and a slightly different bridge. I was going to plank over that one as well but the hardware was going to be a nightmare so I just painted and weathered that one.
I picked up A gallon of paint from LHS to paint (CT) hill reg. $45 I got it for $5 not bad. Now after finishing up tonight I need to go back to LHS to get 2 damaged 2ft. by 4ft. ceiling tiles to finish (CT) hill and start painting it grey as A base color and then start laying track. Choo Choo Kenny![]()
The yard is just 2 pieces of track short of being done. I brought a different ladder downstairs, which made the task much easier.
Some of the track in the foreground is still loose as I try to figure out the engine service area.

You can see the "missing link" next to the backdrop.
Looking the other direction.
Patrick will be over tomorrow.![]()


that layout is impressive. I wish I had the space for something like that. my room is only 16x14 and my layout is 12x10 with a 3ft leg of one side . small compared to this one.
that layout is impressive. I wish I had the space for something like that. my room is only 16x14 and my layout is 12x10 with a 3ft leg of one side . small compared to this one.
Thanks! Conversely I'm slightly envious of the speed with which you work. You actually have some scenery and a more finished look going, in fairly short order. It will take years for me to get that far.![]()
![]()
The yard is just 2 pieces of track short of being done. I brought a different ladder downstairs, which made the task much easier.
Some of the track in the foreground is still loose as I try to figure out the engine service area.
You can see the "missing link" next to the backdrop.
Looking the other direction.
Patrick will be over tomorrow.![]()
Elliott - I love the looks of this trackwork. You did a great job with it. It flows very nicely and realistically.
Art
that layout is impressive. I wish I had the space for something like that. my room is only 16x14 and my layout is 12x10 with a 3ft leg of one side . small compared to this one.
I'm with Elliott on this one. Your speed of construction makes me even madder at myself for how slowly I am going lately. Your doing a great job and I love seeing the pictures of your progress.
Art
mine's a lot easier than yours Fastrack snaps together and there's no bending of flex track. which goes much faster. and my layout is maybe 1/4 of the size. I do a little every night. weather it be make a few plaster rock castings or plaster retaining walls. I sat one night doing nothing but making castings . mixing up plaster and pour and repeat. I enjoy scenery and making it all look good but the wiring for get it can't get a grasp around it but I do keep trying. no matter what I do it ends up spaghetti under the layout.
thank you guys that makes me feel really good about what I do . this is my first layout of any size. that has gotten this far. I like posting the photos. and seeing everyone else's photos for more ideas. I only post a fraction of my photos I take some every night of what I do that day .
Thanks Art, track design and installation is one of my favorite parts of the hobby. Fortunately or unfortunately, this aspect will be coming to an end within the next 6 months. Then I'm going to have to find a new "love".![]()
Nice to see that you've been busy. Looking good, Elliot.
mine's a lot easier than yours Fastrack snaps together and there's no bending of flex track. which goes much faster. and my layout is maybe 1/4 of the size. I do a little every night. weather it be make a few plaster rock castings or plaster retaining walls. I sat one night doing nothing but making castings . mixing up plaster and pour and repeat. I enjoy scenery and making it all look good but the wiring for get it can't get a grasp around it but I do keep trying. no matter what I do it ends up spaghetti under the layout.
that's the way to approach it, a little bit at a time, especially when working by yourself. You have made tremendous progress since you moved to the upstairs, a little at a time.
Finished building a crossing shanty, re-strung some telephone pole wires and added a little more landscaping. My layout is pretty much complete, so anything I do is mostly putzing around.
Patrick was here today, and we got a few things done.
We made a minor adjustment to the upper level benchwork in order to smooth out the future mainline. Then cut and installed the fiberboard.

I set up my makeshift compass, and swung the arcs for the two mains. Inside 072, outside 080. I need to make a minor correction to the fiberboard for part of the outer main. 
Patrick Bondo-ed the backdrop that we hung last week. Sand, prime and paint next time.
After that we cleaned up, as I have company coming over tomorrow.
When we were done cleaning, it was time to run the train. Part for fun, and part to test everything, including a track cleaning run.
The test was not without incident. I turned on the turnout power supply for the first time in a few months. I forgot to visually check the route. A switch on the panel had accidentally been flipped, sending the intermodal crashing head on into a parked Empire Builder.
Then, the track cleaning car lost a screw in its frame, and a wheel set popped out. Good luck finding that screw! I just happened to find one with the right thread on the workbench, but it was too long. Ground that down, fixed the track cleaner, and put a drop of super glue on the head of each screw, so I won't have a repeat of that.
In the famous words of the late Robin Williams (T. S. Garp) "It's pre-disastered". Everything should be fine for visitors tomorrow.![]()


You guys make it look so easy that I am motivated to head downstairs and get busy. But I just came up from there and I was totally frustrated with my bridge project. I must be making it harder than it should be. Not that that is a new event. LOL
Art
Art, it's not easy. It just takes persistence. If you find yourself stuck on a project, just switch to a different one, and think about the one that you're hung up on. I do that all the time, and sometimes come up with better solutions by putting off construction.
Now get busy! Don't make me come down there.![]()
Elliot,
Good advice. I had a manager once who used to say that. Many want you to keep banging your head against the wall until you finish it. ![]()
I am building a girder bridge over a dry wash canyon on my southwest-style layout. I was very pleased with the Scenic Express "girder bridge plate" from cast resin as the basis for my bridge. But the smooth interiors of those bridge plates seemed unprototypical. So I fashioned some triangular supports from 3/8" strip styrene, alternated with some small vertical supports. Glued the triangular supports on about 2 1/4" apart. Spray-painted the result with the dark green color of my bridge. I'm pleased with the results.
Bob A.


Bob - That is a great improvement. It really looks fantastic.
Art
Art, it's not easy. It just takes persistence. If you find yourself stuck on a project, just switch to a different one, and think about the one that you're hung up on. I do that all the time, and sometimes come up with better solutions by putting off construction.
Now get busy! Don't make me come down there.![]()
Thanks, Elliott. I needed that.
Art
Good evening
Picked up some furniture for the basement. thought it might be nice if people had a place to sit and watch trains.
Clem
Clem, are you having another open house?
Bob,
Your girder modification is just what that bridge needed. We've seen scads of girder bridges just like that. I like the green also.
I'm sort of "late in the thread" with this post, but I finished another installment of the "BACKSHOP" and got it into my editor yesterday. So today, I started on finishing up the scenery walls of my roll-away canyon and trestles module. I've got to get that done before the end of the next two weeks to meet the next print deadline.
I sure hope this thing is going to come out like I'm planning it. Sometimes I get apprehensive about how things are going to work, even though they always seem to come out OK.
Sometimes I feel like everybody out there thinks I should just KNOW how all this is done, and naturally expects me to come up with all the answers. I usually don't HAVE all the answers but, due to the beauty of writing and sitting back and analyzing what I've written, it just SEEMS like I have all the answers.
Thank goodness for all you guys out there that I don't hesitate to call on when I need advice! I really appreciate it!
Jim,
I have been very interested in your series. I am sure the layout will turn out quite well. This is one thing I have learned on this forum; things that forumites present are often trial and error on their part, but turn out great. It gives all of us encouragement.
here's what I have done tonight and yesterday. spent more time making retaining walls than anything but it has to be done. decided to add a spur on the front. need to add a 5" X 12' board to the front to support the track ran trains last night and tonight alittle you have to run just to have fun with them or you will loose interest ![]() first time a long train made the incline to the second level after it was reworked. I tried the other day with a steam engine 4-6-0 pulling 8 Madison cars and threw a traction tire. replaced it with a new one and tried again and it went up fine. this time was 13 cars and it never slowed or nothing.
first time a long train made the incline to the second level after it was reworked. I tried the other day with a steam engine 4-6-0 pulling 8 Madison cars and threw a traction tire. replaced it with a new one and tried again and it went up fine. this time was 13 cars and it never slowed or nothing. ![]()


Yesterday I put in some risers for the second level. I measured the height, leveled each riser with great precision and ensured that each riser was absolutely level with every other riser. It was a thing of beauty. If only I had figured what the height should be correctly it would have been a great success. Unfortunately I did not so I got to take it all down and do it again. Great precision, very bad accuracy.![]()
Al
Jhainer; that is shaping up to be one fine layout.
Clem, are you having another open house?
Good morning Mark
Not yet just thinking of the future, last open house I noticed a few things and now is the time to correct them. I also installed a new guard railing that no one will ever see.
Clem
Jhainer; that is shaping up to be one fine layout.
Thank you
Spur track is in. and it's just about right in length I do have one more hopper on it's way so then it might be to short but we will see.
not bad for 7 bucks in wood. ![]()
the hopper train fit there but it also fits under the layout in the yard so I am thinking maybe put passenger cars there and building a second level there for a station. who know yet just a idea. and yes I used the water tower to hang my hat ![]() since I am a displaced Michigander if anyone wants to know its a Detroit hat I wear it proudly here in Ga.
since I am a displaced Michigander if anyone wants to know its a Detroit hat I wear it proudly here in Ga.


I spent the day erecting the first leg of my new BridgeBoss elevated system. I am replacing my old risers to create a more detailed interesting double track system. I have spent a great deal of time thinking this through. I assembled the parts earlier this week and today actually cut the risers to fit the configuration.
")
")
")
")
")
")
")
")
The other day I picked up some MTH spline cars 20-95035 tried to find out the minimum curve size well comes to find out 054 after I got them. My tightest curves are 031 so this wasn't going to work for me . tried them out and they could do the 048 curves but not the 036 or the 031 so with a little thought and a dremel tool they now navigate 031 with no problem and you would never know I did the mod. ![]() I now have a 5 car spline set.
I now have a 5 car spline set.
Access to this requires an OGR Forum Supporting Membership


![20140923_214823[1]](https://ogrforum.ogaugerr.com/fileSendAction/fcType/0/fcOid/12129987997660671/filePointer/35358642407459080/fodoid/35358642407459076/imageType/LARGE/inlineImage/true/20140923_214823%255B1%255D.jpg "20140923_214823[1]")
![20140923_214823[1]](https://ogrforum.ogaugerr.com/fileSendAction/fcType/0/fcOid/12129987997660671/filePointer/35358642407459080/fodoid/35358642407459076/imageType/LARGE/inlineImage/true/20140923_214823%5B1%5D.jpg "20140923_214823[1]")


