


I bought a 5 pack of needle bottles on the bay for something like $6
FarmerJohn, that approach looks great. The only problem is that it will cause a loss of revenue for the railroad. Trucks will start making deliveries to the town.
Decided to primer and repaint the boxcar so I can add it to my MTH Wash & Rinse Subway set. I like it better than brown too.
")

")
Attachments
Images (4)
")
")
@romiller49 posted:Check with Mega Steam. They have the needle container you need.
That's what I'm doing!
FECRailroaddog - That track cleaning boxcar really turned out nice.
I finished the labeling and clear overcoat(s) on the panel. The numbering system for the turnouts is based on which tracks they are connected to ie. 23 is the turnout connecting sidings 2 and 3. The number stickers (from Amazon) are just the right size to be placed on top of the controllers and on the switch motor covers as well. The turnouts from the mainline start with 1 for the main. This works well except on the reversing loops. 
Attachments
Images (1)

@FECRailroaddog posted:Decided to primer and repaint the boxcar so I can add it to my MTH Wash & Rinse Subway set. I like it better than brown too.
Outstanding work, Fec. You need to put some MTA decals on this as well as the other work train cars in the set. You can get them from IslandModelworks or print your own.
Got more work done to the gas station scene. Click on my layout progress link to see more and my YouTube page to see the entire process in video form.
Dave

Attachments
Images (1)
John, nice road up to your little town! I sure hope you know some pavers! I will be watching to get some ideas.
FECRailroaddog, Good looking yellow! Looks like it fit's right in.
Dave, Outstanding gas station scene! I really enjoyed the construction video on your You Tube page!
Nothing from me today guys as the wife had me stacking 3 cords of wood getting ready for winter! LOL
Thanks Mike!!
@FECRailroaddog posted:Thanks Mike!!
Just got done checking yours and lovindemtrains You tube pages! Wow guess maybe one day I should think about one! Wonderful stuff on both!
Today I laid out the parking lot for my new WS Miss Molly's Diner, sanded and painted in flat black paint, and then paved with the WS fine ballast black cinder and WS scenic and cement glue. I use WS scenic glue instead of Elmer's or other white glues, because with the fine ballast black cinder WS glue dries flat. Sometimes I get a glassy sheen from Elmer's glue. Here's some photos:


Now for the waiting game in this hobby, drying! The asphalt is about 1/8th" thick, so it takes a full 24 hours to dry. Once dry it should look the same as the surrounding street, then I'll line it with a concrete curb.
Attachments
Images (3)


Thanks Mike!
@farmerjohn posted:Changed my approach to my little town today after getting some ideas from my friend Steve. As it looks I should have done this sooner.


Super progress Farmerjohn.
Looking forward to seeing the finished project
@Strap Hanger posted:Outstanding work, Fec. You need to put some MTA decals on this as well as the other work train cars in the set. You can get them from IslandModelworks or print your own.
@FECRailroaddog- great job on the repaint. I just bought my decals from Island. Nice folks and quick service. You can find them on that big auction site.
@farmerjohn- the new road is going to look nice. Make sure you put up a sturdy guardrail- that turn at the top has quite a long fall to the bottom. ![]()
@WesternPacific- the diner scene has me craving a deluxe cheeseburger platter.....![]()
@luvindemtrains- the gas station looks great.
@mike g.- and I though my CEO kept me busy. I think you win this.....
I did a little more assembly on my track car last night. I added the end caps to the pipes and assembled the pump. I need to get a bottle of the solvent cement from Plastruct. The Testors glue is just not holding firm.


At the suggestion of @Tranquil Hollow RR I also checked clearances. We are go for launch! ![]()


Bob
Attachments
Images (5)


I put some grass down for a grave yard and made a space for a church with parking lot which will probably be gravel. I haven't done much since April due to a work injury but I got 4 new discs in my neck 2 weeks ago and am back on track. I'm glad I had the forum to occupy my time waiting for surgery approval. The train rooms also a wreck as I bought and sold alot when bored.


Attachments
Images (2)
Dave...this is the first time you mentioned or at least I caught news about your injury. Hope all is on track to getting well. 4 new discs sounds serious (at least to me), glad you seem to be getting better.
Regards
Don
@Don McErlean posted:Dave...this is the first time you mentioned or at least I caught news about your injury. Hope all is on track to getting well. 4 new discs sounds serious (at least to me), glad you seem to be getting better.
Regards
Don
Thanks Don, I kept it quiet in case it went south. I had a great surgen and with a replacement verses fusion there is instant relief. After therapy I'll be back to work in the middle of November.
I'm going to do something different than most of you!!!
I'M GONNA RUN TRAINS ALL DAY! IT'S RAINING OUTSIDE SO CAN"T MOW the GRASS !! DARN !!
FREDSTRAINS
@Fredstrains posted:I'm going to do something different than most of you!!!
I'M GONNA RUN TRAINS ALL DAY! IT'S RAINING OUTSIDE SO CAN"T MOW the GRASS !! DARN !!
FREDSTRAINS
Sounds like a great idea Fred! Too bad I'm at work or I'd be doing the same. ![]()
Wow Dave! Glad you are doing better. Like Don said, that sounds serious. Keep us posted and continue to take it easy.
Dave
Hey Dave - Glad for your speedy and complete recovery. That kind of surgery is scary stuff.
I had to extend the yard to install the Lionel Saw Mill. I was not expecting to have a mill when I laid out the yard but it's a neat accessory. I had some Homasote left over so I have been putting it to use in the widened and extended yard. I supported the Homasote with 1/2" plywood. The longer log cars required an extension of the track in front of the loader as well. There was just enough room by the switch motor for the track extension. I had shifted the Saw mill as far as I could without fouling another passing siding adjacent to the yard.


Attachments
Images (4)


afternoon guys. I hope your all having a great day! I know it's been a good day for me. but first to you guys~!
WesternPacific2217, Nice job on the parking lot, it's been a while since I have seen it done like that!
Bob, that is such a cool project! I sure hope you make a video of it when your done!
Dave R. Glad to hear your doing ok! I hate anything that has to do with neck injuries! The grass and church look great, but man thats going to be one huge grave yard!
Victor, Great placement of the saw mill, it fits right in!
Well because of yesterdays firewood stacking I had all day to the train room, so I go an early start. I nailed down the track and had to run to the store to get more nails, Then I soldered all my joints that needed it, added a power drop hooked everything up. Then I had to figure out where I screwed up cause when I would drop the bridge it would power both upper and lower tracks. Took me a while but found it and its all good.
Then I ran some trains! LOL
Sorry the video I took is to big and I cant figure out how to cut it down!
I did another mundane layout project today: installed a few LEDs in my Postwar 022 switch tracks.
Pretty much all I do on my layout at this stage in my life is make an occasional adjustment and run trains, which I'm quite content doing.
When I was actively building my current layout 25 years ago, I did it in a fever! I would work on it when I got home from work until 2 AM. I was obsessed, maybe even possessed. It was very stimulating.


Way to go Mike, supplies are moving again.
@Tranquil Hollow RR posted:Way to go Mike, supplies are moving again.
Thanks Jay, when I get more funds I will have to work on the other loop at the other end of the room. But for now I will work with what I have on hand.
Mike,
You have made some wonderful modifications and the trains are running great. Congratulations.
Dave
Looks great Mike. Nice big reverse loops!
Did more assembly on the track car piping and fittings last night. I started using Gorilla instant glue which worked great and cut wait time way down. A tornado warning was issued around 9 PM as Ida passed through, so what better way to pass the time in the basement than work on the trains. No photos of note but I did put my new boxcar on the rails.


Attachments
Images (3)


Bob, I hope you faired well threw last nights weather! It looked pretty bad on the news this morning!
Dave, if you get a chance can you share more information on the brick pattern for your gas station?
Everyone stay safe and have a great day!
@mike g. posted:Bob, I hope you faired well threw last nights weather! It looked pretty bad on the news this morning!
Dave, if you get a chance can you share more information on the brick pattern for your gas station?
Everyone stay safe and have a great day!
We were fine Mike. I'm in central Nassau county, about 20 miles east of Times Square. North and west of us got hammered though.
Thanks
Installed a flashing blue roof light on my early '50's Massachusetts State Police vehicle......
Attachments
Videos (1)
")
@Richie C. posted:Installed a flashing blue roof light on my early '50's Massachusetts State Police vehicle......
Ok Richie, you show off! LOL
Maybe you should do a how to video for the rest of us, I know it would really help slow guys like me out! LOL
@mike g. posted:Ok Richie, you show off! LOL
Maybe you should do a how to video for the rest of us, I know it would really help slow guys like me out! LOL
Hah ! No worries - I'm doing my ambulance next and I'll include some photo's and descriptions. The lighting kits are from one of our Forum sponsors, Evan Designs.

I started the tunnel. This will be the bottom “footer”.
Beveled down for better/more clearance. Old school tool,
a Stanley hand plane which was my Grandfathers on a 1x3 rough cedar. I’m pretty excited with regard to finally getting started on tunnel.
Attachments
Images (1)
@Dave Ripp. posted:Thanks Don, I kept it quiet in case it went south. I had a great surgeon and with a replacement verses fusion there is instant relief. After therapy I'll be back to work in the middle of November.
I'm 2 days behind. I'm glad the new discs are working out. My double lumbar fusion in May has kept me away from the layout too, but I am starting to get back in shape enough to get at it soon.
Mike, The two levels look great! How are you accessing tracks on the lower level?
@train steve posted:
My wife's grandfather was a carpenter/ cabinet maker. He had a beautiful collection of wood planes from the early to mid 1900's. They wound up in a rusty pile in my brother-in-laws barn......![]()
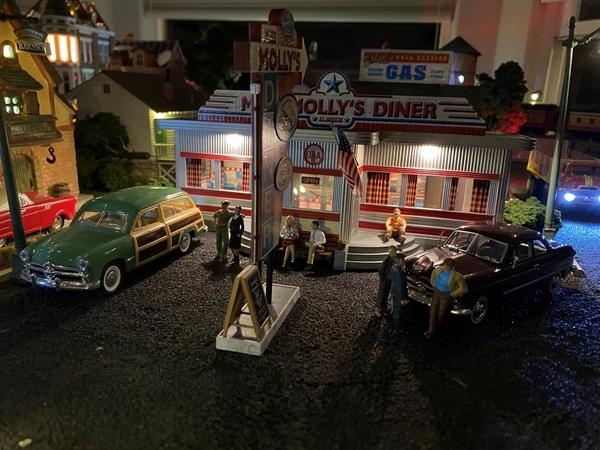
Finished up WS Miss Molly's Diner this morning. But, is anything on a train layout really done?! :-)

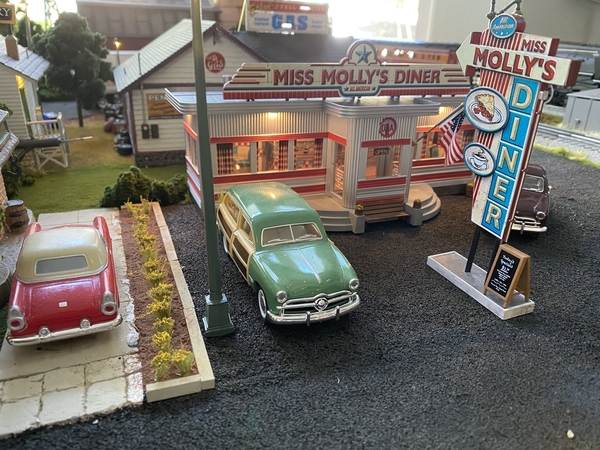
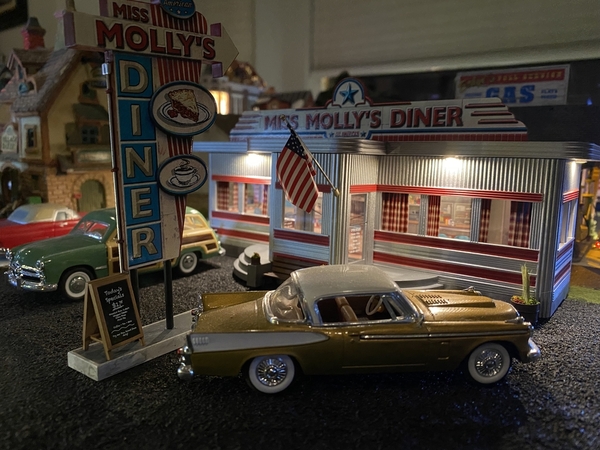
Nope, it still needs some people in the parking lot. Figures are next.
Attachments
Images (4)


Western, great looking scene...I agree, the "people' will finish it up!
WP, Molly’s diner looks great! The more people the better the food. Oh wait! It the other way around! 😄
@WesternPacific2217 posted:Finished up WS Miss Molly's Diner this morning. But, is anything on a train layout really done?! :-)
Nope, it still needs some people in the parking lot. Figures are next.
That is an awesome diner, and the cars are also beautiful, perfect for the time.
We have a diner in Syracuse called the GEM Diner, and it looks just like this one.
BTW, is that bronze auto a Studebaker Hawk?
It may not seem like a lot but I got the ball rolling on fixing my ongoing Legacy issues and with getting some tips on winter scenery techniques and materials. Since I'm having such a hard time even building a layout, I think my Christmas one is going to end up being run year round.
WesternPacific very nice job on the staging of the diner. Good attention to the detail of the parking lot from the macadam to the vehicles. That is one of my gotta haves, since that’s my eldest granddaughter’s name; and she’s my backdrop art director.
@WesternPacific2217, you're right -- your great diner scene screams out for little people.
Well done!
Ran this Weaver RS-3 Reading after I done some major altercations to it.
Attachments
Videos (1)

@RWL posted:That is an awesome diner, and the cars are also beautiful, perfect for the time.
We have a diner in Syracuse called the GEM Diner, and it looks just like this one.BTW, is that bronze auto a Studebaker Hawk?
Hi RWL, Thanks for the kudos! And yes, that is a 1958 Studebaker Hawk. The Wagon, or as the English call them, An Estate, is a 1949 Ford Woody. Unfortunately, it is really hard to find 1/48 scale cars :-(, so most of my vehicles are 1/43 (most common) and a couple 1/53. Thanks again!
@Gandalf97 posted:It may not seem like a lot but I got the ball rolling on fixing my ongoing Legacy issues and with getting some tips on winter scenery techniques and materials. Since I'm having such a hard time even building a layout, I think my Christmas one is going to end up being run year round.
Hi Eric, I hear ya! My layout started as a Christmas display in my bay window so folks walking by could see it. The layout is still in the bay window and I put the Xmas tree up on the layout every year and get lots of kids oooing and awing. At lot of fun! So, more power to you if you keep the Christmas theme for your layout!!
Put a coat of primer on the track cleaning car. Doesn't look much different so pix will wait till more visible progress can be
@WesternPacific2217 the Diner looks great. The cars are a nice touch.
For those keeping track....Happy Friday!
@Tranquil Hollow RR posted:WesternPacific very nice job on the staging of the diner. Good attention to the detail of the parking lot from the macadam to the vehicles. That is one of my gotta haves, since that’s my eldest granddaughter’s name; and she’s my backdrop art director.
Hi Jay, yeah man, go for the Molly's Diner. Woodland Scenics just starting shipping them about a week and a half ago (new product). My hobby shop gave me a good deal too, so shop around for a good price. FYI - WS doesn't offer Miss Molly's Diner as a kit, just the ready built structure with built in LED lights. I was a little disappointed the sign on the roof wasn't illuminated, but I won't have much trouble to remedy that.
Dave I’m certainly glad you’re on the right road to your recovery. I can’t imagine what you have gone through to get where you are today.
I hope that you have cured your issues that you were experiencing.
We all owe lots to the smart an talented doctors.
I have enjoyed a couple of your videos this afternoon. The gas station is great… thanks for sharing
John d.
We finally got the river scene installed. It could not have happened without my friend Steve's help. It is the first thing you see when going down stairs into my train room . The dam swings out and the river drops down for assesibility. Took a lot of time but worth it. 


Attachments
Images (4)
John the whole scene is terrific!! What a lot of variety!
That’s an eye catching introduction John with a gigantic WOW factor. Your work is so impressive.
@Seth Thomas posted:Dave I’m certainly glad you’re on the right road to your recovery. I can’t imagine what you have gone through to get where you are today.
I hope that you have cured your issues that you were experiencing.
We all owe lots to the smart an talented doctors.I have enjoyed a couple of your videos this afternoon. The gas station is great… thanks for sharing
John d.
Hi Seth,
Thanks for the watching the video. However, I'm unsure what you are speaking of as it relates to cured issues and talented doctors.
Dave
farmerjohn,
I have been waiting patiently since your last post on this scene. I even went back, in the thread, to see if I missed it. This is totally what I expected from you... greatness! You certainly up the scenery game with your terrific results. I would probably spend a lot of time just digesting this scene if I ever got to see it in person. Thank you for taking us through the process and you have a friend for life in Steve. Congratulations on a job well done sir.
Dave
Today I primed Wicked Wanda's(Bar Mills) and the detail parts, such as the windows and doors. Two errors in this build were not painting the walls, etc. before assembly and an afterthought was to put in a floor for the second level. At this point, I would only be able to put interior details on the first floor. Once I decide where it will go on the layout, I will make that decision.
Dave


Attachments
Images (3)


@WesternPacific2217 posted:Finished up WS Miss Molly's Diner this morning. But, is anything on a train layout really done?! :-)
Nope, it still needs some people in the parking lot. Figures are next.
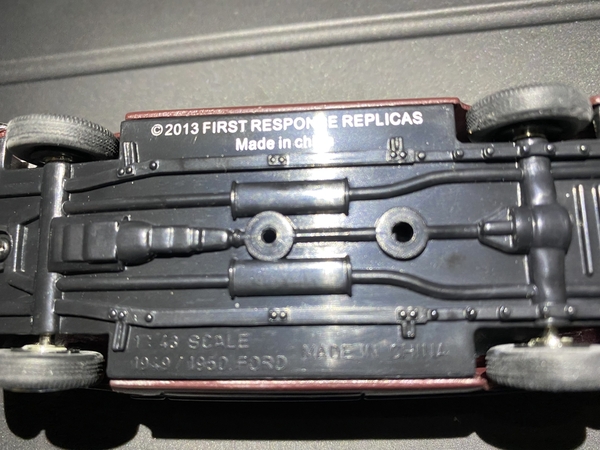
Great scene…reminds me of my days cruising the drive-ins on Woodward Ave. in Royal Oak Michigan. I am really interested in that little burgundy Ford Business Coupe…especially the manufacturer? Sure would look great on my layout.

I did have a 51 Ford Business Coupe (see photo), but it had a 58 Olds engine, Hydramatic trans and 55 Chrysler wire wheels…oh…and it was burgundy too!
Attachments
Images (1)
John, WOW! That looks amazing!
Lee Drennen, what were the alterations you had to make to the Reading RS-3? I recently purchased one and it ran okay. I’ve since packed it away.
@UKE KAT posted:Great scene…reminds me of my days cruising the drive-ins on Woodward Ave. in Royal Oak Michigan. I am really interested in that little burgundy Ford Business Coupe…especially the manufacturer? Sure would look great on my layout.
I did have a 51 Ford Business Coupe (see photo), but it had a 58 Olds engine, Hydramatic trans and 55 Chrysler wire wheels…oh…and it was burgundy too!
Hi Paul, great photo and memories! Your '51 Ford was a bit of a Ford/GM/Mopar highbred! I purchased the Burgundy 1950 Ford from Diecast Direct online (diecastdirect.com). It was manufactured by First Response Replicas in 2013. Here's a photo of the bottom of the car.
Scott
Attachments
Images (1)

@farmerjohn posted:We finally got the river scene installed. It could not have happened without my friend Steve's help. It is the first thing you see when going down stairs into my train room . The dam swings out and the river drops down for assesibility. Took a lot of time but worth it.
FarmerJohn, that is awesome! I can see the many hours of work you put into that scene. your water work is fantastic, and the color of the water is very realistic and perfect for the scene. Also, the rock and concrete work is second to none. Thanks for sharing that! I'm still looking at all the details, it may take awhile to take it all in.
Farmer John, Extremely nice!!
@Tranquil Hollow RR posted:Lee Drennen, what were the alterations you had to make to the Reading RS-3? I recently purchased one and it ran okay. I’ve since packed it away.
Jay. I had to cut the foot boards down they kept dragging on the tracks and it would high center and my curves are sharp so I had to add Kadee Couplers to it the cars kept jumping track. This may not happen to yours. I also cleaned and oiled it but it still growls pretty bad sometimes. Guess I’ll run it till it dies.
farmerjohn, I am speechless. Unbelievable ! So many items to see in that scene and I am sure it is 10 times better in person. Congrats on a wonderful scene and I look forward to seeing others you make. JP
@farmerjohn Absolutely spectacular!!!! Well done!!! ![]()
![]()
I'm sure many are curious to see how such a beautiful scene opens up for access. Can you share some pix? To not only create this, but to make it moveable is quite a feat of modeling.
Bob
@farmerjohn posted:We finally got the river scene installed. It could not have happened without my friend Steve's help. It is the first thing you see when going down stairs into my train room . The dam swings out and the river drops down for assesibility. Took a lot of time but worth it.
What a fantastic center piece and grand entrance to your wonderful layout! Well placed and Very well done!
Cheers, Dave
@farmerjohn posted: Took a lot of time but worth it.
Beautiful job John. No doubt here about it being worth it.
3D artwork sir. 😉
Farmer John - Those views are really amazing. So realistic! This sets a high bar.
I finished a mini-panel showing the turnout locations on the reverse loops.
Attachments
Images (1)

I apologize for the confusion.
My message regarding the recovery should have been directed to another Dave on our Forum
John
It happens Seth. As I scrolled through, I located the gentleman you were speaking of. No worries.
Dave
Thanks to all you guys with you're comments . I love it when other people enjoy trains and layouts as I do . As you know by now scenery is a big thing with me and trains running through it make childhood visions come true. I was asked how the dam and river are accessible. Here is some short videos with the help of my wife showing how this works. Thanks again everyone.
Attachments
Videos (4)


That’s great, John!
That is an engineering marvel. Wow! Great work, John
Okay, I added figures to Miss Molly's, I think I'm done for now, we'll see. LoL Figures really brought the scene to life. That was fun and satisfying!
Scott
Attachments
Images (1)

John- thanks for the demo on how the water scene opens up. Very impressive.
Scott- yes, people make the scene more realistic looking. Very nice work. ![]()
Got the basic construction finished on the track cleaning car. Everything is primed except the piping and pump which I will paint separately. Still debating what color to paint the tanks. The car will be LIRR blue and I think that the tanks done in silver would look sharp. The alternative is to paint it all the same color.


Bob
Attachments
Images (4)


WesternPacific2217 - Yes , the figures really added to it. I just love diners. Must be from Jersey. Now you have to find a newspaper rack for outside the entrance ! Great work !
farmerjohn - I went back and looked at the first pics and could not tell where the break points were without really searching. Fantastic job on doing that. And it all looks so solid as it will never shift down the road - nice planning and design. I am really surprised you did not motorize it - just kidding. JP
As mentioned on another thread I had to dismantle layout to make repairs in the garage. Before and after pictures. Waiting for new door before rebuilding 

Attachments
Images (2)

@RSJB18 posted:John- thanks for the demo on how the water scene opens up. Very impressive.
Scott- yes, people make the scene more realistic looking. Very nice work.Got the basic construction finished on the track cleaning car. Everything is primed except the piping and pump which I will paint separately. Still debating what color to paint the tanks. The car will be LIRR blue and I think that the tanks done in silver would look sharp. The alternative is to paint it all the same color.
Bob
Awesome work, Bob! My vote would be for flat black on the pipes.
@Strap Hanger posted:Awesome work, Bob! My vote would be for flat black on the pipes.
Funny you would say that....they were black up until yesterday morning. ![]()

Attachments
Images (1)

RSJB18 My 2 cents worth which wont even get you 2 cents. Do not make it all the same color - that option should be out. Unless you are a blue freak. I see the one pic with the one blue pipe - going to be a lot of blue. The only advantage I see would be that you can dip the whole car in blue paint to paint it - Lol. Try the silver or better yet have them chromed. If not go with black. Again, just my opinion and what do I know. JP
@RSJB18 posted:Funny you would say that....they were black up until yesterday morning.
Too funny! I’m with JPLoco on this. Just mix it up. If you don’t want to go with black for the pipes, then a decent rust color or oxide red, weathered with a nice black wash and/or dirt colors. The car in that LIRR Tichy blue with your decals is going to look real nice.
Thanks Guys. All blue is out but the red oxide is now in the running. Still leaning toward the silver. Probably comes from my power house on our campus. The old boilers were painted silver. We had two 600 HP International water-tube boilers to heat the campus. They were bigger than a semi. The tube sheets were always silver and it always looked sharp.
Bob
well at least the blue is out ........
John, as mentioned, that is an engineering marvel. The seams are flawless and you would never imagine it would open up like that. Sensational and intimidating.
@Bill Sherry posted:WesternPacific2217 - Yes , the figures really added to it. I just love diners. Must be from Jersey. Now you have to find a newspaper rack for outside the entrance ! Great work !
farmerjohn - I went back and looked at the first pics and could not tell where the break points were without really searching. Fantastic job on doing that. And it all looks so solid as it will never shift down the road - nice planning and design. I am really surprised you did not motorize it - just kidding. JP
Hi JPLoco, thanks! Actually, the newspaper stand is at the Passenger Depot! :-)

Attachments
Images (1)

WOW guys, what great work!
WP, Molly's diner turned out great looking!
Bob, your tracking cleaning car is just outstanding!
Famer John, Your dam and River are just AMAZING! I love how the dam swings out of the what and the river swings down! Where you first explained it I didnt understand but after watching the video it all makes perfect since! Thank you so much for sharing it with the rest of us here on the forum!
The last couple of days I have been working on my upper level area and built the backing for some sort of retaining wall. While I was at it I cut out for a road to go from the upper level to the lower level to get people to the future park area. I know its not much but here are a couple photos.


Just a little advice, make sure your tallest and longest cars will fit any new openings! LOL![]()
Attachments
Images (3)
Thanks Mike.
I like the wide angle shot from the door. Those big curves are going to look great with the orange and black running the rails.
Bob
We put down some ballast this weekend which isn’t that exciting. We tested the trains over the rails tonight. Hers the El Capitan pulling into the station picking up some passengers

Attachments
Images (1)
Mike,
You've been doing some work! I can't wait to see what you do with the retaining wall. You also mentioned a future park. I'm going to get out the popcorn and beverage. I gatsta see this! Very sound advise about checking the height/length of cars for openings on your layout. Ask me how I know.
Dave
Wow, farmerjohn, thanks for putting up the videos of the river and ****, let's say, articulation. That took some real thought and execution of assembly. I'm very impressed!!! Beautiful layout.
Scott
I’ve been attempting to make some Venetian blinds for the big house . I learned the process from here on the Forum.
Attached a lamp to the side of my newly purchased MTH C&O Madisons 5 car heavies. Finally found the little buddy by shining the IPhone LED over the floor while on my knees. It’s worth the search don’t you think?
After I recomposed myself I added the Testors and pressed in the lamp back into position. I discovered the lamp was brass…
And to wrap up the evening I ran the Allegheny and the Madisons several trips around the tracks…
Have a good Labor Day guys ☺️
Attachments
Images (2)


@Seth Thomas posted:I’ve been attempting to make some Venetian blinds for the big house . I learned the process from here on the Forum.
Attached a lamp to the side of my newly purchased MTH C&O Madisons 5 car heavies. Finally found the little buddy by shining the IPhone LED over the floor while on my knees. It’s worth the search don’t you think?
After I recomposed myself I added the Testors and pressed in the lamp back into position. I discovered the lamp was brass…And to wrap up the evening I ran the Allegheny and the Madisons several trips around the tracks…
Have a good Labor Day guys ☺️
How well does that Testors glue hold styrene? I have a tube of the non-toxic (blue tube), and it does not hold well. I like the jig, very ingenious.
Nice work on the marker light. If I had a buck for every time I dropped a small part on the floor........![]()
Bob
Super Chief, very nice scene. I am with you about ballasting! LOL
Thanks everyone, its been a chore making the backer board. I used an old store sign that was made out of plexiglass that has been sitting behind the garage for a year or so, I know I would use it for the layout somehow! LOL So I cut it into 7" strips and I am thinking about printing my own brick pattern on some 8 1/2" X 11" Decal paper that almost sticks to any thing.
Seth, I am will Bob and love the jig. Its amazing what folks in this hobby come up with!
I hope you all have a great day and find time to have fun on your layout and with your trains!
Good Afternoon Everyone,
I continued to work on Wicked Wanda's a kit from Bar Mills. This go around the building was painted. The windows, doors, and trim have been painted and installed. I also added decals. At this point I need to complete the roof to the extension, add roof details, and add the railings. I am still trying to decide if I want to include some interior details and have set a couple of figures inside just to get a feel for it. I have one door that hasn't been installed until I commit to that decision.
Dave


Attachments
Images (2)
We had a great Labor Day BBQ. But when everyone left, I finally got a chance to just run trains on my layout. What a great relief and a fabulous time. This is a video of five single engines running and one two engine consist on the subway level (r-32 and r-34) - for a total of 7 engines. Nothing beats this and quite frankly, sitting in my layout room running trains for the past two hours is like a shot of adrenaline through my veins. So glad to finally get some train running time.
Attachments
Videos (1)

Evening guys! Looking good!
Dave, your doing a wonderful job on Wicked Wonda's! I think you should take the plunge and add some folks inside the building! LOL
Straphanger, I would have to agree with you, it sure would be nice to just sit and run trains for a couple of hours, but as for me there is to much to do.
Well guys I got out to the train room this morning and first thing I took a page from FarmerJohn and roughed in a road from the upper level. It took a while but I am pleased with it so far! I will tell you a hand plainer sure makes a mess! LOL
I was going to add a photo of it, but I guess I forgot to take one! LOL Then I got to work looking for something to build my access hatch post so I can push it up and just spin it out of the way! Took a lot longer then I thought. But here is what I came up with.


A little wood work, and some welding and bang its done! Now I just have to rub some candle wax on it to make it slide smoother!
Attachments
Images (4)
I want to thank all you guys for you're comments on our latest project of the river and dam. Those kind words mean a lot and they keep me going on to future projects. My trains are really a therapy for me as I find myself in a different world when I'm in my trainroom. Thanks again to all of you. Farmerjohn.
That looks like a nice job, Mike!!
Add Reply
Sign In To Reply
