


Looks great Bob. Really nice work you did.
Added welders, arc weld LED's, '60 Corvette to lift at Ethyl's Gas Station.
Attachments
Videos (1)

Working the opposite corner corner from last week I found a place for mt Menards bike shop. Guard rail,trailer and a asphalt lot.


Attachments
Images (4)
WP2217 the welders really look great and enhance the scene. Super work!
Dave Ripp: I was admiring your "cemetery" and how well it was coming along, but the bike shop really looks terrific. Great job!
Don
@Don McErlean posted:WP2217 the welders really look great and enhance the scene. Super work!
Dave Ripp: I was admiring your "cemetery" and how well it was coming along, but the bike shop really looks terrific. Great job!
Don
Thanks Don, I had that building for a few years it didn't fit the last layout.
@Dave Ripp. posted:Working the oppiset corner from last week I found a place for mt Menards bike shop. Guard rail,trailer and a asphalt lot.
Hi Dave, cool building, amazing what Menards can do for the price!!! Awesome motorcycles, where did you pick those up, I want to put a motorcycle out in front of Miss Molly's Diner. Thanks for sharing your layout.
Scott
@Don McErlean posted:WP2217 the welders really look great and enhance the scene. Super work!
Dave Ripp: I was admiring your "cemetery" and how well it was coming along, but the bike shop really looks terrific. Great job!
Don
Thanks Don, I'm always looking for ways and things to bring the layout to life! You know how it goes, no train layout is ever done! :-)
Scott
@WesternPacific2217 posted:Hi Dave, cool building, amazing what Menards can do for the price!!! Awesome motorcycles, where did you pick those up, I want to put a motorcycle out in front of Miss Molly's Diner. Thanks for sharing your layout.
Scott
Thanks Scott, The moter cycles came with it. I coming back Andy's Frozen Custard and was thinking whle driving I have to find a few more. They fit my 1971 era very well.
Got up early today for Physical Therapy so I got some training done early. Added head stones to grave yard. Left a plot open for a future funeral someones dying to get in here. Also took another photo of yesterdays work with the asphalt paint dry now.


Attachments
Images (5)
Morning guys, its been a couple days from the last time I checked in and wow what great work being done. I did get some time in the train room, but first I want to call out some guys! LOL
Dave, great job on the piping are you sure your not a pipe fitter? Really looks great but the next question is what are you going to use it on?
Dave Ripp, You Sir sure have been burning the midnight oil with all the work you have been getting done! The Cemetery has turned out looking outstanding! I would think about doing one but with my luck it would be haunted ! Its nice to see you have room for a mobile home area along with the Menards bike shop! I like the Menards stuff also!
Victor, the control panel looks like its ready to go! Nice to see projects like that come together!
Bob, sounds like fun! Nothing wrong with just sitting back running trains, But also nice way to get yourself motivated! The flatcar is looking great!
Scott, Outstanding job on getting the welder back to work! Looks Great!
Well as for me I have been working on the town area and the roads system along with parking lots. Of course everything on my lift section has to be fasten down so it doesn't fall off when raised and lowered. Here are a couple photos for your enjoyment!


I still have to work on the RR crossing and the road heading down to the future park area!
I hope you are all well and finding time to have fun with your layout and trains!
Attachments
Images (3)
looking good Mike. ![]()
Nice arrangement on the structures Mike; congratulations on your progress.
Hey @mile g.
I enjoyed seeing bike shop and cemetery as well. Your town is coming together really well as well as the lift out section. I especially love the Lionel store sign on your downtown building. I recall a group driving from Morehead to Missouri for a load of Coors for the Saturday night Coors Party. And Dave I have ordered one of your track cleaning cars, thanks for the help.
My Woodlands Amilio’s spaghetti house had transformed into our downtown Greyhound Bus station. This was the central meeting place for my crowd on Saturday mornings as we grew up. I purchased a 1938 Greyhound from Die Cast so we can have the new weekly movies delivered for the Dixie Theatre. We had our strawberry shakes and read Superman an Archie comics at the Station’s sandwich bar… I only do adult things, I’ve not grown up.
The windows on the Sewell Big House are slowly being decorated and getting ready for final placement near Railroad Street on the layout.
Have a Good Friday Guys!
Attachments
Images (6)


Hi guys, thanks for all the nice words!
Seth, I remember riding with my Dad in his pickup to Idaho to get a truck load of Coors as back then they didn't sell it here in Washington State back then! The funny things you remember as a kid! Amilio’s spaghetti house transformation to the gray Hound station is great looking! Also what a wonderful job on the blinds in the Sewell Big House! I really love to see the work you do!
Tom M, Those look so cool! Its great that you were able to get something you got from your dad working again!
Dave - The cemetery is a piece of art. Are you going to add a person to cut the grass or plant flowers? Nice to see the living as well.
Did an overhaul on a 250W ZW transformer with new rollers, cord, circuit breaker and diodes. It should last another 70 years and certainly will outlast me!
I also painted the two ZW support(s). One is a bracket below the layout and the 
 second is the platform extension in the coal yard.
Attachments
Images (3)


@Jesse ferguson posted:
Happy Sunday all. I have been making scrap loads. And Installing the power lines with the service and meter to the scrap yard.

Really great looking realism in this photo Jesse. 🤓
I think if I grabbed a canvas and tried to get this feel painted I would be quite busy for some time.
Great job in your three dimensional canvas sir. 👍


@Victor Bertolina posted:Dave - The cemetery is a piece of art. Are you going to add a person to cut the grass or plant flowers? Nice to see the living as well.
Did an overhaul on a 250W ZW transformer with new rollers, cord, circuit breaker and diodes. It should last another 70 years and certainly will outlast me!
I also painted the two ZW support(s). One is a bracket below the layout and the second is the platform extension in the coal yard.
Thanks Victor, Nice transformer bracket. I took your advice and added flowers to some of the graves and a few scrub trees also.


Attachments
Images (4)
Afternoon guys,
Victor, then brackets for your transformer looks great!
Dave Ripp, What great work! Would be a lovely place to be put to rest, right next to the tracks!
Well guys I spent all day working on building placement and wiring building lighting, I think I may have burned up a buck convertor but I will check it tomorrow as the weather man says heavy rain. So that means another day in the train room. I may just pull all the wire for teh buildings and start over, I have 3 buck convertors and they ran all my buildings before, so I will take one section at a time. Here are a couple photos and a really short video.


Attachments
Images (2)
Videos (1)

@mike g. posted:Afternoon guys,
Victor, then brackets for your transformer looks great!
Dave Ripp, What great work! Would be a lovely place to be put to rest, right next to the tracks!
Well guys I spent all day working on building placement and wiring building lighting, I think I may have burned up a buck convertor but I will check it tomorrow as the weather man says heavy rain. So that means another day in the train room. I may just pull all the wire for teh buildings and start over, I have 3 buck convertors and they ran all my buildings before, so I will take one section at a time. Here are a couple photos and a really short video.
The lights look great Mike, I don't look forward to powering my buildings. I may do it as I put them in so it's not so daunting.
@Dave Ripp. posted:Thanks Victor, Nice transformer bracket. I took your advice and added flowers to some of the graves and a few scrub trees also.
Great looking cemetery Dave 🤓
The suggested small trees worked out well ...........maybe a sprinkling of tombstones or crosses under the trees for a ' POTTERS FIELD ' 🤔
Replaced the power cord on an old RW transformer I got second hand earlier this summer, tested it and got it working. Not sure how I'm going to use it yet but might use it to power my accessories, any thoughts about that?
Attachments
Images (1)

@ArtsModelTrains posted:Replaced the power cord on an old RW transformer I got second hand earlier this summer, tested it and got it working. Not sure how I'm going to use it yet but might use it to power my accessories, any thoughts about that?
It'll be great for running postwar trains! ![]()
Mitch
Today I added something to my train workbench I should have had when I built it last year. I built a overhead shelf to hold the TIU/TMCC base/1033 powering the test track. I've got far more work space on the bench top now with the TIU/TMCC base/1033 off the bench top.

Attachments
Images (1)
Last week, I could’ve sworn that I loaded my RS1 with smoke fluid before running it, but after an hour of operating, I realized there was no smoke. Sure enough, I clearly burnt out the wick. Well a quick search of this website turned me on to a cheap wick supply (Thanks Gunrunner John), which arrived yesterday, so today I thought I’d replace the burnt wick. After installing and juicing up the wick today, I gave it a test run on the layout and noticed that the smoke wasn’t coming out right. So back to my workbench and another search to find out the optimal wick placement for my MTH engine. Sure enough, I found this post by Gunnrunner John of an old photo taken by Marty Fitzhenry showing the correct way to place the wick -

I find it quite amazing that around the same time this forum has a thread about saving the late Marty Fitzenry’s layout and how much of an impact he had on the hobby, this man is able to continue to live on and help other hobbyist like me through this forum. Sure enough, after disassembly and installation of the wick like Marty illustrated and Gunrunner John reposted, I was able to install it without obstructing the fan opening and now my switcher is emitting more smoke than it ever did. Thanks Gunrunner and Marty!
This is a picture after I finalized the install. You can see how badly I burned up the old wick in this photo -

As an aside, I’m pretty impressed with how compact and tidy the interior of the newer mth PS3 diesels are. I didn’t notice any loose wires and the shell came off pretty easily once I gently backed the wire handrails out of their slots. Everything aligned perfectly and all wires were nicely bound and well secured. The interior lights were also not hooked into the shell like in prior models, further easing the shell removal. All in all a very “clean” and uncluttered interior design. This is a nice improvement over my early PS2 diesels.
Attachments
Images (2)
Dave Ripp, thank you very much! I hope things go smoother for you then me! LOL
Lou1985 Outstanding work area!
Strap Hanger, I am so glad you got it fixed! You are so right on how much there is to learn from folks here how and people like Marty that have left such a big foot print on this hobby!
Well I was able to get out to the train room this morning and talked to the power company. It took them awhile but they were able to get things figured out and was able to get power restored to the rest of the town and the Schnider and Fedex building.


Its funny how many people show up when the power is turned back on!
I was right I burned up a buck convertor!![]()
Attachments
Images (2)
I finally got the accessories wired up. Need to adjust one or two of the contactors. Have most of the lights in the buildings working. Waiting for more led strip lights. Next will be finishing the streets and adding grass. Have an idea to make an elevated station platform with stairs to the lower level. John
Attachments
Videos (1)

I needed to add a gas station and had 2 to choose from Mobile or Menards. I liked the Menards building but wanted a more modern early 70's Sinclair. I changed the pumps with some key chain gas pumps then printed out signage to replace all the other brands. I also framed out a larger door and printed one to fit the opening. This all took much longer than I care to admit.


Attachments
Images (5)
@Dave Ripp. posted:I needed to add a gas station and had 2 to choose from Mobile or Menards. I liked the Menards building but wanted a more modern early 70's Sinclair. I changed the pumps with some key chain gas pumps then printed out signage to replace all the other brands. I also framed out a larger door and printed one to fit the opening. This all took much longer than I care to admit.

Hi Dave, neat modifications, I like it! But, isn't that a Woodland Scenics Ethyl's gas station, or does Menards have the same building? Here's a photo of mine that I added LED's to the outdoor lights, some guys welding, and a Corvette on the lift. This one is Woodland Scenics.
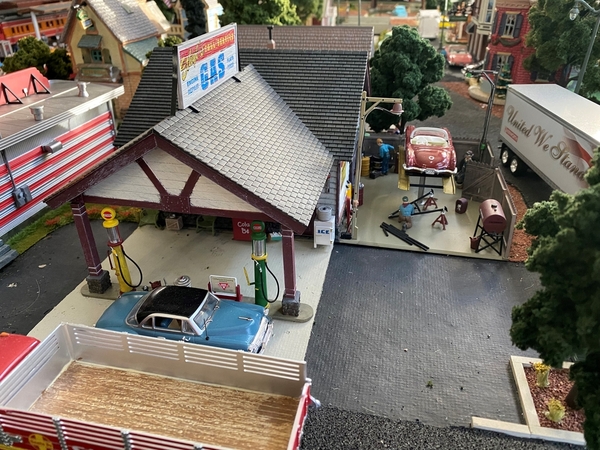
Scott
Attachments
Images (1)

@WesternPacific2217 posted:Hi Dave, neat modifications, I like it! But, isn't that a Woodland Scenics Ethyl's gas station, or does Menards have the same building? Here's a photo of mine that I added LED's to the outdoor lights, some guys welding, and a Corvette on the lift. This one is Woodland Scenics.
Scott
Hey Scott, Menards had one also. I used a stock photo which is now corrected. Besides the roof sign they were pretty much the same. I really like the welders I have some in one of my boxes. I'll put them to use eventually.
Lionels return to the Razorback Traction Co. workshop, as I gave the museum's Texas Special 2245 a checkup and some routine maintenance...

Mitch
Attachments
Images (1)
@Dave Ripp.- the gas station is a beauty. The key chain pumps are great. What's the chance they were the right size to be in scale.
@mike g.- the power company is always the villain or the hero, depending on who has power.
@Radioman77- great classic post war layout. Looks like tons of fun.
@M. Mitchell Marmel- the new bench looks good. Better lighting too ![]()
@Strap Hanger- see that- Marty was looking down on you and your struggle with the smoke wick. Nice work.
Nothing new on the RSJ&B this weekend. I got as far as prepping the decals for the other side of the car and was immediately summoned for other tasks........![]()
![]()
There's always tomorrow (or today) ![]()
Bob
Dave Ripp - The station looks fantastic and worth all the hours you put into it. Very nice work !! JP
@RSJB18 posted:Did a couple of things last night. I made it over to Harbor Freight yesterday to pick up some wheel weights. They were out of stock on the 1/2 oz but I took two packs of the 1/4's. I added 5 oz to a ATSF box car that gave me some issues last Switcher Saturday. The car tracks much better now and doesn't derail when pushed.
I also started painting the pipes for the track cleaning car. Two coats down, one or two more to go. Hopefully I can get a first coat of blue on the car when I get home from work.
A shout out to @gunrunnerjohn- I installed one of his isolated rail relays for my crossing signals the other day. What a huge improvement over the chattering ice-cube relay I had originally.
Bob


Impressive Bob.![]()
Nice work on the track cleaning car and very smooth opration through the switches. 👍
The one pic looks like a silver bullion car ! Lol JP
Dave, The Sinclair gas station turned out Amazing looking! Well worth all the work you put into it!
Thanks Bob, I always count on the power company , sometimes I have to break out the generator during the winter. But thats ok!
Well guys after yesterdays work and getting all the cars put out I noticed that it looks strange without people so today I put out some more people, wired up the Menards jeep so the head lights and tail lights would come on.
Then I started working on the road that will be going down to the future park.

And last but not least I started work on relocating the walking bridge onto the train bridge deck so its not hanging off the side. came off ok, had to do a little repair. But now I have to build an additional 22" of walking bridge! LOL Oh well, I am sure we all need something to do!

I sure hope you all had a great day today!
Attachments
Images (3)
Mike,
I really like how your road winds down to the lower level. I can't wait to see how it turns out.
Dave
Finally got one of my one of my planes ready for takeoff on my runway. The reason I did this is because I haven't figured out how to make the plane that flies around the room to land. This gives an excuse .
Attachments
Videos (2)


Farmerjohn, beautiful airplane, nest lights, it’s going to be very interesting. Mike g., your layout is coming along swell, everyone is having fun with their layouts. I’ve been away for awhile but will be working on my layout soon. Great work everyone. Happy Railroading Everyone 


Attachments
Images (6)
Mike - That scene came out real nice - love it.
farmerjohn - I have faith in you. I'll give you 2 weeks and you will be doing touch-n-goes !
@farmerjohn posted:Finally got one of my one of my planes ready for takeoff on my runway. The reason I did this is because I haven't figured out how to make the plane that flies around the room to land. This gives an excuse .
The plane looks great John.
These guys figured out how to make 'em fly . ![]()
The town and cars are looking great Mike. Can't wait to see what's next.
Welcome back Larry. Hope your time away was enjoyable.
I got more of the decals done last night. Getting closer to final assembly. I had picked up a load of decals from a forum member a few years ago so I dug through them and found some block letter sets along with a sheet of reporting numbers for a freight car.
I added MOW to the top tank and did the builders tags on one side of the car. I can flip it over and do the other side tonight. It's been a long time since I did water-slides. I forgot how fragile they are. ![]()
Bob


Attachments
Images (5)


That’s really looking great Bob.
https://ogrforum.ogaugerr.com/...9#157265375019509709
Are those 027 switches mixed in with 0-gauge track? What kind of mating pins do you use for the transitions?
Completed installing the Evan Designs flashing lighting kit in my Meteor ambulance. The kit consists of three sets of double lights - head, tail and roof. Since the ambulance has a single roof light, I cut off one of those LED's. Each pair of lights is connected to a rectifier/resistor ("RR")and then has two wires to connect to a power source. The lights run off 9-18 AC voltage.
First step was disassembly of the car. In this particular car, the roof (and windows) are a separate piece and not part of the metal shell. I removed the front and rear bumpers and headlight lenses which allowed me to choose where to drill holes to insert the 3mm LED's. Once the holes were drilled I CA glued and taped each set of lights to the body shell to hold them in place.
The RR is a little bulky, so finding a place to locate three of them can be challenging and finding a way to route the wires out of the car can also be challenging, especially the roof light where you don't want the wires exposed and hanging down in plain sight. The roof light wires were painted off-white to match the interior of the ambulance and taped in placed with white electrical tape. The wires were CA'd along the roof interior and then run down the the divider between two windows and then along the floor and out the rear of the interior. Three small holes were drilled in the chassis to route the wires out of the bottom of the car - one in front for the headlights and two in the rear on either side of the exhaust pipes - one for the taillights and the other for the roof light that went through the interior.
The car was then re-assembled and the six wires twisted together in two groups of three wires each. Each "group" was then soldered and shrink wrapped to a longer 18 gauge wire and the car was placed on the layout and a hole drilled through to connect to power. One wire went directly to power (I used a terminal strip connected to the 10 acv tap off my Z-4000). I ran the other wire to a simple push button switch mounted in the layout fascia, so the flashing lights do not have to be on all the time and I can turn them on and off. Another wire was then run from the switch to the terminal strip.
The video shows the ambulance parked alongside the Lionelville Hospital where it's getting ready to make a run.
One small disaster - although I work on a towel and have barriers set up to catch flying parts, when I went to snap the rear bumper back in place, the tiny upper bullet lights on one side popped out and went flying somewhere never to be found. I heard it hit the table top, so its not on the floor but could have fallen into a crack somewhere. I made some replacement tips out of toothpick points painted red.


Attachments
Images (11)


Videos (1)
")
Drummer3 I just enlarged the track openings to fit the O-gauge track pins. John
I put some grass in from one RR crossing to the nex about 16 feet. Tomorrow I'll remove the tape and vacume off the excess.


Attachments
Images (3)
I haven't run a train or worked on my layout since July 4th. So many things need work on my layout. I have two O22 switches, on the lowest level, in the back, that must be removed and repaired. This will require the removal of the upper two layers of track. I need to clean all of my track. I will add more power drops and correct some lighting issues. I know this must be done to have smooth operations. I need a kick start. My "want-to" is low on fluid. Any encouragement out there?
Bill
@Odenville Bill posted:I haven't run a train or worked on my layout since July 4th. So many things need work on my layout. I have two O22 switches, on the lowest level, in the back, that must be removed and repaired. This will require the removal of the upper two layers of track. I need to clean all of my track. I will add more power drops and correct some lighting issues. I know this must be done to have smooth operations. I need a kick start. My "want-to" is low on fluid. Any encouragement out there?
Bill
That's a good little rest Bill. I had a simalar layoff partly due to medical and partly a lot of different excuses. I started working hard a few weeks ago and really enjoy it. I watched your posts in the past so I know you can do the same.
Odenville Bill...Hey, I would be the last one to claim never to have procrastinated or let projects sit too long. So the following advice is just from my personal experience and I used this method both at work and at home. I sit down, normally with a morning cup of coffee, and make a paper list of all the things I need to get done in some reasonable period. Like say 2 weeks or so. That keeps the list finite and moves away from huge jobs like say "painting the house". I then take those tasks and simply do one at a time over the period, taking time and care to CROSS THEM OFF as they are completed, which gives me a sense of accomplishment and some incentive to keep moving through the list. To me, taking the time to write out what needs to be done and making a paper list to cross off accomplishments is what keeps me moving. The list tells me..."no its not an infinite amount of work" and crossing tasks off tells me..."yes , I am getting some things done".
Anyway that's what works for me. Best regards
Don
@Odenville Bill posted:I haven't run a train or worked on my layout since July 4th. So many things need work on my layout. I have two O22 switches, on the lowest level, in the back, that must be removed and repaired. This will require the removal of the upper two layers of track. I need to clean all of my track. I will add more power drops and correct some lighting issues. I know this must be done to have smooth operations. I need a kick start. My "want-to" is low on fluid. Any encouragement out there?
Bill
I have 2 friends that make a great inspiration for me. More fun if you have help.
Your not alone. I am taking an extended break from another hobby to work on my trains, it seems that I can't get motivated for the other one. I dabble with it a little as it is where this computer(my main one) so I am not completely disconnected. I normally would spend a good portion of my free time on my radio's either fixing up or using. Now all of my time is spent "playing trains" it is very relaxing, even though I have had several problems to trouble shoot and fix. Hopefully I will soon recover the enthusiasm for equally for both hobbies. John
@endless tracks posted:Worked again on my machine shop boiler house. An RC Metal Smoke Generator Unit for Henglong 3918 1:16 RC Tank Hobby Model (eBay for 12 bucks) and a 10" piece of 1/2 conduit makes for pretty good smoking stack. Covered with a shack of your choice and voila!!
I have run it continuously on 5 VDC and is works fabulous. If you turn it up to 7.5VDC, it will smoke you out of the house. If it only lasts a few months, well they're cheap. The only drawback is blower sound, but that can be abated somewhat with foam under the foundation.....which is still a work-in-progress....like everything else!!
Very cool. Had you considered a smoke unit from an engine? I would think you could get the same results.
Bob
@Odenville Bill posted:I haven't run a train or worked on my layout since July 4th. So many things need work on my layout. I have two O22 switches, on the lowest level, in the back, that must be removed and repaired. This will require the removal of the upper two layers of track. I need to clean all of my track. I will add more power drops and correct some lighting issues. I know this must be done to have smooth operations. I need a kick start. My "want-to" is low on fluid. Any encouragement out there?
Bill
Rip off the band-aid Bill!!!!!!
I faced a similar issue with a back corner that I had been putting of for a long time. I had to build a platform so that I could climb up on the table to reach. One day a grabbed some plywood and scrap 2X4's and built what I needed. It was off to the races from there.
Before and after shots


Attachments
Images (2)


Okay Bill, so today is September 22nd. By Saturday you will:
1.have a list of materials you will need 2.determine what you have and what needs to be procured.
3. Determine the order in which the work will progress.
4. Based upon availability, schedule days and times when you will be going to work.
Take the layout down, fix the 022 switches and then start a new layout. You’re most likely tired of the old one.


Hi Guys, I hope everyone is having a great day!
FarmerJohn, The plane looks great! I was thinking it doesn't have to fly. Maybe you can just hook it to a small motor, some fishing line and you could make it Taxing down the run way with the prop spinning! Either way looks great!
Larry, for being away for awhile it must be nice to be able to come home to such an Amazing layout! I could just get lost just watching your trains on your layout!
JP, Thank you sir!
Bob, thanks you also! Your track cleaning car is really looking sharp! It is truly going to be nice to see the finished product!
Richie C, First off the finished product looks Outstanding! Second thank you for taking the time to do an How To for the Evens Designs flashing lights!
Dave Ripp, Man the grass sure grows fast in your neck of the woods! I guess it's ok it will give the MOW crew something to do! LOL Looking good!
Bill, like others have said been there also. My advice is don't jump all in, you need to remember winter is coming and your going to need something to do inside when its cold and snow is on the ground! Just take it slow and easy and enjoy!
As for me I worked on the road coming down to the park and the walking bridge for the train bridge. But as it has been said before by many, no pictures it never happened. So I will get pictures poster later today!
I hope you all have a great day and find time to have fun with your layouts and trains!
Thank you all. I work well with .xls charts. This afternoon I will create a chart, like has been suggested. Friday I will remove all engines and cars. Just what I needed Guys. Thanks again.
Bill
@mike g. posted:Afternoon guys,
Victor, then brackets for your transformer looks great!
Dave Ripp, What great work! Would be a lovely place to be put to rest, right next to the tracks!
Well guys I spent all day working on building placement and wiring building lighting, I think I may have burned up a buck convertor but I will check it tomorrow as the weather man says heavy rain. So that means another day in the train room. I may just pull all the wire for teh buildings and start over, I have 3 buck convertors and they ran all my buildings before, so I will take one section at a time. Here are a couple photos and a really short video.
Mike, you're layout is coming along nicely! You have a fair amount of Jack the German Shepherd! ;-) Very cool, I love night scenes with lots of lights, keep it going.
Scott
@mike g. posted:Hi Guys, I hope everyone is having a great day!
FarmerJohn, The plane looks great! I was thinking it doesn't have to fly. Maybe you can just hook it to a small motor, some fishing line and you could make it Taxing down the run way with the prop spinning! Either way looks great!
Larry, for being away for awhile it must be nice to be able to come home to such an Amazing layout! I could just get lost just watching your trains on your layout!
JP, Thank you sir!
Bob, thanks you also! Your track cleaning car is really looking sharp! It is truly going to be nice to see the finished product!
Richie C, First off the finished product looks Outstanding! Second thank you for taking the time to do an How To for the Evens Designs flashing lights!
Dave Ripp, Man the grass sure grows fast in your neck of the woods! I guess it's ok it will give the MOW crew something to do! LOL Looking good!
Bill, like others have said been there also. My advice is don't jump all in, you need to remember winter is coming and your going to need something to do inside when its cold and snow is on the ground! Just take it slow and easy and enjoy!
As for me I worked on the road coming down to the park and the walking bridge for the train bridge. But as it has been said before by many, no pictures it never happened. So I will get pictures poster later today!
I hope you all have a great day and find time to have fun with your layouts and trains!
Right - now you can light up that fire truck !!
Excellent projects everyone! Richie, that certainly was a good tutorial on installing the flashing lights!
Don't ever let anyone tell you that I do things in the proper order. I've shared photographs of my in progress double sided panel for my controls. After looking over some photographs and data Bill Webb sent me of how he connected relays to control power to track sections from the DCS remote, I collected the additional parts. I noticed how everything stood out so well on Bill's white plywood board. So I decided to paint mine. Here is the unused board with the same blue I used on the train room walls and behind my aluminum train shelves. All I had to do was disconnect the MRC power supply I am using for the linear actuator that lifts the bridges.

The other side wasn't so easy. Here is how it looked before I started.

Here it is painted. What did I do with all that stuff??

There it all is. I'll wait until everything is good and dry before I start mounting things. I'm going to take the opportunity to do it a little differently as well. Se there; there was method to my madness!! Ha ha! Right!

Attachments
Images (4)


Hi guys, thanks for liking my comments! I try to read everything and I know what I do read I really enjoy and learn from!
Mark, Your doing it correct! That's how I do most of my projects, build them then take it apart and do it again! I think what you have going there looks great! 1 question, are the relays to power up sidings so MTH engines dont start up?
Well guys I went out today and did a little more work on my road and walking bridge. Here are a couple photos as I said I would bring from my earlier post!


I hope you all had a great day and some fun along the way!
Attachments
Images (3)
Mike, the road and the pedestrian walkway on the bridge look good!! I am glad you approve of my procedure! ![]() The AIU contacts can only handle 4 amps, the AIU terminals will energize the coil, or whatever you call it in these solid state relays, then the contacts will close completing the power circuit to the track, protecting the AIU from short circuits caused by derailments, etc. It sounds like you are thinking of the lack of the watchdog signal of the DCS engines starting up on energized tracks. I have a couple of devices I bought from Gunrunnerjohn to take care that. I don't even understand that whole electronics discussion, but a dummy can connect John's circuits and be in business.
The AIU contacts can only handle 4 amps, the AIU terminals will energize the coil, or whatever you call it in these solid state relays, then the contacts will close completing the power circuit to the track, protecting the AIU from short circuits caused by derailments, etc. It sounds like you are thinking of the lack of the watchdog signal of the DCS engines starting up on energized tracks. I have a couple of devices I bought from Gunrunnerjohn to take care that. I don't even understand that whole electronics discussion, but a dummy can connect John's circuits and be in business.
I have never used these solid state relays before. When I worked for the power company, I was in the relay department. The relays detected faults on the transmission line, transformers, or breakers. Those were massive electro-mechanical devices. The relays in the power station protected the switchgear for station power, etc. Since the lines were so short, we would test the relays to trip at instantaneous currents of up to and over 100 Amps. ![]() Yes that's right; over 100 Amps.
Yes that's right; over 100 Amps. ![]() When we operated our test equipment, the coils in those relays would literally groan when current was applied! Those are the kind or relays I'm used to.
When we operated our test equipment, the coils in those relays would literally groan when current was applied! Those are the kind or relays I'm used to. ![]()
@mike g. posted:Hi guys, thanks for liking my comments! I try to read everything and I know what I do read I really enjoy and learn from!
Mark, Your doing it correct! That's how I do most of my projects, build them then take it apart and do it again! I think what you have going there looks great! 1 question, are the relays to power up sidings so MTH engines dont start up?
Well guys I went out today and did a little more work on my road and walking bridge. Here are a couple photos as I said I would bring from my earlier post!
I hope you all had a great day and some fun along the way!
Mike, The road coming down from top to bottom is great. I needed that on my last layout but never did get it right. The pedestrian bridge is nice to. There's an simalar old EJ&E bridge near me with the pedestrian walkway. I'll have to take a closer look it's been a few years since I've looked at it.
Mark, I’m glad you’re feeling good enough to get down to do that stuff. How did you feel later on?
Jay, it’s not too bad. My lower back gets a little sore, but it goes away pretty fast. As long as I have a well padded seat, I do good. The damaged sciatic nerve gets irritated by being pinched by the bottom of the pelvis unless I have a lot of padding. I’m stuck with that. It’s a pain in the keister! 😄
Decided to make a work shack out of an old boxcar I had..

Attachments
Images (2)
@mike g. posted:Hi guys, thanks for liking my comments! I try to read everything and I know what I do read I really enjoy and learn from!
Mark, Your doing it correct! That's how I do most of my projects, build them then take it apart and do it again! I think what you have going there looks great! 1 question, are the relays to power up sidings so MTH engines dont start up?
Well guys I went out today and did a little more work on my road and walking bridge. Here are a couple photos as I said I would bring from my earlier post!
I hope you all had a great day and some fun along the way!
Looks good Mike.
@FECRailroaddog posted:Decided to make a work shack out of an old boxcar I had..
Very nice you did a great job.
@FECRailroaddog posted:Decided to make a work shack out of an old boxcar I had..
FEC, very creative and really well modeled. I'm impressed, very nice addition to your layout.
Everybody thank you for the kind words!
FECRailroaddog, Outstanding job on the new work shack! I did one awhile back for a new yardmaster office! LOL
I got this from a forum member along with my yard tower. He had already did the yardmaster decal and over hang. I added lights and the BN decal.
Hey Lee if your interested in a Gray Hound bus station drop me a line, I can give you a screaming deal on one! LOL
Well I went out at 4am this morning to work on the road and walking bridge again. There is only so much you can do while your waiting for the glue to dry, but I did get my parking lot marked out for the park and if I have time later this afternoon I plan on striping the road and parking lot.
There wont be any train room work tomorrow as I am taking the wife to the sons house so she can help him paint. Kind of an all day deal to drive to Seattle visit and drive back, oh and stop at the VA for my new hearing aids! LOL
I hope you all have a great day and find time for your layouts!
Attachments
Images (1)
I have a box car shell which I want to make into some kind of shed/building similar to yours. Any pointers?
@Dennis Rosenthal posted:I have a box car shell which I want to make into some kind of shed/building similar to yours. Any pointers?
I put mine up on RR ties to lift it off the ground so I could run lighting wires down with no problems.
Just make it anything you would like to see on your layout!
Attachments
Images (1)
How did you make the awning, the door and the window?
@Dennis Rosenthal posted:How did you make the awning, the door and the window?
The awning can be made out of the sliding door you take off. The door and window were kit bashed from an old building kit. The forum member I got it form put that in. The deck and stairs are also from an old building flat that wasn't used for that project.
Removed tape and vacumed up excess grass from yesterday. I tried to touch up a couple spots in the church lot and botched it. I then added a thin layer of glue and resprinkled it so it would all have the same tone. I'm waiting for some 1/4 inch cork sheets to go under some buildings with no sidewalks so no work till Tuesday. I may try to clean up the rest of the table it's a train wreck. I'll shame myself with some photos for motovation.


Attachments
Images (5)

@Snkbittin posted:Messing around with the front corner of the second level..long way to go but I knew I
wanted the Ford dealer there..so much to do so little time
Looks good they take up alot of realestate. I've got a spot picked out for my dealership but I'm pretty far from getting to that end of the layout.
@Dave Ripp. posted:Removed tape and vacumed up excess grass from yesterday. I tried to touch up a couple spots in the church lot and botched it. I then added a thin layer of glue and resprinkled it so it would all have the same tone. I'm waiting for some 1/4 inch cork sheets to go under some buildings with no sidewalks so no work till Tuesday. I may try to clean up the rest of the table it's a train wreck. I'll shame myself with some photos for motovation.
It's ok Dave, mines is looking the same way right about now.
Dave
@Dave Ripp. posted:Looks good they take up alot of realestate. I've got a spot picked out for my dealership but I'm pretty far from getting to that end of the layout.
Ya they do!!!..But Im a die hard Ford guy so its front and center :-)
Afternoon guys, I hope all is doing well!
Dave Ripp, The grass looks great! I wouldnt worry to much about the church lot, I am sure its going to turn out just fine! Thanks for the photos of the rest of your layout Like Dave said dont worry. I do have to say I dont feel so bad now, I also took a photo of the other end of my layout to show my mess! LOL

So today after a meeting I was able to get out to the train room. I was able to get the road and parking lot all striped, populated with cars and trucks.


As you can see in the photo above I was able to get my fence between the parking lot and the beginning of the park installed. Just used 1 #3 pencil and some wood strips. I was also able to get the walking bridge done along with some black cinders to finish of the ramps up to the bridge. Also did a little work on the park area with the help of the park crew.


I can tell you its one long walking bridge! LOL
Attachments
Images (6)
Mike, you sure did get a lot done! I'll probably die before I get all my wiring done! ![]()
Speaking of wiring,, one other mistake. I picked up 2 AIUs while the new batch were being manufactured. Last evening, I received a call that the two I had ordered from the local hobby shop arrived from MTH. I had forgotten that I had ordered them long ago. So, I picked them up today. How many accessories can I fit on an 11 x 8 layout that need controlled? ![]()
Well, the paint is dry. I can start mounting some items on my blue backboards.
Nice going Mike! I really like the footbridge and I will keep that idea in mind. I never would have thought to do that; very innovative .
Halloween coming up so I decided to make me a nice boxcar out of a 0-27 one.


Attachments
Images (4)
@Dave Ripp. posted:Removed tape and vacumed up excess grass from yesterday. I tried to touch up a couple spots in the church lot and botched it. I then added a thin layer of glue and resprinkled it so it would all have the same tone. I'm waiting for some 1/4 inch cork sheets to go under some buildings with no sidewalks so no work till Tuesday. I may try to clean up the rest of the table it's a train wreck. I'll shame myself with some photos for motovation.
looking good Dave! I have redo’s and fixes all over my layout too! Is that a roll of Lemax brick road in the foreground? I have some of that somewhere in box. I removed it for asphalt.
Mike,
The crew looks hard at work with great progress. This is just plain fun to watch. Keep it coming!
Dave
Nice progress being made gents! Mike G, Dave Ripp, FECRailroaddog, Snkbitten ![]()
![]()
I assembled the track cleaner last night. It's all glued together so no turning back now. I ordered a set of weathering powders and I'm going to take the plunge and try dirtying it up a bit.


Bob
Attachments
Images (4)


Mike - nice walking bridge; seems like a light stain or wash would make it really pop.
Looking good, Bob.
@RSJB18 posted:Nice progress being made gents! Mike G, Dave Ripp, FECRailroaddog, Snkbitten

I assembled the track cleaner last night. It's all glued together so no turning back now. I ordered a set of weathering powders and I'm going to take the plunge and try dirtying it up a bit.
Bob
Outstanding work Bob! Really great job. I need that for my LIRR fleet.
That looks positively outstanding Bob; and the weathering will be a nice touch. Again, you need to publish your effort.
@Strap Hanger posted:Outstanding work Bob! Really great job. I need that for my LIRR fleet.
@Tranquil Hollow RR posted:That looks positively outstanding Bob; and the weathering will be a nice touch. Again, you need to publish your effort.
@Richie C. posted:Mike - nice walking bridge; seems like a light stain or wash would make it really pop.
Looking good, Bob.
Thanks Guys. ![]()
Sorry Strap- but this one is staying in it's native territory at least until I can retire and get the H&#$ off this Island! ![]()
@RSJB18 posted:Thanks Guys.
Sorry Strap- but this one is staying in it's native territory at least until I can retire and get the H&#$ off this Island!
LOL! Sure thing, Bob. You know. The funniest thing about being from the island (and I consider myself, a former resident of Queens, part of the island), is that you try your whole life to get off of it, but when you do, you find that your best memories are from when you were there. You will always look back fondly, so don’t rush it and enjoy your ride, my friend.
Bob, I agree with the others. You did a really fine job!!
Thanks Mark.
Strap- I know what you mean. The grass is not always greener on the other side of the fence....
Probably a lot cheaper tho....😂
@FECRailroaddog posted:Decided to make a work shack out of an old boxcar I had..
Rail dog, nice work, but I just finished watching your YouTube video of the new upper level subway lines. Great job on that. It’s looking really good!
Thanks Strap Hanger! appreciate it.. Bill still has my blue Worlds Fair Set, apparently the part he needs is way back ordered..lol
Add Reply
Sign In To Reply
