


One advantage of having your trains in the basement too....
What did I do today? Well after having for years the Plasticville Cathedral on my layout, it kept looking like a "Plasticville Cathedral". How to make it look less, I decided to paint and add new window backings. Added it today back onto layout. To me, a 110% better looking Cathedral, and less Plasticville. Total time, 1 day. Its also close to a window, so I'll be looking to see how the morning sunshine hits it.


Attachments
Images (4)


JOSEF, nice job on the church. It looks much better.
Dad ( CABINET BOB ), if me and my brothers lived much closer we would of shoveled you pout to get to your layout.
This morning I got the rest of the waterfalls glued in along with the small waterfall between the bridge abutments. Once they are dry I can go back and tack down what did not set. I also painted the culvert with aged concrete. Pics.....Paul


Attachments
Images (5)
josef posted:What did I do today? Well after having for years the Plasticville Cathedral on my layout, it kept looking like a "Plasticville Cathedral". How to make it look less, I decided to paint and add new window backings. Added it today back onto layout. To me, a 110% better looking Cathedral, and less Plasticville. Total time, 1 day. Its also close to a window, so I'll be looking to see how the morning sunshine hits it.
Nice and I like the wedding seen also.
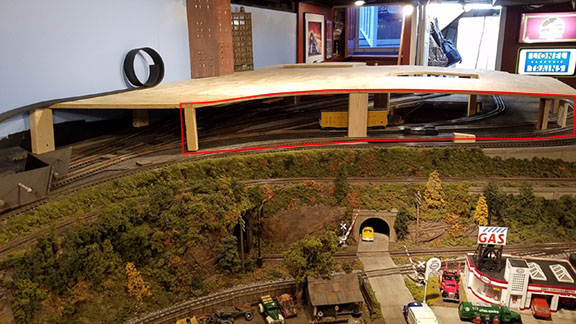
CSX Al posted:Well tonight I decided to paint my viaduct wall sections, since I am waiting on scenery material from Scenic Express to arrive for the sawmill pond.
Here is a photo of the area this is going to be installed outlined in red. It covers the gap between my 2nd level of the layout and the 3rd city level. On the second level under the city I have a hidden storage yard. I only want this area to be visible from this view of the layout. So I had this wall sections laser cut and brick etched out of hardboard. I may add some strips about a inch wide brick sheet to the arch openings to give the wall some depth. In some of the other arches openings will be filled in with brick sheet to hide some of the 3rd level supports.
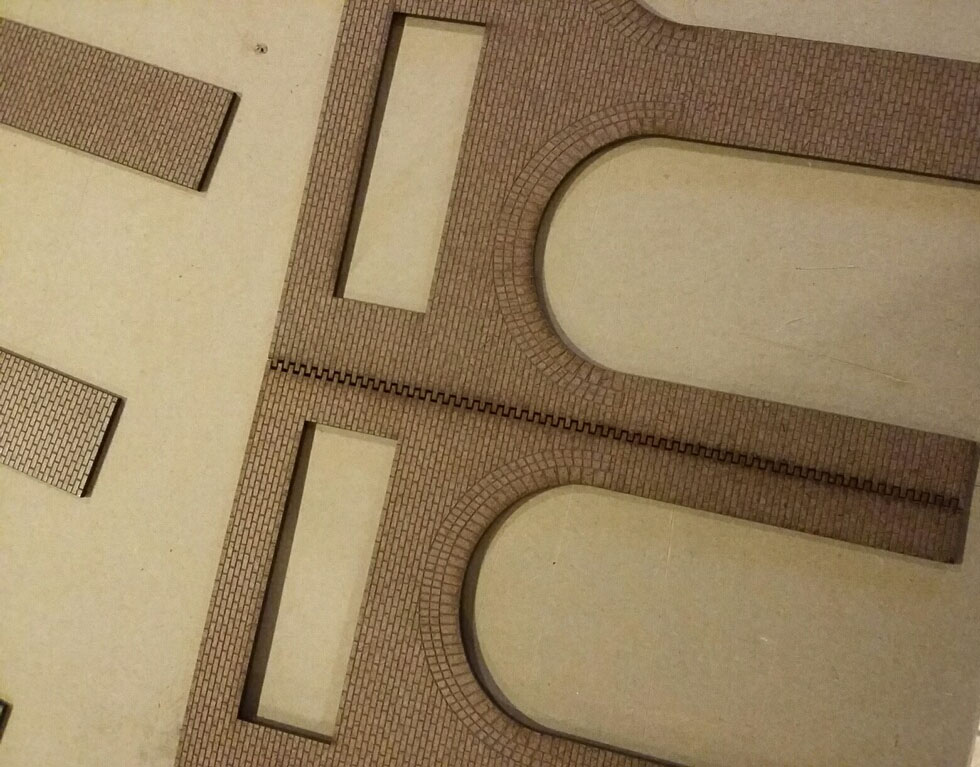
Here are a couple photos of the lasered hardboard
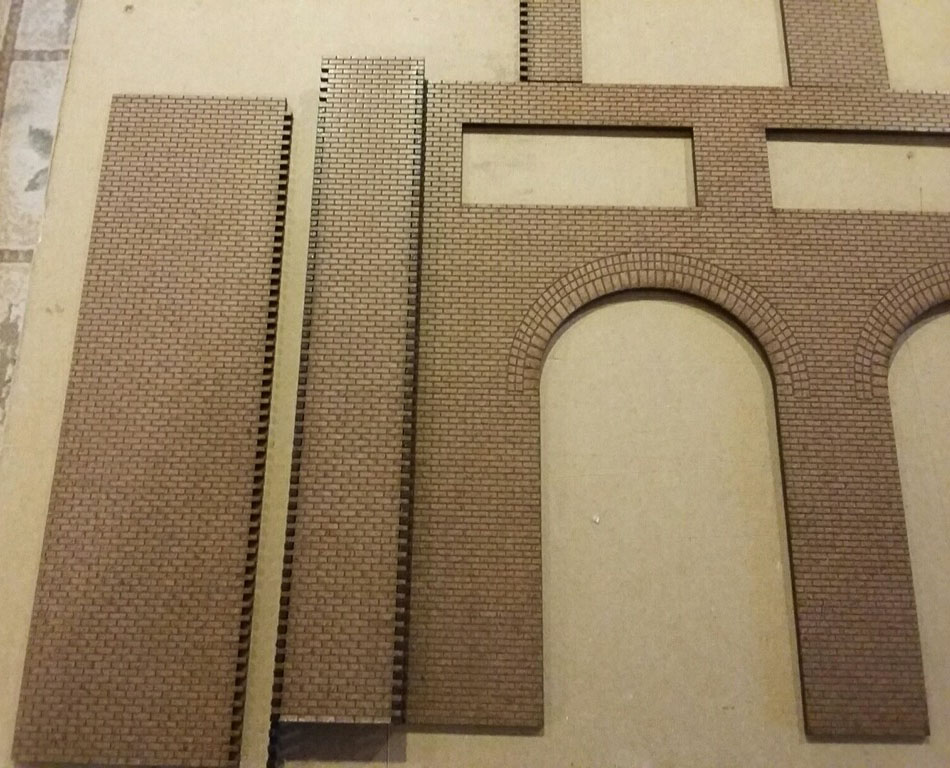
Here shows the whole wall section
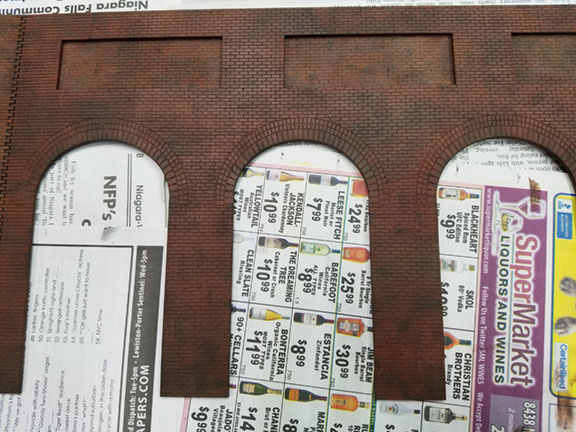
I painted the brick with white, gray & black primer and then used 4 craft paint colors applied with makeup sponge wedges. Adding a little bit of each randomly and dabbed the sponge in it to apply to the wall . Here are some shots.


Looks good Al!! Would you tell me how high your second level is? I am doing something similar and just did a test. My Lionel tunnel portals (I reckon for tubular track- made in 1984) are too short! One of my wood sided cabooses nearly hits them on the top of them. The bottom of my second level plywood is 7 inches off of the layout.

Those portals aint gonna work...……….. : (
Paul you are going to be finished with your gorge in no time! Looks great!
Jose that church turned out great too!
Off to fool with some track!
Jim
briansilvermustang posted:
well, yesterday got up and decided to play hookie from work...
ended up on a all day road trip... got to watch some trains...
finally got to see CSX coke cars in real life...
we stopped and ate at a authentic Mexican restaurant, awesome food !!
as we are driving along, Marci spots this, one of her dream cars...
under a rail road crossing sign to boot...
so, a little haggling later, and a less train $$$'s now...
well, we drove back separately, meet Marcisilverbeamer ....
really can't wait till nice weather now,
train watching road trips should be even more fun...


Reminds me of the time I went to get an oil change and came home with a new Shelby Cobra Mustang. Don't know why, but wife afterwards insisted she goes along whenever I needed an oil change.
WOW Brian- that was quite a trip. Since you were train spotting I'm surprised you didn't say you bought one of those locomotives. ![]()
Congrats to Marcisilverbeamer!
carsntrains posted:CSX Al posted:Well tonight I decided to paint my viaduct wall sections, since I am waiting on scenery material from Scenic Express to arrive for the sawmill pond.
Here is a photo of the area this is going to be installed outlined in red. It covers the gap between my 2nd level of the layout and the 3rd city level. On the second level under the city I have a hidden storage yard. I only want this area to be visible from this view of the layout. So I had this wall sections laser cut and brick etched out of hardboard. I may add some strips about a inch wide brick sheet to the arch openings to give the wall some depth. In some of the other arches openings will be filled in with brick sheet to hide some of the 3rd level supports.
Here are a couple photos of the lasered hardboard
Here shows the whole wall section
I painted the brick with white, gray & black primer and then used 4 craft paint colors applied with makeup sponge wedges. Adding a little bit of each randomly and dabbed the sponge in it to apply to the wall . Here are some shots.
Looks good Al!! Would you tell me how high your second level is? I am doing something similar and just did a test. My Lionel tunnel portals (I reckon for tubular track- made in 1984) are too short! One of my wood sided cabooses nearly hits them on the top of them. The bottom of my second level plywood is 7 inches off of the layout.
Those portals aint gonna work...……….. : (
Paul you are going to be finished with your gorge in no time! Looks great!
Jose that church turned out great too!
Off to fool with some track!
Jim
Jim,
My 1st level is about 37.5 to 38.5" off the floor, the second level is at 48" and the third level is about 55" ( 7-7.5" off the 2nd level).
carsntrains posted:CSX Al posted:Well tonight I decided to paint my viaduct wall sections, since I am waiting on scenery material from Scenic Express to arrive for the sawmill pond.
Here is a photo of the area this is going to be installed outlined in red. It covers the gap between my 2nd level of the layout and the 3rd city level. On the second level under the city I have a hidden storage yard. I only want this area to be visible from this view of the layout. So I had this wall sections laser cut and brick etched out of hardboard. I may add some strips about a inch wide brick sheet to the arch openings to give the wall some depth. In some of the other arches openings will be filled in with brick sheet to hide some of the 3rd level supports.
Here are a couple photos of the lasered hardboard
Here shows the whole wall section
I painted the brick with white, gray & black primer and then used 4 craft paint colors applied with makeup sponge wedges. Adding a little bit of each randomly and dabbed the sponge in it to apply to the wall . Here are some shots.
Looks good Al!! Would you tell me how high your second level is? I am doing something similar and just did a test. My Lionel tunnel portals (I reckon for tubular track- made in 1984) are too short! One of my wood sided cabooses nearly hits them on the top of them. The bottom of my second level plywood is 7 inches off of the layout.
Those portals aint gonna work...……….. : (
Paul you are going to be finished with your gorge in no time! Looks great!
Jose that church turned out great too!
Off to fool with some track!
Jim
Tunnels on a curve are tough for clearance on the sides also. I always take the 2 longest cars I can find and watch to see how close they get. I had to get rid of several scale diesels because I didn't think ahead.
briansilvermustang posted:mike g. posted:BRIAN< I need your help! You have every railroad picture known to man, can you find me a couple of a BN Crane car and tender?
a little late Mike, sorry... got a little busy yesterday... Have a good Nascar/ train day !!
former BN crane D-158 [also known as D-152, there are multiple numbers stenciled on the crane] was stored at the Twin Cities Arsenal for years. Originally built in 1914, it is seen here with MNTX 10106. Info at www.mtmuseum.org
A view from above as BN crane 975435 sits in the sun awaiting its next job
https://www.lionelsupport.com/...neID=&CatalogId=
https://ogrforum.ogaugerr.com/...nd-boom-car-question
A BN crane working 28th St Yard
BN 961657- powered crane passes by Lincoln Station


Great research Brian, there are some awesome pictures here.
My family was not impressed with the smaller lake so my oldest son Ryan volunteered to cut a different one in. I'll have to re brace the aria under it and re landscape but it will look better in the end.


Attachments
Images (4)
thanks Dave ! the lake area is going to be nice !
Brian
road trips are good specially when you can RailFan and eat Mexican food
and having left overs while "railfanning" the forum...![]()
Dave Ripp, Looks like Ryan wants a larger lake than the first one. It is always best to try again if everyone isn't satisfied. Any chance Ryan would want to make a trip to Western Pennsylvania to do my heavy work! ![]()
![]()
Brian, The silver BMW sure looks nice! Marci will have to drive you around now! ![]()
Well we found the solution! Some old foam brick stuff I salvaged off of an old layout somebody was throwing away some years ago. Did some more trimming on it and evened out the opening after I took the picture. Worked out really well and I have another piece to make the other end of the tunnel with! Got my turnouts in for vetters and US power! Also made the passenger station pass through! Very happy with how it all turned out!

Jim
Attachments
Images (1)
Mark, I was thinking that too, probably won't ever get a chance to drive it anyhow... ![]()
carsntrains posted:Well we found the solution! Some old foam brick stuff I salvaged off of an old layout somebody was throwing away some years ago. Did some more trimming on it and evened out the opening after I took the picture. Worked out really well and I have another piece to make the other end of the tunnel with! Got my turnouts in for vetters and US power! Also made the passenger station pass through! Very happy with how it all turned out!
Jim
Very nice Jim I’m liking it


Kon112H posted:Great post all ! Haven’t done much other then some videos. Here’s a view I don’t think I shared yet. Also worked on my buddy’s layout Thursday, time to wire soon .
Is the triple track curve in the video all 072 curves? Looks great by the way.
Dave Ripp. posted:Kon112H posted:Great post all ! Haven’t done much other then some videos. Here’s a view I don’t think I shared yet. Also worked on my buddy’s layout Thursday, time to wire soon .
Is the triple track curve in the video all 072 curves? Looks great by the way.
Thanks. The inside loop is 054. Then 072 072 Where lucky to even make that happen.
Jim, That looks like enough room for trains to get through
Andy,That’s a birds eye view! Your friend’s layout is taking shape
Pretty good afternoon. I trimmed some of the tops and bottoms on some of the falls and added a small piece at the top of the waterfall between the abutments. Then I tacked down some loose places on the falls. I gave those a chance to set up and I poured my first water through the gorge. I'll pour another coat when the first has had time to setup. I am going to do three coats if not four. Once I do the last pour and it dries I'll do all my white high lighting. Pics............Paul


Attachments
Images (4)
Bangor & Aroostook R.R. action.

Attachments
Images (1)
looking awesome Paul !
BAR GP7 #63 posted:Bangor & Aroostook R.R. action.
Very nice weathering, Johan. Looks like some of the rusty boxes that roll by here.
This is one of the best ongoing post. Has given me ideas and allowed me to follow many of the members layouts as they improve or add.
My only complaint is that I wish I was as good as 99.9% of those posting here. Keep it up and thanks to all that take the time to take photos, videos and post same.
Moonson posted:luvindemtrains posted:Hi Guys and Gals,
This is day 5 of me being a model railroad maniac. In my insanity a lot was accomplished over the last week. Here is the almost finished results of the work done. Please check out my layout progress page for more pics and a detailed description of each project.
Dave
WOW, Dave, gorgeous! Real. And WOW! again!!!
FrankM
P.S. Very apparently, you know the unkept secret of not skimping on the foliage. The results are rich and real.


Thank you much Frank! The last year or so I have been making/buying a lot trees. I thought I had accumulated a lot of them. I went through about half in this section. Back to making trees it is.
Dave
Johan, thanks for another great scene. The weathering job on the State of Maine boxcar is one of the best I have seen. SO real it looks like the paint is actually peeling off the car............Paul
decoynh posted:BAR GP7 #63 posted:Bangor & Aroostook R.R. action.
Very nice weathering, Johan. Looks like some of the rusty boxes that roll by here.
Matt: Thank you. I have a lot those State of Maine cars and many, many still a waiting weathering..
Johan
paul 2 posted:Johan, thanks for another great scene. The weathering job on the State of Maine boxcar is one of the best I have seen. SO real it looks like the paint is actually peeling off the car............Paul
Paul: Thank you. This one is quite old work and many State of Maine cars still a waiting weathering… I have now also a many scenery projects, pics comes later, when is a something what to show. ![]()
Johan
BAR GP7 #63 posted:Bangor & Aroostook R.R. action.
Great photo with your moniker off to the side, love it,
Dave Ripp. posted:BAR GP7 #63 posted:Bangor & Aroostook R.R. action.
Great photo with your moniker off to the side, love it,
Dave: Thanks. I love the BAR.
Johan
If you put a computer case inside your lay-out, you don't lose any space, because you can put things on top of the case. And if you leave the case open, you can build a panorama inside. I've been collecting material for a future "People inside a computer" addition to my lay-out.
Today I cleaned up this 25 year old sewing machine and barbecue grill that I spotted at a yard sale.


Attachments
Images (3)
BAR GP7 #63 posted:Dave Ripp. posted:BAR GP7 #63 posted:Bangor & Aroostook R.R. action.
Great photo with your moniker off to the side, love it,
Dave: Thanks. I love the BAR.
Johan
Their #56 BL-2 is one of my favorite locomotive photos. It's my favorite diesel and # and a great shade of blue.
Bob, AKA DAD! I truly feel for you! The snow here is just starting to melt!![]()
Josef, Nice job on the Cathedral! Really like the new windows!![]()
Brian, what a great day! Trains, Mexi food, and a new car! I bet Marci is just thrilled!![]() Hey also thanks for the BN Crane pictures! I would have to guess in real life they are either Black or Yellow!
Hey also thanks for the BN Crane pictures! I would have to guess in real life they are either Black or Yellow!![]()
Paul 2, that sure turned out looking great! I bet when your done with your water pours its going to look even better! Oh by the way I broke my snow shovel so no more for me! LOL![]()
Dave, that is quite the lake remodel! Best of luck, I will be checking in to see how it turns out!![]()
Jim, the new portal looks great! Perfect!![]()
Andy, nice view of the layout! Your buddy sure is luck to have you helping him! It looks like its going to be a very nice layout!![]()
Johan, what a great picture to show off your skills! Wonderful weathering!![]()
So today I went out to power up the Tortious switch machine, but I am a little off, doesn't work yet, but I will get it! LOL Oh side note, does anyone have a MTH Scale Trax switch machine extra?![]()
Running 1401 pulling some boxcars and a new to me caboose! And running 2401A pulling my new Lionel coal hoppers and new to me Caboose!
Attachments
Videos (1)

carsntrains posted:Running 1401 pulling some boxcars and a new to me caboose! And running 2401A pulling my new Lionel coal hoppers and new to me Caboose!
Plenty of clearance now.
mike g. posted:Bob, AKA DAD! I truly feel for you! The snow here is just starting to melt!
Josef, Nice job on the Cathedral! Really like the new windows!
Brian, what a great day! Trains, Mexi food, and a new car! I bet Marci is just thrilled!
Hey also thanks for the BN Crane pictures! I would have to guess in real life they are either Black or Yellow!
Paul 2, that sure turned out looking great! I bet when your done with your water pours its going to look even better! Oh by the way I broke my snow shovel so no more for me! LOL
Dave, that is quite the lake remodel! Best of luck, I will be checking in to see how it turns out!
Jim, the new portal looks great! Perfect!
Andy, nice view of the layout! Your buddy sure is luck to have you helping him! It looks like its going to be a very nice layout!
Johan, what a great picture to show off your skills! Wonderful weathering!
So today I went out to power up the Tortious switch machine, but I am a little off, doesn't work yet, but I will get it! LOL Oh side note, does anyone have a MTH Scale Trax switch machine extra?
Mike: Thank you very much.
Johan
Add Reply
Sign In To Reply
