


All that room up there must be nice Kevin. The ability to change things up on a whim is something I miss about carpet centrals after going to tabletop running. Too bad the attic would need me to extend my arms and push to get up there.
Mayor Magoo, Nice job on the building! Your dad would be proud of you!![]()
Lew, I get it now with 036 curves!![]()
Brian, is sure is nice you have Izzy to keep you focused on trains!![]()
Paul 2, sorry about the tree on your house! I hope everything turns out well once you get it removed!![]()
Ralph, looks good and what a great idea!![]()
Leapin Larry, its hard to take pictures when not much has changed, but I will try and get out tomorrow and take some pictures of my mess as it is now! LOL![]()
Bill, the water tower looks much better! Plus it looks like you have a good start on your train car! Keep us updated!![]()
Lee D, great pictures of your layout! I like how you keep moving things around to keep it interesting!![]()
Larry, yesterdays high was 41 degrees, almost felt like spring! LOL![]()
Ed, nice job on the platform, way to think out of the box!![]()
LEE, your attention to detail is top notch! Nice work and looks great!![]()
John the People Painter, your just like the enegerizer bunny! You just keep going and going! Nice work as always!![]()
Kevin, nice tree from seaweed and a wonderful looking layout! 4% WOW!![]()
As for me I did nothing on the layout yesterday as it was doc appointments and removed snow for an older couple around the corner! Today will be about the same, more doc appointments and then work! Maybe I will get out there tomorrow morning!![]()

Attachments
Images (2)


Odenville Bill posted:Hey Y'all,
What a great train day. I painted my first Plasticville part today. I liked the water tower but felt the colors could be improved. I will do the detail painting for the level gauge, install a lightening rod, and maybe add a Southern Railroad decal. It got wife approval! For my next trick I sprayed a primer coat on my first custom train car. I have a long way to go on the work car.
Then I cut four custom length pieces of O27 and add another siding to the Bald Rock Mountain Railroad. Time to run trains.


Yes, painting and a little detail work does improve them. Here's how I did my gauge.

Attachments
Images (1)
Andy, That's a lot of steam!!! Thank you!
Lee the car and license plate look great!
John, the train rider numbers keep increasing!!
Kevin, Having fun is what it is all about! That's a couple of strong MP-15s!
Butch, I understand what you mean about getting into the attic!!
Mike, The layout will be calling your name when you finish with the doctors and snow!
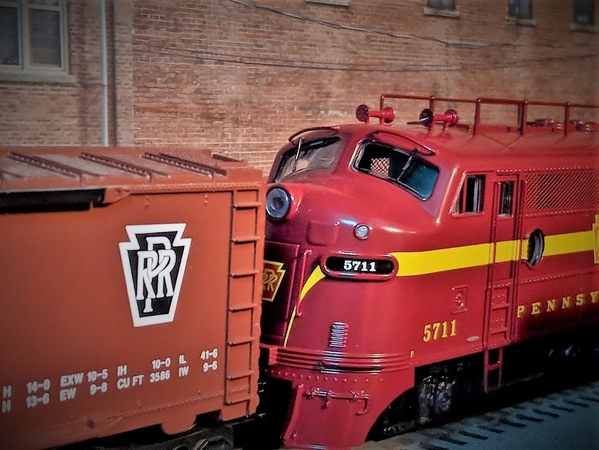
Brian, Nice PRR F units. Are those RMT BEEPs?
Josef, the tank looks good!
"Brian, Nice PRR F units. Are those RMT BEEPs?" yes...

Pennsy's new " CENTI-PEEP "... ![]()

OK, now what was that one ....

umm, I thought, well, umm, never mind... ruff...
Attachments
Images (4)


Centi-peep!!!! I love it! Handles sharp curves the centipede couldn’t!!!
Mark Boyce posted:Centi-peep!!!! I love it! Handles sharp curves the centipede couldn’t!!!
LOL, That's a good one Mark !!!
Joesf, nice job on the water tank! Loos good!![]()
Brian, as always nice train! Red sure is a nice color, but not as nice as orange & black, or Green and white! LOL![]()
Odenville Bill posted:Hey Y'all,
What a great train day. I painted my first Plasticville part today. I liked the water tower but felt the colors could be improved. I will do the detail painting for the level gauge, install a lightening rod, and maybe add a Southern Railroad decal. It got wife approval! For my next trick I sprayed a primer coat on my first custom train car. I have a long way to go on the work car.
Then I cut four custom length pieces of O27 and add another siding to the Bald Rock Mountain Railroad. Time to run trains.
Nice job on the water tower!!! I see some nice Southern Railway stuff rolling around there! Is that some type of MOW car you are building?
Kon nice video! What do you run on that upper track that I havent seen anything on?
Lee I dont know how you do that stuff! Is that some ole revenuers car?? lol
That seaweed tree is great!
I didn't get to the train room yesterday either. Had to work late. Then I had to cook dinner (grill work lol) Got a lot done Sunday with the hill, turnouts, and got all my buildings plugged up again. Decided not to drill holes for them yet because the track plan is still evolving! Wife says I have no other choice but to do another level. HMMMMMMM
Jim : )
There you go Jim, go UP!!!! LOL![]()
mike g. posted:Brian, as always nice train! Red sure is a nice color, but not as nice as orange & black, or Green and white! LOL


![]()
Attachments
Images (2)


briansilvermustang posted:mike g. posted:Brian, as always nice train! Red sure is a nice color, but not as nice as orange & black, or Green and white! LOL
![]()
Brian never disappoints!
I disassembled and cleaned one set of tracks and installed a different set. I don't like it, so I'll take it down today and replace it.
I’m working on the long retaining wall between the grade and the industrial area above. As with the small wall I recently posted, the wall and vertical pieces are 1/8” Masonite (hardboard) and the cap is 1/4” MDF. I’ve already glued the cap on, and today I’ll glue the vertical trim pieces in place. Then I’ll break all the edges (lightly sand) to get it ready for primer. The paint will adhere better than if all the edges were sharp. After that, I’ll spray paint it with the textured Desert Bisque I’ve been using and install it. Then I’ll give it a dark wash. It’s all one piece, and measures about 81” in length. The last picture shows where the wall will be installed. After the wall is in, I’ll put some basic ground cover down.
Andy


Attachments
Images (5)
Centi-peep ![]()
If new Brian, you need to send that one to RMT or do an "@ RMT" because not having the curves for those monsters, a Centi-peep may be as close as many of us will ever come close to having a Centipede run at home.
As the Guinness brewing scientists would say; "Brilliant!"
I know that is the only way I would have a Centipede running at home!!
Andy, that is going to be one long wall! However, it will look as good as the other one!!
thanks ADRIATIC !! I thought it looks pretty cool !
runs GREAT !! yep, going to have to contact RMT... ![]()

hmmm... maybe I'll get another "Centi-peep", so I can run a double header... ![]()
Attachments
Images (1)

Thank you Mark!
Andy
I m working on a upper level and I know I like to have girder bridges but could not find any I nned @ 20 or feet .. So Im trying to make my own I need them to flex around the bends I made. So I went to Lowes and bought 8ft long 1.5 x 1/4 flexible white flat plain molding $5.75 . I had form before 1/4 x1/4 square wood .

I glued them on and painted them with the krylon camouflage brown.. letting them dry and going to see how well they fit and look for now that's what I did today "for" my layout.. sorry for the bad phone camera.. daniel
Attachments
Images (2)
Looks like lots of workin' on the railroad going on - and really outstanding work by all.
After my recent interwebs shopping order arrived, I worked on several items:
1. Woodland Scenics auto - really like the head and tail lights, though it seems undersized to me when compared to the usual vehicles I can find (1:43).
2. Tried some Heki grass mats, think I like it.
3. Lastly, the local AOH Division needed to do some March event planning, so they went to find some uisce beatha.


Attachments
Images (4)
Still working on my 4 story factory, but a lot of progress has been made. All 16 of the LED lights are installed and working. It worked well soldering the LED's to N Scale track, and the track spacing fit directly into these small push connectors I purchased. All the missing 3 window brick panels finally arrived from the OGR store so all the exterior brick work is done and sealed... etc... Going to paint the upper roof tonight, then start scratch building some exterior duct work, a chimney and add other small details....
Lots of great work by everyone, haven't been here in about 6 days, too many new pages of posts to go back and comment on individually, sorry.

")
")
")
Attachments
Images (4)
")
")
")
great job Chris !! looks awesome !
John Rowlen posted:I like the detail work being done to the vehicles. It is very nice work. Thank you for the inspiration.
Thanks! You do great figure work!
I wanted to share this with you guys.. This was on one of the boxcars I got last week. Yall might remember the place!

Attachments
Images (1)
chris a posted:Still working on my 4 story factory, but a lot of progress has been made. All 16 of the LED lights are installed and working. It worked well soldering the LED's to N Scale track, and the track spacing fit directly into these small push connectors I purchased. All the missing 3 window brick panels finally arrived from the OGR store so all the exterior brick work is done and sealed... etc... Going to paint the upper roof tonight, then start scratch building some exterior duct work, a chimney and add other small details....
Lots of great work by everyone, haven't been here in about 6 days, too many new pages of posts to go back and comment on individually, sorry.
Very Nice! Chris, what is the power/size and source of your LED lights? Thanks, Dave
Dan, the bridge looks good! Very creative. Steve, great scenes, nicely detailed! Chris, the building and the details are outstanding!
Andy
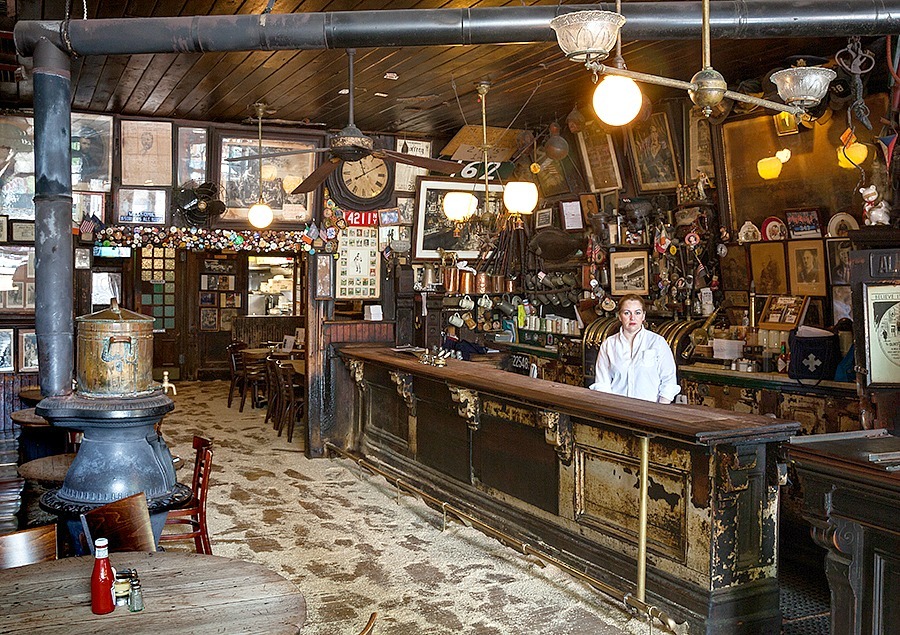
McSorley's has Long been on my bar bucket list...

Brian, Andy, Dave, thanks for the kind words on the "factory building"... Also thanks for the many "likes"...
Dave, I am including a link to the ebay supplier I buy these from... First time around I bought 25 to try them, then came back and ordered 100. They are 3 mm, Warm White, Flat Top LED's, I ordered the ones with the resistor soldered in and heat shrunk. I have probably installed close to 1/2 of what I purchased, the color of the light really is warm white ( I don't like the bright blue white colors ).
With the resistors they operate on 9 to 12 V DC. I supply the entire layout with a DC bus that carries 12 VDC. On some buildings I add the DC/DC adjustable buck converters for like $2.50 each so I can alter the voltage and brightness.... I just ordered another 5 DC buck converters as I purchased some Miller engineering signs that I need to provide 4.5 VDC to and I have a couple of Woodland Scenics buildings that will need lower voltage DC.
For all my applications so far, I really like these with the resistors and especially the 6 inch wire leads. The only exception is when I want an outside overhead gooseneck lamp in which case the short resistor and heat shrink isn't optimal for that application.... I may go find 25 or so without the resistors. I am also including a link to some "push connectors", these are really handy inside of buildings, eliminate excessive amount of soldering ( not my favorite activity with small/fine wire).
f:0&var=431149524702" target="_blank">https://www.ebay.com/itm/Super...amp;var=431149524702
f:0" target="_blank">https://www.ebay.com/itm/10-50...OoIdDjwNDg:rk:7![]() f:0
f:0

Attachments
Images (1)
Mayor Magoo posted:Looks like lots of workin' on the railroad going on - and really outstanding work by all.
After my recent interwebs shopping order arrived, I worked on several items:
1. Woodland Scenics auto - really like the head and tail lights, though it seems undersized to me when compared to the usual vehicles I can find (1:43).
2. Tried some Heki grass mats, think I like it.
3. Lastly, the local AOH Division needed to do some March event planning, so they went to find some uisce beatha.
So, I wonder how many drunks have come out of McSorley’s Old Ale House and have been hit by a train due to its close proximity to the tracks?
Larry
John Rowlen posted:I went back to painting Preiser 65602 people for my passenger cars before dinner, and I found myself dozing off and smearing the brown paint for the hair over the nearly completed figure's face, (Five separate times). I must have been really tired. I decided to rest and got up at midnight to paint some seated figures from China, Evemodel #8602. I painted flesh so the paint job was not that critical. I started 36 figures and have 48 Preiser 65602 I am working on.
Four more packs of Preiser 65602 arrived from Frankarts on Ebay today. I need a total of 29 packs of 24 for the passenger cars arriving in December, 2019. Thirteen are completed. Five more need to be purchased.
I like the detail work being done to the vehicles. It is very nice work. Thank you for the inspiration.
Sincerely, John Rowlen
John can you slow down just a little bit I only have two figures done and I need to catch up with you at this rate I might catch up when I’m 75 years old please slow down anyway they look great can’t wait to see your magic touch on these
carsntrains posted:I wanted to share this with you guys.. This was on one of the boxcars I got last week. Yall might remember the place!
That’s pretty neat I would try to save that if I was you
Steamfan77 posted:I’m working on the long retaining wall between the grade and the industrial area above. As with the small wall I recently posted, the wall and vertical pieces are 1/8” Masonite (hardboard) and the cap is 1/4” MDF. I’ve already glued the cap on, and today I’ll glue the vertical trim pieces in place. Then I’ll break all the edges (lightly sand) to get it ready for primer. The paint will adhere better than if all the edges were sharp. After that, I’ll spray paint it with the textured Desert Bisque I’ve been using and install it. Then I’ll give it a dark wash. It’s all one piece, and measures about 81” in length. The last picture shows where the wall will be installed. After the wall is in, I’ll put some basic ground cover down.
Andy
Andy that looks very nice I really like that landscaping.
Thank you for all your likes and complements not much going on the layout seems like work keeps getting in the way I have a short day tomorrow and get something on the bench or on the layout out
Hi Everyone,
Today I continued making rock molds. It is about a week long project.
Dave


Attachments
Images (2)


chris a posted:Brian, Andy, Dave, thanks for the kind words on the "factory building"... Also thanks for the many "likes"...
Dave, I am including a link to the ebay supplier I buy these from... First time around I bought 25 to try them, then came back and ordered 100. They are 3 mm, Warm White, Flat Top LED's, I ordered the ones with the resistor soldered in and heat shrunk. I have probably installed close to 1/2 of what I purchased, the color of the light really is warm white ( I don't like the bright blue white colors ).
With the resistors they operate on 9 to 12 V DC. I supply the entire layout with a DC bus that carries 12 VDC. On some buildings I add the DC/DC adjustable buck converters for like $2.50 each so I can alter the voltage and brightness.... I just ordered another 5 DC buck converters as I purchased some Miller engineering signs that I need to provide 4.5 VDC to and I have a couple of Woodland Scenics buildings that will need lower voltage DC.
For all my applications so far, I really like these with the resistors and especially the 6 inch wire leads. The only exception is when I want an outside overhead gooseneck lamp in which case the short resistor and heat shrink isn't optimal for that application.... I may go find 25 or so without the resistors. I am also including a link to some "push connectors", these are really handy inside of buildings, eliminate excessive amount of soldering ( not my favorite activity with small/fine wire).
f:0&var=431149524702" target="_blank">https://www.ebay.com/itm/Super...amp;var=431149524702
f:0" target="_blank">https://www.ebay.com/itm/10-50...OoIdDjwNDg:rk:7
f:0
Chris, thanks for the info! Dave
Add Reply
Sign In To Reply
