


I like it, Paul!! Yes, once it dries you will know better if you want to change colors. The overall scene looks great to me!
BEFORE/AFTER:
BEFORE:

AFTER:
'Lighting the way' for the motorists.


Attachments
Images (6)


Samparfitt, Those motorists in the neat vehicles need plenty of light to navigate between the wonderful cliff and the tracks! Your concrete highway looks great too!
Pete, Fifty pages of instructions! How can you go wrong?? The layout is looking great!
Mark Boyce posted:Al, How do you keep up on so many great projects at once! They all are coming along nicely!
Thank you Mark. It keeps me from being bored. ![]()
paul 2 posted:CSX Al, your buildings are really making a difference and bringing the scene together. Your Sawmill scene just keeps getting better with what you keep adding to it.
Thank you Paul. Your waterfall and gorge are coming along nice. Soon you will be able to put the bridges back in service. ![]()
briansilvermustang posted:
thanks Andy !
your scenery, track work, and ballast are all looking GREAT !!

Thank you Brian! Paul, the paint for the gorge is really looking great! Sam, the lights and scenes are excellent.
Andy
Andy, thanks I sure hope it's an easy change! I am with Brian, your track work looks great!
Jim, i am not sure, but it's a cool idea! I will have to check into it this weekend! Oh by the way thank you for helping me spend more money if this idea works out!
Paul, thanks your right, i am glad I cought it now then later! The back drop is looking just Amazing!
Sam, the highway lighting is looking great!
Pete, looks like a fun build! Remember one step at a time.
So now a question for you all, what's the best way to take up cork so I can reuse it?
Mike, I used a two inch putty knife under the cork and worked back and forth slowly. Of course I used a minimum amount of glue in the first place. I have gotten to use less glue over the years because I am always tearing stuff back up!
paul 2 posted:


Looking great Paul. Any plans to include a few dead trees, some tree trunks, branches & rocks? I really like the sky! Well done. Cheers, Dave
I finally got around to addressing the lift out section on my layout. I wasn’t happy with the fit, and decided to go with a hinged lift up section instead. I used some hinges I had hanging around, mounted on 3/4” blocks of plywood. The shiny track sections will be painted, ballasted, and then I’ll put down some ground cover. I’ll also paint the blocks to help them blend in a little better.
Andy


Attachments
Images (3)
Andy lift up section looks good. Do you have an idea on how to conceal the hinges? What is going in that area of the layout?
Andy, the lift up looks great! The cable harness should do the trick. A lot of folks go to great lengths to engineer fantastic lift ups, downs, swing outs, and whatever you can think of. If I built one, it would be functional but simple like yours, then I would figure out some scenic treatment to conceal the hinges a bit. But you know what, mine would probably sit the way it is while I do other things. ![]()

 Good news everyone! My Weaver RSD 4/5 came today. Seller said the horn was broken but was included which was fine BUT they didn’t tell me someone tried to already glue it and somehow managed to get glue residue all over the area around the horn. Anyone know to remove old glue from painted plastic? Besides that she’s a beauty and is equipped with R. S. And TMCC.
Attachments
Images (2)
Andy the lift up is cool and I to as Al asked wonder if you have a plan to hide the hinges. I was afraid to do a lift up or out due to my ability to forget that I left it up or open! : )
Mike I am always happy to help you spend more money! I just bought some switches to try to fix the crane that YOU caused me to look into!!!AHAHAHAHHAHA
Ive spent double on turnouts because I don't like dead end spurs! Except at an industry. Its a huge challenge to make pass through sidings with Fastrack too! But well worth the effort!
Ive been eyeing my On30 train sets wondering if there is a way to work them into my layout. Without an upper level there is no way... I have a spirit of America steam set that is a great looking train! But its set on top of my computer desk for years.
Lots of good stuff to see on here lately! Everyone is moving forward and that's great! I've spent the past few evenings out in the yard mowing, taking care of my goats, and trying to keep my bird feeders full! Was 70 here today!!!
Jim
Jim,
I had thought of working my On30 trains into an O gauge 3-rail layout for a couple years. I finally decided I wouldn't have enough room do either justice to my satisfaction, so I sold all the On30 I had. (2 engines and 4 or 5 cars) I am always game to see what other folks can do with O gauge and On30 together on a layout.
It was about 55 here today. I cleaned up some dead leaves. All the grass is still brown and I haven't seen any spring flowers yet. Keep in mind it was just last week we had three nights in a row that went down into single digits.
Thanks Al. This area is between my first station (Mineola) and the staging yard, where I can either turn trains on a loop, or store them on four stub end tracks. So this spot sees a lot of action. As far as hiding the hinges, I’ll just say “these aren’t the hinges you’re looking for” ![]() (Star Wars reference). Seriously, I’ll paint them brown and build up some ground cover around the mounting blocks. It’s just as you enter the room, so I’m hoping the focus will be elsewhere! Thanks Mark, I wanted something simple and functional. Thanks Jim, I won’t forget to put it down, because it doesn’t stay up by itself, and it’s only me operating.
(Star Wars reference). Seriously, I’ll paint them brown and build up some ground cover around the mounting blocks. It’s just as you enter the room, so I’m hoping the focus will be elsewhere! Thanks Mark, I wanted something simple and functional. Thanks Jim, I won’t forget to put it down, because it doesn’t stay up by itself, and it’s only me operating.
Andy
Andy, wonderful job on the most up section!
Jim, i wish it was 70 here not 40 something! The switch is a cool idea. I will let you know!
Jack, nice looking engine, but I'm sorry I don't know anything about removing glue!
Thanks Mike!
Andy
I worked with a used Lionel Santa Fe GP9 #726 that just arrived. It needs the thinner traction tires. Some engines in 2012 had fat traction tires that raise the flange out of the switches, causing derailments. I ordered 36 more 6208815206 traction tires from Lionel parts. I replaced traction tires on my GP35 and F3 Western Pacific engines and they run perfectly now. I bought extra to include thin tires with any GP35 engines that I sell from my collection.
I continue to paint seated people at night for the 21" passenger cars arriving in December 2019. If I have extra, I will sell them on Ebay. I will begin thinning out duplicate freight cars and engines on Ebay in a week. I need to reclaim some space in an upstairs bedroom.
Sincerely, John Rowlen
Attachments
Videos (1)

Steamfan77 posted:Thanks Al. This area is between my first station (Mineola) and the staging yard, where I can either turn trains on a loop, or store them on four stub end tracks. So this spot sees a lot of action. As far as hiding the hinges, I’ll just say “these aren’t the hinges you’re looking for”
(Star Wars reference). Seriously, I’ll paint them brown and build up some ground cover around the mounting blocks. It’s just as you enter the room, so I’m hoping the focus will be elsewhere! Thanks Mark, I wanted something simple and functional. Thanks Jim, I won’t forget to put it down, because it doesn’t stay up by itself, and it’s only me operating.
Andy
Andy, Don't mind me. I was thinking of a cool idea i saw on a friends layout. You could do something like this just smaller since you have what looks like tunnel
entrances to the left of the hinges.Just food for thought.
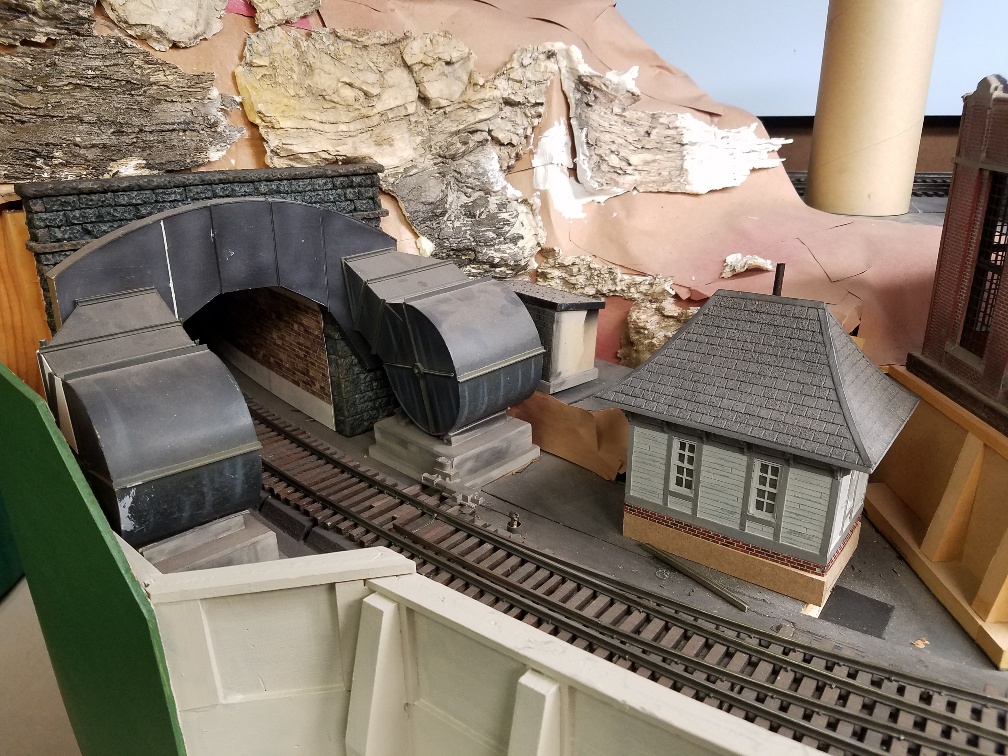
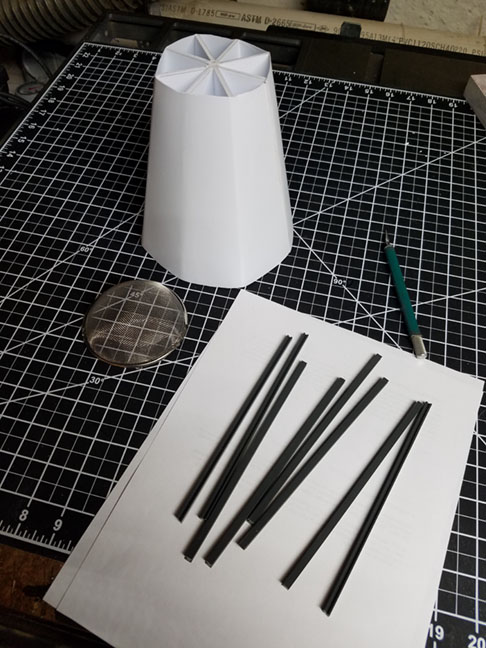
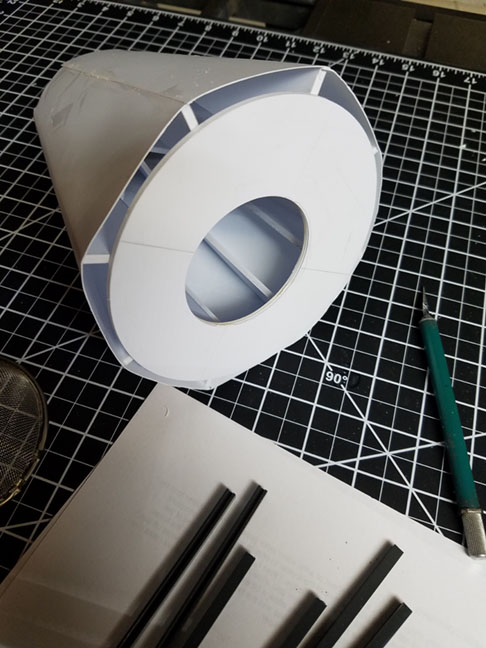
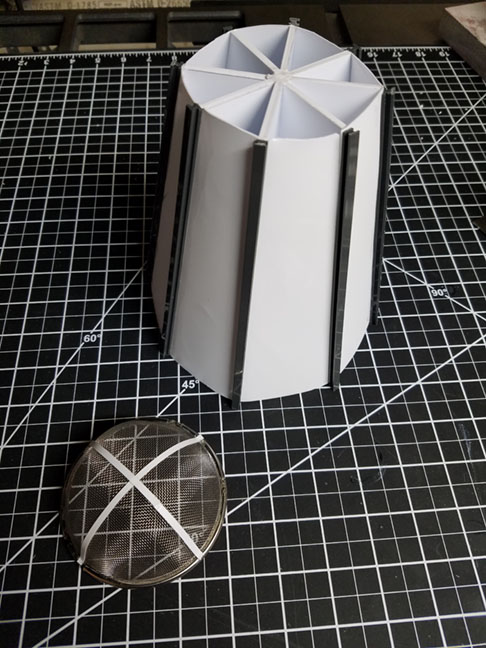
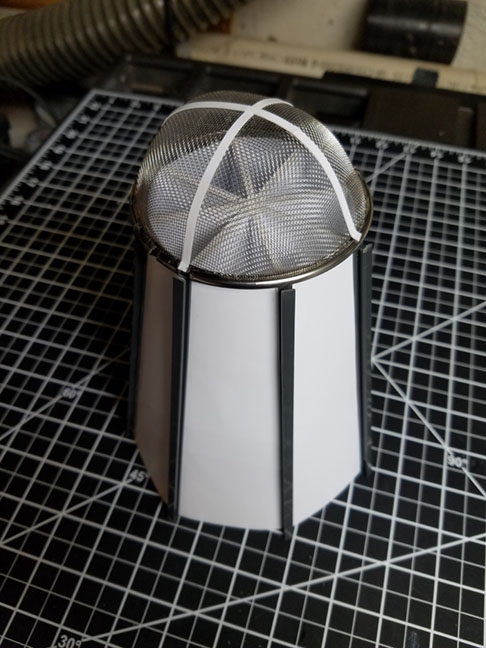
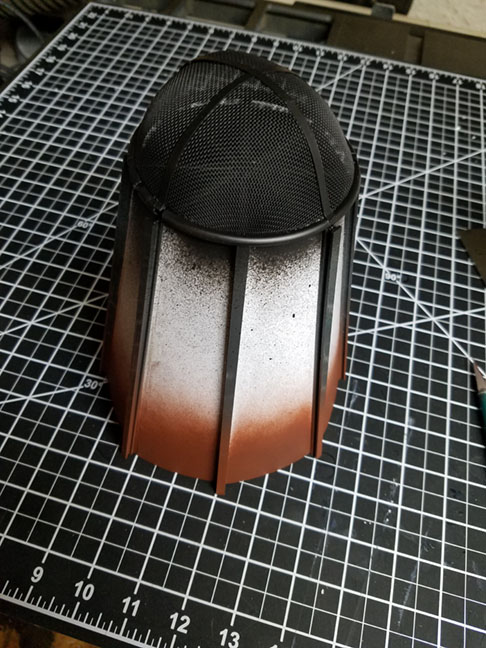
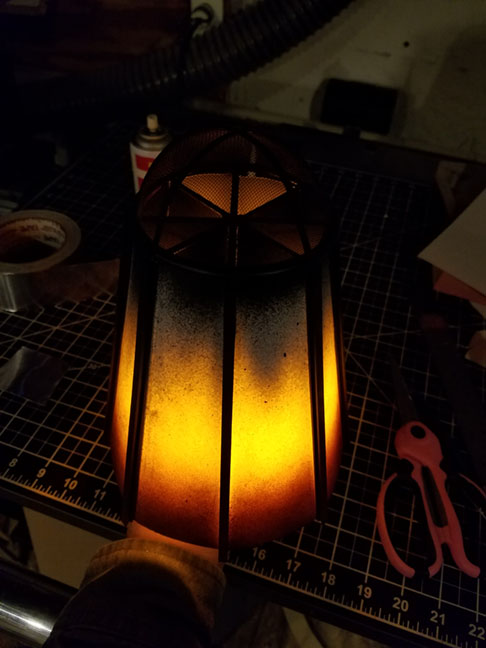
I did more work on the slash burner tonight. I put the inner skin on over the frame. I then attached the I beams over the internal ribs. I then glued two pieces of styrene in a cross over the mesh of the strainer. Painted the top strainer and inside the top of the burner. I sprayed the lower outside of the inner wall and the I beams a rust color as these areas will show below the outer skin. After paint dried I tested my bulb to see if I will need to open inner walls up some to allow more light to pour through for it to come through outer wall skin. I might test a section to see how it looks. Here are some photos of the steps and a video clip of the light effect.
CSX Al posted:Steamfan77 posted:Thanks Al. This area is between my first station (Mineola) and the staging yard, where I can either turn trains on a loop, or store them on four stub end tracks. So this spot sees a lot of action. As far as hiding the hinges, I’ll just say “these aren’t the hinges you’re looking for”
Andy
Andy, Don't mind me. I was thinking of a cool idea i saw on a friends layout. You could do something like this just smaller since you have what looks like tunnel
entrances to the left of the hinges.Just food for thought.
Al, that’s cool! Tom (MNCW) said:
Andy,
That looks like you did a pretty nice job. the fact that its on a curve did not make it easier for you. One thought...maybe you can disguise your hinges with gluing piles of railroad ties as though the railroad was renewing ties and piled them in those three areas.
Tom
Al, nice job on the slash burner.
Andy
50/50 white glue/water mix was spread on the hillside I'm making, it was covered with a mix of Woodland Scenics ground cover, then sprayed with a 50/50 mix of glue/water. After it dries for a couple of days I'll get it on the layout and put my rotary beacon on top. Probably add a few more bushes and other details here and there after I get it on the layout.

Attachments
Images (1)
Another day and this topic is exploding with so much going on that it is hard to get back to working on the layout. Kudos to everyone. You all are doing great jobs. I slowed down and only put one color on this afternoon. I am doing a wait and see what it looks like the next day.
Jim, thanks for those ideas. I don't think I will be adding any rocks but tree trunks and dead trees sounds interesting. I'll have to watch a few more paint episodes to do that. Once I am done with that I will be adding turf and trees in front of the back drop.
Couple of pics of the color added today..............Paul


Attachments
Images (2)
Mitch, you will be in our Prayers to, you friends from Tennessee....God is Good, Prayers are Powerful.....Thank You for the update....As Al said, stay strong, and keep the Faith....,
Paul, the paint looks great! Al, the slash burner is really slick looking.
Andy
WOW AL, That slash burner looks great! Is that all scratch built?![]()
Paul 2, Looks great! Are you sure you don't have an Afro and talk with a slow deep voice! LOL Wonderful work!![]()
Mitch, I am so glad the operation went well to remove the cancerous mass! It can be scary! But I am so sorry about the Bile Duct issue. You and Fortescue are in our prayers also! We know it really work! Get better soon!![]()
Nothing for me today till I get all the tree limbs cleaned up today! What a wonderful day to spend the day off! LOL I hope to get it done this morning so I can get a little train room time this afternoon!![]()
mike g. posted:WOW AL, That slash burner looks great! Is that all scratch built?
Thanks Andy & Mike.
Yes, it is scratch built. I should be able to get it finished up tonight. I will post photos of the finished burner.
Nothing for me today. Gotta clean up from that Bomb Cyclone that went through here yesterday. Six foot drifts in places around the yard and a foot of powder on the driveway to plow.
BEFORE/AFTER:
Lamps added to the icing platform for the night shift.
BEFORE:

AFTER:


Attachments
Images (6)
Today I added tree trunks through out the back drop then went back and added somemore color to blend the trunks in. Not quite sure I am happy with the darker color I added but I'll wait till tomorrow to decide on that. I'm also considering adding a dead tree in which the trunk has broken and has fallen into the river but is still attached to the main trunk. Figuring out what side it would look better on. Couple of pics.......Paul


Attachments
Images (3)
paul 2 posted:Today I added tree trunks through out the back drop then went back and added somemore color to blend the trunks in. Not quite sure I am happy with the darker color I added but I'll wait till tomorrow to decide on that. I'm also considering adding a dead tree in which the trunk has broken and has fallen into the river but is still attached to the main trunk. Figuring out what side it would look better on. Couple of pics.......Paul
Wonderful!!! Paul, you are almost ready for your own "How-to Paint" series on Chanel 2. You could become the new "Bob Ross"! I like the added branches and darker colors. I think few dead trees and stumps would help give a height perspective. Do you plan to darken the river a bit to blend with the falls? Great work! Cheers, Dave
Sam, the lights look great! Paul, the trunks are a nice detail, they add interest to the scene.
Andy
looking GREAT Paul ![]()

Looks good Pete!
Andy
Paul, the backdrop is looking great!
Sam, the lights are a great addition to the icing platform.
Pete, the building is really taking shape!
Dr. Joe, Well at least it is powder you have had to contend with. All the same, I'll bet you are ready for spring!!
Add Reply
Sign In To Reply
