


Only lacking the barbed wire around the fence...

Repaired Operating Man inside the Madison Hardware Operating Boxcar • 6-19816 / He throws the UPS Package to fast, got him to slow down.


Attachments
Images (2)


I picked up an old vintage Great Northern Box car...all metal, I think it is American models?
Attachments
Images (7)


paul 2 posted:Got the last of the table legs for the tables done. A lot of pieces of wood cut for finishing off tables. And back supports for the back drop screwed to the table at one end. Tomorrow will be a longer day of getting things done ..........Paul
Paul, you better hurry up with that bench work. If it rains tonight I am starting mine and plan on having 2 tables built, you can't let me catch up.
Almost done with the mine headframe kit; just need to add cable and skip bucket AND power for the cable. Have almost completed a model of a primitive Hart Parr gasoline tractor as power, but think that would need some kind of safety winching mechanism, so skip would stop and not drop if engine quit. I think somewhere I have a steam boiler and equipt. I may use, instead. Will complete both and then decide.
Sure I can Bryan. The faster you get yours built the quicker I can bring my trains over and that way I don't have to finish my layout. If I had the time I would stay ahead of you but unfortunately all my time is taken up looking for a Z4000. LOL.................Paul.
PS I'll do a good rain dance for you so you can build right through the weekend.
look no further - Z4000's are on sale - $395 with free shipping!
http://www.mariostrains.com/in...id=33&Itemid=772
p51 posted:Added some ballast last night...


Ballasting is such a lot of work. Looking good here!
Bryan, instead of this Bud is for you this table is for you. Today I got table four all put together and ready to go in place after I get the Masonite backdrop painted. Two more tables to go then I can start to figure a track plan. Still trying to figure out that Swarm program. Couple of pics of work so far..................Paul

Attachments
Images (2)
Paul,
The tables are looking good. Well constructed
Thanks Mark it has gone better then anticipated. Not any cut short pieces this time around so far. Probably spoke too soon and jinxed myself with two more tables to go................Paul
This morning, Tom made a template and cut a long sloping curve on the 8'10" long mahogany front facing board for the Art Deco Std. Gauge layout table. I designed the curvature and spacing! Then Tom glued it in place. Can't see it well because several clamps and extra piece of wood are holding it on while the glue dries.


Attachments
Images (2)
working more on the repainting of a few vintage Barclays. Officer O'Malley got his uniform and cap touched up. Deanna and Trudy both got their hair freshly colored. Trudy's kid brother Buddy got his hair cut, and new grey suit and a new navy cap, and is seen carrying a red covered book he borrowed from the public library. Still more to be done.

Attachments
Images (1)
Clamps and glueing spacer boards off. Pic shows one edge of the front facing board, mahogany.
Oooh... purty![]()
![]()
![]() Good job, baby!
Good job, baby!
The other three facing boards get cut and glued on, and then staining.

Attachments
Images (1)
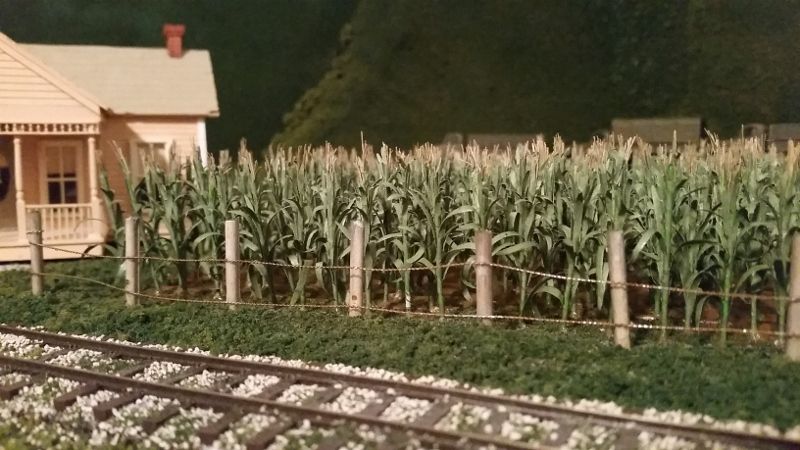
I added barbed wire to the cornfield fence and gave it some random rust as well.
Had to touch up the white on the Masonite. After it dries I'll apply the blue. I'll let it dry a bit then get the table in position, level it, then to bolt it to the last one table......................Paul
my best Buddy. Final repainting on "Buddy" the young man vintage Barclay is now done. My daughter Sarah painted his eyes and mouth. I did the rest, I'm quite satisfied with how he turned out. Left the stand original. Used acrylic and enamel paints on him. Just a gloss coat left to do. I think he came out rather well. The original grey paint shows through in places, creating shadow and highlights. He looks very sharp in his blue cap and new brown boots. He's carrying his camera, and a red covered book.


Attachments
Images (4)
Last night I cut some mountain profile-shaped 4-foot sections of ¼” MDF board for backdrops. I’d had a long sheet of Masonite already cut for that, and had some metal reinforcement channels to keep it from warping, but it warped along its long axis instead while it was waiting to be installed. The MDF is far more rigid and doesn’t weigh too much more. It won’t require nearly as many supports to the top of the bench work as the Masonite would have as the backdrop has to be free-standing. I should have used MDF from the start. This weekend, I hope to have the hardware installed, the paint work done, then light ground foam spread over the entire faces before installing them onto the layout. Once that’s done, then the backgrounds will be finished and I can get started on the trees and bushes (I have two big bags of green poly foam and a lot of ground foam in containers). I also have a hug bag full of small detail parts and I really am looking forward to getting all that stuff in place.
Well Bryan with my Z4000 coming today no more pressure for the two of us. Now we can focus on table building. Let the games or should I say let the table contest begin. LOL. After dinner going to get that table in place. Partial day of rest tomorrow. Going to go to the Strongsville Ohio show in the morning but then work will commence work again and go through the weekend.....................Paul
Tom trimmed to my design the first of the two side facing boards for the Art Deco layout table, then glued and clamped it to the table this morning. Unveiling later tonight.
Pic to follow.


Went to the Strongsville Ohio S spree show with one of the guys from the Tuesday night group. Even though it was pretty much S gauge the operating layouts were nice to view. There was some O gauge there but nothing I needed. Once I got home I got table four into place leaving just the cross braces to put on and paint the bottom black. Then I put table five together. But I have to get the back corner cleaned out and painted first. Pics of the tables........Paul

Attachments
Images (2)
Gave a couple armatures a polish and broke in some new motor brushes, for 30 min each direction, then re-cleaned with air. A cobbled up Marx E-7's motor with a three car limit, still didn't respond to the quick servicing at all. I dove in again, and it really woke up after pinching the barely loose armature plates mounting tabs down tighter. 5 minutes of brush setting and I have a double reduction A-B +5 car El Capitan that'll jump the tracks again now ![]()
![]() .
.
Published a You Tube Video
https://www.youtube.com/watch?v=9_655DJQuaE
Madison Hardware was located in New York City from 1909 to 1989. It was the premier Lionel Train dealer for decades.
A Lionel Train Collector, Richard P. Kughn was a real-estate developer from Dearborn, Michigan. He purchased Lionel Train Corp. in 1986 and moved the factory to Chesterfield, Michigan. He was Lionel’s (CEO) from 1986 to 1995. This video will tell the Madison Hardware story with rolling stock, road trucks and trailers.
Gary
Gary,
That's a real nice tribute video! Excellent!
p51 posted:I added barbed wire to the cornfield fence and gave it some random rust as well.
What did you use for your grass? It looks great

Just took this with my cell.
The backdrops are cut and hardware in place. I still have to paint, put ground foam on, and then install them.
David, I used several different color and texture types of ground foam, all from Woodland Scenics. Soon, I'll be hitting a lot of the layout with static grass, too.
Attachments
Images (1)
Lee wonderful looking outhouse, looks just like one I have been to a few times! I also think the cornfield and wire is great looking, just like the real thing!
Paul your table work is looking first class, I hope it all come together without a hitch!
And Gary thank you for the nice video, shows some real class!
mike g. posted:And Gary thank you for the nice video, shows some real class!
Agreed. Nice video, Gary.
Since my 19yo son is the ""Engineer" for the wedding cake diorama tomorrow, today he got to learn how to run everything. Then he got to do set-up in reverse- having to carefully wrap and pack each piece. Every item boxed for load-out to the venue in the morning.


Got the July issue of CTT today; some idiot named Marmel has a tip printed in it... ;-)
p51 posted:Got the two main grade crossings covered. Just need to weather them for the acceptable road wear from cars...
Lee,
It's been a while since I commented. You do exceptionally nice work! Very realistic! I should know you would place a Jeep in the photo. Very good. The upcoming Jeep rally will be in Butler, Pennsylvania soon.
For other's benefit, the Jeep was invented in Butler by the Bantam Car Company. They built about 2000 Jeeps for WWII. The bulk of the Jeeps were built by Ford and the famous Willys Overland. For the last few years thousands of Jeep owners from across the US and Canada bring Jeeps of all eras to Butler for a parade and other activities.
M. Mitchell Marmel posted:Got the July issue of CTT today; some idiot named Marmel has a tip printed in it... ;-)
I took a look Mitch! Not such an idiot as you may think! ![]() I love your humility, but willingness to share all the good ideas you come up with. I will take a look, as I do not know if I will be using tubular or other track for the childrens oriented part of my upcoming layout build.
I love your humility, but willingness to share all the good ideas you come up with. I will take a look, as I do not know if I will be using tubular or other track for the childrens oriented part of my upcoming layout build.
p51 posted:Got the two main grade crossings covered. Just need to weather them for the acceptable road wear from cars...
Lee
Layout coming together real nice. The weathered Bobed wire fence. Nice touch. The corn field as a whole has come out great. For the crossing you could lighten the color of the planks maybe a grayish brown color and Indian ink wash to give them that worn, been around awhile look. Perhaps use an eraser to rub in tire marks and slightly splinter the wood. The out house is a nice touch and necessary evil. Sure beats using an entrenching tool and of course the people in the house are saying about time. ![]() To bad about the back drop. Hopefully you could repurpose the sheet of Masonite
To bad about the back drop. Hopefully you could repurpose the sheet of Masonite
Nice work !! Coming together nicely. Mark-that is a Command Car, probably Dodge. I always liked our 3/4 ton trucks. Probably about Korean war vintage. The guys who used them said they were better than the jeeps.
M. Mitchell Marmel posted:Got the July issue of CTT today; some idiot named Marmel has a tip printed in it... ;-)
I saw that. I hear he has a real fetish for giraffes. ![]()
Parts arrived from Lionel this week.
Time to fix the Dreyfuss smoke unit. 
That charred bit is the sleeve that Mike R recommend removing in his Video on smoke unit upgrades. I can see why.

New smoke resistor installed.

New batting installed.

Test run. Wow so much better. Smoke even comes out of the cylinders. Which has never worked correctly.
Ether that or it's on fire!
Nick
Attachments
Images (4)
suzukovich posted:M. Mitchell Marmel posted:Got the July issue of CTT today; some idiot named Marmel has a tip printed in it... ;-)
I saw that. I hear he has a real fetish for giraffes.
It's true! ![]()
Paul,
The bench work battle is on. Got 2 of the modules done this weekend, just 8 more to build.


Attachments
Images (2)
jim pastorius posted:Nice work !! Coming together nicely. Mark-that is a Command Car, probably Dodge. I always liked our 3/4 ton trucks. Probably about Korean war vintage. The guys who used them said they were better than the jeeps.
Jim,
Thank you for correcting my error!
Nice going Bryan and it was not even raining. The tables look good. I got a bit bogged down but I did finish off table four. Table five is all put together and ready to go in place. I just have to get rid of the old farmer's shelving and paint the walls and that table goes in. Table six will go on the other side of the wall where the main tables are. That will be my stopping point. Thus will begin the track plan and placing of some of the buildings. Couple of pics.........Paul


Attachments
Images (2)
suzukovich postedPerhaps use an eraser to rub in tire marks and slightly splinter the wood.
The eraser suggestion worked well. I gave each crossing some alternating weather colors as well.
Looks far more correct now.

I also finished my backdrops but I must allow them to dry before installing. I did put a small corner one in place and will leave it there. The others are way too large to move around until the paint and glue is totally dry, so maybe I'll get them into place tomorrow night or so?
I also scattered a few figures around the layout in certain places and now I realize I will need a few more...

Attachments
Images (2)
Today I finished the Hart Parr tractor kit to power the mine headframe model's skip hoist. However, as previously noted, I am thinking I will put the tractor in the logging equipt. inventory, and use a boiler and some steam engine to power the hoist. Can't have these hard working prospectors turned miners falling down the shaft after finally striking it rich, so that is being pursued.
You got a jeep at the crossing now !! Looks really good. Nice work.
Great looking crossing. Like the tip for weathering it and using a pencil eraser. have to remember to do that on a couple on our club layout.
jim pastorius posted:You got a jeep at the crossing now !!
Yep, I have three Jeeps, the command car and a weapons carrier that I haven't gotten to making layout-worthy yet, but will soon...
Looking great Lee, Whats next?
mike g. posted:Looking great Lee, Whats next?
Backdrops. They're done but the paint and glue needs to dry.
Then, TREES. Lots of them.
And I have found that I have a lot less figures than I thought I had. I bought more stuff than I needed in almost every way except for glue for scenery and figures. I have bags of detail stuff for the layout itself and I'm looking for completing all that and finding places to put it all...
What I'd really like is if someone made WW2 soldiers in 1:43 scale, but I haven't found any. The 1/48 stuff just looks too darned small. More than anything, I'd love some 1:43 scale Germans (preferable Afrika Korps ones), so I could paint big "PW" letters on their backs so they could be POWs working the fields, which did happen in other areas of the south during the war.
I don't know if this is considered working on the layout but I had some time today so I decided to work on my latest bridge since i now have all the parts cutout and assembled. I only had time to do one side there are three in all, each side has about 300 screws.
sepearte parts that have been pressed together before screwing them to the main frame

I have to buy my screws in bulk

The fish plates at least i think thats what they are called use up a lot of screws and nuts

One section finished only two more and about six hundred more screws and i can tie them together with the cross trusses and roadbed. I had to look at this pic twice the engines are williams F7 A&B units and a lionel boxcar not HO. The Bridge is 105 inches long by 10 1/2 inches wide, The center of the arch is 26 inches from the roadbed. It is being built the same way that I built my 20 and 30 inch bridges.

This is the 30 inch bridge with a williams PB resting in the middle
Attachments
Images (5)
Wow.
Just...wow.
Mitch
Old Toy Maker, those bridges are fantastic. What are they made of? What method are you using to cut out the pieces? I'm sure I am not the only one who wants to see how you make them.
Old Toymaker,
The new bridge is massive, to say the least! That will be quite a span on the layout. Both it and the existing ones look great!
First thanks for the nice comments, I have been a machinist/tool and die maker for the last 40 yrs and I have always loved making things with metal. That said most of the material is scrap aluminum, and I have several friends that own there own shops. Since I write programs for CNC machines I have worked out a few deals, I write a few programs for there machines and they let me have time on a waterjet to cut out the pcs. I did pay someone to cut some out with a laser for a 20 inch bridge, Using 1/16 scrap aluminum for the girders and 1/4 inch for the main beams the cost was about $150.00. All the holes are drilled and taped by hand. The girders or trusses are 3 pcs pressed together and the bridge is assembled with 4-40 screws, the bridges are actual working bridges that is the trusses and girders are actually holding up the roadbed which is made from 1/8 inch aluminum.
pcs for a bridge ready for assembly

one assembled side

top girders keep the top sides together

bottom trusses support the road bed


The finished bridge

I was not to concerned with how much the smaller bridge could hold but the larger ones did concern me. my 30 inch and 45 inch have been tested with 75lbs and held up great the large bridge is going to be tested with 100lbs.
I have all the drawings of the bridges and all the components if anyone would like them. However unless you know someone with either a laser capable of cutting 1/16 inch metal or a waterjet it could get very expensive. The 45 inch bridge took 6 1/2 hours to cut all the components out.
Thanks for looking
Gary
Attachments
Images (6)
That is super interesting. It's like you are fabricating the real thing only smaller.
Not so much what I did, but what I'm going to do. I'm going to add a 4x6 or maybe 4x5 extension where the train yard is that is currently 4x5 and at the end of that I'm going to add a 'T' section to accommodate 048 and 060 side by side half circle. Currently the half circle is 036. I'm eventually going to redo the entire layout, but for now I'm adding the extension and putting the 060 half circle there and expanding the train yard.


Attachments
Images (2)
Today I didn't get started till late afternoon. Had to get grass cut. If only the city would let me have some cows they could graze and keep the grass down and give me more time to work on the layout and keep ahead of Bryan table building LOL. But even with a short day I was able to get the old shelve out and the wall painted. So tomorrow I can fit the next table in. Couple of pics...................Paul


Attachments
Images (2)
old_toymaker posted:I was not to concerned with how much the smaller bridge could hold but the larger ones did concern me. my 30 inch and 45 inch have been tested with 75lbs and held up great the large bridge is going to be tested with 100lbs.
I have zero problem believing you there.
Really good work!
After building a kit Hart Parr tractor to power the shaft hoist for a mine head kit I finished, I questioned its practicality, so, today, tracked down a model of a Case steam tractor. I have started a partially enclosed shelter for the Case so it can power the hoist cable. Will string the cable with skip when I get the Case in place in the finished shelter.


Lee, What a big change in a relatively short period of time. It's looking good. ![]()
P51-coming together nicely !!
Pat Kn posted:Lee, What a big change in a relatively short period of time. It's looking good.
Thanks!
Hard to believe it was still just wood and some pink foam shapes exactly one month ago...
Argued repeatedly with a suddenly ornery pre-war Marx CV ![]() .
.
Slow too slow![]() followed by sudden bursts of track jumping speed
followed by sudden bursts of track jumping speed ![]() .
.
Throttle back in time, and it stops after a lap or two. ![]()
Finally, I called out it's older brother to show him how it's done ![]()
We'll have another little talk again later ![]()
Adriatic,
Sounds like you are training puppies! lol
Today after running to the Home Depot for more screws and patching stuff for the basement walls. I went back to work. Going to finish painting the wall in that corner but wanted to patch some small holes in the blocks. While that was drying I needed to make the opening for the table a bit wider so it would fit. While doing that I found out the basement floor is higher in that corner then what I had been working with. I had to cut down the two back legs so I will be able to level the table. I also decided to paint the table frame and legs while it was up on the saw horses. Trying to get ahead of the game. So while that is drying I am going to put a second coat of drylok on the wall and then I can set the table in place. Couple of pics....................Paul


Attachments
Images (2)
Mark Boyce posted:Adriatic,
Sounds like you are training puppies! lol
Some of that too, but them training me today ![]() . Bruno the train watching petbull, was confused about the testing happening on the little 0-19 table that I had moved into my room just prior to this. After posting, I found him in the living room on his train watching stool, ears back, and chin resting on the big layout, he let out one big whine.
. Bruno the train watching petbull, was confused about the testing happening on the little 0-19 table that I had moved into my room just prior to this. After posting, I found him in the living room on his train watching stool, ears back, and chin resting on the big layout, he let out one big whine.![]() So I ran the Marx El Capitan and a General for him since his chin was on the GG-1s track
So I ran the Marx El Capitan and a General for him since his chin was on the GG-1s track ![]()
Him and a 5-stripe, that's a lot of nose whiskers on one track ![]()
Lee, Looking good, what kind of tree's are you going to be putting in?
I got the fifth table into the opening. Once I did I found I took the right amount off the back legs but I had to make up some blocks for under the legs. Waiting for that paint to dry. In the meantime I measured for table six. That will be another odd ball. 16 inches wide where it will join with table 4/5 run 5 feet along the wall widening out to 24 inches. And found I am one 1x4x8 short. So in the morning a quick run to the Depot to get one. Of note I could not run the table all the way into the corner because I have a conduit pipe that carries the power out to the garage there. Pics of the table...................Paul


Attachments
Images (2)
Paul,
So I'm not the only one who is always short one something or other. It is looking good!
For the last few days focus shifted from model railroading to playing with blocks. Here the staging yard lead in disappears into a tunnel and a roadway crosses over the mainline and reverse loop. A few well placed cuts in the WS portal made it fit. A very poor home made latex mold is providing the other dressed stone, cast from Hydrocal.

my eyesight ain't what it used to be and the camera helps me pick out mistakes, like the tilted stack of blocks seen here. I've since gone back and corrected it.

Bruce
mike g. posted:Lee, Looking good, what kind of tree's are you going to be putting in?
I have a large box of scenice express super trees. Going to experiment with lighter foliage colors to contrast with the backdrops.
mike g. posted:
Lee, Looking good, what kind of tree's are you going to be putting in?
Mike I have been using Sedum's cut and dried and then using elmers spray adhesive I sprinkle on scenic express flock and turf. It comes in all different colors. I have attached several together to make larger and more realistic, as much as i can, looking trees. Its quick and fairly cheap and you can make up a large amount in a very short time
These are some in varing shades of green

These were done trying to get some fall colors

I'm still experimenting with them combining lichen dosen't look too awful i don't think.
Attachments
Images (2)


1. Tunnel work.

2. Track clean up after working on tunnel.

3. Get a bag of Hydrocal from the store room.

4. Clean up the main staging yard.

5. Organize the waybills for the next operating session.

6. Changing the Marquee for the June Open House
Gary
Attachments
Images (7)


Adriatic posted:Him and a 5-stripe, that's a lot of nose whiskers on one track
Haw! He and Norma Bates Kitteh should get along fine. being fellow railfans... ![]()
While I am waiting for a steam tractor model to float in, and other mining details, I began a Western Scale Models portable three stamp ore mill to support this mining headframe. The prototype weighed 2 1/4 tons, so the term "portable" seems a misnomer, but I guess mules or oxen could move it.
Last Saturday was Train Day at the Fort Smith Trolley Museum, and, of course, the Razorback Traction Co. was there with bells (and gi-raffes) on...


More pics below! ![]()
Mitch
Attachments
Images (11)


brwebster posted:
"my eyesight ain't what it used to be and the camera helps me pick out mistakes,"
Bruce
Your not alone. I used to pride myself on being able to see fine detail, even as little as six years ago. I'm happy to focus at any distance today. I think cataracts are forming if genetics are any indication. The ever unforgiving use of a camera helps.
M. Mitchell Marmel posted:Adriatic posted:Him and a 5-stripe, that's a lot of nose whiskers on one trackHaw! He and Norma Bates Kitteh should get along fine. being fellow railfans...
He stopped paying any mind to the neighbors cats after the first real hiss ![]()
Unless your a visiting male dog with dominance on your mind, you likely haven't a worry. Very social, loves, and listens to any human "insisting", especially when away from home. Real English terrier blood, not a Detroit street bred mutt, hence a "petbull". The female Mastiff and "Puppy"(huge now) aren't smart enough to be cautious over curious, Norma may have to pull a Freddy Kruger on a muzzle first ![]() .
.
Ok... disciplinary talks didn't work on the finicky Marx Commador. I searched and played and tested and tweaked with little difference. I did finally notice the armature was hanging in one position only. I tightened the tabs on the loose plate, and re-cleaned the gaps. Better, but still hung up. Pressing on a brush with a toothpick it took off. Replaced it, spring was fine, but to no avail, it stopped again before a single lap. All signs pointed to a bad armature winding. Taking a cue from "cold solder joints" from circuit board repairs of my past, I decided to quickly heat the spot where each wire to armature plate solder connection was made, and reassemble it one last time before declaring "lost cause" and simply buying a new motor. I already majorly chipped the paint, and knocked the stainless roof loose again when I failed to fully catch a speedy rollover (it's the CV to a Crusader bash no huge loss just a cheap blue rattle can job I'll touch up when I'm felling it, and a dab of fresh JB Weld for the roof is done already)
Best for last, it now runs great again. An hour, and a half at a crawl that would make a few can motors jealous ![]()
M. Mitchell Marmel posted:Last Saturday was Train Day at the Fort Smith Trolley Museum, and, of course, the Razorback Traction Co. was there with bells (and gi-raffes) on...
More pics below!
Mitch
Mitch;
Is that a gi-raffe or a very rare long-necked zebra???
Looks like the kids share you love of "unusual" rolling stock!!!
Apples55 posted:Mitch;
Is that a gi-raffe or a very rare long-necked zebra???
Looks like the kids share you love of "unusual" rolling stock!!!
It's a gi-raffe cosplaying a zebra in honor of my working for Zebra Technologies, Inc. ![]()
And yes, they do! ![]()
Mitch
Today I uploaded a video of my 736 Berkshire that I filmed over the weekend to YouTube. Here it is. Hope you enjoy.
I feel that the description is important, so I copy/pasted it here. It is also on the YouTube page, of course:
This is my 736 Berkshire pulling SCALE freight cars on the FH&J RR mainline. It pulls the prototypically sized cars with ease and looks just as good doing so as any scale, LEGACY equipped locomotive does. The whistle is recorded in post-production, as the postwar tender needs to be rewired.
Now that I'm back home in the states, I ran trains for 10 minutes. Thats all the time I had ... and enjoyed every minute of it too![]()
trumptrain posted:Now that I'm back home in the states, I ran trains for 10 minutes. Thats all the time I had ... and enjoyed every minute of it too
Welcome back to railroading and reality as it exists here.
Randy Harrison posted:trumptrain posted:Now that I'm back home in the states, I ran trains for 10 minutes. Thats all the time I had ... and enjoyed every minute of it too
Welcome back to railroading and reality as it exists here.
Thanks Randy! Its always great to come home to Patsburg!![]()
![]()
![]()
Harry,
Thats a great engine and train!
More work on the Clarksville station. I turned the previous owner's Chic Sale wiring:

Into my own Chic Sale wiring:

The Lionel contacts are for supplying power to the whistle and light. The original K-Line contacts have been repurposed to control the whistle.

Monkees posters (printed on self-stick labels and cut out) added, and the station put in place:


These last two pics have been heartily approved of by the listeners of Zilch! (the leading Monkees podcast)...
Remember, keep Monkee-ing around!
Mitch
(also below: Monkeemobile behind-the-scenes pics!)
Attachments
Images (10)


Mitch,
hey, hey, we're the Monkees!
Looking good!
They're not the best shots, but I have been placing figures on the layout. Here's a few that I placed, including some bench seats I made for the depot:

What would Eastern TN be without a bunch of hillbillies?

I also placed the backdrops in on Monday night, then 2 hours later was hit by a kidney stone. Just confirmed with my doctor a couple of hours ago after he read my x=rays from this morning that I apparently did pass it. They had to put me on Oxycodone (as Vicodin did nothing to help), which I immediately got off of once the main pain was past, as I know the dangers of addiction as much as any of you, I don't think I'm prone to addiction and hate being 'high'.
Don't wanna regress to 'old man griping about his ailments' mode as I'm only in my 40s, but needless to say it stopped work on the layout and everything else for a few days.
I completed the initial build of a WW2 Quonset hut, which I need to work on the windows, then paint. No idea where I'll place it but my plan is to light the inside and put some 1/48 scale GIs in it where they won't be so obviously out of scale.
Attachments
Images (2)
Looks Great Lee, ya'll just have to love the hillbillies! Your in Wa. Correct?
mike g. posted:Looks Great Lee, ya'll just have to love the hillbillies! Your in Wa. Correct?
Yep, but my parents were born and raised in mountain country in Northeast Tennessee. Growing up, we'd go visit family there every year.
p51 posted:mike g. posted:Looks Great Lee, ya'll just have to love the hillbillies! Your in Wa. Correct?
Yep, but my parents were born and raised in mountain country in Northeast Tennessee. Growing up, we'd go visit family there every year.
Would like to come see your layout sometime!
I wasn't able to work on the layout till after dinner. Wife and I had a lot of running around to do. I got table five leveled and bolted to table four. I got the frame done for table six and the plywood cut for the top of it. Still have to cut Masonite for the backdrop but that should not take too long. Couple of pics of the work completed tonight....Paul


Attachments
Images (3)

WP posted:Today and the last couple of days I've started building and trying out ideas for our logging operation area of the layout and adding some trees. I still have a way to go.
Hi WP, Do you have any particular circa in mind for the logging site or are you doing this from memory, if I may ask.
FrankM.
Moonson posted:WP posted:Today and the last couple of days I've started building and trying out ideas for our logging operation area of the layout and adding some trees. I still have a way to go.
Hi WP, Do you have any particular circa in mind for the logging site or are you doing this from memory, if I may ask.
FrankM.
Hi Frank: I am more or less free styling this to 30's to 40's. My inspiration (although I am not copying the real source because not enough space) is the Pickering Lumber Corp. Thanks,
John
WP posted:Moonson posted:WP posted:Today and the last couple of days I've started building and trying out ideas for our logging operation area of the layout and adding some trees. I still have a way to go.
Hi WP, Do you have any particular circa in mind for the logging site or are you doing this from memory, if I may ask.
FrankM.
Hi Frank: I am more or less free styling this to 30's to 40's. My inspiration (although I am not copying the real source because not enough space) is the Pickering Lumber Corp. Thanks,
John
Hi John, I asked because this city-boy from metropolitan Pittsburgh, who moved to NYC years ago, found himself very, very enthusiastic about modeling (what-the-heck did I know about logging?!) after seeing a modest operation in-progress while visiting Upstate NY. Subsequently, I crafted numerous logging scenes, after conferring with folks at a John Deere dealership on Rt.11, near Cortland, NY. I purchased logging machinery models from them, and once I had finished my first several scenes, I took them back to the dealership for their inspection. Allowing for some compacting due to practical space limits, they pronounced my work very realistic and accurate.
Also, after some research, I custom-modeled an 1890's logging site for a client, and he was pleased. It was great fun learning about such things as horses, oxen, and mules being involved, not to mention such special features as "steam-donkeys" and "skid-roads" and laborers' temporary cabins.
I have no idea what features would be included in the era you intend, but I offer these shots for you because they demonstrate what I found successful, and what machinery is available as models/toys for contemporary logging scenes. I hope this helps, or at least, interests you and, perhaps, others.
I have several more shots of my work...


 if you care to see them.
Attachments
Images (7)

Got the rest of my wood delivered for the benchwork. You better hurry up Paul because I plan on having this thing framed by June 1.
![DSC_0840[1]](https://ogrforum.ogaugerr.com/fileSendAction/fcType/0/fcOid/12129987997660671/filePointer/57883406199554510/fodoid/57883406199554506/imageType/LARGE/inlineImage/true/DSC_0840%255B1%255D.JPG "DSC_0840[1]")
Attachments
Images (1)
![DSC_0840[1]](https://ogrforum.ogaugerr.com/fileSendAction/fcType/0/fcOid/12129987997660671/filePointer/57883406199554510/fodoid/57883406199554506/imageType/LARGE/inlineImage/true/DSC_0840%5B1%5D.JPG "DSC_0840[1]")
Bryan in Ohio posted:Got the rest of my wood delivered for the benchwork. You better hurry up Paul because I plan on having this thing framed by June 1.
Looks pretty straight ...You must have shopped at Carter Lumber.
Bryan vs Paul! The race is on!
Great work gents!
Well Bryan that is a nice pile of 2x4's. Too nice. Unless you got them at Carter Lumber like Dobermann said. I think you photo shopped a O gauge pile of wood placing it behind the couch. So the date of June 1st was thrown out to rattle me. But I am steadfast and have got table six just about done. Looks like this weekend I may be laying track. This is making me feel like the chariot race in Ben Hur only it is with tables LOL..................Paul
Add Reply
Sign In To Reply
