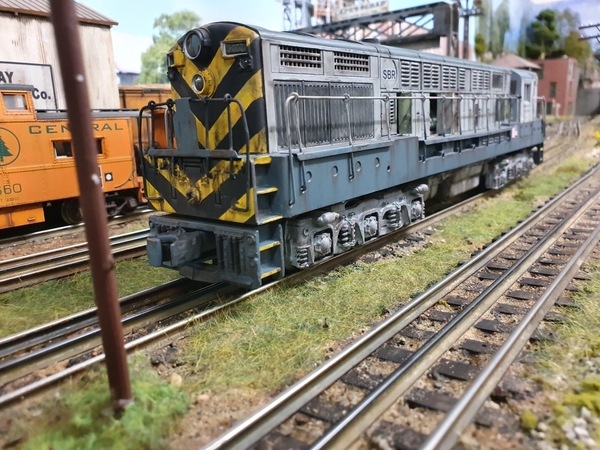
The 238E looks great!
Got a Williams Amtrak GP in Phase One livery on Consignment at Papa Bens on Bellaire Blvd in West Univetsity in the Houston area yesterday. Also had 3 Railking Amtrak ROW cars in orange. Store package them to survive a METRO bus trip back to the nortvside of town. No damage. Thanks.
Now back to thread theme. Took the engine and three cars, and did my off the self setup and upgrades. Lube/oil items. Then I had some Mode drop in BA9 one can purchase at Ace Electronics on Antione near 34TH. Next is to get some figures and accents one would find with such a train, like welding tanks, crates, et. al.
Trains and ham radio have been on the back burner due to sick relative. That situation has changed, and getting steam up to get trains and radios nack to operation.
Some Mexican friends came over with some of their friends. Everyone was fascinated by my Christmas train lay-out. And then we went out for ice cream. Two scoops apiece for 5 people =$6 US.
RSJB18 posted:Lot's of great stuff going on. Chris- the coaling tower looks great. Johan- nice work on the trailers. Brian- You've got a special gal there. CGW Patrick- the signals look nice.
I took another look at the motor for my M-10000. I couldn't get it to run the other day. I'm guessing the gears were a bit out of sync so I gave it a shot of power at 18V and it sprung to life! Just need to clean up the track and put it all together now.
Bob. Thank you. That M10000 is a really something what i like a own some day. I think i can buy a MTH Premier -version some day. 🤝 Johan


have a great weekend everyone 
Attachments
Chris a, did a nice job on the coaling tower.
Johan, I missed seeing them the first time but that is a nioce string of State of Maine box cars.
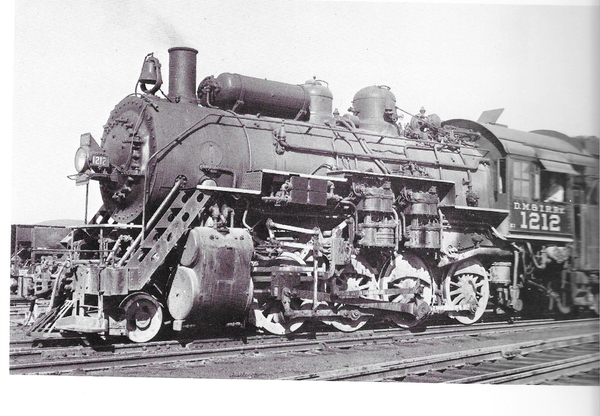
Gandydancer, nioce restoration on the 238E.
Today with the paint dry I glued the stairs to the loading dock. once dried I'll place the building against the backdrop. Tomorrow I'll run to Menards to get more PVC pipe to make more silos. Now I think I'll head to the attic to relax and run some trains for awhile. Pics Paul 2
Attachments
Attachments
PSU1980,
I used 110 trestles on Warrenville but cut the elevation rise in half by doubling up (instead of one different size at each track joint, I used two of the same size at each adjacent joint).
briansilvermustang posted:
have a great weekend everyone
As far as a pretty train, the orginal streamlined MKT/SL-SF is vastly underrated. To run it is doing something to the layout.
Got the Ogle Coaling tower back on the layout... Have to admit threading chain and making and closing rings made me feel like I was 100 years old !!!! Thank goodness for reading glasses, magnifiers, dental pick tools, unfortunately none of those things improve "steadiness"... LOL
Here are some photos, so that I don't take up a "whole page", only 1/2 the photos are in the post, the remainder are attached below... Yeah I know I took a lot of photos, after spending this many hours like a dog with a bone, I figured plenty of photos was my consolation prize.
Johan, I really like the details under the "hood" and covers of the FM Trainmaster, very cool !
Paul, looks like we're cutting up and assembling the same stairwell and railing parts... Plastruct ?
Attachments
Chris, it was well worth the effort! Yes, steadiness seems to have left me too! To think, I used to scratch build structures in N scale at one time boggles my mind! The Ogle coal tower is a highlight of your wonderful layout!
Wonderful work everyone!
Chris class act! The coaling tower looks amazing!
I got a little time in the train room today and added some power contacts for power on when the bridge is down and off to the open approach. Needless to say I have a new problem, when the engine hits the joint from the old power to the new power section the engine stops and starts up.
I am just scratching my head! I will try again tomorrow.
Mark, thanks very much. Yes at one point during this layout build I gave some thought to HO when I realized how much space it would take to build a layout like this. The few times I contemplated a "switch" to smaller gauge, I was always too sentimental to sell off my 3 rail trains that were given to me as gifts, and got me started back in the 60's... Now there's new aging issues that will ensure I don't ever go "smaller".
Fortunately I still have a pretty stable hand when painting details with brushes, we'll see how long that lasts....
Anyway, I should really have very little to whine about, I am enjoying a hobby I have been involved with since I was about 7 years old, it's incredibly rewarding and keeps me active in a pretty diverse set of activities.
Mike G: Glad to see your post, I was thinking about you over the Christmas holiday ! Hope the roof rafter project got done ????
This summer I purchase an MTH NYC 2-8-0 consolidation off the bay with the plan of assigning it to the DM&IRR. I had an extra set of DM&IR steam decals that needed a home. The DM&IRR had several consolidations during the steam era. This year, the Duluth and Northeastern (predecessor of the DM&IRR) consolidation #28 has been recently restored and lettered as DM&IR #332. It is currently pulling excursions between Duluth and Two Harbors, MN and has provided some inspiration for my project.
I am not a rivet counter but I could not live with the original pilot configuration of the MTH NYC 2-8-0. I am going to retain the original NYC number #1121 as the lighted number boards up front and on the tender backup light are a nice feature. But the pilot had to go!
I was pleased to discover that much of the pilot prow was constructed of brass. This meant I had a nice contact for soldering the new replacement. So this week I took the plunge and starting cutting away the old pilot prow in preparation for the design and construction of a new cow catcher. I used some scrap copper and 3/64 brass rod that I had to forge and reshape. I flattened the brass rod to some degree and hammered out end tabs. I constructed a wood frame to support the components during solder construction. I still need to solder the new cow catcher and footboards to the pilot before primer and finish coat. So far I am pleased with the fit. I may also need to redo the footboards on the tender. After that, I will remove the old NYC markings and add the appropriate decals.
Always fun to follow the Forum posts as see what everyone is doing.
Happy New Year to all!
Cheers, Dave
Attachments
Chris , just 2 rooms done about 30 more trusses to go!
Dave, sure is some nice brass work! Keep us posted!
Nice work Dave!
I haven’t done much. Knee replacement PT is going well, but Christmas activities took precedence
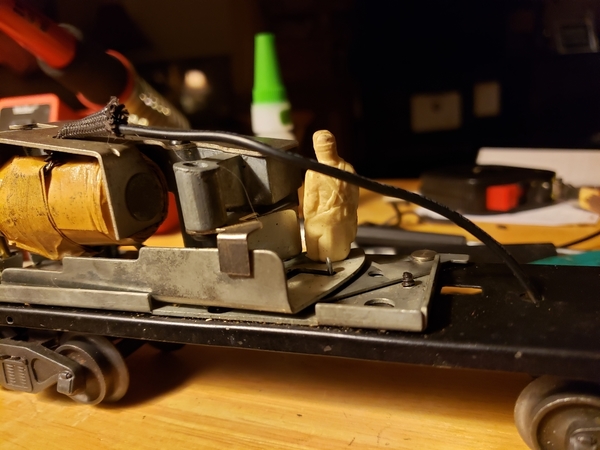
All right. This took two days. I rewired a 3472 milk can launcher. A coupler broke after a fall of 120 scale feet. I noticed the wiring was at the point of being dangerous. I gathered up all the needed parts and wiring. I put together another sliding shoe truck first. Next up was all new wires. Finally it was time to test. ![]()

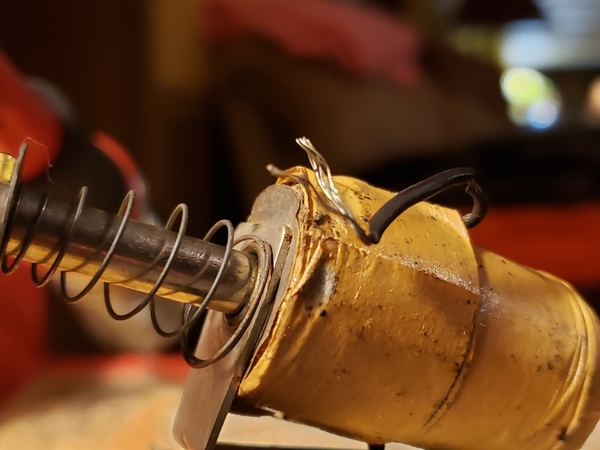
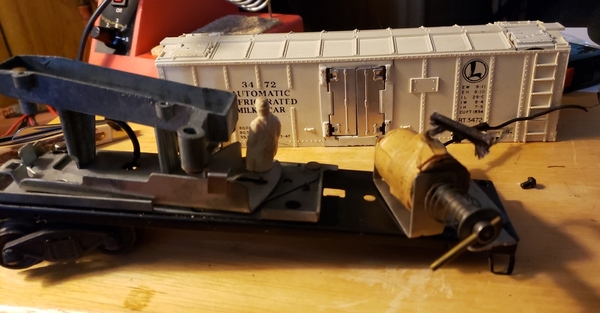
Attachments
Sorry about the repeats
chris a posted:Got the Ogle Coaling tower back on the layout... Have to admit threading chain and making and closing rings made me feel like I was 100 years old !!!! Thank goodness for reading glasses, magnifiers, dental pick tools, unfortunately none of those things improve "steadiness"... LOL
Here are some photos, so that I don't take up a "whole page", only 1/2 the photos are in the post, the remainder are attached below... Yeah I know I took a lot of photos, after spending this many hours like a dog with a bone, I figured plenty of photos was my consolation prize.
Johan, I really like the details under the "hood" and covers of the FM Trainmaster, very cool !
Paul, looks like we're cutting up and assembling the same stairwell and railing parts... Plastruct ?
Chris. Fantastic work, really. Hope you can post some new videos where we can see that beautiful tower. I like also that wall, behind the tower. 🤝
Johan
Chris- beautiful work. I like this shot through the TT bridge the best. Bob
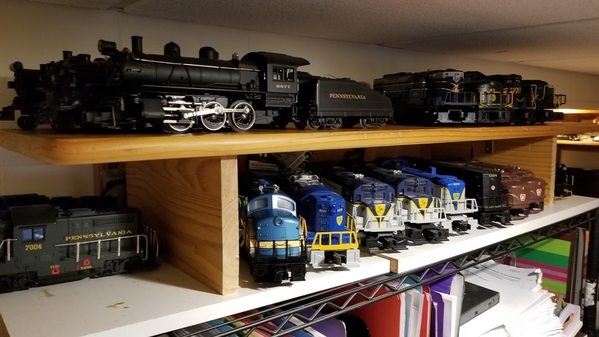
While technically not "on the layout", I consider any train time, layout time, so I put a shelf together yesterday from some scrap shelving I had laying around so I could display more engines. Since I'm not going to stop buying engines any time soon, more shelves were the only solution. The CEO doesn't want more shelves on the walls so I get creative. ![]()
The wood is from an old pine TV stand that our neighbors were throwing out many years ago. We did use it for a TV stand for a while when my kids were little but I took it apart and kept the wood when it was no longer needed. I'll take free 3/4" clear pine any day of the week.
Attachments
RSJB18 posted:While technically not "on the layout", I consider any train time, layout time, so I put a shelf together yesterday from some scrap shelving I had laying around so I could display more engines. Since I'm not going to stop buying engines any time soon, more shelves were the only solution. The CEO doesn't want more shelves on the walls so I get creative.
The wood is from an old pine TV stand that our neighbors were throwing out many years ago. We did use it for a TV stand for a while when my kids were little but I took it apart and kept the wood when it was no longer needed. I'll take free 3/4" clear pine any day of the week.
Nice collection of engines and I totally understand working around the watchful eye of the CEO. I try to repurpose when possible as well.
Fendermain
chris a posted:Got the Ogle Coaling tower back on the layout... Have to admit threading chain and making and closing rings made me feel like I was 100 years old !!!! Thank goodness for reading glasses, magnifiers, dental pick tools, unfortunately none of those things improve "steadiness"... LOL
Here are some photos, so that I don't take up a "whole page", only 1/2 the photos are in the post, the remainder are attached below... Yeah I know I took a lot of photos, after spending this many hours like a dog with a bone, I figured plenty of photos was my consolation prize.
Johan, I really like the details under the "hood" and covers of the FM Trainmaster, very cool !
Paul, looks like we're cutting up and assembling the same stairwell and railing parts... Plastruct ?
Hey Chris,
Really nice work with the tower. It really looks like this was the perfect fit for your layout. Pat yourself on the back for all of the work with those chains. I know it was tedious to say the least. It looks like the results were well worth the time and effort. Unfortunately in this hobby most of the most gratifying results come from this type of effort. Thanks for posting.
Dave
Installed 400+ wood ties under the tubular track. Screen molding stained with black rit dye. I think I will forego ballast for now as it is a tinplate layout. Very difficult install at rear with scenery in place. Should have done this 25 yrs ago during the build. Experimented with 2 or 3 between metal ties. Two won.

 .
.
Fendermain
Attachments
 Enclosed is a picture of the "Lexington Park and Savannah" named for 2 places we lived but really so I could nick name it the "long and skinny" as you see its but 34" wide and 17 ft long to accomodate the space between the display shelves. By the way, these shelves are "repurposed" as well, my wife bought them out of a drug store in Dayton, Oh when we lived there that was redecorating. They were dirt cheap (basically free if we hauled them away) because they are really too slim for books, but they were built that way to accommodate the pill bottles. Hence re-purposed for my trains.
Great fun, I am in the process of adding details to my layout and building "mini-scenes" especially adding people.
Happy Holidays, Don
Attachments
Dave (LUVINDEMTRAINS): I have you to thank for this "perfect addition" to my layout, thanks also for the positive feedback. Yes, pleasure out seems to be directly proportional to effort put in !
So the weather is so mild and sunny here south of Boston, I decided it was probably one of the last days I could actually dullcoat and spray paint out in the sunlight !
I got one of my BAR State of Maine Boxcars very lightly weathered and faded with Pan Pastels and am about to do the other... With a build date of 1954, these would barely be "one year old" for the time period I am modeling, so I just want them to look barely run over the road, but not right out of the paint shop. The difference between done, and not done, is more noticeable to the human eye than the digital camera, but c'est la vie !
Bob, thanks for the comment on the photo "through the turntable bridge", I don't bring the camera and tripod back there very often, but as I was heading out "under the duck under" I decided to take that photo. Now I have some engine service track to change/modify. Since installing the coaling tower, I have decided to reverse the arrival track with the coal, sand service track... Eventually, I will add a "coal dump" house to the back of the new tower, just not now !
Attachments
Fendermain posted:Installed 400+ wood ties under the tubular track. Screen molding stained with black rit dye. I think I will forego ballast for now as it is a tinplate layout. Very difficult install at rear with scenery in place. Should have done this 25 yrs ago during the build. Experimented with 2 or 3 between metal ties. Two won.
.
Fendermain
Fendermain,
I did the same on Warrenville, except about 2,400 ties were used along with kitty litter ballast. About half was retrofitted, the rest as expansions occurred. Toughest retrofit was replacing all O27 curves with O42, O54 and O72 - talk about disrupting a layout!
I find that some of my accessories, particularly the operating fork lift and ice loader, mysteriously either don't work correctly and need tuning, or stop working all together.
For instance, recently the fork lift would not hold on to the pieces of wood to pick them up. This was a puzzle for over one month. Finally, I noticed the spring in the fork lift was slightly out of place (needed to be repositioned to catch on to a little notch), and that completely solved the problem.
Yesterday, preparing for relatives to see the layout, my ice loader completely stopped working while testing it before guests arrived. This morning, after trying various things, I discovered that the wires that connect to the controller had become disconnected. This was a very easy and quick fix.
Repairs like these, when successfully done, can be gratifying. Arnold
Lionelski posted:Fendermain posted:Installed 400+ wood ties under the tubular track. Screen molding stained with black rit dye. I think I will forego ballast for now as it is a tinplate layout. Very difficult install at rear with scenery in place. Should have done this 25 yrs ago during the build. Experimented with 2 or 3 between metal ties. Two won.
.
Fendermain
Fendermain,
I did the same on Warrenville, except about 2,400 ties were used along with kitty litter ballast. About half was retrofitted, the rest as expansions occurred. Toughest retrofit was replacing all O27 curves with O42, O54 and O72 - talk about disrupting a layout!
I checked out Warrenville. Quite impressive sir! Quite impressive! Yea, curve retrofit would not be fun.
Fendermain
Have installed Legacy system even though no engines yet, but programming all my TMCC engines and setting lashups and trying to find an unobtrusive home for the base and TMCC unit. Then everything off the tracks for a good cleaning, I have a track cleaning car but like to use 91% isopropyl alcohol to wipe the oil residue off as well as the wheels.
With TMCC I could address TR1 and TR2 as tracks but haven't found a way to do that in Legacy. So no fun today.
Thanks for the kind comment Fendermain
Attachments
chris a posted:Dave (LUVINDEMTRAINS): I have you to thank for this "perfect addition" to my layout, thanks also for the positive feedback. Yes, pleasure out seems to be directly proportional to effort put in !
So the weather is so mild and sunny here south of Boston, I decided it was probably one of the last days I could actually dullcoat and spray paint out in the sunlight !
I got one of my BAR State of Maine Boxcars very lightly weathered and faded with Pan Pastels and am about to do the other... With a build date of 1954, these would barely be "one year old" for the time period I am modeling, so I just want them to look barely run over the road, but not right out of the paint shop. The difference between done, and not done, is more noticeable to the human eye than the digital camera, but c'est la vie !
Bob, thanks for the comment on the photo "through the turntable bridge", I don't bring the camera and tripod back there very often, but as I was heading out "under the duck under" I decided to take that photo. Now I have some engine service track to change/modify. Since installing the coaling tower, I have decided to reverse the arrival track with the coal, sand service track... Eventually, I will add a "coal dump" house to the back of the new tower, just not now !
Chris. Really nice looking BAR -cars. The best looking box car ever. 👍
Johan
Johan, What a great scene, simple but so full of realistic details and weathering.. I love the old wooden crossbuck , seeing the light coming through the vertical boards in the shed building.... and backdrop that just draws you in. Yes I agree I have always thought these were some of the best looking boxcar paint schemes.
Ray, (SIDEHACK), not sure you will have the same issue(s), but I installed GRJ's TMCC signal booster on my layout with both Legacy and TMCC base units, and ran into some "issues" that seem to happen to some users of both systems. The fixes below worked well for me.
1. Had to plug my Legacy base directly into the duplex by itself, not through the rather expensive surge protecting power strip I purchased to plug everything else into, including the TMCC base unit.
2. Had to move my TMCC base unit down near the floor, I did have it on a shelf under the table top next to the Legacy base unit, looked great but had communication issues. The symptom was flashing red signal light on the TMCC flashing.... Wrote to Gunrunnerjohn, and he explained that I needed some physical separation between the base units.
Anyway, you may not experience any issues, but if you do, hopefully these hints will help.
Hi guys, I know its been awhile from my last post on here about my layout. But I did get out to the layout this morning after having a nice talk on the phone with Chris A. He gave me some great advice on a problem I was having that some of you may have read about.
Anyways I broke up my track sections near my lift bridge do to the fact I had a runaway train last week and it ran into the back of my Amtrak train. The good thing is there was no damage to either train. But anyways the problem I was having was my engine would come to a switch and stop then start up, I could not move it again till I shut off the power and turn it back on again. It was acting like it was missing the watchdog signal.
Well come to find out the little section right before the frog for the center rail was not getting any power. Makes since do to the fact if the train was going fast it would roll right over it! I soldered the little center rail to the frog that had power and problem fixed.
I took every engine I had and ran it over that area and no problem. Here are a couple pictures of my new sidings in there new locations!
Chris A. Thanks again you truly ROCK!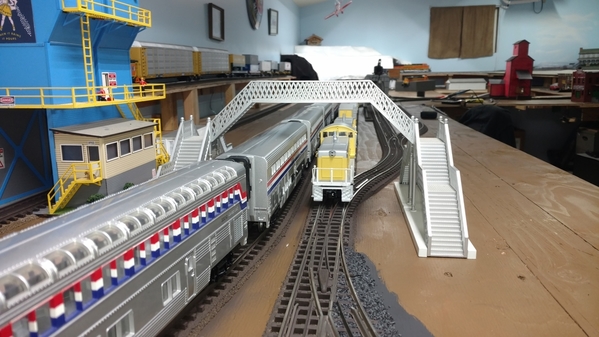

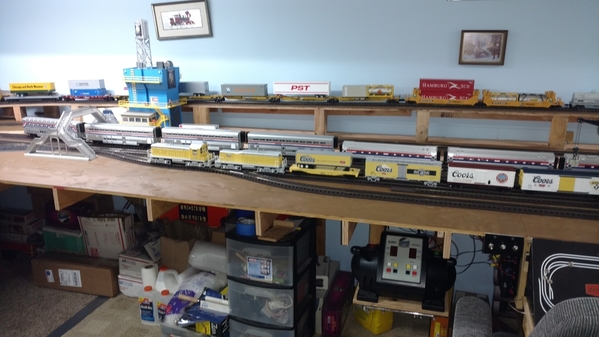

I hope you all have a great weekend and Go SEAHAWKS!
P.S. Great work on the Maine cars Chris!
Johan wonderful scene as usual!
You all are doing great work and I just love seeing what your all doing! Please keep up the great work!
Attachments
RSJB18 posted:While technically not "on the layout", I consider any train time, layout time, so I put a shelf together yesterday from some scrap shelving I had laying around so I could display more engines. Since I'm not going to stop buying engines any time soon, more shelves were the only solution. The CEO doesn't want more shelves on the walls so I get creative.
The wood is from an old pine TV stand that our neighbors were throwing out many years ago. We did use it for a TV stand for a while when my kids were little but I took it apart and kept the wood when it was no longer needed. I'll take free 3/4" clear pine any day of the week.
Bob, Great looking shelf's! But more important what a great selection of engines! Don't stop buying as the CEO will always forgive you! LOL
It looks like a BAR day! Nce work Bob and Johan.
Also, the shelves look great, Bob and Don.
Mike, I see a lot of silver there in those photographs! Very sharp looking! I'm glad you got back to it on the layout a bit.
I had planned to post photographs of my adaptation to the upper level of my under construction layout into a Christmas diorama. I didn't get the simple project done until the day after Christmas. I still haven't fanangled my way under the shelves to get the Polar Express out. (Recovery from Knee replacement is going very well, but it takes time.) So I substituted a Western Maryland engine and a couple of cars that were at easy reach. Surprise. ![]()
Now the bad part. I bought my wife a storage device for her zillions of photographs for Christmas. I tested it out before Christmas by copying the 47 photographs on my phone to it. It worked like a champ. However, now that I took a few photographs to the layout, I can't attach the ones I just took because the program thinks they are on 'the cloud'. It must be something with the goofy app, and I haven't had time to dig in with Christmas visiting including 3 trips to the nursing homes. Conclusion is, I will probably be posting the Christmas photographs in July! ![]()
![]()
Lew, I know; none of the above ever happened!!! ![]() Have a great evening everyone!
Have a great evening everyone! ![]()
Assembled the new consolidation pilot today. It's washed, primed and ready for finish coat. Happy to get to this point. Tomorrow: finish coat and begin stripping original road markings. Looking forward to getting it road ready and back in service.
Cheers to all, Dave
Attachments
That pilot looks great, Dave!


