


Finished this


dobermann posted:Thanks again Lee. Somewhere I have a guy looking through binoculars that will be perfect in there. Maybe I can pop the roof off without breaking anything else. I should have asked them to leave the roof off. Hopefully if I surround it with some large HO pines it will appear to be taller

Here is the fire tower I had in mind; Cook Forest State Park, Pennsylvania. I just look at the Korber as being selective compression. Yes Lee, it would be a good guard tower too.
Not a bad idea to have them not glue the roof on! Thanks
Attachments
Images (1)
News Flash!!
I just ordered one! Yes, I ordered a built up one. My hands aren't up to building the frame any more I'm sure. But I did request that they not glue the roof on. Thank you Doberman!!
More classroom layout buildings taken from the classroom to the car. Exhausting. The layout boards go out and taken home tomorrow.
I made two "slide shoe" power pick-ups, and adapted one light bulb base, to light two previously dark Marx semi-scale passenger cars.
I punched a 5/16 hole in two brass feeler gauges (.015 & .040), and bent the metal over brass tubes mounted on the axles. Then I soldered them in place.
One set has the feeler gauge soldered at an angle, and the tubes "offset" to mimic the originals side to side slide limiting function, and still reach the center rail, but also still miss hitting the twist coupler's "un-coupling tab" on the bottom. The other homemade set, was swapped onto an observation car, and was soldered straight, not offset & angled, since there was no coupler on the rear of that car. The original observation cars shoe was there, but moved to a regular car, to avoid some harder soldering, and trimming the tubes for limiting the side play again for clearing the coupler.
In the feeler gauges, in the 5/16 holes I press fit isolation bushings, leaving a hole up the center of the plastic bushings I used. I then soldered a wire lead onto a low/wide head grade 8 steel rivet for one botton, and a large upholstery finishing tack for the other one, just to see which is best (the rivet so far). So the "slide shoes" or "buttons", are mounted solid to, and isolated electrically from the feeler gauge. And that got bent to lightly rub the top rail, and the springiness of the feeler gauge works nice; the buttons drag smooth across all my turnouts too.
Mounted a tad closer to the truck's pivot, my shoes also stay centered on the middle rail in curves even better than the stock ones.
I would have spent about $15 a car for "new stock parts", and I only spent near that on the cars to begin with. All is reversible, so if I spot a stock one for cheap enough to suit me I'll do it.

Attachments
Images (1)

Looking good Chris.
Lot of great work since the last time I had a chance to really look.
Cary it just to bad you have to take down the class room layout as it turned out very nice.
Lee, your layout is just getting better with time.
Here is my contribution..
Installed Kadee #743 Type E Couplers on my GN SD45s #400 and #411 yesterday
Part List: #743 Type E Couplers Short Centerset with Short Plastic Gearbox
Shapeways Lionel O scale EMD GP7/GP9 pilot Kadee coupler mou in Black Strong & Flexible by mscalzo3

I had to modify the Lionel Kadee mounts I ordered from Shapways to fit the opening in the MTH Pilots.
In this case I used the GP9 mounts.


This just give you an idea just how much from the sides that needed to be removed.

Once modified they were Kadees were installed into the mounts and painted. Once paint was dry, they were installed into the pilots using the same mounting holes that were already been predrilled by MTH.

Here are pictures of completed project.


GN SD45#400 with GN GP35 #3040. You also will note That I didn't fix the pilots. I know sacrilegious for 3RS but this allows me to run on O81 curves on the main and 072 for the yard without any issues.

MTH GN GP35#3040 (Shapeways Lionel O scale EMD GP7/GP9 pilot Kadee coupler mou in Black Strong & Flexible by mscalzo3 ) with Lionel GN GP35 #2519 for comparison using Lionel O scale EMD GP30 pilot Kadee coupler mount in Black Strong & Flexible by mscalzo3.

Attachments
Images (15)

Yesterday now.. but I pulled up a turnout to a spur on my Super O line, and laid in a plain curve, just so I could run "all Marx", including 3 fat wheel engines. Then I noticed a slow down in train speeds that I thought was low power, knowing everyone in town was running the A.C. hard in the heat.
I just put new bushings in a couple of motors, but better safe than sorry, so I lubed them again, and it turns out, just in time. So I've been running just a bit too long between oilings with all the running I do now ![]() . So after I cleaned and lubed 64 wheels, and 6 gears, I had to reduce certain throttles up to 25%
. So after I cleaned and lubed 64 wheels, and 6 gears, I had to reduce certain throttles up to 25% ![]() .
.
I had also moved the layout, & rearranged the living room last week; so last night, I painted "foam rock" that had been forgotten about, hidden against a wall for the last year![]()
I used a flack black base, then granite grey for dry brushing, and even got in a black & brown wash coat seeing how things dried so quick ![]() .
.
If you go into the hair care section of your local pharmacy, you'll find little black elastic hair rings. These are dandy for couplers with weak springs what keep poppin' open...

Also, if you have fixed couplers which fly apart on rough track, one of these bands will hold the cars together. ![]()
Mitch
Attachments
Images (1)
p51 posted:I just completed the war memorial for the O scale civil war 12 pounder barrel my father made for me.
The barrel isn't weathered to compare to the pedestal but I couldn't bring myself to mess with Dad's handiwork...
Hi Lee, You and your dad do great work together!
I am visiting my son in the Raleigh area and I set up some Standard gauge track with an LW transformer so I could run the the #33 engine and two passenger cars. I gave these to him at least 15 years ago and the first run since then. I had to clean the armature and lube it good. Runs great.
Mitch,
If you're out of rubber bands, but in need, ask a kid with braces![]() .
.
The orthodontic bands are another "perfect fit", and though usually clear, they do have colored ones too, including black.
Lee,
All you really need is "that old vet" with a polishing cloth.
..... and maybe an "Old Dutch Cleanser" boxcar ![]()
![]()
suzukovich posted: pictures
You know,..from this view KD's look "funny" to me; too tall..
The boxcar's, often seem too squat..maybe it's the bars, or un-couplers?
But this is a big improvement


Adriatic posted:Mitch,
If you're out of rubber bands, but in need, ask a kid with braces
.
The orthodontic bands are another "perfect fit", and though usually clear, they do have colored ones too, including black.
Yep. I useta hit my dentist up for orthodontic bands; they're great for tensioning overhead trolley wires! ![]()
Mitch
Not a darn thing. Just a relaxing, not-doing-much kind of day.
M. Mitchell Marmel posted:If you go into the hair care section of your local pharmacy, you'll find little black elastic hair rings. These are dandy for couplers with weak springs what keep poppin' open...
Also, if you have fixed couplers which fly apart on rough track, one of these bands will hold the cars together.
Mitch
Mitch,
Those little hair bands are a great idea. My wife buys them to tie up the dog's hair then puts a bow there for dress up. ![]()
I haven't used them on couplers, but have for other uses. I have noticed they are amazingly strong and resilient!
jim pastorius posted:I am visiting my son in the Raleigh area and I set up some Standard gauge track with an LW transformer so I could run the the #33 engine and two passenger cars. I gave these to him at least 15 years ago and the first run since then. I had to clean the armature and lube it good. Runs great.
Jim,
Sounds like you are having a good visit helping your son!
Adriatic posted:
suzukovich posted: picturesYou know,..from this view KD's look "funny" to me; too tall..
The 743 seem to be a little more bulkier then the 806. The Mario's Kadee mounts were designed for the his Lionel GP9/30/SD40s. So they are actually shimmed at the correct height. On a whim I decided to see if I could make them work on MTH and Weaver engines. The first MTH engine was the GP35.. I figured at the worst I would have to increase or decrease shim height. Turned out I didn't have to do nether. For the Weaver pilots I am going to have to shave the GP30 Kadee Mounts a little of the top to decrease the height. Learned this with the RS 11 conversion.
The boxcar's, often seem too squat..maybe it's the bars, or un-couplers?
Actually I the think it depend manufacture of the rolling stock. In this case its an All Nation car that I had rebuilt and upgraded to kadees and Weaver wheel sets.
But this is a big improvement
I gave my TMCC engines a rest and ran strictly conventional. I started with my Williams Rock Island AA Alco units and finished with my Lionel 0-8-0 Union Pacific Switcher.
I dressed the armature with very fine sandpaper, and cleaned inside the brush holders on my Grandmas "buried in a dirt floor" Commodore Vanderbilt for the first time since the 80's. It managed to bring that "cruise" throttle setting down even further, to about 55%, of my 100w Marx. ![]()
DMRRC Layout • O Scale - 2-Rail
A local Boys Scout Troop visit the DMRRC, they visit the train room, staging & shop areas and got to run the trains using DCC.
A good time for some fun and learning about model trains. The photos below will tell the story.


Gary
Attachments
Images (3)


Files (1)
Support to groups like the Scouts, Big Brothers and Sisters etc is good for the hobby and for the community. ![]()
![]()
![]()
![]()
![]()
![]()
mike g. posted:p51 posted:I just completed the war memorial for the O scale civil war 12 pounder barrel my father made for me.
Hi Lee, You and your dad do great work together!
Thanks. Dad is the best craftsman I've ever known. This barrel was child's play to him, compared to some of the real 'heavy lifting' artillery projects he's done over a long life.
For example, this 1/6 scale James rifle. He built this on a whim:
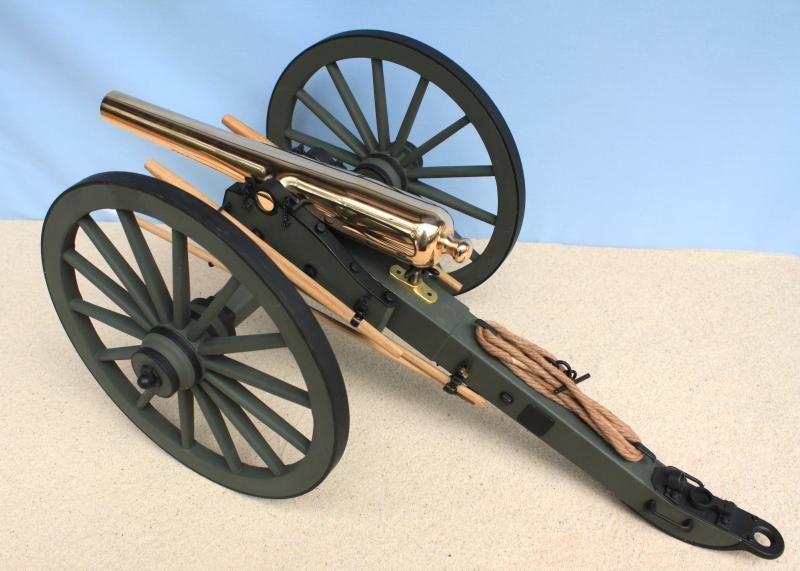
And what I consider his master work, a 3/4 scale M1841 6-pounder:
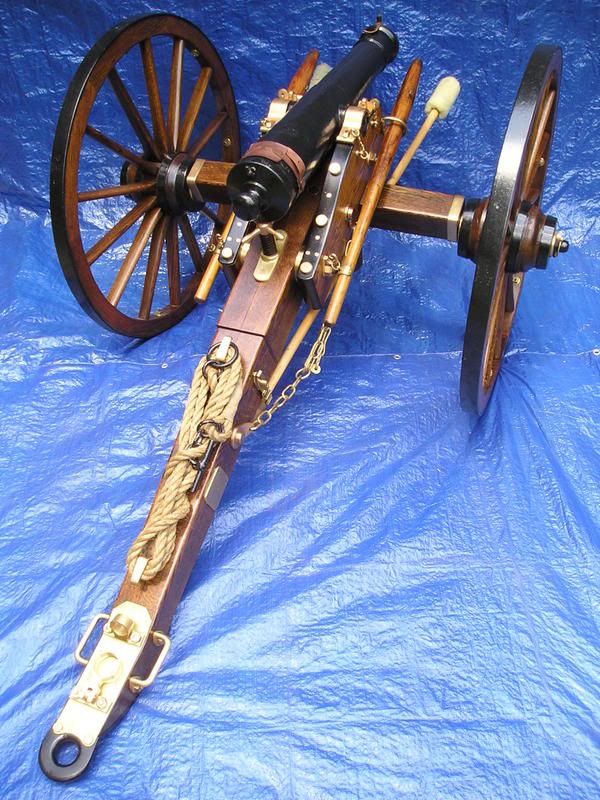
In each case, NO commercial parts were used on either build, with the exception of the barrel for the 3/4 scale 6PDR as he couldn't cast something that large that'd be reliable to shoot*. He cast all the other parts himself. Those aren't wagon wheels, either. Dad loves making spoked wheels, as artillery wheels are different in profile from wagon wheels.
*I grew up crewing this gun at competition artillery shoots. Dad usually took first place at most of them as he's also the best shot I've ever know, with any kind of weapon.
That's very cool Lee! I am glad you took the time to share this with me and the rest of un here on the forum. It shows where you get your attention to detail. I hope to some day get started on my layout and see where it goes. Thanks again!
Well I thought tonight would be a good work night but I hit a small snafu. I was going to put my transformer shelf in and use one TIU instead of two. I was using the fixed posts on both TIU's to run my four mainlines. Everything was running good that way. But when I combined the two I just moved the wires down so one Z4000 had a fixed and variable. Then I added the other Z4000 to the other half of the TIU. I turned the power back on to see what I had and only two lines ran. Those were the ones running through the fixed posts on The TIU. So right now I don't know whether to go back to the two TIU's or try to trouble shot this. I am also going to post this on the DCS forum...........Paul


Well back from vacation and back to the fun of building the layout. Put down foam to quiet the subway level, got both inner and out loops down and fastened as well as the 4 sidings. Also dug out my 3 z-4000's, AIU, TIU. Tomorrow I wire the subway level up and run trains for the first time since last November.
For those wondering the long straights along the right side will be stations and open for viewing. The big curve in the middle will not be seen but it curves around because I plan on putting a gorge with lake on this level and have a trestle bridge cross this for the upper level trains to go across. The left side with the sidings will also be exposed but be more of a open air yard and have no roof over top of it. Depending on available space there may be a station stop over there as well.
Attachments
Images (2)
Bryan, I here the Caribbean will never be the same LOL. Hope you had a great time. Nice to see you roll up your sleeves and get back to layout building. Starting to take shape. Now that summer is here and school is over you should make some good strides..................Paul
Welcome back, Bryan! Wow, that was a quick vacation! Seems like you just left yesterday. You started back into the layout with a bang!! Looks good!
Tonight I tried figuring out the DCS through one TIU. Still can't work it out. Two will run conventional and the other two will not. Before when I was using two TIU's through the fixed on each one I could run everything. Well tomorrow in a new day..................Paul
Absolutely Nothin !!!

Showed off my Amtrak consist (avec hand-rolled baggage car) at the local NRHS meeting on Thursday evening.

Turns out the locos are oddballs; while the shells are numbered for MPC of the 1970s, the drives are up to date with electronic reverse and digital horn sounds. A mystery which may never be solved. Oh, well! ![]()
Mitch
Attachments
Images (1)
Adriatic,
Things are looking up in the mine! That's a great idea and you are pulling it off well! I really like the video also! Excellent job!!
Mitch,
What? No giraffes!! Your Amtrak train looks great!!
M. Mitchell Marmel posted:
Turns out the locos are oddballs; while the shells are numbered for MPC of the 1970s, the drives are up to date with electronic reverse and digital horn sounds. A mystery which may never be solved.
Maybe it was the Giraffes!! ![]()
Adriatic posted:
I've been very busy on the layouts lately. Today, I painted the "new" legs I put on last year, and cleaned up an old "what now" issue.....
Sorry, looks more fun with the new format
Nice video. Nice work. Glad you still have your fingers.
Mark Boyce posted:Mitch,
What? No giraffes!! Your Amtrak train looks great!!
Thanks!
suzukovich posted:M. Mitchell Marmel posted:Turns out the locos are oddballs; while the shells are numbered for MPC of the 1970s, the drives are up to date with electronic reverse and digital horn sounds. A mystery which may never be solved.
Maybe it was the Giraffes!!
Hmmmm. AmGiraffes? ![]()
Mitch
Mark Boyce posted:Adriatic,
Things are looking up in the mine! That's a great idea and you are pulling it off well! I really like the video also! Excellent job!!
Did you actually see the photo's? It was working, but in the wrong screen size.
Then it wasn't working, so I tried to reload it, and it hasn't worked since . Three attempts but it won't load the same ![]() I know Lee saw it, from the finger reference.
I know Lee saw it, from the finger reference.
Adriatic posted:Mark Boyce posted:Adriatic,
Things are looking up in the mine! That's a great idea and you are pulling it off well! I really like the video also! Excellent job!!
Did you actually see the photo's? It was working, but in the wrong screen size.
Then it wasn't working, so I tried to reload it, and it hasn't worked since . Three attempts but it won't load the same
I know Lee saw it, from the finger reference.
I sure did see it, and on my iPhone to boot!! I saw all the photos, including captions and, what I'll call information pages in between. Very professional looking in my opinion!
OK, I see it again. Still off in screen size though; some text is cropped out for me.
I decided on a slide show, and loading one file, vs loading a bunch of singles. It really wasn't made to impress, but thanks ![]()
Oh I understand it wasn't made to impress, and Lee has told me it is actually easier once you get used to it. Nevertheless, I liked it; so I wanted you to know.
Thanks, but just I slop cheap craft paint and washes around like a kid and hate measuring anymore ![]() I "match sticks" at best
I "match sticks" at best ![]()
![]()
Most of my stuff is mostly done as cheap, quick, Fun and easy as I can; i.e., 8yrs to 88 x 8, anyone, any age or income, can hopefully do this, or better.
I have whole pennies tied up in that little project, mostly paint and glue cost ![]() .
.
What I don't like about that side of the mine is the cut I did on the foam rock wall and the obvious seams [I'm attempting hiding the seams with "moss"]. I had to stick to vertical vs foam stacks, to quickly clear rails and a hidden wire terminal area. Unseen against a house wall then, so I didn't take the time to cut horizontal streaks for a "shale" look, below the mine portals. I'm going to try working towards "earth brown" patches and steaks of gold, silver, silver glitter, emerald greens, and ruby reds, running horizontally next. Brown especially to "soften" the rock for "easier digging"![]() ....The mine is plateau is a removable "lid" with little glued down, so if that doesn't "work", I'll "pop the top" and re-carve the walls .....someday
....The mine is plateau is a removable "lid" with little glued down, so if that doesn't "work", I'll "pop the top" and re-carve the walls .....someday ![]()
I'll stick to just photos till I can stop the crop ![]()
![]()
I've been playing with another scratch build for a long time, but I'm not too happy with it.
O.k. for junk I guess, and not done, but I'm "stuck". It's time to toss it, or something needs to be added or removed; its just missing "something" (besides less windows![]() [and they are straight pairs; bad optics]) ....maybe the smoke stack, or...(gulp
[and they are straight pairs; bad optics]) ....maybe the smoke stack, or...(gulp![]() )... rivets?
)... rivets? ![]()
"Parts list"- The base evolved. It started on just one set of trucks, and an ultra short frame in mind, then came a giant, cement "pillar" (Block? Dock? ![]() Monolith?
Monolith?![]() ) (packaging foam), then it spent time loosely sitting on a single EMD-E truck. Then I found my elevation piers and gained some height. Then achieved "super-elevation"..... but then left the wheels off
) (packaging foam), then it spent time loosely sitting on a single EMD-E truck. Then I found my elevation piers and gained some height. Then achieved "super-elevation"..... but then left the wheels off ![]()
The body is shaved wood scrap, fireplace matchstick frame, and the plastic shell from a Stanley tool's package (the roof). A square on/off "slide knob" is the roof's shutter/vent/door?![]() (glued to a Q-tip box panel that slides out
(glued to a Q-tip box panel that slides out![]() ) It sits on a soup can, cut as a skirt over a 2.5"dia. x 1/16" tall roller bearing (pan/swing), and assorted large washers for more stability. The "washer bearing" will allow motorizing tinkering. Some triangle brackets from mounting window blinds, were used for the boom's vert. pivot's A-frame, and the boom's upper wire supports are temporaries, with SS wire going between boom, and frame mounted outrigger "wings" (extending out from the slots in the roof), 2" slide type fishing sinkers mounted on stainless wire, counter weighting off the back of "the piece that started it all", by simply looking sort of like a crane's boom, "the tone arm off a 1980's Sansui, linear tracking turntable"...that I broke off
) It sits on a soup can, cut as a skirt over a 2.5"dia. x 1/16" tall roller bearing (pan/swing), and assorted large washers for more stability. The "washer bearing" will allow motorizing tinkering. Some triangle brackets from mounting window blinds, were used for the boom's vert. pivot's A-frame, and the boom's upper wire supports are temporaries, with SS wire going between boom, and frame mounted outrigger "wings" (extending out from the slots in the roof), 2" slide type fishing sinkers mounted on stainless wire, counter weighting off the back of "the piece that started it all", by simply looking sort of like a crane's boom, "the tone arm off a 1980's Sansui, linear tracking turntable"...that I broke off ![]()
![]()
No more Beatles, Monkeys, or other "noisy" Animals...like Burton or Floyd. No Bowie, N.Young, F. Zappa, Hank Sr. or any other vinyl for a bit. Took out my 8-track in the same accident too (I have a collection of various rare recordings never released to vinyl, cassette, or CD).
(ever notice that "cry emoji" has a bad comb over at the end? ![]() )
)
My "Sansui crane"...."hope I don't get needled"![]()
")

")


You can just see the white plastic triangles and sinkers in the window.
The removable roof's overhang grips the gutter line frame rails. I planned on melting that excess bit of forward roof overhang then bending it up and painting it as a torch cut from the removal of the rest of the beam.
I haven't decided on a smokestacks placement yet.
Attachments
Images (5)
")
")
What did I do today? I upgraded my TIU to version 5.0 then I added the DCS wifi interface. I am now operating with the DCS wifi app on my iPad. It is fantastic!
Was running my 2025 around the layout, since Norma Bates Kitteh was sitting there expectantly waiting for a train to run. At the first puff of smoke, though, Norma sneezed violently and hopped off the train table. Guess she doesn't like Lionel smoke fluid... ![]()
Mitch
The excavation crews were working from both ends on one of two final tunnels when their shovels from opposing ends struck about midway. Much to the surprise of some, when the gypson earth was cleared away final survey checking confirmed that the projected right a way grade way was dead-on flat and level.
Now construction can begin on setting another turntable which will serve the end of two different branchlines in a hidden staging room.
I am gluing this real metal corrugated siding on this grain elevator old kit model....slow process....and, I do not trust the glue for long term holding...
Got the subway lines wired and ran some trains on them. Might not seem like much but haven't been able to run anything since November because of the rebuild so this was really a cool day.
Good for you Bryan. That has to feel good to run trains after so long and that sweet smell of ozone that goes along with it. By the way in that one pic is that my almost Z4000 transformer. LOL..................Paul
Adding the black foam base for my roads and started on the crossings where possible. This will be covered by a thin coat of tinted Durham's water putty when finished. I need to order the remaining buildings for my town and install the sidewalks before completing all of the roads due to my existing space limitations. Slow process, however, I have been pleased with the work to date.
Howard
Attachments
Images (2)


Looks good. I'm about to start adding roads and crossings as well. Thanks for posting gives me incentive and inspiration. I wasn't aware of using Durhams water putty.


Former Member
Set up the WiFi units on the club layout so the guys can paly with it and see if they like it. I like it and find it much better than the remote but im not sure how the older guys will feel. We shall see. I also swapped out the Z4000 that blew yesterday for a loaner from my bench til I get it fixed. Looks liek I blew 3 fets on the board.
I added some flashing red beacons to my Korber Power Plant.
Neal Jeter
Revamping my Std. gauge layout: after much deliberation, I decided to NOT do an upper circle of track on a glass circle on piers. Looking at the logistics of having a double mainline on the table.
With snagging a 116 station and a 129B terrace very recently on the evilBay, my placement of structures and figures are in a state of flux, until the new pieces get here.
Working on a new YouTube video for upload, which follows my Lionel NYC S-2 electric locomotive no. 125. Hopefully will be up in not too long.
The Boss at The DMRRC, gave me some home work. Make about 20 concrete bumpers for the staging room in the basement. Below are some photos. They were made on a table saw from basswood. Used acrylic paint mixed with Behr Floor Finish Sand, #970. Looking for a plan "B" - If you have any ideas. Please post on this thread.
2 Rail • "O" Gauge Scale


Attachments
Images (4)


Adriatic posted:I'll stick to just photos till I can stop the crop
I've been playing with another scratch build for a long time, but I'm not too happy with it.
O.k. for junk I guess, and not done, but I'm "stuck". It's time to toss it, or something needs to be added or removed; its just missing "something" (besides less windows
[and they are straight pairs; bad optics]) ....maybe the smoke stack, or...(gulp
)... rivets?
"Parts list"- The base evolved. It started on just one set of trucks, and an ultra short frame in mind, then came a giant, cement "pillar" (Block? Dock?
Monolith?
) (packaging foam), then it spent time loosely sitting on a single EMD-E truck. Then I found my elevation piers and gained some height. Then achieved "super-elevation"..... but then left the wheels off
The body is shaved wood scrap, fireplace matchstick frame, and the plastic shell from a Stanley tool's package (the roof). A square on/off "slide knob" is the roof's shutter/vent/door?

That's what I call truly using what ever you have within arms reach. Nothing wrong with that
No more Beatles, Monkeys, or other "noisy" Animals...like Burton or Floyd. No Bowie, N.Young, F. Zappa, Hank Sr. or any other vinyl for a bit. Took out my 8-track in the same accident too (I have a collection of various rare recordings never released to vinyl, cassette, or CD). Well that's obviously a go to jail offense. Sharks can be just like a bull in a china shop. Good thing you caught the shark and put him in its place. Although dead he still looks like he is laughing.
(ever notice that "cry emoji" has a bad comb over at the end?
My "Sansui crane"...."hope I don't get needled"
You can just see the white plastic triangles and sinkers in the window.
The removable roof's overhang grips the gutter line frame rails. I planned on melting that excess bit of forward roof overhang then bending it up and painting it as a torch cut from the removal of the rest of the beam.
I haven't decided on a smokestacks placement yet.
With a little body filler, sanding, and painting it. It could come out rather nice. Don't sell yourself short.
Lot of cool work be done. finshed the SD24s earlier in the week and Just completed another kadee upgrade yesterday. (Lionel U30C) . Plan to up date thread later today.
https://ogrforum.ogaugerr.com/t...40#60417098730478240


Attachments
Images (3)
Lee, It's the portholes at the rear of the crane I don't like. I can block over the picture with my thumb, on either the single roof portal, or the two portals below it, and I like it more again.
No, not too bad for a broken tone arm, and an empty tool package laying on a full garbage can. "Call me Gheppetto, it asked to be built"![]() . And at the same time, its no scale model, and should have a toyish quality to "fit in". All my stuff has been low effort for a while, but I'm still happy with most of it. I'm sort of "Rat Rodding" my model railroad
. And at the same time, its no scale model, and should have a toyish quality to "fit in". All my stuff has been low effort for a while, but I'm still happy with most of it. I'm sort of "Rat Rodding" my model railroad ![]()
Filler, or a vent panel over the offending windows. That would be the only way to back out of that, other than a new cab roof. Which wouldn't be that hard either ![]() But on the corners and such, I eventually wanted a "raw', imperfect, aged, look; damaged panels separating from the frame, peeled back corner or framing, dents (with heat) etc. I think some styrene strips for outer panel framing, and/or scoring panel sheets into the sides, (and some rivets) will "clean it up" more. That seem along the roof panel is way too wide even by design. I'll need to " bend it open", and or close the gap with framing. It's a back-burner job finishing this one.
But on the corners and such, I eventually wanted a "raw', imperfect, aged, look; damaged panels separating from the frame, peeled back corner or framing, dents (with heat) etc. I think some styrene strips for outer panel framing, and/or scoring panel sheets into the sides, (and some rivets) will "clean it up" more. That seem along the roof panel is way too wide even by design. I'll need to " bend it open", and or close the gap with framing. It's a back-burner job finishing this one.
I can do filler work, but hate waiting for the modeling type to set, and hate "shrinkage" even more. I usually let filler set for a least a week, sometimes months. And I've had it "divit and dent" suddenly after years. All it takes is a tiny drop of something that can penetrate a little, to hit the no gloss paint, so I just avoid it if I can.
I got bored and lit up a set of 6 articulated Marx passenger cars. I used a single homemade "feeler gauge" power shoe. Thin brass, wrapped and glued around two tubes made from a plastic ink pen. I cut slots in the tube length so they clipped on the axles , and a long string of old automotive wedge bulbs wired/taped together ( most without sockets) and simply threaded through all the cars "doors". Two issues. #1-The aftermarket speaker wire is to nearly to stiff and if a pigtail splice "hangs up" at all, the taunt wire may tip a car, and derail in the S-turn (very light tin cars) #2- An overly bright bulb got used by mistake..it must be the dining car?![]() Nothing I'll mess with soon. I wanna see how fast that pen plastic wears.
Nothing I'll mess with soon. I wanna see how fast that pen plastic wears.
It's dark, I have a camera, and 3 out of 4 of my Marxs electric trains are running passenger service. ![]()
I bow to your superior Scrounge-Fu. Pics, please? ![]()
Mitch
Spent the day at the NJ HiRailers stretching the legs on my new BTO Lionel BN SD40's. Tried to take some unique shots off my iPhone, was trying a few new perspectives.. - not to bd but trying to edit the video in the MAC using iMovie proved to be more than I expected. Need to figure that out.
These are great engines, pull quite a consist, great horn, bell and overall look. Only issue was with the smoke units, they were working great then seemed to overheat and output tapered off. Other than that these are excellent performers.
Here is some of the video for the day.
Enjoy.
Kevin
Attachments
Videos (1)

WOOWOOCHOOCHOO!! Standard Gauge double mainline loops work in progess: We cut four pieces of track, fitted them up and have the largest or the two loops operational. Giving my repro 408E some run time to test it out.
Next, trying to figure out how to take my repro Ives 1134 apart to replace the battery...
WOOWOOCHOOCHOO2!!! We got the new battery in the repro Ives 1134, and it is WORKING!!! *happytraindance*
Showed it off to some people who came over for my niece's high school graduation party (it was at our house because she's moved and all her old friends live close to us. We were happy to do it, as she's a great kid) yesterday. My sister-in-law's husband was very surprised at the progress I'd made as it was nothing but plywood and track the last time he saw it.
I don't get the opportunity to ever show it off to people outside the hobby, so it was cool to see some 'normal' folks' jaws dropping when they walked in the room, especially as I had the sound running on all my locomotives so they immediately heard the air pumps thumping.
Ok pics..last night, & today. More below. I can't edit my video to lighten it though, turns out this camera takes video in Quick-time. There are normally screen options for that player that should work though.
It's actually two feeler gauges soldered together Mitch. Looking at the pic, the tube slices are at about 7 o clock on the right, 4 o clock on the left.
These cars were in awful shape, and my locos aren't the articulated versions, so, a year or two ago, I stole the wheels off one now serving as a building ![]() , and I converted one of the articulated cars to a four wheeler with a tab coupler by using a sheet of brass. I can pull them with near anything now.
, and I converted one of the articulated cars to a four wheeler with a tab coupler by using a sheet of brass. I can pull them with near anything now.


Attachments
Images (19)


Videos (2)


Placed almost all the Barclay and Trico folks back on the layout. Added a mirror for a year-round ice skating and sledding rink, next to the Barn which will be used as a permanent community venue for WWII-era "fancy dress" Victory Dances, featuring Ginger Rose and her Band. The show's emcee Will Patrick, dressed for the evening's dance as a pilot, is seen conferring on details with Miss Rose. Fencing and a sign will be added around the ice rink. Lots of folks are seen busy outside the train station. The local 1134 is leaving after getting the all clear from the oiler, and the 408E just arrived from California.


Attachments
Images (6)
Adriatic,
Thats some fine looking engines and trains! You did a great looking job!! Thanks for sharing all the photos!
Carey,
Thats a lot of activity in your town! The 408e made a grand entrance for sure!
Why isn't Will Patrick in the military ?? If it is WW II. ???
today a club member added lights and a siren to a fire truck.
jim pastorius posted:Why isn't Will Patrick in the military ?? If it is WW II. ???
Draft dodger, call the G-men!
Originally an old TCA anniversary GG1 by Williams, I had designs on it even before purchasing. Painting over the drab flat silver in black helps show off the flowing body curves. After 2 months curing, it received the gold stripes and Pennsy decals last weekend.


The background color and gold accents gives the illusion of a DGLE paint job. The set came with 4 Madison cars ( in bakelite, just like the PW Lionel's ) which are now painted the same basic black.
Bruce
Not a darn thing! Instead: worked out twice today. Learning a new Glenn Miller song, "I Know Why" to add to my Ginger Rose repertoire. And went to see my vintage dressmaker, to have a second fitting on a 1940s gown I'm having custom-made for me. Made using an original 1940s sewing pattern, using original 1940s tropical print 100% rayon yard goods. Will be able to pick up the dress on Thursday, and will wear it to a dinner dance Friday evening.
I've been workin on installing two new bridges. Nothing fancy just two stock Lionel Arch over style.
Here are a few pics
Al

Attachments
Images (2)
brwebster posted:Originally an old TCA anniversary GG1 by Williams, I had designs on it even before purchasing. Painting over the drab flat silver in black helps show off the flowing body curves. After 2 months curing, it received the gold stripes and Pennsy decals last weekend.
The background color and gold accents gives the illusion of a DGLE paint job. The set came with 4 Madison cars ( in bakelite, just like the PW Lionel's ) which are now painted the same basic black.
Bruce
Yes it most certainly does look like DGLE. Nice work.
Those cars were so thick & heavy, for all these years I thought the old Madisons were cast in metal., but I remember the black scratches now. ![]()
Despite the fact its 75°, and I feel cold enough to wear flannel because it's been so hot, I bore down, and ate a fudge-sicle ![]()
![]()
Only three more, and I'll have enough wood to start building a small wooden water tank ![]()
(enough to encircle the pattern, which is an fudge frosting container![]() )
)
(Empty of course ![]() )
)
Carey TeaRose posted:Not a darn thing! Instead: worked out twice today. Learning a new Glenn Miller song, "I Know Why" to add to my Ginger Rose repertoire. And went to see my vintage dressmaker, to have a second fitting on a 1940s gown I'm having custom-made for me. Made using an original 1940s sewing pattern, using original 1940s tropical print 100% rayon yard goods. Will be able to pick up the dress on Thursday, and will wear it to a dinner dance Friday evening.
Nice!
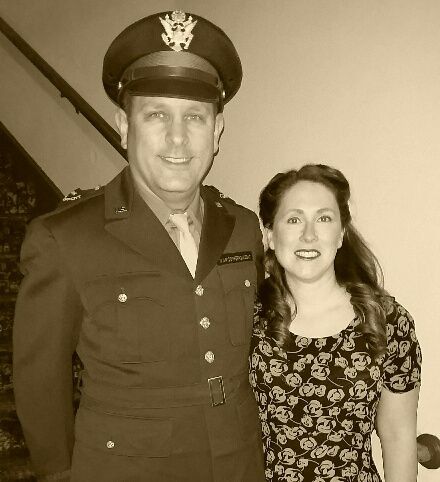
I have more than a passing interest in the 40s, myself. In fact, I'm going to our local 4th of July in my 'other ride' and these duds:

And my wonderful wife surprised me by getting her own 40s dress and did her hair, for an event I was going to, something she'd never previously showed any interest in!
brwebster posted:Originally an old TCA anniversary GG1 by Williams, I had designs on it even before purchasing. Painting over the drab flat silver in black helps show off the flowing body curves. After 2 months curing, it received the gold stripes and Pennsy decals last weekend.
Bruce
Bruce,
It looks fabulous!! Patience is a virtue.
p51 posted:Carey TeaRose posted:Not a darn thing! Instead: worked out twice today. Learning a new Glenn Miller song, "I Know Why" to add to my Ginger Rose repertoire. And went to see my vintage dressmaker, to have a second fitting on a 1940s gown I'm having custom-made for me. Made using an original 1940s sewing pattern, using original 1940s tropical print 100% rayon yard goods. Will be able to pick up the dress on Thursday, and will wear it to a dinner dance Friday evening.
And my wonderful wife surprised me by getting her own 40s dress and did her hair, for an event I was going to, something she'd never previously showed any interest in!
Lee, you and your wife look great!
Carey, I have noticed your photos show you like a vintage look. You always do it right!
Mark Boyce posted:News Flash!!
I just ordered one! Yes, I ordered a built up one. My hands aren't up to building the frame any more I'm sure. But I did request that they not glue the roof on. Thank you Doberman!!
A 'like' reminded me to report that I received the fire tower two days ago. Yes, from recent experience the spindly frame looks like it may have given me trouble these days. I'll have no problem removing the roof and detailing the interior. Many thanks to Korber and their expert builder, (I'll not divulge who it is) for giving me the chance to have this great model on my future forested mountain!!
Vintage clothing is fun especially with old cars and historical events. At one time I had a pretty large collection but have down sized it quite a bit. Have kept some items that I have made myself over the years. No old steam engineer's outfit, though. I do have an old PRR cotton cap that looks like it was worn in the shop.
p51 posted:Carey TeaRose posted:Not a darn thing! Instead: worked out twice today. Learning a new Glenn Miller song, "I Know Why" to add to my Ginger Rose repertoire. And went to see my vintage dressmaker, to have a second fitting on a 1940s gown I'm having custom-made for me. Made using an original 1940s sewing pattern, using original 1940s tropical print 100% rayon yard goods. Will be able to pick up the dress on Thursday, and will wear it to a dinner dance Friday evening.
Nice!
I have more than a passing interest in the 40s, myself. In fact, I'm going to our local 4th of July in my 'other ride' and these duds:
And my wonderful wife surprised me by getting her own 40s dress and did her hair, for an event I was going to, something she'd never previously showed any interest in!
You both look super. Please tell your wife I love the print of her dress. Does your wife have any 1940s hats? Would love to drive the 1938 Pontiac in a parade, or create a float with me singing WWII era songs as Ginger Rose.
jim pastorius posted:Vintage clothing is fun especially with old cars and historical events. At one time I had a pretty large collection but have down sized it quite a bit. Have kept some items that I have made myself over the years. No old steam engineer's outfit, though. I do have an old PRR cotton cap that looks like it was worn in the shop.
There is not so much for "events" to wear our vintage (completely all decked out head to toe) in the San Francisco bay area, unfortunately. Southern California seems to have much more. However, Tom loves to wear his 1940s trousers and suits on a very regular basis. Our local Italian Club monthly dinner dances are the best opportunity for him to wear his vintage tuxedos (he has five), and for me to wear my vintage furs adding to my evening's ensemble. I can always wear much of my daywear; including hats, coats, slips, and gloves any time and I do. I'm looking to bring my vintage look into being my "every-day M-F" style, especially being a teacher this next school year. My vintage mentor has a number of school teachers she works with that wear their vintage full-on head to toe every day to school.
Carey TeaRose postedYou both look super. Please tell your wife I love the print of her dress. Does your wife have any 1940s hats?
No, just getting her as she is in the photo was something I never thought I'd see. But after 16 years of marriage, she still has some surprises. The afternoon before the even we were going to, she showed up from town with her hair done up 40s style and that dress (and another of its type) under her arm. She never even hinted she was even thinking of that.
This is the same woman who allowed me to move some large stuff out of my 'toy room' to fit the layout in place, originally.
Yep, she's a real keeper! ![]()
Hoping today I can make some progress on boxing up the O-scale layout pieces from my classroom for going up into storage.
I finally got around to adding another car to my "Beer" train. Thanks to Ben Fioriello for selling it :-)

Attachments
Images (1)
I haven't done anything for a bit now. I sort of hit a brick wall. Wanted to go to one TIU but that has not worked out so far. Between Barry's book and fellow railroaders giving me ideas still sitting with two out of four mainlines running. Went to a train get together this past Friday night and that got me pumped again but next day same brick wall. Tossing around the idea of putting back the second TIU and next month just buy another TIU and remote plus a 500 watt brick to power it. It helps to come on here and see what everyone else has been doing...........Paul
paul 2 posted:I haven't done anything for a bit now. I sort of hit a brick wall. Wanted to go to one TIU but that has not worked out so far. Between Barry's book and fellow railroaders giving me ideas still sitting with two out of four mainlines running. Went to a train get together this past Friday night and that got me pumped again but next day same brick wall. Tossing around the idea of putting back the second TIU and next month just buy another TIU and remote plus a 500 watt brick to power it. It helps to come on here and see what everyone else has been doing...........Paul
Brick walls happen, I've found that the best way to get past it is to just work on something....big or small. Either way it will pass. ![]()
Finally got a YouTube video to upload. It didn't work a few times. But now its up.
The primary electric locomotive on the FH&J RR is the Lionel New York Central S-2 no. 125 with TMCC. Here, it is pulling a short train of boxcars and reefers on the mainline. It gets briefly held up by the Broadway Limited, made up of a Williams Crown Edition Pennsylvania K4s streamlined Pacific and Hogwarts Express coaches. But NYC is quick to get moving again and finish the job.
Congratulations on your first YouTube Harry!! The S-2 and the K-4 are great!
I am not very well versed in videos and YouTube myself, but I have done about 10. The last one I can't get to upload for anything while I can see it run on my PC fine. I may just have to shoot it again. I have trouble getting enough volume on mine with my iPhone, that's the only camera I have.
I'll look forward to seeing more from the FH&J RR!!
Mark Boyce posted:Congratulations on your first YouTube Harry!! The S-2 and the K-4 are great!
I agree, the video is really good, I especially like the view from mid-train!
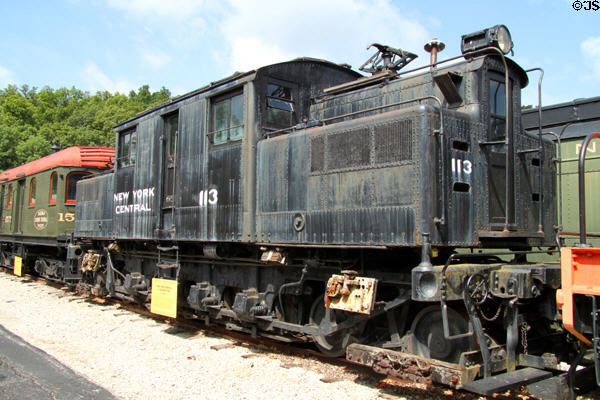
I have an odd soft spot for juice jacks, even though I grew up in the deep south and never got to any electric lines (current or abandoned) until well into adulthood. The only S-motor I have personally seen is this one in St Louis a few years ago:
Finished putting on upper level decking and dry fit some bridges for the lake/gorge area. Side note for Paul, put the TIU problem out of mind and work on something else for awhile that you know will work. Then come back to it in little bit with a fresh mind and a successful completion of another area.


Attachments
Images (2)
Working on something new......

Attachments
Images (2)
An amusing quote from the minutes of the July meeting of the Sugar Creek Model RR Club:
"SHOW & TELL: Mitch Marmel showed a diesel set he had liveried as AMTRAK. He had NOT converted it to a trolley." ![]()
Gee, do I have a reputation or something? ![]()
Mitch
Former Member
Worked on the pile of customer repairs. Barely made a dent. I'm very oddly busy for summer
Bryan you are making some pretty good strides. That arched viaduct will be another great focal point on your new layout, especially with all those car carriers going over it. At the rate you are going you will be well ahead of completing all the track work before you said................Paul
I have been installing dwarf signals to indicate switch direction. Have 12 of them made and installed. I have made them for less than $3.00 a piece. I purchased the signal heads and LEDs on eBay (JTD23 10 sets Target Faces With LEDs for Railway signal O Scale 2 Aspects). Reshaped the signal head and with the help of some styrene strips and 5/16 tubular styrene, I constructed a dwarf signal that shows red for the divergence switch position and green for straight alignment. I am using Tortoise switch machines and the signal lights are connected to and controlled by one of the internal SPDT on the switch machine. You can reference my original post on page 206, 4/23/16 for more construction specifics.
Dave


Attachments
Images (9)
Add Reply
Sign In To Reply
