LOL Brian, Just wonderful!

Johan, I just love the new box cars and the scenery you use to show them off!

John, I can see the light at the end of the tunnel for you! Nice work!

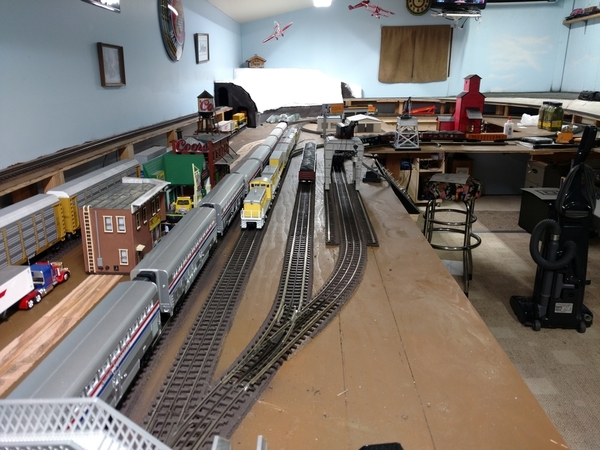
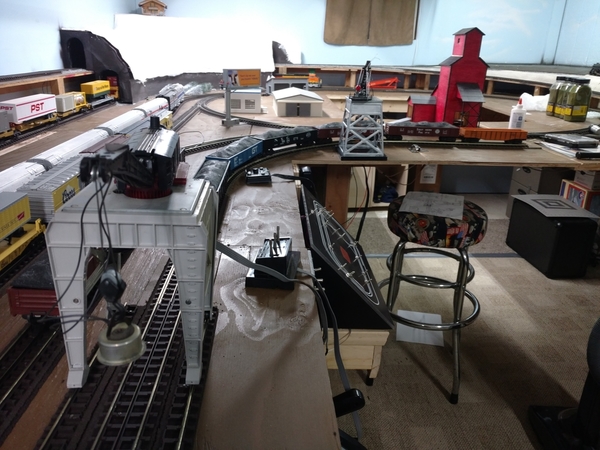
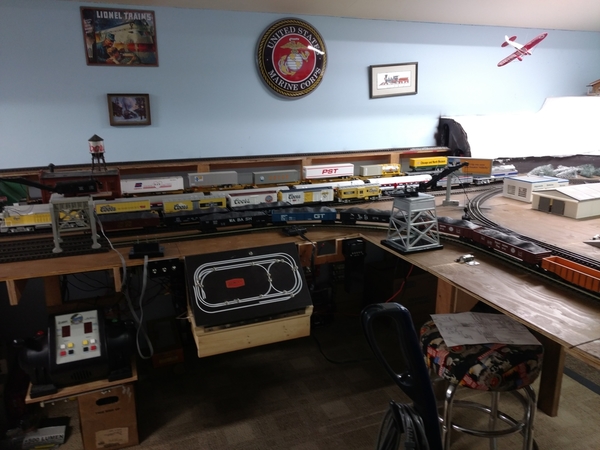
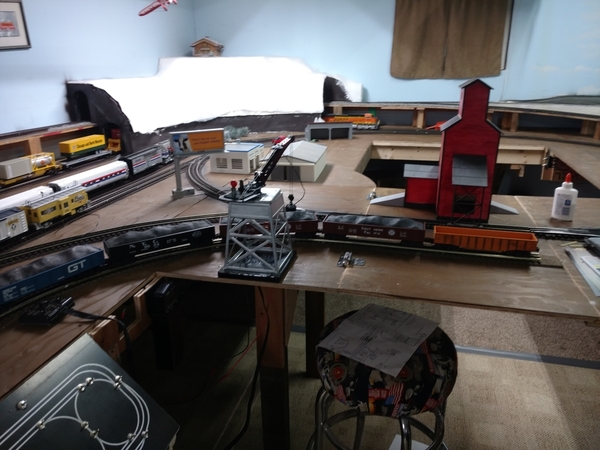
So today I got some train room time and went out swapped out a right hand switch for a left hand by a suggestion from Lew! Worked out great! Then I extended the siding that the crane is on to meet up with the other crane. That took a little doing! Here are a couple pictures.

I hope everyone is having a great Super Bowl Sunday!IMG_20200202_140524002IMG_20200202_140532613IMG_20200202_140540198IMG_20200202_140546800

Attachments

Images (4)
  • IMG_20200202_140524002
  • IMG_20200202_140532613
  • IMG_20200202_140540198
  • IMG_20200202_140546800

Hi everyone,

Great to see work progressing on your guys' trains and layouts. In case you don't know already, I'm in the process of expanding my current layout from a 4x8 table to an 8x11 table. The layout will be roughly modeled after the 1940s-1950s era of railroading, taking a lot of inspiration from the Pennsylvania Railroad, including a rough rendition of their world-famous Horseshoe Curve.

Here is an illustration I made in SCARM with other details drawn in with Photoshop.
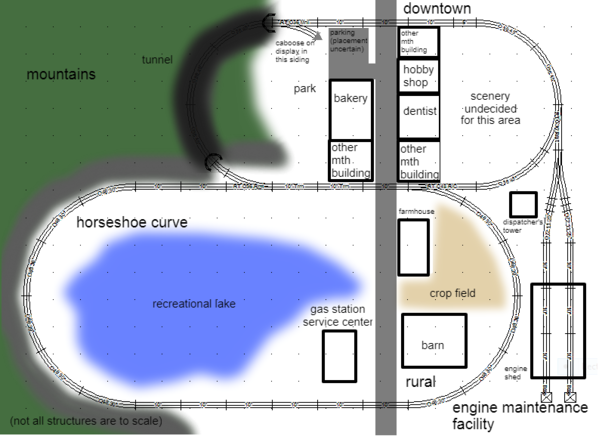
layout

Allow me to expand upon this drawing by providing some more insight.

The layout will be made using Lionel's Fastrack, and expands upon an existing loop of track that was once part of a starter set. The smaller loop at the upper part of the photo has been in place since about 2011, and has all O-36 curves. The larger loop is being added on and will have a maximum radius of O-48. In the engine maintenance facility, there will be O-72 curves, as that is literally the only place on the layout that I have room to accommodate them.

Now, let's talk about scenery. Starting within the smaller loop will be a downtown section, using all MTH Buildings to maintain a common look and curb height. The road through this section of the layout will likely be elevated to hide the actual height of the curbs, which is unrealistically high. Behind a few of the buildings will be a city park, complete with all amenities that anyone could need; benches, playsets, fountains, and the beauty of the outdoors. Additionally, a relic of railroading's past will be sitting on a long unused siding: a former PRR caboose.

To the left of the park will be the mighty Allegheny Mountains, and resting within them the PRR Horseshoe Curve. Rather than modelling the current park that is at the curve, my version will be sceniced as the curve was when steam was still king. Beyond the curve, the hillside slopes down to the reservoirs that supply water to the city of Altoona. While I'm not able to recreate the sloping hill down to the lakes, I can recreate the lakes themselves. And additionally, I'll be using a bit of my own imagination and make it a recreational lake, complete with people fishing, canoeing, and doing other activities to add more interest to the layout.

The scene with the lake will be a transition point from the more wooded areas to a rural scene. It will feature an old style gas station and service center, a farmhouse and barn, and crop fields as far as the eye can see. Behind the barn, I want to put some farm animals grazing, and I also want the entire area fenced in. The property owner doesn't like to see railfans on his property. 

Finally, we come to the engine maintenance facility. I'll be using MTH's two-stall engine shed (which yes, it accomodates Fastrack). I'd like to populate the yard with as many railroad workers as I see fit to make it as realistic as possible. It's likely that I will weather all the buildings. The area behind the buildings in the right-hand side of the photo is still undecided, so I'm open to suggestions on that.

Once I have more progress to make a good post, I'll make sure to share it here. Have a good Groundhog Day and Super Bowl Sunday everyone!

Attachments

Images (1)
  • layout

Mike, The change of switch looks good!  Your crane will have a great place to operate!  

Nick, Your plan looks good as does your description of what you plan to do.  I'll look forward to seeing your progress.

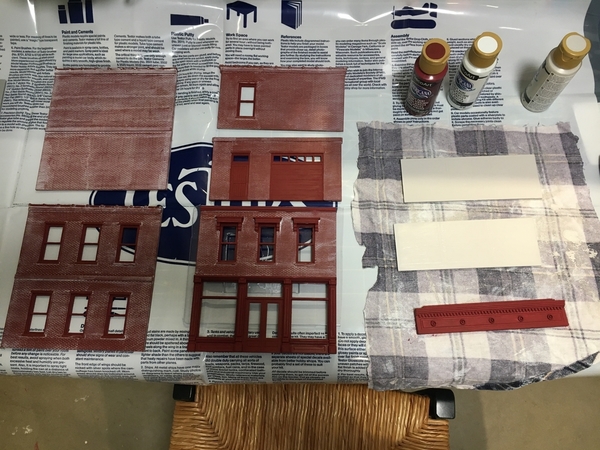
I finally sat down and did some painting on the AmeriTown Marvin's Drug Store kit I had planned on building when recuperating from knee replacement.  Well here we are 3 days short of 3 months and I finally got at it.  I had already washed the parts to get any ols off then a couple weeks ago. I sanded the edges smooth and used the method of painting mortar and wiping most of the color off to expose the bricks.  It isn't as even as I had hoped since it has been a few years since I had done it before. I painted the woodwork a burgundy color and will add other colors for the details another day.

2020-02-02 18.36.43

Attachments

Images (1)
  • 2020-02-02 18.36.43
Last edited by Mark Boyce
mike g. posted:

LOL Brian, Just wonderful!

Johan, I just love the new box cars and the scenery you use to show them off!

John, I can see the light at the end of the tunnel for you! Nice work!

So today I got some train room time and went out swapped out a right hand switch for a left hand by a suggestion from Lew! Worked out great! Then I extended the siding that the crane is on to meet up with the other crane. That took a little doing! Here are a couple pictures.

I hope everyone is having a great Super Bowl Sunday!IMG_20200202_140524002IMG_20200202_140532613IMG_20200202_140540198IMG_20200202_140546800

Mike, that worked out great!

What would it be like to extend the crane siding to the right off the tilt-up onto that deck. The grain elevator might fit there and then you'd have three car-spots on one siding. Lots of prototype-like switching operation right there.

mike g. posted:

LOL Brian, Just wonderful!

Johan, I just love the new box cars and the scenery you use to show them off!

John, I can see the light at the end of the tunnel for you! Nice work!

So today I got some train room time and went out swapped out a right hand switch for a left hand by a suggestion from Lew! Worked out great! Then I extended the siding that the crane is on to meet up with the other crane. That took a little doing! Here are a couple pictures.

I hope everyone is having a great Super Bowl Sunday!IMG_20200202_140524002IMG_20200202_140532613IMG_20200202_140540198IMG_20200202_140546800

Mike. Thank you Sir. 🤝

Johan

Hello all. I think I have time for a quick post, but likely no replies soon.

This is what I've had going the last few days. 

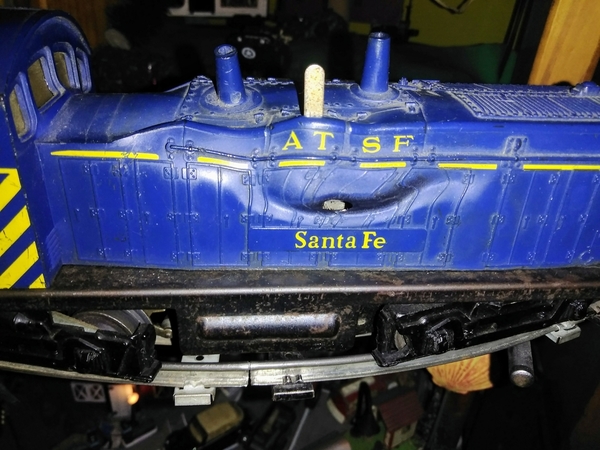
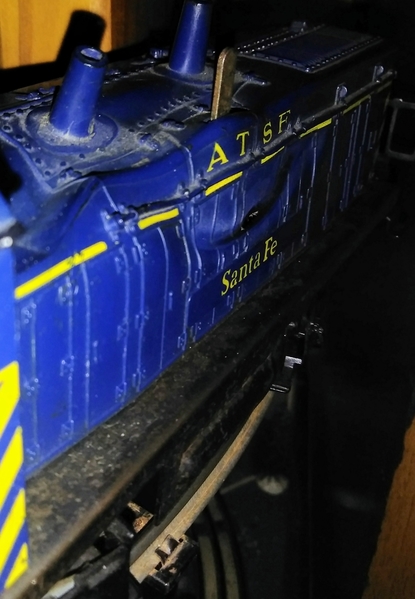
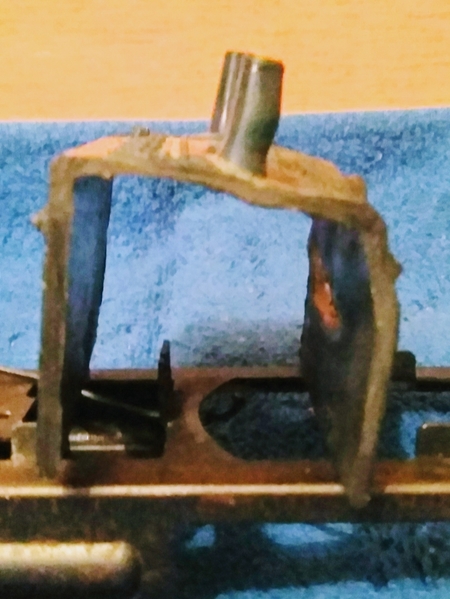
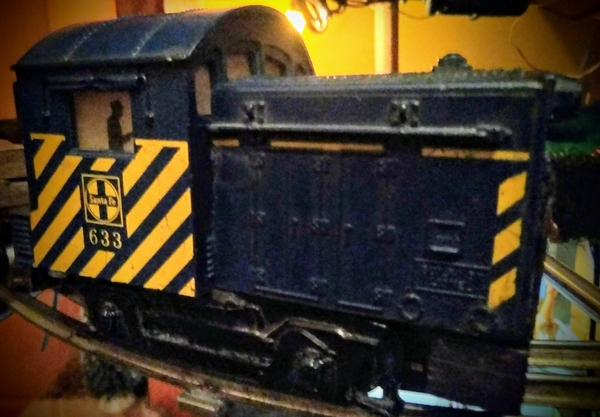
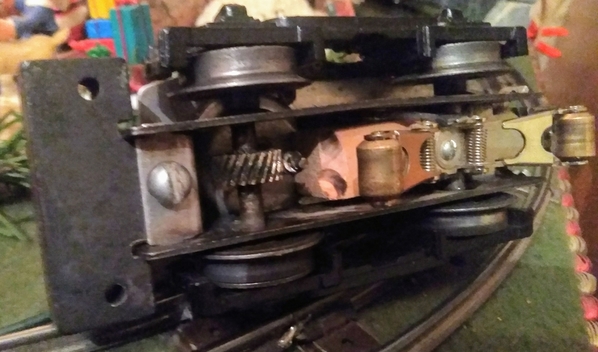
A loose e-unit mounting screw came loose. Said screw also supplied the only chassis ground(2 position) and I had been pulling a good load about 20min before this meltdown was noticed. After these photos I pressed lightly along the oblong burn hole and it's edges shattered. The hole ended up being about 1½" long.IMG_20200125_043350~2IMG_20200125_043451~2

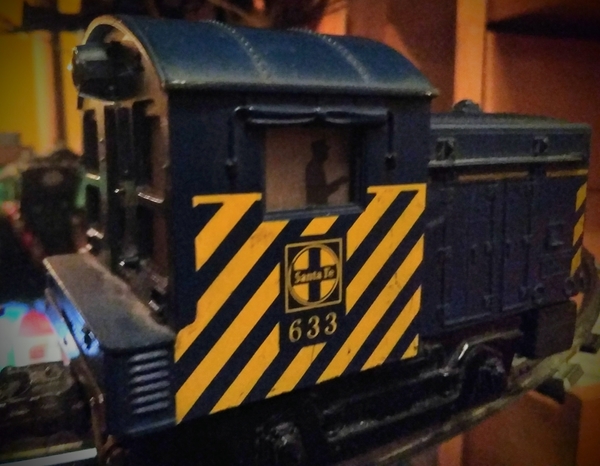
633 is one shot/one year shell; and a zebra which I like, AND I had already repaired /bashed the grill with a metal frame/screen; so I reached for an Exacto saw..."extending it's life by shortening it"...(insert loose screw joke here)

This is after an attempt at bumpshop work with a micro torch and hardwood. I might have tried boiling water / baking ,but it would never fix the fine lines. The torch told me enough to decide to simply cut it up to "save the cab".

IMG_20200128_031727~2IMG_20200128_031237~3IMG_20200128_031102~2

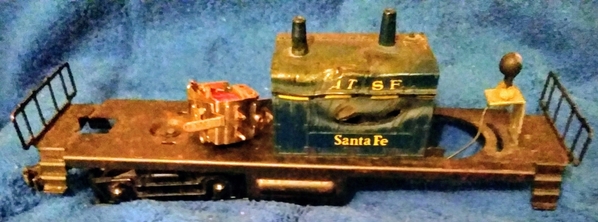
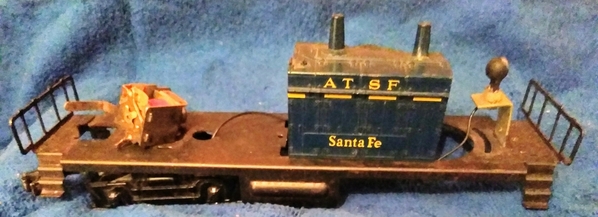
I"m thinking this good shell side might be used against a factory wall as a generator or AC unit, pump house, etc. (cover for Gantry's drive?)

IMG_20200128_023638~2IMG_20200128_023605~3IMG_20200131_011558~2

The pilotweight is from an old plastic PW Lionel steam engine and is needed for traction and counterbalance. (it could use a few more oz really). GG-1 roller mounted on a Z-cut Jenga block. Positioning it to both clear the gears and go over the free axle, and still sit deep enough was tight.

It already pulls 5 cast PW blunt axles no problem (heavys-6 wheel crane, work caboose etc) or half a dozen baby Madisons, etc.  I have to mount better lights, make better mounts (1/2 done now) and reverse the shell( to center the engine bay more over truck; cab "hanging" and make an e-unit bracket.  

....with 2 mounting screws this time 🙄

The e-unit shows no sign of the overheat and works fine. But I have a smoke unit whispering to me too. I don't think I can fit both in my "Pygmy Zebra"😔


Attachments

Images (8)
  • IMG_20200125_043350~2
  • IMG_20200128_023638~2
  • IMG_20200128_031727~2
  • IMG_20200128_031237~3
  • IMG_20200128_031102~2
  • IMG_20200131_011558~2
  • IMG_20200125_043451~2
  • IMG_20200128_023605~3
Mark Boyce posted:

Mike, The change of switch looks good!  Your crane will have a great place to operate!  

Nick, Your plan looks good as does your description of what you plan to do.  I'll look forward to seeing your progress.

I finally sat down and did some painting on the AmeriTown Marvin's Drug Store kit I had planned on building when recuperating from knee replacement.  Well here we are 3 days short of 3 months and I finally got at it.  I had already washed the parts to get any ols off then a couple weeks ago. I sanded the edges smooth and used the method of painting mortar and wiping most of the color off to expose the bricks.  It isn't as even as I had hoped since it has been a few years since I had done it before. I painted the woodwork a burgundy color and will add other colors for the details another day.

2020-02-02 18.36.43

Looks good Mark.

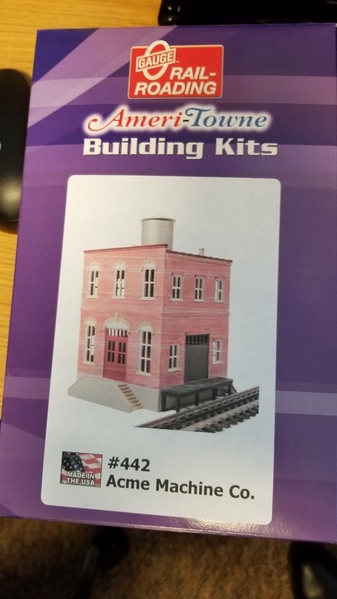
This was sitting on my desk when I got back to the office this morning so we can trade tips and tricks as we build.

2020-02-03 08.20.28

Attachments

Images (1)
  • 2020-02-03 08.20.28
Mark Boyce posted:

Mike, The change of switch looks good!  Your crane will have a great place to operate!  

Nick, Your plan looks good as does your description of what you plan to do.  I'll look forward to seeing your progress.

I finally sat down and did some painting on the AmeriTown Marvin's Drug Store kit I had planned on building when recuperating from knee replacement.  Well here we are 3 days short of 3 months and I finally got at it.  I had already washed the parts to get any ols off then a couple weeks ago. I sanded the edges smooth and used the method of painting mortar and wiping most of the color off to expose the bricks.  It isn't as even as I had hoped since it has been a few years since I had done it before. I painted the woodwork a burgundy color and will add other colors for the details another day.

2020-02-02 18.36.43

Mark:

The building is shaping up real well. The latest issue of OGR has a GREAT article on painting bricks. The author had several techniques of which I did not know. The technique that you are using is similar to that which I was taught by a guy that works in the Custom Model Railroad shop in Baltimore, Maryland with one exception. Since you appear to be using acrylic paint, before painting the bricks with white, thin some white paint with water and then paint and wipe the surface. It will take a bit longer to dry but there will be less stains from the wipe on the face of the brick, Some thin mortar smudges are OK, so, don't obsess with getting the face of the bricks perfectly clean. Again, great work.

Nick, Your plan sure looks good and you have a great idea of what you want to do. Thanks for sharing it with the rest of us and I will be fallowing for sure!

Mark, Thank you, as I stated it was Lew's idea, 1) to get rid of the s curve between the switches and 2) to give me a longer siding. Both worked great! See Mark, your just like Bob and Paul, more projects. You should stay young for a very long time! Now all you have to do is get the body on the same page! I hope you will post photos when your done!

Lew, Thanks as it was your idea! I could take the track to the other side, but as for now I am out of track, Plus I might want to put a building over there. Time will tell!

Butch I am sorry about your meltdown! But you sure have taken a bad deal and turned it positive! Nice work!
Bob, Nice looking building. I hope you post photos as you g along!

Ray, Looks Amazing! I could spend days on CAD trying to get there and never make it! I tried CAD for home building and was just faster for me to hand draw it out and turn it in the building dept! LOL

Well I don't know if I will make it out to the train room today, but if I do as you all can tell by the photos from my last post I have some track to paint and a switch machine to move to the new switch location.

You all did a great amount of work over the weekend and sounds like most had fun!

Have a great Monday and maybe you will get time for train and layout fun today also!

Bob, Thank you, That looks like a nice one to build!

Randy, Thank you, I forgot to mention that I did thin the acrylic, but I don't think I thinned it enough.  I did see the article in OGR.  It is very good, and I saw some things that were new to me also.  

Mike, Yes, I must have gotten the gumption to start painting from Bob and Paul's posts!    Actually, when I was feeling up to doing something, it was always trying to do something around the house to help my wife, go through all the stuff we brought back from my parents' and aunts', or just keeping up with our bills and my aunt's finances since I am power of attorney.  After those things, I was beat!  

Ray, the 3D printed building front and elevated girders and supports look great!

Last night I was working on a cardstock bridge for my lay-out, when my neighbor came over with his two grandchildren. The four-year-old girl is a "Young Sheldon"--a child genius. She loved everything, ran the trains successfully, mooched cookies off me, operated a powered pirate ship from my lay-out, and got into stuff.

Her grandfather told me that at school she often attends classes for higher grades, and since she behaves, they let her do it.

Randy Harrison posted:

Bravo, Ray! This is a superb structure. What CAD software do you use for the design?

Thanks Randy, I am using Autodesk Powershape Premium 2020 which I purchased almost 15 years ago before they were bought out by Autodesk. It is way more than is needed but I used it for designing parts and forgings before retiring.  I hear there are a lot of inexpensive software out there that can do the job like Autodesk Fusion 360 which my son uses and likes very much.

Mark Boyce posted:

Mike, The change of switch looks good!  Your crane will have a great place to operate!  

Nick, Your plan looks good as does your description of what you plan to do.  I'll look forward to seeing your progress.

I finally sat down and did some painting on the AmeriTown Marvin's Drug Store kit I had planned on building when recuperating from knee replacement.  Well here we are 3 days short of 3 months and I finally got at it.  I had already washed the parts to get any ols off then a couple weeks ago. I sanded the edges smooth and used the method of painting mortar and wiping most of the color off to expose the bricks.  It isn't as even as I had hoped since it has been a few years since I had done it before. I painted the woodwork a burgundy color and will add other colors for the details another day.

2020-02-02 18.36.43

Mark

Glad to see you are getting into it again. 

Like Randy said I found what works good is to thin the white or light gray to the consistency of milk, then apply in an area and angle the surface back and forth to let the paint flow through the mortar lines, when it starts to stick somewhat then start wiping with a damp cloth which is a learned art in itself. Depends on how much white you want on the brick faces.

This is one of the last ones I finished:

Brick_8286

Attachments

Images (1)
  • Brick_8286

Expanded the upper loop on my temporary 4' x 8' test layout only to discover I'm four A trestles short, hence a WTB listing--the project engineer has been duly chastised for inadequate planning.

I'm using a mix of GG flex track for the straights, and GG sectional for the 031 curves.  To attach feeder wires, I heavily tinned the ends of 18 awg stranded wire and stuffed it into the ends of the GG track in the space below the track pins for the center rail and an outside rail.  Doing so avoided soldering to the rail, and has worked well on around the tree Christmas set-ups.

Photos to follow.

Last edited by Pingman

After seeing Bill Bramlage utilize these New London Industries stencils for clouds I gave it a shot but in practicing I didn’t like that I was creating too many straight lines through oversprays. I tried to ensure better success by purchasing foam boards from Walmart and making templates for the stencils to create depth with a soft backing on the backdrop. I am pleased with the results but would like feedback from you guys before I call this project complete. 

Attachments

Images (4)
  • 8C52A883-2B6B-4851-8ED6-0A7C5A173033
  • AA8C3BBF-EC3B-4C45-944E-5B780899DADB
  • 6F7D7DCC-ECCD-4BB5-854F-469E8AB8F7F4
  • F4EC0467-EEB1-4777-A3B3-2AFA3BE0B062

Last night surfing the net I found some building flats I want to try from Trackside scenery to fill in the last area. So today I ordered them and I hope they will be here in a few days. Then I decided with the beautiful weather I would cut my PVC pipe and recut the ones I made too long. The smaller ones I am going to use as storage tanks. And with the really short ones left I am going to make some flatcar loads. Plus I washed the wife's car. That should get me a few extra brownie points LOL. Pics..............Paul 2

DSCN0024DSCN0025DSCN0026

Attachments

Images (3)
  • DSCN0024
  • DSCN0025
  • DSCN0026
Fireball RR posted:

After seeing Bill Bramlage utilize these New London Industries stencils for clouds I gave it a shot but in practicing I didn’t like that I was creating too many straight lines through oversprays. I tried to ensure better success by purchasing foam boards from Walmart and making templates for the stencils to create depth with a soft backing on the backdrop. I am pleased with the results but would like feedback from you guys before I call this project complete. 

I think they look very nice, the size looks good and the thing with clouds is like snowflakes no two the same. I'd have to see it on the layout to be sure however.

sidehack posted:
Randy Harrison posted:

Bravo, Ray! This is a superb structure. What CAD software do you use for the design?

Thanks Randy, I am using Autodesk Powershape Premium 2020 which I purchased almost 15 years ago before they were bought out by Autodesk. It is way more than is needed but I used it for designing parts and forgings before retiring.  I hear there are a lot of inexpensive software out there that can do the job like Autodesk Fusion 360 which my son uses and likes very much.

Ray:

Thanks for the information. Is Autodesk Fusion 360 More affordable? also, is it somewhat intuitive to use? I have never used a CAD program to pass on a drawing to either a laser cutter or a 3D printer.

Nice work everyone.

I finished the Lionel 1927050 Union Pacific "Excursion" Dome Coach "Columbine" tonight.  Used 1/3 of a box of Kleenex blowing my nose, so I am quitting for the night.  The dust from grinding must be irritating.

I can't tell if the pictures are clear.  My eyesight may be dictating that these are the last cars I detail, or my sinus condition is messing with my eyesight.

Have a good night.

Sincerely, John Rowlen

Attachments

Images (9)
  • IMG_1448
  • IMG_1449
  • IMG_1450
  • IMG_1451
  • IMG_1452
  • IMG_1453
  • IMG_1454
  • IMG_1455
  • IMG_1456

Mark,  I moved back to O-gauge six years ago after detailing 180 Walthers HO Passenger Cars.  My eyesight was much better back then.  It is relaxing painting late at night while I wait to help Mom in the middle of the night.  After she left the hospital two years ago, I stayed up painting and detailing people and passenger cars so I would be there to help if she needed me. She is much better now and more able to move through the house.

The habit of painting late into the night is hard to break. I have a dozen more boxes of Preiser 65602 Seated People I may paint while I can, before eye surgery this summer.  I might just want to detail another set of O-gauge passenger cars.

Sincerely, John Rowlen

Last edited by John Rowlen

Morning guys, Im up early as usual do to my buddy Tank! Now he is sleeping again! LOL

Lee D, Nice job on the pigs!

John, wonderful work on the UP Dome car! I am glad your done and can move on to something else relaxing! I hope your sinus problem goes away and your eye sight improves!

Mark I am sure your building is looking wonderful even without photos for Lew!

Well its early so I cant work on the house, but I think I can get out to the train room and paint the track I laid the other day!

I hope everyone has a great Tuesday and have time for there trains and layouts!

Randy Harrison posted:
sidehack posted:
Randy Harrison posted:

Bravo, Ray! This is a superb structure. What CAD software do you use for the design?

Thanks Randy, I am using Autodesk Powershape Premium 2020 which I purchased almost 15 years ago before they were bought out by Autodesk. It is way more than is needed but I used it for designing parts and forgings before retiring.  I hear there are a lot of inexpensive software out there that can do the job like Autodesk Fusion 360 which my son uses and likes very much.

Ray:

Thanks for the information. Is Autodesk Fusion 360 More affordable? also, is it somewhat intuitive to use? I have never used a CAD program to pass on a drawing to either a laser cutter or a 3D printer.

Randy it looks like you may be entitled to try the Fusion 360 CAD software for 1 year FREE because of our hobby

https://www.autodesk.com/campa...on-360-for-hobbyists

it sounds like a good way to test it out and at least get a taste of how these systems work before you purchase anything

Add Reply

Post

OGR Publishing, Inc., 1310 Eastside Centre Ct, Suite 6, Mountain Home, AR 72653
800-980-OGRR (6477)
www.ogaugerr.com

×
×
×
×
Link copied to your clipboard.
×
×