Mark Boyce posted:Ray, the hotel looks even better with that wonderful fire escape!!
Thanks Mark, I wasn't sure I could do it but glad I tried.
Pingman those car really came out nice.


|
|
Mark Boyce posted:Ray, the hotel looks even better with that wonderful fire escape!!
Thanks Mark, I wasn't sure I could do it but glad I tried.
Pingman those car really came out nice.
I didn't get much time on the layout, but I did install a few braces that I can fasten the plywood from the bottom so I can easily remove my modules if and when the time comes. Here is one example. Oh, I see I forgot a screw on the front one. ![]() The dark boards are just sitting on the joists to hold the 1:1 SCARM plan in place so I can see where the track will go.
The dark boards are just sitting on the joists to hold the 1:1 SCARM plan in place so I can see where the track will go.


gandydancer1950 posted:To prevent the spread of the corona
virus.....
I look at it this way, on my layout, even though it is 1943, and everyone is working hard to support the war effort, nobody dies. No resident of my layout is going to die overseas, and everyone gets to come home after the war is over.
It's tough going on the layout, for everyone, but it's always summer, and there are no viruses to worry about. Not for my population.
Not on MY watch.
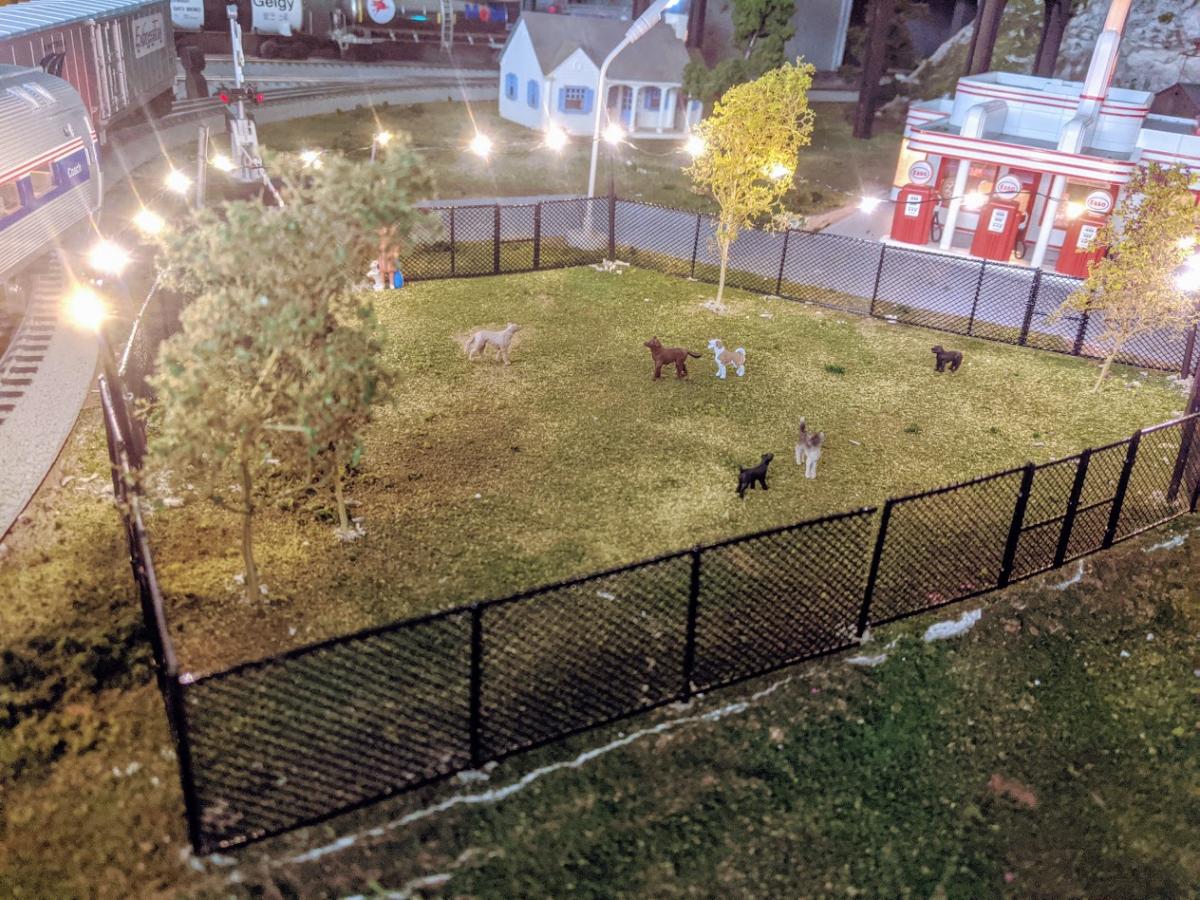
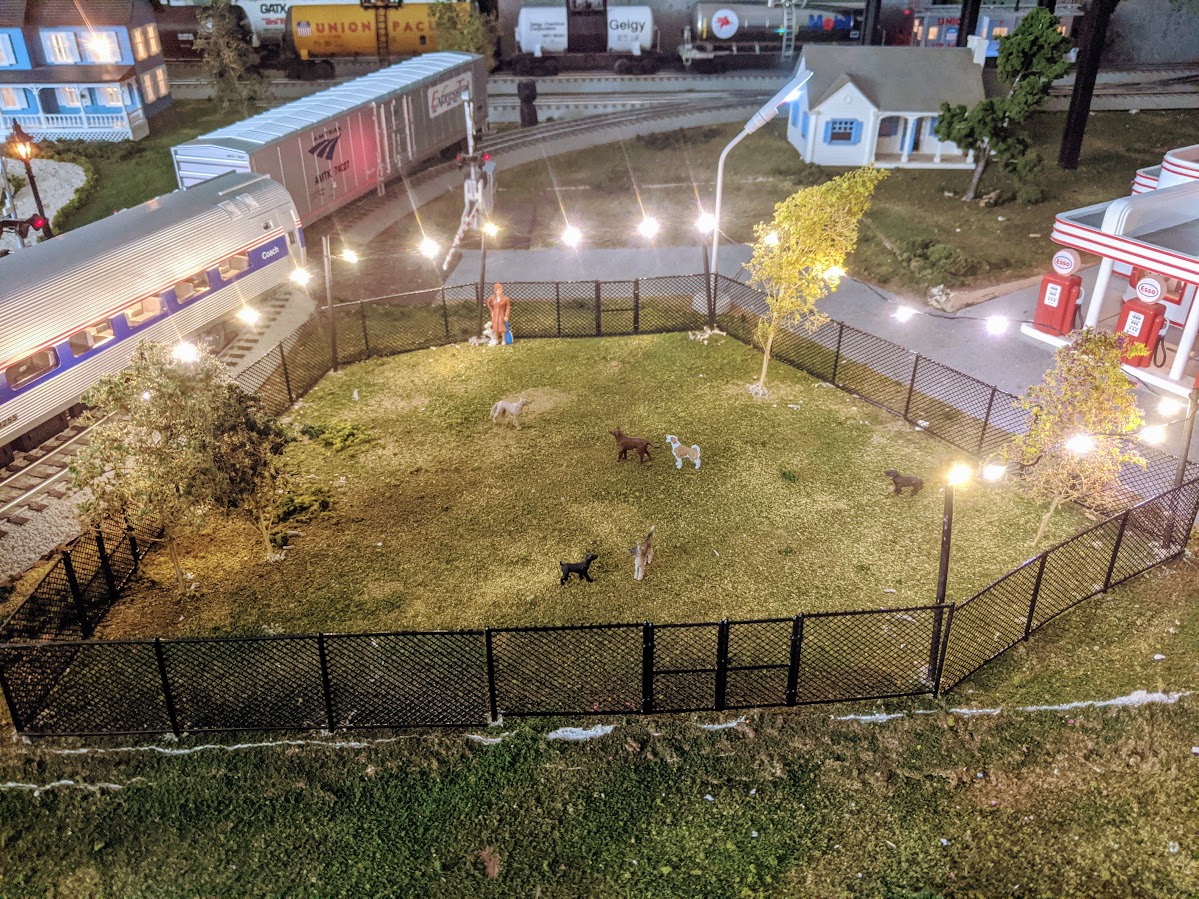
Added some details to the dog park:
- Used some inexpensive LED string lights. I just cut off the battery pack and wired them in to my layout DC source. The batteries included with the string lights were 2 x CR2032 3V but my DC source on the layout is 4.5V. The wires were originally silver, so I painted them black with some acrylic paint
- Used some bamboo grill sticks for the light supports, just cut them to length and painted them black
- Picked up a few Arttista dog figures to populate the park
mattrain posted:Added some details to the dog park:
- Used some inexpensive LED string lights. I just cut off the battery pack and wired them in to my layout DC source. The batteries included with the string lights were 2 x CR2032 3V but my DC source on the layout is 4.5V. The wires were originally silver, so I painted them black with some acrylic paint
- Used some bamboo grill sticks for the light supports, just cut them to length and painted them black
- Picked up a few Arttista dog figures to populate the park
mattrain,
I never would have thought of making a dog park - a great idea and it looks fantastic,
A suggestion; My local dog park has two large red metal trash pails, rounded tops with swinging doors. Next to each is a pole with a box on top holding plastic poop bags. Might be a detail for you to add.
Another is a small concrete pad, maybe 4' x4' under a pipe with a faucet. 2 Large water dishes too.
Lastly, benches for the dog's people
Screwed down the track on my O27 “door layout”... improved the running no end!
Matt, if you would like a couple of more "dogs" for your park, I have at least two O scale dogs you can have. Email me your address if interested--free of charge, of course.![]()
Where did the 5,000 people go? On a passenger train.
Dear Dearly Concerned,
The People on the "Valley of Bridges" layout surrounding the river and Village of Deichman are healthy and happy and always with a smile on their face. The Civil Defense Department prior to World War II built a large underground shelter off the tunnel through the granite ridge that separates the village from towns to the east. As part of the shelter preparation, two of the underground springs were tapped as a bountiful source of mineral water for the underground shelter.
As good planning and dumb luck would have it, the water has given residents a strong immune system and an occasional good cleaning out of the intestines. A few residents tried the water to make beer during prohibition, but the minerals kept the beer from developing a foamy head. Mineral water was the best that they could bottle, but its side effects are greatly appreciated today.
If you are riding the train and passing through The Village of Deichman, be sure to stop at the local restaurant or ice cream parlor and ask for a taste of our wonderful mineral water. It has kept our spirits up, but not the head on our beer.
Sincerely,
Town Council, Village of Deichman
mattrain posted:Added some details to the dog park:
- Used some inexpensive LED string lights. I just cut off the battery pack and wired them in to my layout DC source. The batteries included with the string lights were 2 x CR2032 3V but my DC source on the layout is 4.5V. The wires were originally silver, so I painted them black with some acrylic paint
- Used some bamboo grill sticks for the light supports, just cut them to length and painted them black
- Picked up a few Arttista dog figures to populate the park
Wow, I LOVE this dog park!
The only thing about this photograph that looks a little odd to me is the train to the left. I'm assuming that is an S curve with talgo trucks, but it really looks like the passenger car has derailed.
Started doing scenic ahead of track installation, more about this in SCENERY FORUM " My Li last Layout" updated 3.20
Did a bit of post-trainshow tuneup on the Ratlas and my Marx FasTrack bumpers.

The 12v screw in LED bulbs I used at the show didn't work out so good, so I installed regular incandescent bulbs. Plus, since Atlas, RailKing and Ratlas bumpers tend to ride low and get caught under bumper posts, I installed basswood crash boards underneath.
The Ratlas got a cracked bumper JB welded, the cab windows blacked out and LED lights substituted for the incandescent bulbs:
Then, I decided to give my prewar consist a bit of exercise...
Can't imagine who that mysterious shadowy figure is...

Mitch


I run conventional. Finally turned down the sounds on a Premier Northern and Premier Texas so I can hear myself think. Weathered one Pecos River Santa Fe double door boxcar. Then tested them for about half an hour. John in Lansing, ILL
This working from home stuff is exhausting......and no train time at all this week. Planning to get back to the machine shop project today. Working on some interior lights and looking for some prints to cover the interior walls with. I had to pack up my new to me MTH SW-8 Penn Central switcher and send it back to the seller. Its not running right and they said they would repair it under warranty. ![]()
Thank goodness we have a perfect hobby to pass the time while we're all stuck at home....
Bob
It's been a while since I last posted any work.
Started construction on the warf and ore boat slip.

In the background you can see the start of the electric arc furnace and annex building. To the right is the framework for the ore pile.
Maybe with these imposed stay-at-home orders I might be able to get some of the projects done.

Today as yesterday and probably tomorrow will be working on the "Hotel", I'm not complaining as it really helps take one's mind off what's going on at least for a little time.
If you look close you can see some poor souls who may be in quarantine.
Have 2 store front vacancies to fill before it goes on the layout


A couple dozen citizens of Warrenville still had their original bases on them. It was obvious to me when looking at a pic I posted the other day how ugly these are. Soooo, I pulled them off, removed the bases and touched up or repainted them. While I was at it I picked out about 30 more from my project box, removed their bases, and painted them.

Gonna place them in Warrenville now.
Warrenville population: 1,000 plus
Lionelski, Your painted people look good. Have fun painting.
John Rowlen
I have been sort of idle waiting for stuff to come in so I can move forward again. Got my package from Plastruct but when I opened it it was not my order but someone elses. I call them but unfortunately the woman said she would try to get my order to me but the Governor there just closed non mandatory businesses but she said if she could she would try to get it to me. To my surprise I got my order from Ross today which I was not expecting till Monday or Tuesday. I just got uncoupling tracks and bumpers from Marios the day before. Now tomorrow I can start laying out track so I can lay down cork and get it painted. The roof done for the machine shop. All I have to do is trim it to size. Pics....................Paul 2


Nice job John, I agree about the bases even though there is nothing wrong with using them.
As my man, the late great Yogi Berra used to say, "It ain't over 'til its over." Yogi was right. More small steps were made toward the competion of my Union Station. The largest of the small steps was the priming, painting and TEMPORARY placement of the lettering on the front of the building's roof (They will be centered and straightened when the letters are glued in place).

See my post on the OGR Scenery Forum at https://ogrforum.ogaugerr.com/...9#139948894538373849 for more details.
Got started on the lights for the building earlier, then work stuff popped up that I had to take care of.
I enjoy scratch building stuff when I can....I've made these lights for other projects on the layout before They are made from a short piece of 1/4" plastistrut tubing, glued to an inverted drywall washer. I run a screw through them to bend them into the hood shape.
Pro tip- when you need a third hand some upside down painters tape holds small parts in place.

I set a 3mm LED in place and filled the top of the tube with some hot glue.

wires soldered on all three. CAT 5e cable makes great project wire.

tested

A quick test in the building. The LED's are cool white so I'm going to paint them to warm up the color a little when I paint the fixture bodies.

painting is next and to plan how to install them.
Bob


 Limited by fractured bone in my leg. Was lucky enough to receive this delivery today.will sit in siding by REA transfer bldg when I can get back there again in a few weeks.
third rail posted:It's been a while since I last posted any work.
Started construction on the warf and ore boat slip.
In the background you can see the start of the electric arc furnace and annex building. To the right is the framework for the ore pile.
Maybe with these imposed stay-at-home orders I might be able to get some of the projects done.
I still need to paint the seawall which was made from corrugated cardboard. First will be a coat of gloss black for about the lowest inch to represent water then a layer of rust colored paint then the upper part will be probably a red oxide color to represent sheet pilings.
Lots of excellent projects everyone!
I finally got back to repairing the Lionel 6-12700 Erie Magnetic Gantry Crane. Mike G. made these nice parts for me which it uses as a linkage.

I also discovered another part was missing, but I was able to adapt another part. I needed a cylindrical part also. I cut a piece off this roofing nail and it fit nicely.

Here it is complete from the underside and regular view.


I took a video of all three functions operating, but I can't get it off the phone camera! ![]() If I ever get it off, I'll post it.
If I ever get it off, I'll post it.
I then worked on the tabletop of the layout. The tan board will support the 6" high end of the passing track. The salvaged shiny boards will support both levels where the crossover each other. Now I need to make more cleats.


Well my project today involved creating my version of "Savannah Harbor" which on my layout is simply a storage yard for rolling stock and engines that I like to run, but cannot stay on the main layout due to space. Its not an elegant solution but it beats trying to open unpack and the re-pack boxes every time I want to run a different train or some new cars. Here is a little photo vignette about my day today.
This was the starting point, just emptied the space (Marx freight house left to go) and moved stuff to another location to give me the open area I wanted to convert to the yard.

This was step 2, I covered the surface with grey foam board both for color and to provide some insulation to the top of the cabinets.

Step 3, after I got the foam board down (double stick tape) I began to tentatively arrange the buildings. My overall plan is that the piece of white wall behind the buildings will eventually have a "harbor scene" backdrop...I am thinking that this is a waterfront area along the Savannah River. Which today is a huge container port but has always been a shipping area.

Step 4: I got the tracks laid and put some "scenery" in place. You can see the Marx #422 Gantry Crane which straddles one track but can swing to cover the tracks to either side. This was a train show find in 2014 , knew I would find a use for it ![]()

Here is another view of where I finished off today. I inserted a Marx control tower as a Yard Operations office. The two buildings are both Menards one is the Gas Station that is designed to fit against a flat wall. I did have to modify this somewhat as it came with a modern vintage tow truck that I had to remove and replace it with a 1940 vintage truck. The station is Menards new "suburban" station, it is very small and well detailed. In my imaginary world, it sees about 2-3 commuter runs a day via RDC bringing RR and Harbor workers down from the City and beyond. Likely needs some additional details and some workers, maybe tomorrow.

I will admit (full disclosure) that the big limitation to this yard is that it is not physically connected to my main layout. The multipurpose use of the space I have the layout just prevents a cross room bridge at this time. It really just serves as storage although I might power it separately for some switching fun later on. I would need to connect the leads with some switches, but I need something other than the 0-22 Lionel switches I had, they are way to big and take up too much space. Paul2 showed some switches above that look far more compact and might work vice the 0-22's
Enjoy the weekend, everybody try to keep healthy
Don McErlean


Today I stopped all work on my layout. This time next week I'll start pulling up track and packing rolling stock in storage bins.
My wife confirmed I will get a much larger building very soon. I found a nice 12x16. My current 7x7 layout would be lost in there. Seems time again to look at layouts. And take down some 5' fencing, again.
Oh, one more thing. I get a new metal roof on my 30x50 garage!!!
Bill
B&O Fan posted:Mounted a mortar and pestle to Read's Drug store and got another background building lit up. Two more buildings to go and the city section structures will be done.
Scott
I bought one of those mortar and pestles just like yours from Wall Drug in South Dakota back in 1995. It makes a great addition to the building.
So much great work ongoing here.
we are up North on the Northport division. My focus will be on a bit of layout cleanup, some train running and a few trackwork projects .
The Governor here has decided that Hobby shops are not essential and if it has not already been closed, it will be by 6pm tonight. So we took a trip to Willis on Saturday to pick up some emergency supplies.
A new Haven RS-3 from MTH Railking has joined the roster. Its in the NcGuiness colors circa 1956. Loaded into DCS and ran around the layout kast night. its a keeper.
Also some rolling stock arrived inclufing some Reading Hoppers, a National car co Plug Door reefer and an Eastern States Refrigerator Plug door car arrived as well. I have a New Haven two bay hopper and a Lionel N5b caboose lettered for New Haven . Should make a nice New Haven freight.
Some photos for you .


LIRR Steamer - who makes that Reading hopper ?
Thx
Joe S
LIRR Steamer- that NH RS-3 looks sharp. I have a MTH LIRR RS-3 that has become a favorite. Glad you shared some cash with the guys at Willis. They are a great bunch. I hope all of our LHS's survive this shutdown.
Bob
dorfj2 posted:LIRR Steamer - who makes that Reading hopper ?
Thx
Joe S
The Reading Hopper is from a Lionel USRA Three pack Cat No.6-84149. Trainland had them on their website.
RSJB18 posted:LIRR Steamer- that NH RS-3 looks sharp. I have a MTH LIRR RS-3 that has become a favorite. Glad you shared some cash with the guys at Willis. They are a great bunch. I hope all of our LHS's survive this shutdown.
Bob
Bob
Willis has ben a long time favorite to go place. Steve Ford always gives you great service.
I’ve been working on an ice house for my Dad’s birthday this week. I didn’t post because I didn’t want him to see. Maybe to celebrate his big day today, Pops could signup for an account and post a picture of this on the layout himself. By the way, Pops is a legend and got me into this hobby when I was born. Thanks Pops!


Lucky Dad!
In the past few weeks I added a black skirt around the table, found a metal cart at target that worked great for my newly acquired Z4000, and added DCS with wifi.
Next will be running a power bus for Menards building with adjustable buck converters for power. All buildings are just loosely placed for now; final locations to be determined.


Access to this requires an OGR Forum Supporting Membership


