


![]() Wow, Mark, you've made great progress on your layout, and it looks very good'.. No dead spots on your track', and that is a very big plus'... The rest will be clear sailing'...😁👌👍🏻
Wow, Mark, you've made great progress on your layout, and it looks very good'.. No dead spots on your track', and that is a very big plus'... The rest will be clear sailing'...😁👌👍🏻
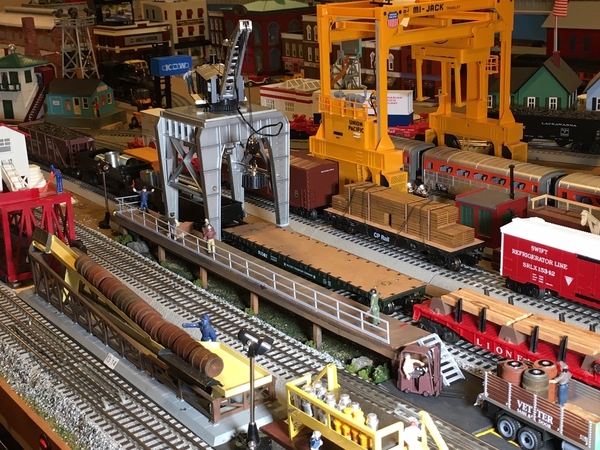
Ed, there is a lot of industrial activity going on in this area on the layout'. The extra foot extension makes it all work and it all looks very good'... Beautiful job'... That superintendent looks a little pushy..... 😁
@Quarter Gauger 48 posted:
Wow, Mark, you've made great progress on your layout, and it looks very good'.. No dead spots on your track', and that is a very big plus'... The rest will be clear sailing'...😁👌👍🏻
Thank you, Ted! I did have a dead section at first. I took the alligator clips off from testing and then forgot about it 😄
@Quarter Gauger 48 posted:Ed, there is a lot of industrial activity going on in this area on the layout'. The extra foot extension makes it all work and it all looks very good'... Beautiful job'... That superintendent looks a little pushy..... 😁
Thanks, Ted. As for the Super...well, what can I say?😁
Time to drag some hoppers away from the silo. Not much done, just put some cars away to make space for others.

Attachments
Images (1)
WOW been away for awhile and just checked out some of the amazing work thats going on here!
Mark, Great work on your layout and nice to see the first full run around it! Looks like everything went smooth. Congrats!
Ed, wonderful job on the crane! I hope you dont mind if I steal your idea about the platform for my layout! It looks great !
I havent been in the train room for 2 weeks now, but did get a chance to hang all the cool BNSF calendars I picked up about 3 weeks ago on the outside wall to the entrance to the train room. I will try to get a photo of that later today!
Everyone keep up the great work and I hope you all have a great week! Remember to try and find time for fun on your layout!
@mike g. posted:WOW been away for awhile and just checked out some of the amazing work thats going on here!
Mark, Great work on your layout and nice to see the first full run around it! Looks like everything went smooth. Congrats!
Ed, wonderful job on the crane! I hope you dont mind if I steal your idea about the platform for my layout! It looks great !
I havent been in the train room for 2 weeks now, but did get a chance to hang all the cool BNSF calendars I picked up about 3 weeks ago on the outside wall to the entrance to the train room. I will try to get a photo of that later today!
Everyone keep up the great work and I hope you all have a great week! Remember to try and find time for fun on your layout!
Mike, thanks, and no problemo! I'm flattered you are going to use the idea. Please post when you are finished.
@mike g. posted:WOW been away for awhile and just checked out some of the amazing work thats going on here!
Mark, Great work on your layout and nice to see the first full run around it! Looks like everything went smooth. Congrats!
Ed, wonderful job on the crane! I hope you dont mind if I steal your idea about the platform for my layout! It looks great !
I havent been in the train room for 2 weeks now, but did get a chance to hang all the cool BNSF calendars I picked up about 3 weeks ago on the outside wall to the entrance to the train room. I will try to get a photo of that later today!
Everyone keep up the great work and I hope you all have a great week! Remember to try and find time for fun on your layout!
Thank you, Mike! I do have some areas I need to adjust to run my steam engines. Some of the grade transitions are a bit too severe. But it is easy to take those sections apart and make adjustments, like I made on the first one I ran into.
Today, I took an older Lionel 15 inch vista dome car, Silver Pony and upgraded it to match the newer cars with full width diaphragms, full interior with people, green tinted window inserts (came with the silhouette windows), and ungraded fully sprung trucks.
I needed an additional Vista Dome to go with my 2 other Dome cars for the California Zephyr and this fit the bill.
Now to my next project, I have a lot on the work bench, just need to figure out what is next.
RAY
Attachments
Images (3)
")
")
")
Wow! You have to tell us more about this amazing upgrade.

Marci helped me put in some more shelving...

she also got me this cool looking taxi...
then we ran some trains, have a great weekend everyone !!
Attachments
Images (3)


Conductor Earl,
The upgrade to my California Zephyr Vista Dome Silver Pony, was easy, getting the parts was a little more involved. I mainly model the CB&Q, GN, NP, but have a nice collection of steam from the UP, SP and PRR just because. I wanted to model the California Zephyr, but knew my home layout was just a little too small for the 21 inch cars made by Lionel and others.
Over a year ago, I picked up a 15 inch Lionel Southern Railway car that had interior detail including figures, full width diaphragms, and scale sprung trucks for a very good price. I knew I could use the parts for something later on.
I recently found the Silver Pony shell on ebay for a price I could not refuse. I knew the parts were interchangeable. So all I had to do was to install all the parts from the Southern car. They fit without like a glove.
Now my 9 car Lionel CZ set cars all have detailed interior, full width diaphragms and scale sprung trucks. I lean more toward scale models, and yes, I know the 15 and 18 inch cars are not full scale, but my home layout will not accommodate 21 inch cars. So there has to be some compromise. I have a Legacy set of CB&Q F3 A/B/A units in silver, changed the pilots to passenger pilots with from P&D and added grab irons to the front of the engines.
I also have several Legacy E7's and E8/9's that I have added new pilots and correct grab irons to the front of the engines. Several of these I painted and lettered.
My favorite part of the hobby, is upgrading and improving the overall appearance of the model. I've been doing this for years and find this most satisfying.
RAY
Ran some trains last night and made some videos. Pretty much all the trains are from @MrMuffin'sTrains. Enjoy
John
Finished assembling the TW Trainworx Lackawanna Bridge Kit. Beautiful bridge and fun to assemble. I had to get it done because I am into tracklaying right where I want to use it and I want to make sure it fits and plan the scenery around it. It will be right near one of the entrances/exits of my helix and return loop. But which entrance/exit it will fit the best is unknown. So I am playing my usual cut-n-try game--"full speed ahead" and darn the track plan!
I also purchased an MTH/Marklin Leipzig station which finally solves my passenger station issue. I wanted a stub-end terminal because I haven't got space for a through terminal. This should be perfect. I am going to add TW Trainworx platform kits to the rear of the station. I think this will make it distinctive and confuse the viewer who looks at it and thinks "tinplate?".
So the layout is ending up with two major tinplate pieces--the Leipzig station and the Lionel Backshop. There will be many lionel operating accessories mixed in with scale hi-rail structures--all on a gargraves/ross hi-rail track layout with the most realistic scenery that an inexperienced layout builder (me) can conjure up. Rules? What rules?
Don
Attachments
Images (1)


 Got around to working the Switch Order in session no. 2. B6s 505 switches out 2 boxcars at a freight house and drops 2 empties. B6s no. 5244 hauls 4 boxcars and 2 empty reefers from the yard to town, and its (fictitiously) 10 am well after the local commuter train and regular mail train have passed through. So the locals will be uttering discouraging words while the switching for local businesses clog the intersection by the train station. Switching was complicated by having to pull out cars and return them to get to traped cars. It makes switching more interesting but time consuming. After the town switching was completed, 6 cars were hauled to the yard where 2 reefers were coupled to the next outbound nine car freight.
Attachments
Images (5)
Hi`, Mark, the layout looks great, wish you all the best with it, Phil
@Love trains posted:Hi`, Mark, the layout looks great, wish you all the best with it, Phil
Phil, Thank you so very much!!
Morning guys, I don't have a lot of time as I have to go to a meeting. But I said I would post photos of the wall going into the train room. So here you go!

I hope you all have a great weekend and find to enjoy your layout and trains!
Attachments
Images (2)
Yesterday I added a dark green, non-glare, coating to the short hood of my new C630. Also found some time to run some trains. Happy Weekend to all!
Cheers, Dave

Attachments
Images (1)
Videos (3)


Dave, the green hood looks great! That's a lot of ore you are hauling on your wonderfully sceniced layout!
Dave, that is one beautiful layout. Love the track work.
needed more yard lights around the layout, started printing some more


Attachments
Images (2)

I am still painting the last 144 Preiser 65602 Unpainted Seated People that I have. It is taking more time than usual. I am splitting time gardening around the pool, painting the figures for my passenger cars, and my caregiver tasks. Where do all the dirty clothes and dirty dishes come from?
Sincerely, John Rowlen


Attachments
Images (2)
My son set up a Patriot train to help celebrate the 4th of July. As you can see, his train includes a number of Lionel's US President cars.
Attachments
Videos (1)

I have two projects stopped dead for parts, a 2-4-4-2 being bashed from a couple of Marx 999's, stalled until l can figure out reverse wiring, four cabooses stalled until l can get Grandt Line windows and doors, so l began a Brennan O B Long box kit. Now this kit is different from dozens of other structure kits l've built, as it builds up in press on layers =less glue, more thought. I am considering enlarging it as I plan to make it a caboose shop, a smaller one that was intended, but lost space to the creosote plant. Many kits use metal corrugated siding; this uses paper corrugated. Back to work ...
Fencing......
Back to the ink jet printer for a fence to put in front of the new building flat. Fence print scales to 6'. I made the posts from some balsa scraps and the stringers are thin styrene. The posts are glued up and I will work on the stringers after the glue dries.
Bob


Attachments
Images (3)


Good morining everyone! Looks like everyone is staying healthy and trying to keep busy. Got another video done on Lionel's Veranda turbine and I am now working on another for Menards' Criple Creek Lumber Yard. So stay tuned for that one and also keep an eye out for a video of the new Lionel catalog. Thanks for reading and happy railroading!
P.S. Sorry for it being a long one but there is a lot of history behind the locomotive and it is just plain huge!
Wow some great stuff here!
Dave nice job on the engine and what an amazing layout!
Ray, looks like you have a great start on your new lighting!
John, I cant believe your still painting people! You have more people then they do in NY City! LOL
Bob, looks like your tired of your neighbors to be building a fence! Looks good!
Well If you all will bare with me, you might like the end of my little story. I have been working on a motorized chair that I picked up for $50. It was all beat up and didn't run. The reason I picked it up is because my 85 year old mother might be coming to stay with us and she doesnt get around very well.
I took it all apart cleaned everything, sanded and repainted all the body parts and added 2 stickers, The wife loved the paint job until she realized what the colors were from. Here is a look and I hope I dont get in trouble for posting it here. It is some what train related! LOL


I have to wait another full day for the clear coat to cure then wet sand and polish!
I hope you all have a great week and find time for your layout and trains!
Attachments
Images (7)
That is awesome Mike!!!!! I hope Mom has a sense of humor......![]()
The neighbors are fine....just don't want anyone wandering onto the ROW.
Looks great, Mike! I hope it works well for your mum! From phone calls it sounds like my mum is still doing okay at the personal care home with her walker. She and Dad will both be 90 later this year.
I worked a good bit on my trestles in the inner part of my over and under this weekend. As one of you pointed out in a PM my steamers would have trouble with my transitions to and from the grades. Also there was a dip in the trestle line. The H9 has the lowest pilot and shorted there and at one transition from level to grade. They are all fixed now, I think. The H9 threw a tire on the trip around and it was getting late, so I didn’t get the other H9 off the high shelf. There really isn’t anything new to see so no photographs.
First time posting on this topic. ![]()
Over the weekend I have been doing some wiring on my 4x6 table. I got some of those selectors that were made by Atlas that allow you to route electrical current so you can change which route trains can go in when you have several switches, as well as allow you to run two trains at different voltages. I have two ovals that are connected via two pairs of switches, and then the inside oval has a siding, which then splits into two different areas to park a few cars. Everything seems to be ship-shape so far, and now I just have to mount the selectors themselves, and wire them to the transformer. I'm very happy with the way it came out. Next I'm gonna try to wire up some accessories and lighting. Also I wanted to add a very small siding to the outer oval, which I primarily intend to use as a dead-end for things like gang cars or trolleys to bump into.
Finished 3 yard lights 

the Gimlich & White Brewery has been waiting for more barley and hops etc. but during these times there is a shortage of grain sacks and pallets so time to make some


and production starts


Attachments
Images (8)
Taking the five Alaska 21" passenger cars for a loop around my layout. I am checking the recent cars I detailed and boxing them for storage. I have run out of people to paint and the energy to paint more.
Sincerely, John Rowlen
Attachments
Videos (1)

@John Rowlen posted:Taking the five Alaska 21" passenger cars for a loop around my layout. I am checking the recent cars I detailed and boxing them for storage. I have run out of people to paint and the energy to paint more.
Sincerely, John Rowlen
Very nice, John. I’ve been away for a couple of weeks helping my brother after spinal fusion surgery, but I couldn’t resist ordering a set of those amazing Alaska cars (a couple of years ago, my brother and I went to Alaska on vacation and road them from Fairbanks to Denali to Anchorage). I did make it home for a couple of days and ran the cars to be sure everything was good (it was!!!), and I used the engine that was on the layout - another recent purchase - and it was the same beautiful CP set you used - they really do look great together. Unfortunately, I don’t have your skill OR PATIENCE to add passengers!!! When I get back home, I’ll have to run out my set of TMCC Alaska F3’s to pull the consist.
Hi Everyone -- been away for awhile. Hope everyone is healthy. Those Alaska cars would look good on Brian's Alaska layout. John has more railroad people riding in cars than we have in our whole town here in NH. Time to clean tracks for me.
Good to hear from you, Matt! I'm taking a little time each day testing different engines on my main line, and while I have each one out, adding BCRs if not already in, doing a lubrication, and noting any problems with each engine. A complete lub program for all engines will be a first for me in over 50 years of having trains. What a slacker I have been! ![]()
didn't have enough trash around the layout ![]() so had to start making some
so had to start making some

Attachments
Images (1)

@Mark Boyce posted:Good to hear from you, Matt! I'm taking a little time each day testing different engines on my main line, and while I have each one out, adding BCRs if not already in, doing a lubrication, and noting any problems with each engine. A complete lub program for all engines will be a first for me in over 50 years of having trains. What a slacker I have been!
Mark, what are you using to oil friction areas. I have a reasonably small oil dropper, but no matter what I do I end up with oil migrating down the wheels and onto the track. Obviously applying too much oil, Is there some type of micro oiler around? I already repack white grease into curved small tip syringes for the gears - works well. Jeff
You want a nice needle tip oiler. A blunt syringe.
Regardless, Gramps would oil a loco on its side, let it sit, flip it, do it again, sit, wipe, repeat until the rag had no black, then stand the loco on a rag for the night and let gravity do it's thing. Wipe pooled excess and run. You seldom saw a freshly oiled wheel roll.
You can't rush oil.
He cleaned trains like that because they took his Garrand away. Cur Ra Hee ![]()
Add Reply
Sign In To Reply
