


Ditto on Chattanooga. Went to a train convention there... can't remember if TCA or TTOS? Today l fabricated doors for this Danish kit for an engine house l am making into a car shop. Was well along when l realized the kit did not provide doors, and l thought some had been offered, Grandtline?, but l had none. Need another color of paint, so stalled..
I finished off the day getting a second coat of paint on the legs and the table frame. Tomorrow all I have to do is cut out the notch in the plywood top and I can start taking it down and putting it back together in the basement... ...Paul 2
Great pictures everyone, Farmerjohn, that’s a real neat railroad bridge topping a curve and it’s really a long bridge, which would look great on your model railroad. Also Incline Mountain Railway is a fun place to visit. The pictures I’m showing were taken from a video we did on the layout. Happy Railroading Everyone....


Attachments
Images (9)
John, As Larry wrote, Neat photographs. I have not been to the incline in Chattanooga, but it looks exciting. I have gone on the Duquesne Incline in Pittsburgh and the one in Johnstown, Pennsylvania. The one in Johnstown took mt breath away starting down. of course I don't like roller coasters.
Larry, those are some really nice photographs!
WOW, Larry has pulled back the veil and shown some of the nuts and bolts of his layout.
Anyone else notice that the traveler cables on the incline car are off the pulley's?
I have been on the incline in Chattanooga and all I can say is, it is not for those who are afraid of heights.
@RSJB18 posted:WOW, Larry has pulled back the veil and shown some of the nuts and bolts of his layout.
Anyone else notice that the traveler cables on the incline car are off the pulley's?
Not sure what that particular cable is, but it appears in other images of the incline. new word of the day "Funicular" Basically you should not see cables on the "down direction" of either car. The cables are attached to the "up direction" of each car, not unlike a teeter totter or a modern counter weight elevator. If the cars are balanced weight wise very little energy is used moving the system.
I started the Union Pacific "City of Denver" Dining Car from the Lionel Excursion 2-pack #3 today. I will be painting tables, table tops, seat cubes, seat backs, and gluing the seat backs to the seat cubes. I have Preiser 65602 Seated People that I have painted waiting to glue in the car.
I thought of building the custom, scratch-built kitchen I built in my Santa Fe Dining Car, but the Santa Fe car has windows into the kitchen that the Union Pacific "City of Denver" does not. I will see how creative I can get. Maybe just a cook looking out the Door Window,
Seat Backs Installed: I cut the 1/4" Plastruct strips into seat backs after painting the strips. They were applied using Krazy Glue. I will paint the seats another time to fill in gaps along the seat back edges. The Preiser 65602 Seated People I painted will then be installed.
Installing Seated People: I am now grinding, gluing and installing the Preiser 65602 Seated People that I painted.
After this car, I have to decide if I will paint the interiors of the four Union Pacific cars in the Bush Funeral Train. The cars have Lionel people that would have to be removed.
Sincerely, John Rowlen

Attachments
Images (20)


It's me again Verne. I made a pattern from a large cereal box and masking tape. I selected a piece of plywood. I cut the wood with my ancient Craftsman band saw. The light bulb above my head came on again. "I can use this box for a engine shop". Here's what it looks like before the track gets screwed down.


A few #6 wood screws, a little wire, and a momentary push button for siding power. I'll add a video tonight of a GP9 testing the new spur.
Bill
Attachments
Images (2)


@Odenville Bill posted:It's me again Verne. I made a pattern from a large cereal box and masking tape. I selected a piece of plywood. I cut the wood with my ancient Craftsman band saw. The light bulb above my head came on again. "I can use this box for a engine shop". Here's what it looks like before the track gets screwed down.
A few #6 wood screws, a little wire, and a momentary push button for siding power. I'll add a video tonight of a GP9 testing the new spur.
Bill
This is the way I like to work. Keep it up!
Don Merz
Late this afternoon I finally got the table done. Decided to screw the top down. One less thing to do in the basement. So tomorrow it should be a piece of cake, a walk in the park but still keeping my fingers crossed my measurements are right. The table should drop right into place. Couple of pics.................Paul 2


Attachments
Images (3)
Paul, the table looks great!!!! When you said ‘drop into place’, I thought I would probably drop it down the stairs. LOL. It’s a good thing I have a lower level and can just walk out the door from the layout to the patio!
Bill, I love when the lightbulb comes on. Mine usually comes on, then pops off! Oh!
We’re so sorry, Uncle Albert; but we haven’t soon a bloody thing on the layout all day!
a few of my postwar gems.....


Attachments
Images (9)


Take a warped, ugly, Plasticville Mfg. Co building, add some glue, green and primer paint, some plastic from an old folder for windows and about 2 hours time. I really like the way this rainy day project came out.
Before and after pics:


Attachments
Images (3)
Hey Gandydancer1950,
I enjoyed seeing your 200 series ALCO's. 

My first engine was a 1055. I no longer have that one but I found two more for $40.

Bill
Attachments
Images (3)


Glad to see everyone is still having fun here. Sorry I’ve been gone Summer is so busy for me keeping up with outside chores on my small Hobby Farm. Was out in the garage this morning it was very cool out this morning so I ran my NYC Hudson with a full manifest of Lionel Standard O cars had the garage smelling like Big Boy smoke in minutes come on Autumn weather
Attachments
Videos (1)

Everyone, great work on your railroads, Gandydancer, cool layout, cool cars, fantastic scenery, Wow, Lee Drennen nice train and video, and I love your truck pictures to, fantastic, Trumptrain, neat pictures even if the bike rider had a wreck, Super great layout, Awesome, Mike G., I understand Time, work, everyday is a new adventure, but, take a few minutes for some updating us with pictures of your cool layout, Please..... Sidehack, I love looking at your pictures as your scenic detailing is so realistic, Super good work, and this being page 941, this is one Long Thread, Don McErlean, where’s your pictures, they bring back Great Memories, it’s time for more Marx Trains, they’re Great., So, Everyone, have a safe, Healthy, and fun rest of the weekend.... Pray continually, Happy Railroading... 


Attachments
Images (4)
leapinlarry - THANK YOU for the complement! I also think the Marx toys are just fun, no where near the superb modeling skills that I often see in this thread but just plain fun. So here are a couple of pictures for today. Thanks for asking!!
This is the Marx "1998" Alco S-3 switcher (a unique design that appears to be 8 wheel but in fact only the middle 4 wheels are powered) pulling its freight consist of a UP cattle and an auto rack out of the depot on its way to return cars to the interchange point . She was new between '55 and '62.

Here is the humble Marx Set #4205 Freight which appeared in the 1958 Allied Toy Distributor catalog (less the boxes in the gondola). I acquired this just this summer, complete with even the two coiled red/green wires to power the track from the included transformer and the track power clip. I really wanted the product boxes, which were included when I purchased the set but not originally, but Marx used them in several gondolas and they are not easy to find. However, to illustrate the power of toy trains (still) I set this up on a game table on the front porch of our summer residence and my 6 year old nephew was absolutely fascinated and loved running them...we may indeed get a future forum member out of this.

Speaking of Marx, I was trying to find some trucks for my Marx freight station. The freight station is not that uncommon but it is HUGE almost too big for many layouts although it is roughly O' gauge. Then I found these trucks, also Marx...a little big but they look great with the station.

Finally for today, one of my favorites, the "Cape Canaveral Express" made between '59 -64 during the height of the "space race" that finally led to the Apollo landings on the Moon.

Best Wishes Everyone, keep healthy and safe.
Don
Attachments
Images (4)


Finished the riverbed and all it needs is for the clouds to open. Once I reinstall the bridge I will add more vegetation, trees, etc.
Dave
Attachments
Images (2)
")
")
Putting Preiser 65602 Seated People that I painted in the Union Pacific "City of Denver" Dining Car. I installed seat backs on 32 seats.
I also installed a scratch built Refrigerator and partial Grill in the empty Kitchen area. The kitchen is seen through a door only, no windows.
Still Putting Seated People in the Dining Car: The Sofa-style seats take more grinding to fit people at the tables. I am now finished placing people at the traditional tables. I posted some progress pictures.
Building a Refrigerator: 1. Cut the front face of the refrigerator out of white Plastruct styrene, 2. Cut two doors out of GREY Plastruct. 3. Glue doors to front face. 4. Use a "pin drill" to make holes for the door handles. I used regular staples bent with a needle-nose plier. 5. Slide staple/handles through holes and use scrap plastic to space/lift the handles from the door. 6. Apply glue to back of staples/handles. The rest of the refrigerator sides are built with Plastruct sheeting.
Note: The Kitchen door was blocked by a wall in the floor piece. I had to cut it away to see the refrigerator and rest of kitchen after I moved the Refrigerator and Grill to the left 1/2 inch. The last picture shows the floor marks from the removal of the wall. I used the scrap right-angle wall to line up with the refrigerator.
Sincerely, John Rowlen


Attachments
Images (12)


Working on a steel girder bridge.

Stringing LED lights under the bridge.

Making the girders.
Gary 🚂
Attachments
Images (2)


I've spent one day each weekend since June as a brakeman at a local tourist railroad. Yesterday was a VERY long day and I'm not scheduled for any other days in August.
I think I was starting to burn out and haven't had much motivation for my layout. I need a break to focus on tbe trains in my house, so hopefully you'll see some updates soon...
@John Rowlen posted:
I also installeda scratch built Refrigerator and partial Grill in the empty Kitchen area. The kitchen is seen through a door only, no windows.
Sincerely, John Rowlen
John, nice work and photos. Question: how did you make the refrigerator; it looks great!
@Mark Boyce I finished re-gluing my Thomas, West Virginia enginehouse I purchased from a modeler who is switching scales. Some of the rafters and center supports had come soose in transport. It is a Carolina Craftsman Kits product. I have it out of the train room so it doesn't get damaged until I am ready to place it on the layout. The seller had taken the doors off for shipping. I left them off but placed them in a plastic bag fore safe keeping.


That is really nice Mark. Post more photos as you progress on this project!
@WP posted:That is really nice Mark. Post more photos as you progress on this project!
Thank you, John! I most certainly will keep everyone up to date.
Made some progress on the pole and light for the new siding. The pole is 3/8" dowel and the light is from Evan Designs. I was going to scratch build something with a LED but it was a spectacular failure. I had a few of these lights so I decided to go with that instead.
Then I needed to figure out how to mount the light to the pole. I started with some small balsa pieces, also went down in flames. I had some 3/8" styrene tubing which slid perfectly over the dowel and holds the fixture nice and tight. I put a few drops of gorilla glue on the styrene and the arm of the light to hold it in place.
Painting and wiring are next.
Bob
 (don't know why this pic is sideways)


Attachments
Images (3)


Well the old saying is good things come to those who wait. I guess I fall into that catagory or I just fall into it LOL. I have a needle in a haystack list of hard to find items. It has gotten smaller over the years. So about a week ago I see on the forum RMT got a bunch of Weaver TOFC's from a hobby shop that closed. As I went through the list there at the bottom were not one but two Weaver Rheingold trailer on flat car and they were different numbers made for the NJHR's. I didn't hesitate and ordered them both. With these two I have pretty much aquired all the TOFC's Weaver made. They came today just as I was going to go and work on the train table. Pics..................Paul 2


Attachments
Images (2)
just enjoyed running my prewar 238E with postwar 2400 series green passenger cars.....
Attachments
Images (1)
I am in the process of adding three additional pre existing module layers: a layover passenger yard, a freight yard and a triple track coal tipple. All being done simultaneously. Adapting the carpentry on all three, then cutting in turnouts, then adapting the track connection on all three, then wiring all three. It seems to go smoother when I use one discipline at a time in each of the areas, somewhat like a production line.
A dear friend passed recently and I am splicing in three scenes from his pike into my RR. A continual reminder of a very special person.
A building technique I use when knitting a level scene onto an existing layout is to cut several inches of the 1/2" Homasote top layer back from the plywood edge for several inches on both the add-on and the existing portion then using a one piece non hardwood 5 ply 1/2" plywood splice gusset in place of the removed Homasote. In this case, I say non hardwood plywood because on my RR, each point of connecting the addition involves attaching small level yards onto a 1% grade. Because the grades are gradual the softer plywood provides an easy vertical transition curve of sorts. Stiff hardwood plywood may torque the right of way.
Also, substituting 1/2" plywood bridging for Homasote at an cross over can be a way to realize an extra fraction of an inch of vertical clearance in over/under situations.
"A dear friend passed recently and I am splicing in three scenes from his pike into my RR. A continual reminder of a very special person."
What a wonderful tribute.
Morning everyone, what great work is being done and some really wonderful photos! I see things really haven't changed. Larry still has his Amazing layout, John R. is still painting people! LOL, Paul2 is still finding room to make his layout larger! Mark is well underway with his layout.
But as for me I am in the same boat as Lee, the CEO has come up with another project for me right when I thought it was Train Room time. I did get a chance to get out there this weekend and pulled down my military train to switch out with my freight train. I then realized that the shelfs above the layout where I store my off the layout trains is a bad idea as I have to get up on the layout to swap them out. Something I will have to work on when I get a chance. Here is a photo of my Military train, I didnt get far but it was just nice being in the train room!

Now I know its not a big deal, but I took my truck to the local Mech. to have it looked at and come to find out he has a speeder. I know almost everyone has a speeder and its not that big of a deal. But this one was handed down to him from his dad who road it on the logging rails here in Mason County. I hope you enjoy this little find!


I hope everyone has a great day and finds time for there layout and trains! Most of all I hope you all have fun!
Attachments
Images (5)
This wasn't necessarily today per-say, but over the weekend. I recently finished (for now at least) construction on a mountain that dominates the back right corner of the layout. I'm very happy with what I've done so far, and plan to add bits and pieces to it in the coming months whenever I can find things. Believe it or not, the abandoned Frick Estate atop the hill is a Halloween decoration I got from CVS years ago. Still works too!
I've attached a progress of shots going back about a month or so of the stages of construction. I'm incredibly pleased it no longer looks like a bunch of styrofoam glued together.


 The mansion before weathering


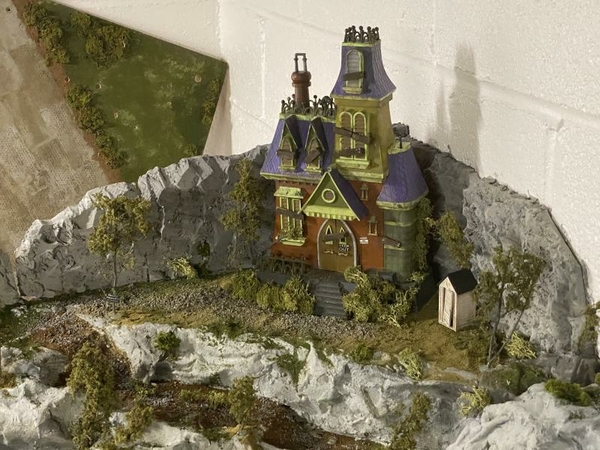


 I also added some critters as well just yesterday.
Attachments
Images (9)


I bought this MTH GP30 used approx. 2 years ago. I thought something about the sound wasn’t quite right from day one. Lately, it had really gone downhill. Sounds were scratchy and distorted. I gambled on replacing the speaker since that would be inexpensive and easy, hoping it wasn’t a bad sound-board, or anything more exotic.
Popped in the new speaker and Voila!, all better. I enjoy this loco and it’s nice to have it back 100% healthy.

Attachments
Images (2)

@Ralph M posted:I bought this MTH GP30 used approx. 2 years ago. I thought something about the sound wasn’t quite right from day one. Lately, it had really gone downhill. Sounds were scratchy and distorted. I gambled on replacing the speaker since that would be inexpensive and easy, hoping it wasn’t a bad sound-board, or anything more exotic.
Popped in the new speaker and Voila!, all better. I enjoy this loco and it’s nice to have it back 100% healthy.
That’s good news. I may have a similar issue on an MTH PS 2 engine, so how hard was it to replace & where did you get the speaker ? Thks, Rich
Trestleking, On this loco it was a matter of dropping the fuel tank (4 screws), then dismounting the speaker (4 screws) and unplugging the lead. Reverse the process to re-install. It's important that you match the electrical properties of the old speaker with the new one - so many ohms, so many watts. This info is printed on the old speaker. I found the replacement on eBay.
Note: this loco is an original (5v) PS2 and the original speaker was specified as 16 ohm and 5 watt. MTH doesn't make that speaker anymore - the replacement speaker is 16 ohm and 3 watt. Seems to work just fine.
I'm getting ready to begin working on my oil refinery again. Have some scenery to work on on the river Bank. Need to put my ballast in and finish the unloading facilities.
Attachments
Images (5)


Wow John. Very nice, love all the lights.
Bob
@farmerjohn posted:I'm getting ready to begin working on my oil refinery again. Have some scenery to work on on the river Bank. Need to put my ballast in and finish the unloading facilities.
Wow!
Farmerjohn, Amazing refinery, beautifully done... Wow. This picture was taken several years ago and I knew it was going to be great.... You’ve come a long way and it’s fantastic. Thanks for the pictures... Happy Railroading 

Attachments
Images (2)
Add Reply
Sign In To Reply
