Haven't done much with the layout of late, but I did discover how Norma Bates Kitteh was getting in trouble online...

Mitch


|
|
Haven't done much with the layout of late, but I did discover how Norma Bates Kitteh was getting in trouble online...
Mitch
Mike That’s what I do our garage is far from the house I sometimes sneak in and get a little train time in when I’m suppose to be doing yard work the “Boss” has no clue
@John Rowlen posted:Placing Preiser 65602 Seated People in Lionel's 21" "City of Portland" Dome Dining Car.
I decided to paint Preiser 65602 Seated People for my George HW Bush Funeral Train passenger cars. Here are pictures of the grinding process to place the seated figures against the table when seated. I used a Dremel Hand-held with sanding drum to make the cylindrical cut into the figures. Some are straight forward cuts and others like the woman with the cane are off-set from the side.
Just a little was removed from the bottoms of the figures. I used Krazy Glue to fasten the figures on the seat and against the round table.
Here are some pictures of the figures as they are placed at one table, I have two more tables to do, in order to cover up the glue residue from the Lionel Little People that came in the car.
Sincerely, John Rowlen
John I think this is your best work yet love the round tables
@mike g. posted:
Which brings up my question, I want to take down the storage shelfs I have over the layout so I dont have to get up on the layout to change trains out. I am looking for some suggestions!
For storage, I would suggest building a storage cart on rollers that would fit under the layout. Cheers, Dave

hello Mike, how about an old dresser under the layout for train storage...

@mike g. posted:Morning guys, just wanted to check in and wow what great work being done!
Nothing new from me as I was informed by the CEO that trains and the train room are for rainy days and winter! Summer and sun are for yard chores! LOL I still try to sneak in to the train room.
Which brings up my question, I want to take down the storage shelves I have over the layout so I don't have to get up on the layout to change trains out. I am looking for some suggestions!
I hope everyone has a great Humpday and finds time for there trains and Layouts! Buts most of all please have fun!
I'm glad to hear from you Mike! We have had a hot, humid, dry summer and I feel it. When I was younger, I got by with this kind of summer, but have to be more careful now. So, some projects are being put off until next month.
I have been working outside on one project that is layout related. When the builder put on the sun room addition for my in-laws that has what is now the train room underneath, they didn't care if it was finished. He left them a mix match of ceramic tiles left over from various jobs. They were in the garage when we moved here, but we put so much stuff in the garage, I moved the tiles to the shed shortly after we got here in 2011. There was no time to install them as our daughter moved her art things in the room. Actually neither she nor I ever cared to install them. We were happy with the cement floor. My wife asked if I was going to install them in at least a couple times. I acquired a riding mower from a friend this year, and it is just too crowded in the shed with the mower. I decided to install the tiles, but I have been scrubbing each tile outside with Lysol since they are dirty from the shed. I have almost completed that job, and have been stacking the tiles in piles under the layout. I have 7 different styles, so I will have to figure some plan that is fairly attractive. I will be able to put the tiles in under the part of the layout with legs, since the 40" Mianee legs were about 2" too short to match the shelving I had already installed. I have blocks under each leg, so I'll just take care of them one at a time.
Great idea Brian that’s what I use
With my budget and space constraints, my layout will be nothing like those I've seen in this thread. I thought I'd still mention where things stand at the moment. My "train room" was formerly known as the living room, which hadn't been used since the 70s. The plaster on the ceiling was falling and there was no electricity In the room. Yesterday I ran a heavy duty drop cord from my solar power rig, then attached an old computer power distribution unit (kind of like a surge protector, but with individual switches for each outlet and an indicator light so I know what has power). I then used 3x4 cardboard sheets to patch the ceiling and the wall where the stove pipe went. Now the room is somewhat sealed and there won't be any falling dirt or plaster. I also added a box fan in one window for some air circulation and cooling. The room has a 9and a half foot ceiling and was hard to light with a stand up lamp, so I added a 4 foot long LED shop light. It puts out around 5000 lumens, so the room is now well lit. It also keeps me from looking up at the patchwork cardboard ceiling. Without measuring, I think the room is about 11x14. I intend to build an 8x8 table, which can be slid side to side if needed. I hope to get the materials in the next few days. It's been an adventure getting everything ready for the table. I know I'm going to build a tunnel and a bridge, but that may be the extent of my scenery due to cost. I have a few street lamps and a couple of buildings I'll add later. Well, that's where I'm at for now.
@Adam4378 posted:With my budget and space constraints, my layout will be nothing like those I've seen in this thread. I.......................................................................It's been an adventure getting everything ready for the table. I know I'm going to build a tunnel and a bridge, but that may be the extent of my scenery due to cost. I have a few street lamps and a couple of buildings I'll add later. Well, that's where I'm at for now.
Adam4378.
Scenery does not need to be expensive.
Buy a Tippi foam cutting tool ( If I recall, I paid about $30 for mine) Leftover blue or pink styrofoam and/or white styrofoam from packing can them make great walls, viaducts, etc. The same free materials can be used for tunnel, plateau or mountain starting points.
It is almost fall, various dried weeds can be made into realistic trees. How-to's have been posted in the scenery section in the past, if you want I can let you know what I do.
Expensive Hydrocal? I prefer cheap powdered plaster (dries quickly) instead. I sometimes mix it with sawdust for extra texture. Expensive plaster cloth for mountains- nah. I dip paper towel strips in plaster and use that instead.
Speaking of sawdust, you can dye it with RIT dye (just like the 1950's) or use it as is or mixed for ground cover. Dried coffee grounds are great for this purpose too.
If I recall, I started a "This from That" thread last year - lots of people posted their ideas there.
Look at everyday objects with a different use in mind. For example the plastic desiccant containers that come in many med bottles make cool barrels. The creamer containers from your local diner make cool G gauge garbage pails.
You can usually pick up appropriately colored paints in quart or gallon sizes- at the "oops" section of you local Home Depot or Lowes, for $2-$5 a can. you can mix 'em for shade variations too.
Even plywood can be cheap - my local "Restore" store has stacks of brand new 5/8 thick sheets, 4' x 4' foot in size for just $2 each.
Have fun!
Adam, shoot me your address, I have a bag of goodies to brighten your layout.
Thanks for all the great ideas everyone! I really like the roll out method, but we will have to see when I get a chance to get back in the train room.
Now the good news, The CEO told me she has invited some people over so I have been doing every thing I can to make her happy. She reminded me today that I should clean the train room and make sure I can at least run a train or 2 to show off to our future guest. I guess that's an open door invention for me to get back in there even for just a little bit right now! LOL
Mike, Sounds to me like you may have a little trouble getting a train to run, telling her everything sat too long without activity. ![]()
Great video but, I'm sure, the railroad wouldn't approve!
https://www.youtube.com/watch?v=yVXM1mACGkc
Tom. That’s real nice of you to help out Adam with his layout that’s why I love this forum so many good people to help each other
Mike. Sounds like you have some showing off to do
@M. Mitchell Marmel posted:Haven't done much with the layout of late, but I did discover how Norma Bates Kitteh was getting in trouble online...
Mitch
Let me guess... now you will blame all your butt-dials on that poor, innocent kitteh??? ![]()
![]()
@mike g. posted:Thanks for all the great ideas everyone! I really like the roll out method, but we will have to see when I get a chance to get back in the train room.
Now the good news, The CEO told me she has invited some people over so I have been doing every thing I can to make her happy. She reminded me today that I should clean the train room and make sure I can at least run a train or 2 to show off to our future guest. I guess that's an open door invention for me to get back in there even for just a little bit right now! LOL
Mike;
Full discloser... I am happily divorced...
If you really want to get more time in the train cave, you should have the train show go horribly wrong and then plead that if you had a lot more time for trains, things would run MUCH more smoothly... and may God have mercy on your soul ![]()
![]()
![]()
@Apples55 posted:Let me guess... now you will blame all your butt-dials on that poor, innocent kitteh???

Innocent as a newborn baby. Baby rat, that is... ![]()
Mitch
@samparfitt posted:Great video but, I'm sure, the railroad wouldn't approve!
Wouldn't? I can assure you, they don't. I don't waste my time watching this stuff. People that do this, and, especially this guy, that post on youtube, or the like, should be arrested, period. Want to ride a train? Buy a ticket on AMTRAK. .... or get a job with a railroad, ride all the time, legally.
People romanticize this garbage, then act shocked when they learn some train hopping youtube star kills themselves, doing this illegal act for kicks, and notoriety. It only takes one mistake, one time .. game over.
Rusty
Decided to try building a cardstock plate girder section for a problem area in my layout. Bought the design from from Clever Models. (Thanks Mike Hasty for the idea.) Cardstock is 60# or 80# and "extreme power" CA holds everything together (including two fingers). Having built this one (my first ever cardstock anything) I would certainly build the next differently. Photos are the raw product - no final smoothing of edges or color touch up. Printed with a black laser jet. Funny how color shows up in the photos.
Completed section is 16 1/2 inches long, 2 inches high. The design is intended to have the girder section attach to a thin deck. ie: the internal and external stiffeners are different lengths - about a 1/4 inch difference. So align stiffeners to the top plate, not the bottom like I did ... oops. Actually I wanted it flat so I should have trimmed accordingly. Next one will have a greater offset to hide the exposed plywood seen in the photo below. (reposted - images should show up now)

So final comment - takes a few hours to build, made of paper so easy to replace - redesign - rebuild, incredibly inexpensive, looks reasonably good, and I learned something.
This is intended to show the extra rivet strips bent into an angle bracket to give a bonding area for the top plate (double laminated). The first is a continuous strip, the next photo shows the sectioning necessary to fit between the external stiffeners. There is enough glue surface at the bottom of the stiffeners to attach the bottom plate.

Probably the worst mistake - the girder section is 3 sections of card stock laminated together. End result a section that is too tall for the stiffeners. Too much gap for the external stiffeners. I would also completely fold so there is no "v" - unlike what is shown in the "instructions". This would also make placement much easier and avoided a case of glued together fingers. Next time I will not trim the "v" notch but cut and fold to provide a glue surface for the top plate.

Top view


Jeff, could you look at your post about the Clever Models again. I am not able to see your photographs, and I do want to see how they turned out!!
Mark - re-posted. It did act funny when I first posted. Photos show up when I look at the post. Odd but not the first time. Should be 4 pics. Let me know. Jeff
Jeff, I can see! I can see! I’m on the phone. I’ll comment further once I see it all on the PC! Thank you!!
No real progress from me today, but I did get the materials to build the table. It's too hot to do anything today. Maybe tommorow will be better...
Jeff, I see your photographs well now, and can see what you mean about the V and the stiffeners alignment. Still, without you pointing out the issues, at a cursory view I would say it looks great! I have two bridges, but am going to need some kind of bridge for a third location once I get to it on my layout. Thank you for the photo analysis.
nice which clever models disk had the bridge
Thanks Mark. I was pretty amazed at how easy it really was, but nice to do a test build at pretty much a cost of my time. The card stock is pretty strong with a vertical load, but it has little stiffness for twisting. I know the creator says you can put a 10 pound engine across, which you probably can, but not any of my expensive engines. I would not trust the glue bond between the girder and decking. I would probably laminate to thin plywood or styrene for at least the plates. In my case this is going on the sides of 1/2 plywood road bed, and that is plenty stiff all by itself. If you have the room, this can be flipped to make it a deck bridge. I would add cross bracing for stiffness to twisting. In my case I had to go up, to keep clearance for the track underneath. Regardless, buildings and non-operating bridges would turn out great. I am going to find more uses for this technique. Jeff
@marty track posted:nice which clever models disk had the bridge
Ah, I found just the bridge design - O Scale Half Through Girder Bridge S71 on page 16. My invoice shows Item# 2-371. It is also on the Steel Industrial Buildings collection. Website could use a better search function. Jeff
Did a little work on my control panels. Haven't got my switch controllers hooked up yet


Quitting for tonight. I have been putting Preiser 65602 Seated People I painted into the second Funeral Train passenger Car, the "Overland" Dining Car. Not everyone is wearing black. Some passengers plan to change clothes before the graveside service.
Mixing passengers in a variety of clothes also allows me to run the Funeral cars with my Union Pacific Excursion cars.
Have a good evening.
Sincerely, John Rowlen


Last few weeks I have been very interested in mail trains and read a lot about them. So much so that I have been working on a kitbash of a K-line baggage car. (So-so results) The flat red Rusto primer looks OK in some light but not great in other places. It also sticks out in my mail train because I don't weather my cars. I would like to darken the color a little but probably need to clear coat the car first so I can wipe it off easily if I want to adjust that. I'll have to test weathering of the primer on something else first. I posted on the "what have you bought lately" thread that this week I splurged and bought a used GGD PRR heavyweight B70 baggage car and a Weaver New Haven B60b baggage express car to replace two K-line RPOs in the mail train. The green B60b will add some interesting color to the train I think. Been reading lots of posts on the forum when I'm not catching up on never ending house projects. Cheers.
Scouting Dad, nice job. When I have a plywood under base I paint it flat black. That obscures it's presence.
Farmerjohn, the control panels look so neat and functional. Also, your green girder railing looks great, very prototypical. Thanks for posting. Here’s some more pictures of your area, it’s amazing. Happy Railroading 


Scouting dad; here are some photos of flat black painted plywood sub frames. I do not rely very much on the Atlas bridges for being very durable when used in a lift out setting so I set them on a plywood sub base then paint them.
On these double bridges they are on a flat tray:

You can just barely notice the flat black plywood.

On the red single track bridges I made a faux girder style sub frame, again the plywood is recessive IMO.


Very nice effect, Tom! That is certainly strong for a lift up bridge.
My grandson came over to run some trains.......
I am doing a 200 sq ft expansion on my 250 sq ft layout. I got tired of tripping over extension cords going to my wire brush Dremel tool, solder station and vacuum cleaner as I was installing drops to my track. So, I stopped the insanity and extended my run of 120 Volt outlets on my existing layout to my expansion. The problem is I originally ran a twenty amp circuit to my layout which calls for 12AWG wire. There is a world of difference running 12 AWG versus 14 AWG Romex to the outlets. When I started the layout I asked for suggestions as to what to run to the layout if I was using Four Transformers (two for Track Power, one for powering switches and one to power my TMCC control boxes) and the answer was that I should use a twenty amp circuit. Oh well, lesson learned.
Thanks Tom Tee for the idea of painting the wood super sub-structure black. All my liftouts are on 1 x 4 pine, so I do not have as much to hide. I have an earlier post with photos of those bridges.
Had the day off and took the afternoon to build another paper girder bridge. Printed in color this time and extended the length so one end would rest on a pillar. I'll have to carve out a space for a bridge bearing later and paint the exposed plywood flat black. Unlike the first bridge, the inside stiffeners are now quite a bit shorter, so that the girder now hides the edge of the plywood. You can see a bit of it peeking out on the right. This is also the point where this bridge swings toward the viewer so I have to leave a bit of a gap between the girder and the truss bridge.

So it took about 4 hours to get this bridge built. Did not even glue my fingers together this time, but did manage to get some on the kitchen table - a quick wipe with acetone - and gone - whew!.
This is a shot of the external stiffeners cut to match up better. However there is no longer enough glue surface for the base plate (without the other side) so its hard to get a good fit here. In retrospect, I should have laminated the baseplate before attaching (would have been straighter) and anticipated the glue surface problem. Next time I'll put a angle plate at the bottom of the girder plate, like I did with the top plate. Still have to make a girder section for the other side of the track. : )

As I mentioned yesterday, the design was intended to be offset leaving space for the internal deck. The black line locates the top of the deck leaving enough of an offset to completely hide the plywood deck - no black paint needed here. I'll put a laminated card stock deck beneath these stiffeners to provide an attachment point. These stiffeners go all the way up to the top plate, unlike the external stiffeners which are too short to go all the way up.

Lessons learned - CA is no friendlier with color laser ink than b&w laser ink. If it gets on the ink, it it will smear. Second - Especially for the stiffeners, color the white edges with a marker once cut and shaped, but before being glued in place. So what takes so long? Each of the stiffeners needs 5 separate fold scorings, minute trimming, multiple folding steps and a 2 step gluing process. There are 18 of these bad boys. Also buy another hemostat - really useful for locking the joints together.
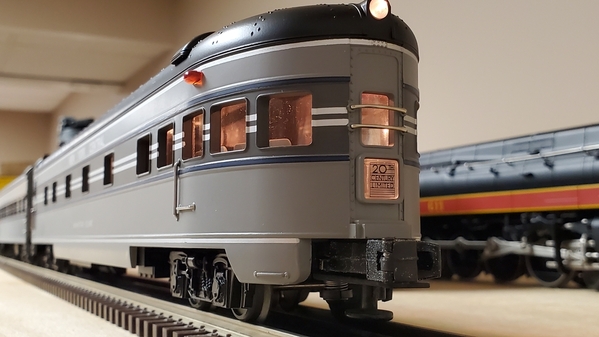

Got out my MTH 20th century limited cars that still haven't got an engine to run them since I bought them. Please lionel, vision line Dreyfus Hudson's.
really need more New York Central in my fleet I don't even have a single engine.
Also fixed a noisy smoke unit on My Lionel 611.


Access to this requires an OGR Forum Supporting Membership


