I have just been watching and holding off for now.

I still want to say thanks to all involved in developing this for their work.

I like to see things move forward and eliminate any guesswork. I am a big MTH fan and have met and heard from people who are not.

I have been blessed overall with well performing DCS equipment. I don't believe I put it under extra undo stress! I always thought 2 rail would have worse shorts then 3 rail would. Just something I stumbled on and kept in the back of my mind. Probably is not correct but was something I heard in the wind....

I'll try these at OSH Park again. If you are going to go with the kits, I will just leave the OSH Park ones un-shared. If you don't want to do the kits, let me know and I will share them if you want so others will have them available. 

If you do the kits I will order one myself, just to compare parts, boards, etc. to see if I am close. I think there will be some takers for the kits.

Thanks again for all the design work! I am still fiddling with Diptrace, but I have a long way to go before mine looks anything like yours does!

Thanks to all, Adrain, GRJ, Stan, and everyone else!  


GRJ, I like your jumper switch too, Diptrace and Digikey were not cooperating at all with me on a slide switch. 

Last edited by rtr12

I thought about a slide switch, but then I figured that was another unique part that I might not be able to find.

I'll probably use SEEED Studio to get ten boards as they'll be as cheap as three from OSH Park.  I'd like to actually build one of these and make sure it works as expected before I turn it loose on the public.

If you share stuff on OSH Park, you really need documentation as well as the boards.  Stuff like the BOM, schematic, assembly notes, etc.  Otherwise, it's not very useful for folks that find it there.

I'm still not happy with the LED situation.  

led

Per the schematic, the 2 cathodes (pin 1) are connected together.  For virtually all LEDs, the flat-side of the body is the cathode.  On the PCB drawing, the square-pads (presumably pin 1) are indeed connected together... yet the flat side of the LED silkscreen is on the right side? 

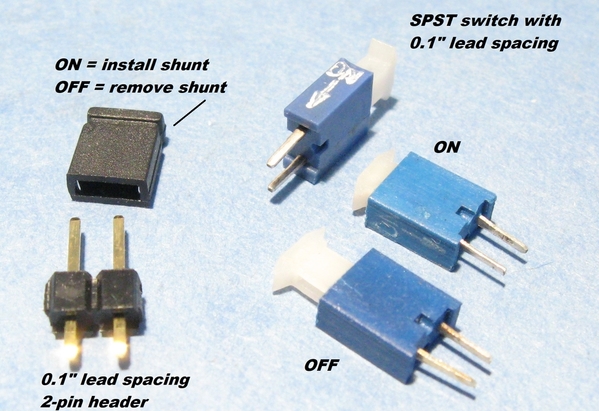
As for the on-off "switch" presumably you are assuming someone is using a 1-cent shunt to install on the 2-pin header.  I'm sure there are many variants but you can also get 2-pin switches that have similarly narrow profiles in the same footprint.  

on off

Next thing you know the peanut gallery will be demanding an LED to indicate power is on!  


Attachments

Images (2)
  • led
  • on off

GRJ, I will just wait on the sharing. If someone wants one from OSH Park it is very easy to order there with your posted Gerber files. Then there is the Documentation, probably not something I could explain? If you go with the kits that will be a much better setup for those wanting one anyway (that part probably also being slightly over my head, then there is the docs thing again). I'll stick with the Diptrace struggle for now. 

Stan, I have a bin full of those jumpers for the on/off headers, but I do like those little switches.  Not sure I have seen those before? I may just go have a look for some. Maybe I can finally one up Diptrace here (since GRJ already has the pins selected)...I have extra LEDs as well, just in case the need arises! 

Stan, that's the pattern that they have for a 5mm LED in DipTrace, I'll check and see if they're backwards.  If so, I'll make my own pattern with the correct footprint.   I actually rotated the 3D part to match the silkscreen, I guess that may be a mistake!

I never saw that switch before, that drops right into the spot for the jumper!   Where did you see those?  Got a source?

Believe it or not, I thought of a power LED, but since this was battery powered, I decided that was overkill.

Attachments

Images (1)
  • mceclip0
Last edited by gunrunnerjohn

OK, found the issue I think.  They have both flavors in the library for LED's, don't know why they have a reversed image one, but I changed them for "standard" LED's.  I'm going to update the build files "again", but I'd wait a day or two before actually using them in case we find something else.

Link to post with current files: TIU SIgnal Tester Rev. 1.1 Build Files.

No source for that switch - one of those parts in the stash that I've had since the last century.  I'd think it would be easy to find but then again, Nothing is so easy as the job you imagine someone else doing.

Regarding the power LED:  the LM340 standby (quiescent) current is about 3 mA typical...so a 9V battery would only last a few days if left "on" inadvertently.  While a power LED would also draw a few mA, presumably it might catch one's attention at the end of the day reminding to turn it off and save the battery.  A tradeoff for sure.  Of course if track-powered using your optional power method, the LED power is not an issue.  Matters of this significance are above my pay grade. 


Stan, I looked around for a switch like that, and I'll be darned if I can find anything like it.  It's a slick idea, too bad it's not obvious how to find it again!

A power LED with a big resistor might make sense, make it only draw a mil or two, you don't have to have them smokin' hot to indicate power.

How about the S-812C50AY-B2-U regulator, 500na quiescent power.  Only 16V input voltage, but it sure doesn't waste power.   99 cents at Digikey.

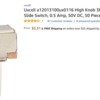
I suspect it is nowhere as popular as a slide switch with 0.1" lead spacing such as - about a dime in modest quantity:

spdt slide

I suppose you could whack off the 3rd pin for use as a basic 2-pin OFF-ON SPST switch assuming there's space for the body.  The somewhat annoying aspect of the previous 2-pin switch is you must lift the actuator to turn off.  It is not spring-loaded for push-on-push-off action.

After some web searching, I found it interesting that hobby and Robotics related sites "get it" and sell these switches (and only a few other types) making a point of the 0.1" lead spacing - perfect for DIY prototyping boards with the 0.1" grid hole pattern.  You go to DigiKey and hunt around forever trying to narrow down the thousands of choices.  

Attachments

Images (1)
  • spdt slide
gunrunnerjohn posted:

...

A power LED with a big resistor might make sense, make it only draw a mil or two, you don't have to have them smokin' hot to indicate power.

How about the S-812C50AY-B2-U regulator, 500na quiescent power.  Only 16V input voltage, but it sure doesn't waste power.   99 cents at Digikey.

Not sure about the 16V limit.  I figure in this specific application some guys might hook the tester to AC track voltage which of course would be 18V command-voltage since this is for TIU testing!

If it were up to me (which it is not!), I would forego the AC option (9V battery only)…and use the real-estate and cost savings from the large electrolytic and diode for an on/off slide-switch and a resistor and power LED (1 mA).

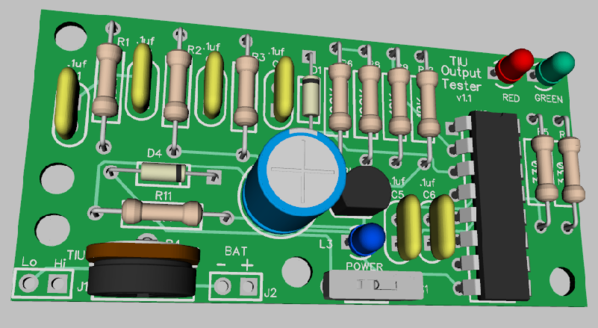
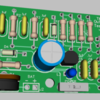
Here's the latest build.  I updated the previous post with all the build files, link below.  This adds Stan's power switch and the 1ma power indicator, it's the blue LED.  I also shrunk the LED's to 3mm LED's no reason to make them king sized for such a small board.

I think we have reached critical mass, if I want to put more on it, I suspect it's time to to to 1/8W resistors.

TIU Signal Tester Rev. 1.1 3D View

Link to post with current build files: TIU Signal Tester Rev. 1.1 Build Files

Attachments

Images (1)
  • TIU Signal Tester Rev. 1.1 3D View

George, it's only for testing the TIU, not for permanent connection.  The one downside of this design approach is due to the parts used (cheap was a primary goal), you have to calibrate each unit using the pot on the board.  That being the case, I'll probably just calibrate mine using my 'scope for around 11 volts P-T-P for the "good" signal.  The "bad" signal ends up being approx. 50% of the amplitude of the "good" signal, in this case around 5.5 volts P-T-P.  If you have a known good TIU, you can simply use the good channel as a standard and calibrate so that the good channel indicates a good signal.  In my mind the "bad" signal is primarily to tell you that the TIU is putting out some signal, but appears to have a weak channel.  I envision the unit to be calibrated to really require the "good" signal to consider the TIU channel to be fully functional.

The usage is to simply power up the TIU, and connect voltage to the input of the channel being tested, and the tester to the output of the channel.  Power up the tester and check the lights, job done.

I'll be generating a BOM for the parts in the near future, so many projects, so little time.

Regarding the AC-power version.  I realize this measures the DCS amplitude with no load on the TIU output except the tester itself (or an oscilloscope).  That said, since the tester is such a minimal load, is there any chance it can be powered by the TIU output itself?

That would make for a simple 2-wire connection.  I'm imagining the temptation will be great to see how the LEDs blink at various points on a large layout (no trains, just the track).  Not clear where you'd get the AC power in such a situation.  But then, ironically, the tester would need a 22uH choke!  


Last edited by stan2004

I suppose, since you are having to power the TIU channel to initially generate the DCS signal that you could just connect the power to the DCS output.  As you say, adding a choke would be the only requirement.

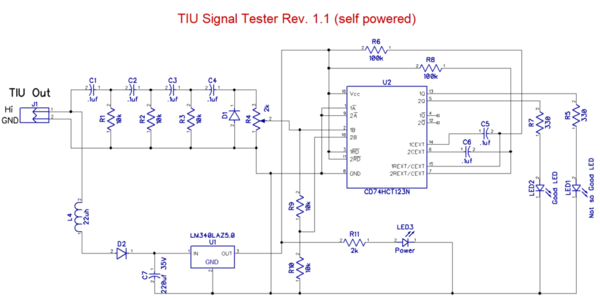
That thought never occurred to me, but it seems it should work.  In that case, you wouldn't need the power switch or the extra set of pins for the power.  It appears that just adding a choke to the input and sending the TIU channel 60hz through the existing rectifier and filter would be all that's required.  Since you're powering the channel, you have gobs of 60hz power available, no need to worry about what you're using.

TIU Signal Tester Rev. 1.1 [self powered)

Attachments

Images (2)
  • mceclip0
  • TIU Signal Tester Rev. 1.1 (self powered)
Last edited by gunrunnerjohn
gunrunnerjohn posted:

Here's the latest build.  I updated the previous post with all the build files, link below.  This adds Stan's power switch and the 1ma power indicator, it's the blue LED.  I also shrunk the LED's to 3mm LED's no reason to make them king sized for such a small board.

I think we have reached critical mass, if I want to put more on it, I suspect it's time to to to 1/8W resistors.

TIU Signal Tester Rev. 1.1 3D View

Link to post with current build files: TIU Signal Tester Rev. 1.1 Build Files

I think I know where the post is with the latest design files, but I could also have lost my way?   Now the 'New Linky No Worky' at least not for me.    However, if the link goes to the last post with an upgrade, which I think it does, I think I got it!  

You guys go way too fast for me, by the time I partially figure out the latest changes you are at least a board design or two ahead of me.

Any chance you guys could type a bit slower... 

Add Reply

Post
The DCS Forum is sponsored by

OGR Publishing, Inc., 1310 Eastside Centre Ct, Suite 6, Mountain Home, AR 72653
800-980-OGRR (6477)
www.ogaugerr.com

×
×
×
×
Link copied to your clipboard.
×
×