
In another topic about sharing AC and DC commons here (Any reasons for separating AC and DC grounds?) the subject of Arduinos, ITADS, Relays etc, came up. I know this has all come up before in pieces here and there, but I though it might be good to have a single thread where this was all discussed.

One of the questions that I don't think was ever answered was which of the devices below would be the best choice? (Picture shown below posted by Stan2004) Or should something else be used? If you have used any of these devices, how did you mount them on your layout? Did you build an enclosure for them, hide them in the scenery, install them between the ties in the track, etc. (pictures welcome)?


Anyway, what are your thoughts, experiences, suggestions etc. on all this? Other methods also welcome.

Last edited by rtr12
Original Post

Replies sorted oldest to newest

I put a signal relay together for a friend's  setup.  I have actually been able to put both an Arduino and IR board under the track.  I drilled two small holes for the LEDs to poke through and hot glued it on.  I also drilled a tiny hole for the sensitivity screw.  I don't really have good pictures.  I used a plasticville  tower for the relay and VR. IMG_3346IMG_1388

Attachments

Images (2)
  • IMG_3346: To the left you can see the IR board and the arduino is under the styrene guard
  • IMG_1388: Tower containing the relay and VR

That is a fantastic video showing "real world" issues with IR sensors.  Before you lighten your wallet with the "other" type of sensor, I found yet another version of this "other" IR method that would probably be easier to use.  I'll write it up with some photos later today...

As you've probably seen, there are indeed relay modules with Time-delay capability for a dollar or so more per channel than a basic on/off relay.  Even the off-the-shelf ITADs need this hold-timing capability to catch the gaps between cars...and to hold the relay for the occasional dark car that can introduce a relay gap of several seconds (as your video shows).

This delay can be done for, say, 25-50 cents per channel using assorted parts allowing you to still use the 4-channel relay modules.  So it comes down to how much fussing/soldering/messing with components you want to do.  I've shown this hold/delay circuit (e.g., transistor, resistor, capacitor) in previous threads on rolling your own ITAD so I can dig it up or just re-draw it which might actually be faster! 

Brendan,

That looks very nice. Thanks for adding your project to the thread. Do you by chance have a picture of the top of the track? How does it work? Any problems with the space between cars?

John H,

I really thought those would work better than that from my bench fiddling, but that is not the same as actual use testing as you have done. A timer might be a good addition to those boards. I might be off here, but I think by putting an Arduino between the IR sensors and the relays you might be able to add the timers needed for drop outs. I was wondering about dropouts between cars though. Did the relays work ok connected directly to the IR boards? 

I was hoping Stan would be by to provide his wisdom and expertise. I think he will eventually. I'm sure GRJ, JGL and all the other electronically wise could add a lot as well. Oops, I see Stan is here already.

Last edited by rtr12
rtr12 posted:

Brendan,

That looks very nice. Thanks for adding your project to the thread. Do you by chance have a picture of the top of the track? How does it work? Any problems with the space between cars?

John H,

I really thought those would work better than that from my bench fiddling, but that is not the same as actual use testing as you have done. A timer might be a good addition to those boards. I might be off here, but I think by putting an Arduino between the IR sensors and the relays you might be able to add the timers needed for drop outs. I was wondering about dropouts between cars though. Did the relays work ok connected directly to the IR boards? 

I was hoping Stan would be by to provide his wisdom and expertise. I think he will eventually. I'm sure GRJ, JGL and all the other electronically wise could add a lot as well. Oops, I see Stan is here already.

Thanks.  Since I built for someone, I don't have it in front of me.  I am going to be able to see it Friday and plan to take more pics.  I use the arduino for exaclty as you say - a delay to eliminate dropouts.  I could have done it with parts, but the arduino can do more if needed.


Brendan

Last edited by Brendan

Hi rtr12

Here is a thread where Stan2004 and Gunrunnerjohn help me with IR build.

https://ogrforum.ogaugerr.com/t...76#48171004101674276

This design or if modification will be incorporated into the Super O permanent layout for use in gates and signals. Here is the thread with an mp3 player and similar setup. Page 6 of the thread has the MP3 hook up instructions.

https://ogrforum.ogaugerr.com/t...tical-sensors?page=6


I tried the bottom approach, but had to be closer than the axles to get a response. I think that might be because they were black. It also seemed like I had to be closer to metal than plastic. Stan or Brendan, can these sensors be paralleled so you could have a distance between them to make up for the gap between cars? I have trains running both directions all the time, so I would have one at each end of the block for signals. I'm enjoying this and all the help is making it possible.

John H posted:

Stan or Brendan, can these sensors be paralleled so you could have a distance between them to make up for the gap between cars? I have trains running both directions all the time, so I would have one at each end of the block for signals. I'm enjoying this and all the help is making it possible.

For the gap, the best solution would be to add a delay using res/cap/tran as Stan2004 mentioned or an arduino.  So long as you have an open collector/low input for the relay, you can have as many IR sensors as you want.  In the setup I did, I used two - one for each side of a crossing.  Ideally, a current sensor combined with the IR sensors gives full coverage of a block or section of track


Brendan

Last edited by Brendan

Thank you NVOCC5 for digging up those links to earlier threads on roll-your-own IR detection.  Lots of posts to wade thru but it does describe how to perform the ITAD-like time-delay using inexpensive parts if you want to use the ubiquitous $1 per relay modules. 

Or as you identified there are off-the-shelf relay modules with delay capability; though I must point out you need to read between the lines to be sure you are getting what you need.  You run into terminology like delay-on, delay-off, cycle-timer, multi-function timing, etc. and then some listings are nothing less than cagey in detailing if you need an active-hi or active-lo trigger to activate the delay!

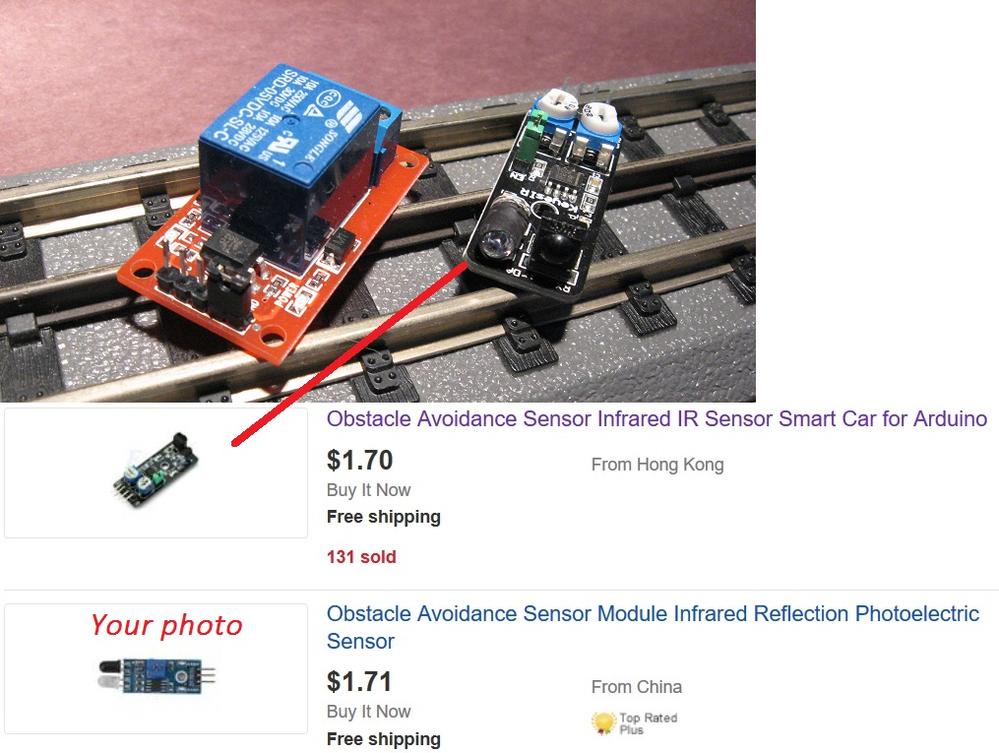
So if you are not getting adequate sensing distance or sensitivity the alternate IR modules can indeed provide better performance.  Some of the posts in the thread links describe the benefits of using modulated IR beams and as I posted earlier, these alternative modules are reasonably priced.  One hassle with the example I showed is you have to manually "tune" the transmitter LED which is sort of a nuisance.  But now I see modules that don't require this extra step. 

ebay modulated IR modules

I have personally messed with "A".  But now it's 2017 and I found B, C, and D on eBay without looking very hard.  I believe these would be better choices but have not used them myself.  Perhaps someone else can attest to their suitability for occupancy detection.  I ordered a "B" and will play with it but it will take a few weeks to get here.

As Brendan points out you can generally parallel multiple detector modules so that if one or more modules is active, it will trip the relay module.   As he points out the detector needs to have a so-called "open-collector" output which allows multiple module outputs to be electrically connected together - if 1 or more modules is triggered, the relay trips).  Otherwise, you can add a 5 cent diode to each module output to "make" it into an open-collector type output suitable for driving the relay module.

Additionally, if you like to experiment you can also drive multiple LEDs to spray the passing train with more IR energy.  IR LEDs of the type used on these module run maybe 10 cents each.  Yes, you have to fuss with more discrete components...but if you're going to de-solder components from the modules to better place them under the track or whatever, then that's another option.  This would increase the effective sensing distance...or for the same sensing distance improve detection of the dark surfaces.

Another option used by some off-the-shelf sensing suppliers is to shoot the IR beam across the track and let the train break the beam.  This is a MUCH simpler electrical problem than sensing the reflection.  Of course you must now mount a component on each side of the track...but by aiming the beam diagonally across the track you do not have the problem of gaps between cars.  This can relax the need for a time-delay.


Attachments

Images (1)
  • ebay modulated IR modules
Last edited by stan2004
stan2004 posted:

Or as you identified there are off-the-shelf relay modules with delay capability; though I must point out you need to read between the lines to be sure you are getting what you need.  You run into terminology like delay-on, delay-off, cycle-timer, multi-function timing, etc. and then some listings are nothing less than cagey in detailing if you need an active-hi or active-lo trigger to activate the delay!


I have tried several of these delay units and the issue I ran into with the delay-off units was that even if it has a continuous low (or high as the case may be) signal, it doesn't stay on past the delay time - it shuts off.  It turns back on right away, but that is of no help.  

Another detecting device is the one Geoff Bunza over at MRH came up with http://model-railroad-hobbyist.com/node/26133  I built a few and they work good in different lighting conditions.  I was looking at using smd photo transistors, one mounted to the roadbed and the other between the ties.  

 It willbe interesting to see your results with other IR units.

Brendan

Last edited by Brendan

Hi Kris,

Thanks for the links, I remember that thread now, it was a good one. Sorry for the late reply, my car and I have been a bit under the weather the last couple of days. I'm doing better than the car, something about a throttle something or other. I have applied for a 2nd mortgage so I can get it out of the hospital sometime this afternoon, I hope.

Some good information posted here so far, I am going to try to read it now, unless something else goes wrong... I haven't read the Arduino article from Geoff Bunza, but I have downloaded it to read. It looks good. And I still need to check out the new things Stan found above as well. I already have a couple of A's on order. I also have some current sensors that were mentioned and also discussed in another recent thread, but haven't tried them yet. I filed them away ad forgot about them until reading the other thread a few days ago. I am getting a real backlog here.

There is another thread about the actual ITADs also going on now. I just read a post about having an emitter on one side of the track and the detector on the other. I was fooling around with something like this a year or so ago and got sidetracked. I think this might be a good 'roll your own' option for this discussion as well.

At the time I also got some photo transistors and I did try some photo resistors with an Arduino for a train speed sensing project. Those did not work very well, but I only had the photo transistors working on the bench as I recall, didn't try them on the track. My 20x4 LED panel for my Arduino quit working and so I got another one, switched computers and reloaded the Arduino programmer and and I never got the library for it working again.

Anyone have thoughts or opinions about these additional devices for making ITADs?

Just checking in to this thread.  Afraid I don't have a lot to offer at this point.  I don't have any of the various IR modules to play with right now.  In general, I find using an insulated rail to be one of the huge advantages of 3 rail track in the first place, but IR sensors are nice and easy to work with.  

I wonder if it might be worth the effort to custom build a PCB for this purpose?  It seems the main issue is that the modules are not sensitive enough at any sort of range.  I know IR can be made to work here, after all the big manufactures have done it, but I'm unsure if the design of the modules allows for that sort of range.  

It may also be worth looking at ultrasonic distance sensors.  They are larger than the IR solution, but might give a better result if going for cheap modules?  Really not sure, as I've not used these either.    

Anyway, I look forward to seeing what you all come up with.  Afraid I have too much on my plate right now to really dig into it right now.  

JGL

I've used the pricey Azatrax brand IR setup and it would be easy to duplicate with the already built parts mentioned above (live and learn).  The LEDs on the years old version I have are of the type from the original post and demonstrated in John H's video.  One advantage was that the LEDs are on long wires rather than mounted to the board - so they could be used next to each other as they are on the modules, or you could place the emitter on one side of the track and the detector on the other.  With the LEDs next to each other my results were similar to John H's - unsatisfactory.  Placing the LEDs on opposite sides of the track was reliable in my experience, worked with dark cars and shooting them at a diagonal solved the gap-between-the-cars problem.  Empty flat cars of varying heights were still an issue. The hardest part is getting the LEDs lined up. A piece of string is your friend!  I've hidden the LEDs in bushes, buildings, snow drifts...  If you are comfortable unsoldering one LED from the ebay modules and adding a length of wire, and you can find a place on each side of the track, you can have a cheap and well working setup without the addition of time delay relays. 

My next experiment is to try a sensor on each side, if they will sense that far. I'm a real novice, so bear with me. I assume the emitter is the clear bulb. Would I have to block one to make it work that way? Then I assume that the NO and NC would be reversed. Any possibility that might work? I would like to stay away from a timer, if possible, because I run both directions and the relay would be still active long after the last car triggers the other sensor. I have a couple of these DC 3.8-5.5V 6mA 3-100cm IR Infrared Digital Obstacle Avoidance Sensor Module DIYordered that have a longer range, but might be a while.There are four posts on some of Stan's examples. What is the extra one for?

The sensor-on-each-side method (break-the-beam) will have longer operating range by a factor of, say, 10 or more.  Just angle the beam diagonally across the track (rather than perpendicular) so that you don't get intermittent gaps between cars.  Also, since you have to remove 1 of the 2 components, make the emitter (clear bulb) the more distant one...this improves sensitivity in that the receiver component operates at lower currents and is more sensitive to noise pickup from the extended wiring.

Yes, you could simply reverse NO and NC.  You could also use a relay module that has hi-level triggering on each input.  Most eBay relay modules now offer select-able hi or lo level triggering by moving an on-board jumper.  Power may not be an issue but if you reverse NO and NC, then the relay is normally "on" drawing coil current when nothing is happening.  On the typical 5V relay module the blue Songle brand relay that coil draws about 1/2 Watt when active.  So you are burning that much power in the idle state; again perhaps more a philosophical issue than a practical one but worth mentioning.

Perhaps obvious but the ITAD timer is both for accessory delay AND to deal with the short inter-car gaps when using the reflective method.  So even if using the reflective method you might want a small delay to keep the relay triggered between cars or during the time that a dark car goes by.

If you can configure a break-the-beam system you should get bullet-proof performance.

The 4th pin on the modules is to let you turn the emitter on and off; it might be labeled EN for ENable or DI for Data In.  Pulsing the emitter with digital codes is how your TV IR remotes work.  In occupancy detection you would just connect this pin to which polarity keeps the emitter "on".  The type A module I showed above even has a jumper on board which you can install to keep the emitter on so you don't need to make a separate electrical connection to the 4th pin.

I think I got all your questions!

I see the confusion.  If you are just experimenting, you can of course use 2 modules...powering both modules with 5V and placing one on each side of the track.  So when breaking-the-beam the "detect" LED will go off on each module.  What I was talking about was if you only have 1 sensor module.  In this case you would need to de-solder the clear emitter (LED) or dark receiver (phototransistor) and run 2 wires to extend it from the board.  If doing this you want to extend the emitter (LED) off the board.

Or am I still confused?

nvocc5 posted:

Hi rtr12

Sorry about the car, I hope you are feeling better. There is a ton of stuff on and off the forum about IR and alike electronic equipment. You sometimes really need an expert to guide you through some of this stuff.

Thanks Kris, both me and the car are doing much better today, car is out of the hospital, however the credit card is now ailing. No one can say this car was built with 'cheap' parts.  

There certainly is a lot of info around here, enough to write a good book with, that is if you could ever find it all and get it all organized in one place.

I didn't get a chance to go back through you thread yesterday, brain wasn't quite ready for that, but I think it was one of your threads that Stan was helping me with the photo transistors and other things. It might be in that thread you linked, if not I will take a look for it.

JohnGaltLine posted:

In general, I find using an insulated rail to be one of the huge advantages of 3 rail track in the first place, but IR sensors are nice and easy to work with.  

......

Anyway, I look forward to seeing what you all come up with.  Afraid I have too much on my plate right now to really dig into it right now.  

JGL

I understand about the full plates, they can also fill up very quickly with things other than what you would rather be doing.

If you haven't seen it, gunrunnerjohn is making an insulated rail module in another thread, one ha has been using for a while only now he has created a small PCB for it, AC or DC with terminal strip and DPDT relay. Here is a link to the thread: Insulated Rail Relay Based Sensor. Looks really nice (like all of his other stuff) and I think it will be a hit too. I think the IR detectors are still needed though, especially for folks with finished (or nearly finished) layouts that don't want to disturb their track.

Brendan posted:
JohnGaltLine posted:

 In general, I find using an insulated rail to be one of the huge advantages of 3 rail track in the first place  


That is a good point to remember.  

Brendan

Check out the link I have above in the reply to JGL, about GRJ's isolated rail module, looks really nice.

Last edited by rtr12

IF further experimentation makes you a break-the-beam convert, here's another idea based on earlier dialog with nvocc5 (Kris):

https://ogrforum.ogaugerr.com/t...75#40004359636588575

ogr%20DUAL%20simple%205v%20itad%20crossing%20flasher%20hookup

I've had the "no soldering, modules only" blinders on...and I understand the advantages of simple plug-and-play Lego-like solutions.  BUT, I was thinking about separating the emitter (LED) off the sensor board and your comment about detecting both ends of the occupancy zone.  So IF you are willing to mess around at the component level, you can make a dual break-the-beam ITAD as shown in the above photo copied from the above  link.  Be sure to watch the short video showing it in action!

Less than $1 in component parts can be tacked on to most eBay relay modules and you're off to the races.  And then, if you follow the dialog in the linked thread, for another $1 in component parts you can add the ITAD time-delay feature if that's what you want.

Attachments

Images (1)
  • ogr%20DUAL%20simple%205v%20itad%20crossing%20flasher%20hookup

Now there's some outside-the-box thinking!  What I'm imagining though is this simply "mirrors" the problem.  Previously it was black or dark colored cars that didn't work.  In the proposed scenario it seems it would be white or light colored cars that would be the problem...particularly reflective aluminum finishes like Amtrak cars.

Perhaps the emitter and receiver could separated by an inch or two.  It would require modification to the off-the-shelf module...but at least all 'active' components would be on the same side of the track so no wiring across/under the track.  By separating the emitter and detector the passing cars would be too close to scatter the reflected light back to the detector.

Dear John H

Stan2004, Gunrunnerjohn and Dale H are great teachers when it comes to electronics. I have not touch a solder iron since I gradated High School which was over 30 years ago.  Because of them I have the confidence to build most of my electronic stuff and last year I purchased my first soldering station. I still need their guidance but the mystery and fog of the electronics world has been lifted and some if not all what they say sinks in. As the insurance company slogan says "You're in good hands" with these folks.


John H posted:


...I'm close enough for what I'm looking for. I will try it in a short tunnel. The angle with two sensors works up to 10" apart. 

I assume you mean black heat-shrink tubing over the receiver (black sensor) to give it tunnel-vision?  I'm thinking that in conjunction with adjusting the sensitivity control might increase your 10" range - not that you need more distance.

In the nit-picky department I notice lights briefly flicker at end of train...maybe beam going through the railings on the rear of the caboose?  That would be an application for a time-delay circuit or a relay module with time-delay capability.

And are you planning to de-solder the emitter or just use "half" of two modules?  If the latter, I'd cover the unused emitter so it does not get reflected back and mimic the beam when it hits a shiny car/engine with irregular features. 


Looks like you already thought of the false reflections if the receiver module's emitter is blasting away - albeit at an angle that should never come back.  I've read about the empty flat-car issue if you place the beam too high but I'd think all that can be adjusted to your cars. 

Yes, it's clearly expedient to just half of each module.  No need to cover the unused receiver.  Frankly, ideally you would not just cover the unused emitter but cut it off the board!  The problem is it consumes a heck of a lot of current...some 10 times more than the receiver half of each module!  But no worries. 

I'm curious about how you're going to mount/hide/disguise these.  You can of course carefully bend the leads of the emitter and receiver if they are long enough.  Separately there are modules on eBay that only have the emitter and receiver components themselves.  Just apply 5V and the emitter operates; the bulk of the circuitry on the modules is for the receiver and its sensitivity adjustment circuit.  This "bare" module may help with space issues on the emitter side...assuming you don't want to de-solder the emitter from one module and run it under the tracks...

  s-l500

Attachments

Images (1)
  • s-l500

Nice test, looks like it works pretty good. Was it difficult to get those lined up to sense properly? I have been thinking about removing one of the sensors and trying it. Gotta go back and re-read to see which one Stan recommended to move.  

I'm a little behind here, got some PBW's (perpetual barking watchdogs) to finish testing this afternoon so I can report back to GRJ on them. I'm slowly catching up...

I have these also pointing on a slight vertical angle. On a low car one side breaks the beam and a higher car on the opposite side. My first place is inside a tunnel, so disguising them is moot. Another one will go at the end of a hidden siding where I back in a passenger train to light an indicator when the end of the train is at the bumper. I think it would be very difficult to aline both pairs identically. Every time I test, only one responds to blocking the emitter or sensor. Would a capacitor help the caboose problem and where could that go?

I might be misunderstanding you alignment comment but it seems to me the only relevant alignment is to the receiver module which is connected to the relay module input.  It doesn't matter what the module that is only acting as a emitter is doing as a receiver.  I wonder if that makes sense.

Anyway, a capacitor connected at the input to the relay module might eliminate the caboose flicker issue.  If you have a capacitor in the 100uF range (16V or more), connect the + side of the cap to the relay module input, and the - side of the cap to Ground/common.   You can try larger values if that's all you have.  But you only have smaller values don't bother with anything below, say, 10uF which would have no meaningful effect.  A simple capacitor is certainly expedient but will give you delays or flicker tolerance in the fraction of a second range (which can be remarkably effective).  If you're look for delays in the seconds like with an ITAD delay you need to use a more complex circuit (3 or so components) as shown in the linked threads.

A soda straw which just happens to slide over the emitter is another high-tech alignment "tool."

soda straw


Attachments

Images (1)
  • soda straw

That was why I asked if they could be paralleled. I figured if one wasn't reading, the other one would when I had them at 90 degrees to the track but offset an inch or two to cover the car gap. Then I tried the angle, and it seemed to work pretty well, so I left them hooked together, but aimed at each other. I had some three pin connectors so I hooked a couple together and went under the track with all three wires. I just adjusted them until both greens lit up. Besides, I thought I told you I don't know what I'm doing.

John H posted:

...  I thought I told you I don't know what I'm doing.

knowledge

Actually, that's a good idea to use 2 parallel modules so that either module can trigger the relay to handle inter-car gaps.  As it turns out, this module is of the type that you can "short" two outputs together without ill effect,

But in the break-the-beam method where both beams are in parallel and close together, the output of the two modules provides redundant information.  So you only need one output.  But, yes, it will still work in parallel - no harm, no foul.

Attachments

Images (1)
  • knowledge

Isolated rail sections. Gunrunnerjohn has a new device in the works that would be neat for isolated rails. I'll go look for a link to the thread. Arduinos may be an option too, isolated rails could probably used to input to the Arduino. Another possible use for GRJ's new device.

Stan will probably have a lot more and better ideas as well.

Here's the link to GRJ's Isolated Rail Relay Sensor. I think he is close to having some made, if he hasn't already gotten some.

Last edited by rtr12
John H posted:

Are there other ways to trigger these 5V relays besides the opti-sensors?

Is this for occupancy-detection? 

These relay modules are triggered by a voltage so pretty much any sensor that can generate the required voltage can be used.  So in addition to direct voltage itself (such as from an insulated rail) there are all manners of sensors/transducers that can generate a suitable trigger voltage in response to some physical phenomenon...optical, pressure, magnetic field, sound, heat, etc.

Are you abandoning the optical method and if so why?

I guess my question should have asked what voltage can be used. Does it have to be 5vdc? My isolated rails would be 18vac. I have three more relays on the set I have and have a few isolated rail drops already built into the track where I planned on signals. If I have to electronically change the isolated rail voltage to use the "blue" relays, I might as well just use a regular relay in those places. I still have places for the optical sensors, although I haven't figured out how to use a pair at each end of a section where I will have a gate or signal to cover trains going both ways. So far the single sensor doesn't work well enough to cover the dark cars and gap between  all cars, so if I have a connected beam at both ends, breaking only one won't trigger the relay. Is that thinking correct? I'm still waiting on some different sensors as the ones I used had to be almost 90 degrees to the train and an inch away tops when using only one. That makes it harder to place them with any kind of disguise.

In re isolated-rail triggering, the 5V DC modules can be use if you connect the common of your 5V DC supply to the outer-rail common.  The 5V DC supply MUST BE from a wall-wart; if this requirement is not crystal-clear, ask for clarification!  Your 5V relay module is triggered on a "low" signal; the isolated-rail section provides such a "low" signal if the outer-rail common is connected to the 5V DC supply's common.

In re bi-directional crossing, if you can get the reflective-method to work then the two sensor modules can be tied together (in parallel which you've done previously) and either or both will trigger the relay.  However, if you use the break-the-beam method then the "logic" is reversed.   That is, you were using the opposite relay contact (the NC).  So your accessory would only be activated when both beams were broken which is not what you want.  To un-reverse the "logic" you would need to fuss with external components - albeit nickels and dimes so cost is not the issue - but small components and possibly a bit of soldering.  This is the "classic" issue of ITADs at both ends of a crossing - the ITAD relay outputs can "fight" each other so additional components are typically added to make them play well together.

Stan,  In re bi-directional crossing ................."To un-reverse the "logic" you would need to fuss with external components". It would be great if you could post schematic on how these external components would be connected.

Your help with the timing module for Pennsy seven LED signal circuit was very helpful to me in making  roll your own signals.

John H posted:

I have the commons connected, but my 5vdc supply is a PC power supply tap. I use the 12vdc for signals, gates and buildings with led strips, and the 5vdc for this relay.

The PC power supply is a big wall-wart!   

I should have said that to connect the commons between the 5V DC source and the AC track supply, the two must be galvanically isolated.  But that's just techno-babble!  For practical purposes it just means the DC supply needs to have it's own AC-wall plug...whether it be a wall-wart, PC power supply, separate HO transformer, etc..

SGMret posted:

Stan,  In re bi-directional crossing ................."To un-reverse the "logic" you would need to fuss with external components". It would be great if you could post schematic on how these external components would be connected.

I can do so but let me know how far along you are - or just thinking of dabbling with roll-your-own ITADs.  Do you actually have components or modules in-hand?

John H is using a 5V relay module that is triggered by a "low" signal...in conjunction with a bounce-the-beam (aka reflective) IR module that happens to put out a "low" signal when triggered.  So this logic reversal was a consequence of modifying the operation to break-the-beam (aka transmissive).

But there are 12V relay modules.  There are relay modules that can be triggered by "low" or "high" signals.  And perhaps the biggest leverage when rolling-your-own is having the time/interest to mess with components and do some soldering.  Hence I ask where you're "coming from" so I can tailor the suggestions.  Do you buy-in (have space on your layout) to use the break-the-beam approach? 

Do you need time-delay like an off-the-shelf ITAD?  Note that for bi-directional operation with two ITADs one function of time-delay is when running a short consist that could be between the ITADs not triggering either.


John H posted:

I have the commons connected, but my 5vdc supply is a PC power supply tap. I use the 12vdc for signals, gates and buildings with led strips, and the 5vdc for this relay.

The PC power supply is isolated, but take note that the ground lead is common to all of the power outputs of the supply.  This may not be an issue in your application, but it's something to be aware of.

While there are many ways to invert the voltage, I think one of the simplest would be with a transistor and a couple resistors if you only need 1 or 2 such devices in the same location.  Using a common, dirt-cheap, 2n3904 or PN2222a transistor would allow an input voltage of a couple volts up to about 40VDC.  One would connect the emitter of the transistor to ground.  The Collector would be connected to the input to the relay module.  The collector would also be connected to a 10K ohm resistor with the other end of the resistor connected to the power source of the relay module (usually 5 or 12 VDC).  Last the output of the IR module would be connected to a second resistor, likely a value of 1K to 2.2K Ohms would be good here, and the other end of this resistor connects to the Base of the transistor.  

Screen shot 2017-01-27 at 6.22.35 PM

JGL

Attachments

Images (1)
  • Screen shot 2017-01-27 at 6.22.35 PM

Finally received what I called the type B sensor module from Asia.  It is absolutely unsuitable for O-gauge occupancy detection as it only handles digital data rather than simple on/off occupied/unoccupied detection.  So I ordered a type C module and will wait a few weeks and report back.  Duplicated photo below of the various modulated IR modules I found on eBay:

ebay%20modulated%20IR%20modules

I've been meaning to post this video showing a type A sensor module.  As previously mentioned I do NOT recommend this module because you have to mess with interacting adjustments of modulation frequency and LED output power.  But it does show the "technology" should work even for detecting dark (black) surfaces.  Midway through the video I crank up the ambient lighting to show how detection performance is not materially affected if you use modulated IR.

Attachments

Images (1)
  • ebay%20modulated%20IR%20modules

Add Reply

Post

OGR Publishing, Inc., 1310 Eastside Centre Ct, Suite 6, Mountain Home, AR 72653
800-980-OGRR (6477)
www.ogaugerr.com

×
×
×
×
Link copied to your clipboard.
×
×