Good day everyone,

 My name is Kevin and I am in the process of redoing my o gauge layout. I am having a hard time figuring out what size layout would be acceptable for o48 curves? I would like to use these curves for both outside and inside loops as I have quite a number of them. Any thoughts or suggestions would be greatly appreciated.

Kevin

Original Post

Replies sorted oldest to newest

Not near enough info to even begin to help. I assume you have FasTrack, so I can tell you that with 4.5" track spacing, dual O48 curves need a corner of 35"x35" to make the quarter turn. A simple dog bone needs 72"x175" (basically 6'x15') of space and it would need to be a free standing table or have access hatches. Obviously, it you do an around-the-room style layout, there are virtually no limitations other than the corners.  Without knowing how much room you have to work with and what style of layout you are considering, there's not much point going beyond these basics facts.

O48


Attachments

Images (1)
  • O48

Hi Dave,

Thanks for your thoughts. It's a small space in an unfinished basement. I would probably have enough room for maybe a 4x12 layout at the most. I am using Lionel Fastrack and have two right hand O48 remote switches and two left hand O48 remote switches along with one left hand O36 remote switch.

Do you think I could get away with the outside loop being comprised of O48 curve and an inside loop of O36 curves in this minimal of space? Thanks again for the insights and the layout plan.

-Kevin

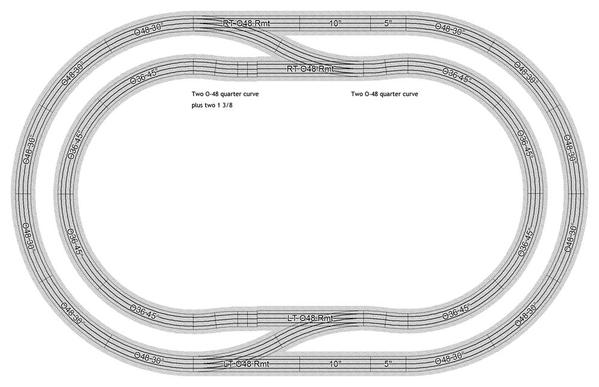
Hi Kevin, while O-48 & O-36 have the matching geometry, from one edge of the roadbed to the opposite side with O-48 you are at 51.5 inches. If you can do 60 inches (5 ft) instead of 4 ft then it will work and give you room away from the edge (or at least 54 inches 4.5 ft). This example uses your 4 O-48 switches. It needs eight O-48 quarter curves to make it fit. I am sure someone will tell you this is making some S curves that put strain on the couplers as the train passes through. You can go longer by adding more straight sections. From here it's like Dave said, we need more info.

O-48 outer with O-36 inner

Attachments

Images (1)
  • O-48 outer with O-36 inner
Files (1)

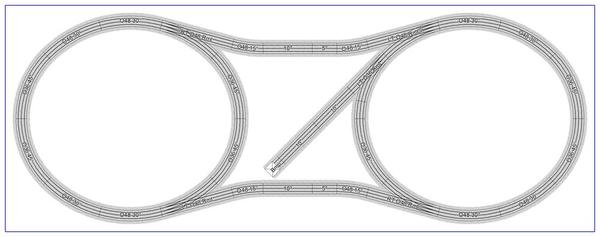
Hi Kevin, there is a fellow forum member "Ace" who is a wizard at using "easements". I kept thinking about your plan and how would an easement make it fit into 48 inches. Well I have studied well... because I figured it out. This fits easily inside of 4 ft by 12 ft and uses all of your switches. The only likely pieces you might need are four O-48 half curves.

O-36 with O-48 easements

Attachments

Images (1)
  • O-36 with O-48 easements
Files (1)

Kevin, the first limiting factor is the space needed for a half-circle using O48 curves. Your initial requirement to have O48 within O48 drove that minimum to 70" for track and edge clearance. Now that you've changed your requirement to O36 inside of O48, the minimum for a half-circle of O48 becomes the primary factor. As Mike said, that is 51.5" and makes the realistic minimum 60".

However, you can't just shove a 60" deep layout against the wall without considering access for dealing with derailments and maintenance (cleaning, repair, etc.). Even with a stepstool, you'll have a hard time reaching across 60", even without landscaping. Now, if you can put that 60"x144" layout in a larger basement where you'd have access on at least 3 sides, that would be feasible. If not, you'd need to add access hatches or hollow out the inside. Either way, you need something 60" deep in order to use O48 curves.

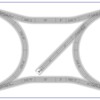
What you do inside the outer O48 doesn't matter much. You can have 2 straight ovals, 2 irregularly shaped ovals or connected ovals. I moved the turnouts and added the dog bine effect for some interest and you could add some height like the 3D photo shows.

Oh, and if you as using a PC, you can always install SCARM and play with things yourself. We'd continue to help of course.

O48

O48-2


Attachments

Images (3)
  • O36
  • O48
  • O48-2

Mike and Dave,

 Thanks so much for the time you took on helping me out and I will use both of what you said into consideration as I move forward an my new layout. I am using an IPad is Scarm a free app or is that something I can use on this device as I would like to look into it. Thanking you both again for the helpful input.

-Kevin

You need Windows for using SCARM, but it is free, a good program, and the author is a regular poster around here (software is his hobby). An older used laptop might be worth chasing. They go for pretty cheap and the program is very fun once your past the the basics. Check the Scarm site for PC requirements.(and download from the blue text on left, not the Google ads in the center that say "download")

You might check into buying Anyrail or RRtrack for a Mac based program. Anyrail used to offer a free 50pc track limited version, but may be win/PC only too..?

I think the scarm simulator is done, and a used PC might be much cheaper too

  No plan from me, I'm on a droid for a bit, lol. But I'll ramble a bit and hope you get something out of it.....

Your first layout, so dont go overboard if your on a budget. Learn YOUR run style, and not your present perception of what that is. And remember it may change, leading to boredom, or restarting.  You may love loops today and hate them in the near future, wanting something more scenic, or more operations oriented than a loop can give. (That said, I love my spaghetti O's. (Mindless loops) it is my indoor campfire)

  Look closer at the dog bone. Imo, it saves sq. footage for moving around over one big square. Look at reverse loops too.  Two 52" squares, a 3/4 loop and one switch on each, switches connected by a long narrow (5-12") straight, or the straight can be bent into a corner. You'll still have two switches for a passing siding and one for a stub siding(now a bit wider with each, siding, but not much, still about 12")  OR two full loops on each table two connecting lines and a single stub. A new switch or two and you have two loops for two trains,& the connection, maybe the stub. With a reverse loop, Your train size is limited to your loop size. A dog bone loop isn't so limited. Again, your style should decide.

Your max reach is now about 30" if you loops aren't in a rooms corner, and you have as much straight track as you can get away with.(the best for viewing a train, imo; but some do prefer twists and turns. Do You? Are you sure? )

Scenic? Over & under, twists - turns, a grade, square-ish space leaves more room in the center for "stuff". Running grades need your near contant attention to throttle, if without cruise command or blocks and relays to help to run "hands free".

Operations? ( switching.) Single loop and a 5 track stub yard. Or two industry/ passenger sidings with 2 stub tracks on one, three on the other or one and four.

Numbers! One train isn't enough for me. I find four to be almost too much in conventional. Two is great, three a slight challenge.

Elevated lines!. No room?; Build up. A level El was the best thing I ever did to that layout. Gave it a whole new feel, depth, and visually broke the tracks below it with a moving visual block that varies constantly. I instinctually want to  put a new train on the El first now though it's the furthest reach. The lower tracks are now "background"; the El, the real star. It's created a want for small engines too. A Hudson with freight looks kind of silly up there, with passenger cars is ok. But an 0-4-0 or SW is just plain great.

   I like passing sidings and ladder yards because I hate reversing long trains into stubs; the flanges dont always save the long trains.

In small scales, S turns are the enemy for backing. It's not as bad in O , mostly because our pizza cutter wheel flanges save us.

   But I've found is there is another somewhat rare issue with S turns often missed by most folk in O, but caused because our couplers are often mounted solid on the trucks.

  On most trains, it's not an issue. The coupler shank is short enough. Articulated couplers also don't suffer it. But when a long solid shank turns right as the truck does, and the next truck is turned left on the opposing turn, one of those two gets pulled off the rails.  

  Its an increased arc radius on the non articulated long shanks. Those knuckles ride too far to the outside of center (overhang) in opposing directions. So also on some peices, it can  create an angle beyond the design of the knuckle. Its rare, but I now own three "issues" for some parts of my 4.5x9. Old Marx diesels or passenger cars with twist couplers really dislike an S badly. (Never want one? Are you sure? )

The fix is a 3" or 4"straight in between the two turns in an S.

The alternative is to build a table and play with track till your happy. No plan needed. But soon I was using Anyrail at night to re-lay track and check possible fitment in other ideas.  It worked for me, and later, SCARM was how I visually checked my scenery ideas. The 3d veiw is great for that

Pretty Similar to what DoubleDaz did, and also 60" x 144".  I inverted the switches to facilitate passing around a stopped train on the inside loop, like at a station, etc.  I was thinking the inside loop could be more "City" with the outer loop being more "Country."  You could have industry, a small yard, station, etc. on the inside for operations while a second train is "travelling" on the outer loop. I'll try to add those in a bit & post, but back to painting for now....

Attachments

Images (2)
  • Kevin22 Layout 1 - 01
  • Kevin22 Layout 1
Files (1)

To carry Fridge56vet's idea a little further, here's a modified variation of mine. It was a good idea to invert the turnouts for his running concept with the passenger terminal, just be sure to keep the inside turnouts like they are, several inches from the end of the curves to minimize the "S" curve effect for a train coming out of the curve and going into the turnout. I look forward to seeing what he adds to his version.

2D

3D-a

3D-b


Attachments

Images (3)
  • 2D
  • 3D-a
  • 3D-b
Last edited by DoubleDAZ

As promised, a couple more digital doodles.  I've thrown in a quick yard (yellow), engine service area (orange), and a few commercial/industrial sidings (purple).  Max engine length that fits in the service area is about 11" long, but you could gain an extra 5" (and ofr the yard, too) by sliding the switches down.  Of course, if you can find more space.... 

Attachments

Images (2)
  • Kevin22 Layout 2 - 01
  • Kevin22 Layout 2
Files (1)

Fridge56vet, not to be critical, but those are awfully short yard tracks. If the orange track is to store an engine, it's going to be hard to get all but the shortest one in there. The yellow tracks will only hold 2-3 cars each (fewer passenger cars), so they're okay if Kevin maybe wants to switch cars around to make up/tear down consists. The single purple track looks it will hold a small train of maybe 3 cars with an engine. The purple engine service area looks okay for 2 engines. That said, I think Kevin wants some city landscaping, but here's another take on a yard with longer yard tracks and no engine service area.

Capture

Kevin, only you can decide if you want some switching action, storage for other trains or landscaping. There's no right or wrong. Smallish layouts are always tough because there just isn't enough space for a decent sized yard without giving up most of your landscaping space. I gave up on a yard for my 4x8x10 "L"-shaped layout in favor of 2 levels capable of running 4-5 small trains or 2 larger trains and 1 small train on 3 sets of track.

Here's yet another variation. I like it because it hides a passing siding and you can sit Train B there, pull into the tunnel with Train A and then come out with Train B.

Capture2

Capture3


Attachments

Images (3)
  • Capture
  • Capture2
  • Capture3

Add Reply

Post
The Track Planning and Layout Design Forum is sponsored by

AN OGR FORUM CHARTER SPONSOR

OGR Publishing, Inc., 1310 Eastside Centre Ct, Suite 6, Mountain Home, AR 72653
800-980-OGRR (6477)
www.ogaugerr.com

×
×
×
×
Link copied to your clipboard.
×
×