
I mentioned in this thread a custom power switch board that I designed for controlling smoke units and electrocouplers with a DCC decoder. I threatened to post some details eventually, so here goes.

The board is a simple 2-channel MOSFET power switch board. It has two independent control channels, so it can be used for heater/fan control for a smoke unit, or for powering a pair of front/rear electrocouplers. It uses a p-channel MOSFET, so it is naturally 'logic compatible' with decoder outputs (see the linked thread for some discussion on that). It is very fast, so it's PWM compatible, and incorporates freewheel diodes for use with inductive loads.

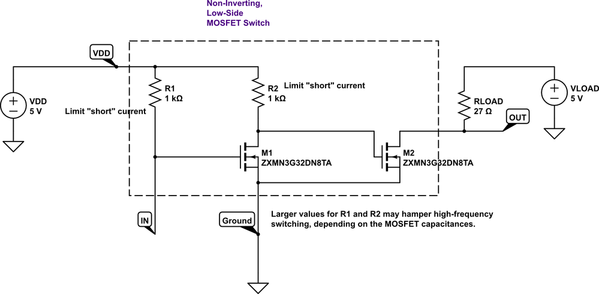
Here is the schematic for the board:

 schematic

Here are the parts I used:

The connections to the board are as follows:

  • In1/In2: Input signals from the decoder. One or both may be used.
  • Out1/Out2: Outputs to the heater, motor, or coupler coil.
  • Vdd: Regulated DC supply, typically 5-6V. (Not DCC from the track - see the other thread for discussion of rectifiers and regulators.)
  • Gnd: Return to the regulator ground. Returns from the loads also get wired up here.


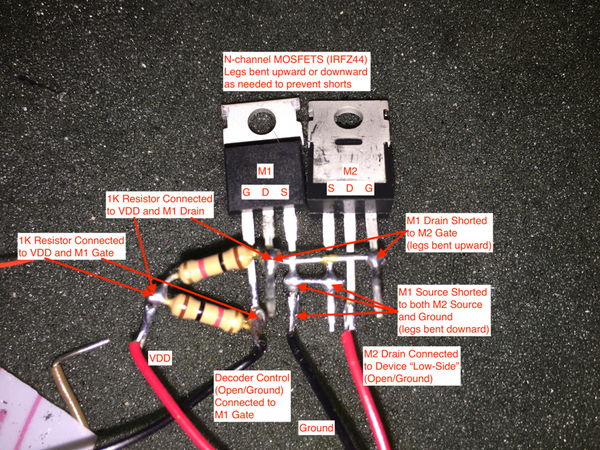
Here's a pic of a couple of the assembled boards:

IMG_7618

And here's one wired up for a smoke unit for recent install I did:

IMG_7569

The red/black leads are the 5V power and return from the regulator. Pink and yellow are the signal lines from the decoder. The red and yellow connectorized harnesses are for the smoke unit heater and fan. I reused these from the original harnesses.

The same board and wiring can be used to power a pair of electrocouplers as well. The physical assembly would be identical. The only difference would be in the configuration of the decoder, which I discuss here.

Attachments

Images (3)
  • schematic
  • IMG_7618
  • IMG_7569
Original Post

Replies sorted oldest to newest

Nice design and very nice boards!

As you pointed out in your posts, the decoder's AUX outputs act as low-side switches, so sometimes you might want to use "low-side" high-power switching of a device, controlled by the decoder AUX output. This application sometimes arises when you have common-power supplying multiple devices, and the decoder’s AUX open/ground outputs control each device separately. 

In this case, you might employ a pair of N-channel MOSFETs in a package such as  ZXMN3G32DN8TA (similar to the DMP3085LSD-13 package in your post) in the following straightforward circuit.

non-inverting_low-side_switch.png

As the decoder's "IN" opens/grounds, this circuit will correspondingly open/ground on the "low-side" of the device. 

An advantage of this design is that the device’s load voltage, VLOAD, can be different from the switch’s supply voltage VDD, which helps reduce power consumption of the switch by keeping VDD small. This feature is useful when controlling higher-resistance (in the 20-30 ohm range rather than in the 8 ohm range) smoke unit heaters that might require VLOAD=14V or so to work well. The down-side to this design is that you need to use both MOSFETs in the package to implement a single switch. 

I have prototyped the circuit above with IRFZ44 N-channel MOSFETs, which are overkill, but are what I had on hand, and they work OK when using this switch as the high-power, low side control of an ESU smoke unit in testing with a LokProgrammer in conjunction with ESU 53900 Profi Decoder Tester mounted with a LokSound L V4.0.

(Parenthetically, the ESU 53900 Profi Decoder Tester could not source the power needed for an attached ESU 54678 Smoke Unit, even with a 14.8V LiPo battery supply instead of the puny AC to DC power adapter provided with the Profi board, so this problem precipitated testing this switch circuit!)

As you can see, the circuit is straightforward to “whip up” with about 5 minutes of soldering. Of course, for “production work,” I would cover the exposed electrical connections with Liquid Tape or the like.

Pasted Graphic 2.tiff

Circuit simulation reveals that increasing R1 and R2 beyond 1K will hamper high-frequency (20kHz-40kHz) response due to the somewhat large IRFZ44 capacitances.

The "proof in the pudding" video.

Again, thanks THOR73 for your posts! Your design is invaluable.

Attachments

Images (2)
  • blobid0
  • blobid1
Videos (1)
LokProgrammerSmokeWithSwitch
Last edited by DarrellR
sinclair posted:

That's a nice small package.  Where do you get the PCB from?

I use DipTrace for the schematic capture and pcb design. It's a really nice package, easy to use (keeping in mind it's a complex cad tool), good integration between schematic and pcb design, really good design verification tools, and a thorough library with a nice pattern editor for defining your own parts. It also has an integrated 3d viewer and step file export. This is especially useful when doing a complete design with enclosure, etc. like I did for my Arduino turnout project. It's also reasonably priced - there is a 'starter' version for $75, which supports two layers and up to 300 pins, more than enough for anything I've needed so far.

They partner with Bay Area Circuits for the pcb fab. There is a handy 'Order PCB' option on the menu, so you can get estimates and order right from within the design tool. Really quick and easy, and I've been impressed with their service and the quality of the boards. They also have an online design analysis tool, which you can use to check your design for manufacturing issues prior to ordering. You can of course export Gerber and a bunch of other formats from DipTrace if you want to use another shop.

If you want to try it out on your own installs, PM me your address, and I'll throw a few in the mail. I had like 50 or 60 of them made, lol.

FWIW, ordering from Bay Circuits is a lot more expensive and less flexible than other sources.  I also use DipTrace, but for onesie-twosie prototypes of small boards, I typically use OSHPark, and if you want ten cheap prototypes, try SEEED Studio.  One of the things I like about alternative sources is I can specify different thicknesses of the PCB and the copper weight for the traces.

DarrellR posted:

Nice design and very nice boards!

As you pointed out in your posts, the decoder's AUX outputs act as low-side switches, so sometimes you might want to use "low-side" high-power switching of a device, controlled by the decoder AUX output. This application sometimes arises when you have common-power supplying multiple devices, and the decoder’s AUX open/ground outputs control each device separately. 

In this case, you might employ a pair of N-channel MOSFETs in a package such as  ZXMN3G32DN8TA (similar to the DMP3085LSD-13 package in your post) in the following straightforward circuit.

Yep, agree an approach like that should (and obviously does) work also.

I'm always looking to minimize parts count, partly to keep things as small as possible, but also because I'm putting them together by hand, so every part means more assembly time! Hence, the approach described above.

Related question - I thought that ESU smoke unit was supposed to be basically a drop in hookup with the Loksound L in a normal installation. You are using the switching circuit here just to run it off the decoder tester, I guess?

Your statement is absolutely correct - the configuration is for testing only! The ESU smoke unit, or a modified Lionel surrogate I've figured out, will simply connect to the six specialized LokSound L V4.0 (and any other L or XL decoder) outputs designed for ESU smoke units.

I am putting together a follow-up post, inspired by your original, fantastic smoke unit post, on how to convert a Lionel 27 ohm smoke unit (essentially by adding an axial, glass-encased 100K thermistor with a B parameter of about 3900 Kelvin), so that it can use the LokSound L's ESU smoke unit connections directly. As part of that post, I will point out that the ESU Profi board, in my experience (or inexperience) will NOT source sufficient power for a smoke unit, even with a hefty 14.8V LiPo battery power supply. Direct smoke unit connections, even with an authentic ESU 54678 smoke unit, will shut down the board when the smoke unit is turned on!

Thanks again for inspiring posts.

gunrunnerjohn posted:

FWIW, ordering from Bay Circuits is a lot more expensive and less flexible than other sources.  I also use DipTrace, but for onesie-twosie prototypes of small boards, I typically use OSHPark, and if you want ten cheap prototypes, try SEEED Studio.  One of the things I like about alternative sources is I can specify different thicknesses of the PCB and the copper weight for the traces.

Yeah, I usually just go with the quick and easy route.   But, that's a good point about options for board thickness, etc.

I ordered a bunch of boards from Bay Circuits, as you say, it was really easy.  However, for the small boards I typically use, I'd have 30-40 boards for a prototype, and I'd pay, I believe, a minimum of $36 for them.  For a 1" x 1" board, I get three from OSHPark for $5 shipped, and I can have them with .031" board stock and 2oz copper.  Since most of the stuff I'm making I want to be as small as possible, every little bit helps.  Also, the 2oz copper allows me to use thinner traces for the same current carrying capacity.

thor73 posted:
sinclair posted:

That's a nice small package.  Where do you get the PCB from?

I use DipTrace for the schematic capture and pcb design. It's a really nice package, easy to use (keeping in mind it's a complex cad tool), good integration between schematic and pcb design, really good design verification tools, and a thorough library with a nice pattern editor for defining your own parts. It also has an integrated 3d viewer and step file export. This is especially useful when doing a complete design with enclosure, etc. like I did for my Arduino turnout project. It's also reasonably priced - there is a 'starter' version for $75, which supports two layers and up to 300 pins, more than enough for anything I've needed so far.

They partner with Bay Area Circuits for the pcb fab. There is a handy 'Order PCB' option on the menu, so you can get estimates and order right from within the design tool. Really quick and easy, and I've been impressed with their service and the quality of the boards. They also have an online design analysis tool, which you can use to check your design for manufacturing issues prior to ordering. You can of course export Gerber and a bunch of other formats from DipTrace if you want to use another shop.

If you want to try it out on your own installs, PM me your address, and I'll throw a few in the mail. I had like 50 or 60 of them made, lol.

Hey Thor,

I appreciate I may be a bit late to the party here, but if you have any boards left over, I wonder if I could politely request a couple; I have a pair of USA Trains smoke units that I'm keen to run from ESU LokSound decoders?

Thanks too for sharing in this thread. I've been trying to work out for a while, how to interface the two and was so glad to have stumbled across these posts. Hugely informative. Thanks everyone who's shared their knowledge and passion for the hobby. It's truly what makes it a richer experience for all.


Kind regards

Darren

DarrenE posted:

Hey Thor,

I appreciate I may be a bit late to the party here, but if you have any boards left over, I wonder if I could politely request a couple; I have a pair of USA Trains smoke units that I'm keen to run from ESU LokSound decoders?

Thanks too for sharing in this thread. I've been trying to work out for a while, how to interface the two and was so glad to have stumbled across these posts. Hugely informative. Thanks everyone who's shared their knowledge and passion for the hobby. It's truly what makes it a richer experience for all.

 Kind regards

Darren

Hi Darren, I'm pretty sure I still have some of the PCBs. You might also want to look at my thread 'decoders, smoke, and couplers' for some ideas on off the shelf parts that might do what you want. Might save you some soldering, if so.

Thanks for reaching out Thor.

I've breadboarded a version which allows me to test the ESU smoke and decoder units on the tester but it'd be really helpful to have a couple of circuit boards if possible, to use a USA Trains unit in a loco - your design looks incredibly compact.

I'd expect to cover the postage of course ( I'm in the UK, but they should still be able to go airmail as a letter I'd have thought). If it really isn't worth it, I can look into getting a design program, copying and finding someone to print over here but I just hoped this would shortcut that - life is so hectic at the moment I don't seem to have time to think


Add Reply

Post

OGR Publishing, Inc., 1310 Eastside Centre Ct, Suite 6, Mountain Home, AR 72653
800-980-OGRR (6477)
www.ogaugerr.com

×
×
×
×
Link copied to your clipboard.
×
×