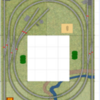
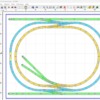
For a while I have been tinkering around in AnyRail on my layout design for the back bedroom. Recently I had thought about how all this would come together by power supplies, power districts, isolated rails, all the good stuff that I have at least an idea of, but not much else. The rails are all Ross rails, the dimensions of the layout are 103" x 126".

The section in the middle is access as well as where control would come from. I plan to have two bridges to pass over the crazy river pictured at the bottom of the layout, there will be a car tunnel on the right side where the road goes through, and not sure if the river would also be through that tunnel or a archway for it. The topside of the layout would be the highlands and have it slope downwards to the river. The station in the lower left corner would be built up to the track, sort of like how the station downtown of the BR&W is, not sure how I would do that exactly, but that is the plan. The road that passes that would would be in the lowlands.

I threw in some buildings for something to show, but have some ideas for others. Top left corner I plan to have a dairy processor for the numerous amount of milk cars I have, I have on the opposite side in the top right corner a coaling tower(hard to make out) for numerous amounts of coal cars I have. Station in the lower left of course, I have on the inner siding mid-left sanding and water tower which I also have but not sure where a water column I bought in 2020. I also have a building I labeled facilities which is undetermined as to what exactly that could be. The lower right corner I have an outline of an invisible representation of a freight building I bought at York some years ago.

The rest of the buildings, and trees are subject to interpretation as they are just there to represent what else could be there. I figured I would place stuff in there just to give it a little bit more stuff basically just to be filler. There will probably be a little bit more road added which more than likely would be on the right side going up to the highlands in some fashion, perhaps that would be fenced off for railroad use only.

Back bedroom project new new new plan

So, with all that of course there are the questions that need to be answered. I went back into AnyRail, snapped a clean picture so I could see the rails without labels, get an idea of where spots are for isolation of rails, and be able to ask about power. So, in red below would be where isolating track pins for the center rails would be applied to isolate power districts and or rails. I figured that maybe two power supplies could be what would be for this, inner loop on one power supply, outer on another power supply. The isolated sections would be powered by the two power supplies individually on whichever is the main power supply for the loop they fall into.

Track sections

I would imagine that of course I would need power drops for bus lines. I figure that this should be a fairly easy project, which of course will be something I nitpick at at how much I want to put into it, make it better than what I think it is. I tend to be a pain working on my projects much like everyone else that wants to get things right.

Attachments

Images (2)
  • Back bedroom project new new new plan
  • Track sections
Original Post

Replies sorted oldest to newest

I had tinkered around some time ago with the idea of another point to get out of the inner loop to the outer. It seemed to me that it wasn't necessary as I had planned to be running two engines opposite of each other, meaning in opposite directions. Some of the other iterations that had come and gone was on the inner loop, another set of switches that I got rid of that just didn't fit well as they would limit what would be run there as it needed to be O54 to fit within the confines of the space I had.

I had considered having siding engines, switchers lined up to just fiddle about doing some odd jobs as it were on the sidings on the outer loop if need be, hardest bit of that is storage of whatever would be switched from running to siding however, not that it is really important, just an odd thought. Storage is a concern that I will have to work out as well, because I would have to build shelving under the layout as there is no other space that would work. I don't see that as a big problem, just something that would be future stuff to be done.

What about bus? How would that work here exactly, what would be good for this, do I need a bus? Are the spots I marked for isolation of rails good then? This would all be Legacy controlled, I did forget to mention that before. I only have Lionel engines and no interest in having a split system of MTH/Lionel. Anything else to consider?

Is there any particular reason you don't post the AnyRail file here.  Some people like to tinker with the diagrams rather than try to literally explain modifications.  Further, if you are planning complete Legacy control, why do you want so many isolated sidings?  Simply isolating one loop from the other should be sufficient unless I am missing something?

Chuck

Last edited by PRR1950
@PRR1950 posted:

Further, if you are planning complete Legacy control, why do you want so many isolated sidings?  Simply isolating one loop from the other should be sufficient unless I am missing something?

Not sure I understand this comment.  I have 13 sidings in two areas on my layout, each of the sidings has an isolated and separately switched power feed.

The question I have is, why would you not want the siding power separately controlled?

Not sure I understand this comment.  I have 13 sidings in two areas on my layout, each of the sidings has an isolated and separately switched power feed.

The question I have is, why would you not want the siding power separately controlled?

I do remember someone telling me(or a video) about siding with MTH engines being powered was a very bad thing, that is to their life expectancy. I don't plan on running any MTH stuff as I don't have any of their systems, but having sidings separately controlled is a beautiful thing.

I don't remember where I read a good number of years ago, heck might have been during my HO days when I was a teen, but shutting off sidings keeps the overall power to the tracks up. If you're not using it, why waste it was the theme of that article. It just makes sense to have as much control as you can within reason. I think if I even had one siding, I'd still have it isolated.

I had tinkered around some time ago with the idea of another point to get out of the inner loop to the outer. It seemed to me that it wasn't necessary

I definitely agree with DoubleDAZ, you need a second cross-over.  Looks like there is plenty of room for another cross-over from inner to outer loops on the right hand side of your drawing.  You might think about a curved turnout from the inner loop or use a turnout with a 072 diverging route.  You will need it to make run-around moves to switch you sidings.  For smoother running -- to avoid S turns -- I would think you should replace a couple of you switches with 072 diverging route ones.

Tom Stoltz

in Maine

I had tinkered around quite a bit with a second turnout, as well as curved switches. The problem with the curved switches(O72) was being able to mate up or just be able to get close enough, at least that is the problem I kept having. I would take a piece of track off, try and get things to work, and then be off more than I thought I should be. I'd try to correct that, and end up with the same puzzling problem.

I could tinker around to try and get an inside to outside switch going on, but I know the right side is tighter than the left side. Maybe it would come down to having to have to cut a bit of track to fit it, but heck, drawings from the drawing board tend to be different when it comes to the real deal. Maybe for that(when I get a few extra turnouts), do a dry fit for the inside to outside and see if it works outside of whatever I come up with(if I can't get it to work) in AnyRail.

I know it is hard to say, I've been back to the drawing board a bunch of times, and each time things change sometimes for the better, other times outright headache. I think the first 5 were the biggest problems, but that was partially not knowing what I wanted to do. I'll see what I can come up with when I get a chance this week.

Here's the best I could up with playing around for a few minutes. Obviously, it's not an exact duplicate, but I think the same functionality is there. Unfortunately, the 2 yellow tracks are 10.75", .75" longer than the 015 tracks, so 020 tracks need to be custom cut to fit. I think cutting 2 tracks is worth not having to back through a crossover.

dave 2023-01-02 daz

Attachments

Images (1)
  • dave 2023-01-02 daz
Files (1)
@DoubleDAZ posted:

Here's the best I could up with playing around for a few minutes. Obviously, it's not an exact duplicate, but I think the same functionality is there. Unfortunately, the 2 yellow tracks are 10.75", .75" longer than the 015 tracks, so 020 tracks need to be custom cut to fit. I think cutting 2 tracks is worth not having to back through a crossover.

dave 2023-01-02 daz

Wow, that looks great. I'll have to mess around when I have time. Sorry I didn't get a chance to get on here last night, stuff just gets in the way sometimes.

@DoubleDAZ posted:

Tom, I didn't see what you were getting at from your earlier post, but here's what I got from your last comment. It requires another cut track and O-72 switches. I took it a step further in the 2nd version.

dave 2023-01-04 daz1.


Thanks Dave.  The 072 switch on the curve is what I meant with my first post.  It would allow Dave NYC to have the second cross-over and a run around track to help switching the spurs with forward and backing moves.  It also avoids all the S turns he had in his first design.

Tom Stoltz

in Maine

Dave/Tom, you guys are really kicking the design around. That is pretty darn good, that's for sure. I heard been scared of using O72 turnouts in the way that you both chose because I had read somewhere about derailment issues with certain track(not Ross), that's why I kind of avoided doing that. I also heard about the dreaded S curves, but that is why I went with the 11 degree as it was not as much of a change, even though it still is an S.

All this is a lot to consider, which will need tinkering. You guys have done a great job at convincing me to change, I'll have to fiddle about and fix my initial plans(again for the better). I just hope I don't over clutter the tracks, but heck, that's what railroads are for eh?

Hopefully the rest of my work day doesn't kick my behind like yesterday did. Give me some uptime tonight to mess around.

BTW, anyone have an answer about my bus question? Given the changes I guess that may add more to the answer to that question with more rails or just a bit more to it.

Dave, you’re exactly right, just offering different options. The concern with O-72 switches on the curves is that trains will always have to go through the turnout portion of the switch when looping. IMHO, the “S” curve with the #11 switches should be a non-issue, unless you’re a speed demon, so I don’t think you’d be wrong building any design. The last design costs more because of the extra switches, but I don’t think they’re worth the expense. BTW, I see I missed that short spur off the curve.

@Mark Boyce posted:

Dave, I wish I could help you on your question about the bus.  I researched how to do it in an MTH system and haven’t paid much attention to folks commenting about Lionel only wiring.

I like the way the plan is turning out now with a second crossover between loops.

I would think that it would be very similar. I think I had read somewhere quite a while back that track footage somehow determines if you need a bus, and also helps determine how far apart it is depending on overall length of track runs, like 12 foot length may have 2 to 3 bus feeders or something like that.

@DoubleDAZ posted:

Dave, you’re exactly right, just offering different options. The concern with O-72 switches on the curves is that trains will always have to go through the turnout portion of the switch when looping. IMHO, the “S” curve with the #11 switches should be a non-issue, unless you’re a speed demon, so I don’t think you’d be wrong building any design. The last design costs more because of the extra switches, but I don’t think they’re worth the expense. BTW, I see I missed that short spur off the curve.

Well, definitely not a speed demon. I learned that a long time ago flipping one of my first O- Gauge engines tumbling across the carpet. Oops. All operations would be slow speeds to enjoy save a freight express or passenger express, which would still be relatively slow compared to postwar speed demons, lol.

I didn't get a chance last night to mess around, but did read how to cut track in AnyRail thanks to a post from Gunrunner John from some time ago. So that helps.

Dave, with MTH, you use what they call star wiring, also called home run wiring, when I worked in telecom and we started using Ethernet.  With MTH, you don’t use a bus, instead every drop comes back to a terminal bus right off the TIU.  I think you can do the same with Legacy, but a bus would save a lot of wire.  That is a guess by me for on Legacy.

Last edited by Mark Boyce

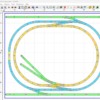
Updated plans

Back bedroom project new new new planTrack sections

Now this looks much better, and again I have to thank GunRunner John for telling the AnyRail folks to have it so you could cut GarGraves Flextrack, which is a very awesome thing to be able to do(I wish they would have turntables besides the Atlas one).

I stuck with the 11 degree switches as I already have a couple of those, and I am not a speed demon through turns. I do have to have that one spur with the O72 turnout which trains will be going through constantly unless fueling for coal. Adding that little bit of 10.75"(labeled as 102) track really gets close to pushing the ends of the tables, but I even allowed a bit of space on that side as there is a radiator over there and a window. I wanted at least a bit of room to try and keep from really pushing to the wall and having the radiator completely under the table. This way there was just enough space for it not to be doing that.

Bus Wiring Question

Found this topic just a couple of minutes ago. I guess I will have to read a bit more to understand exactly what is going on there. I think I can refer to one of the books I have as well to read a bit more on how a bus works, I think it was a layout building book, so that will help. I do believe I have heard about STAR wiring somewhere, maybe one of my friends/old coworkers mentioned it, I'll have to see what I can come up with.

Thanks everyone who offered great opinions to make this work way better than it was. I think the hardest part will be making bridges to span the river. I want some sort of stone/concrete bridges, which means that will be completely from scratch.

Attachments

Images (2)
  • Back bedroom project new new new plan
  • Track sections
Files (1)

With the star wiring. You will be running paired wires to your loops as well as your sidings. Speaker wire works good for this. In some instances especially with Gargraves. It helps to jumper wire both outside rails. With buss wiring. You typically run your center rail wiring to you loops and your sidings from a power strip or toggles if your using them. You will run what’s called a common ground. One or both outside rails will go to either a ground buss that may sort of follow your loop that you will attach the wires to or to just a terminal strip.

Both methods will work. They key is to use a good quality wire. Preferably 14 gauge. I would probably opt for the Star Wiring if you plan to run DCS and your starting from scratch. Using the MTH terminal blocks it makes a neatly done installation that’s easy to trace out any issues.

Yeah, I think I have a good number of posters asking wiring questions, and GRJ has usually been one of the responders expressing what to use, or not to use in cases where the wire asked about was not a good idea. I did know about joining common rails together to create a better signal as that has also been expressed, but always good to point out as much as possible, just in case someone doesn't know.

Well, I go with #14 for the main runs, and I used #18 for the short drops from the track  With two large steamers and about 50 cars between them, I see a fraction of a volt maximum power drop at any part of my 140 foot mainline loop.  The biggest fluctuation in voltage is the actual transformer voltage, put a 4-5 amp load on almost any model train transformer and you'll see a significant drop in output voltage.

As about the specific wire, make sure you don't get stuck with the CCA (Copper Clad Aluminum) junk!  I used #14 THHN stranded copper wire from Home Depot for my main bus runs.  I bought my #18 oxygen free stranded wire from Amazon in 100 ft spools.

I think I remember seeing you post something like that somewhere. Yeah, definitely stay away from the mix and go with straight up copper. No aluminum here, I don't have a bauxite mine intended for my layout anyway, lol.

Here's an interesting thought change to the coaling tower area. The black ruler line is a measurement of the B&O EM-1 I own. I figured that if I pop the switch in on the inside, and have the engines get coal on the outside(even though sitting on a switch), that it would eliminate the O72 switch that was on the curve on the outer loop, keeping engines from going through a switch in that way. It is kind of tight, but looks a bit better there that way instead of other. Of course, this will be figured out completely with a dry fit of the Golden Gate Depot Coaling Tower, and all other stuff that would go into this part of the layout. Since the hoppers only measure a bit over 9", and I could pop a bit more track at the edge of the topside of the layout, that may work altogether better overall.

Coaling Tower change

Attachments

Images (1)
  • Coaling Tower change

Dave, I like the plan!!

That link is a good find.  I never saw it before since I was planning on star wiring.  You can't go wrong with Dave C and John's advice!!  They both have been quite helpful to me switching from HO to O 3-rail, DC to AC.  Maybe we should come up with a "First Responders" category for folks like them; not only in the electronics side, but track planning, benchwork, scratchbuilding, and other areas of the hobby!! 

Yeah Mark, right on the money. I may fiddle more with that switch on the siding when I get some stuff built, it will take a while to order more stuff so I do have some time to fiddle with that when I can. Bench work needs to get started, dimensions are pretty much set in stone, just need to figure the wood portion of it. When that gets to that point, I can dry fit stuff and figure out the other switch to coal tower problem or solution. All will come together probably easy for that part of it. The bridge building will be something interesting, that much is certain. I just have to get stuff built and then move into that part.

Add Reply

Post
The Track Planning and Layout Design Forum is sponsored by

AN OGR FORUM CHARTER SPONSOR

OGR Publishing, Inc., 1310 Eastside Centre Ct, Suite 6, Mountain Home, AR 72653
800-980-OGRR (6477)
www.ogaugerr.com

×
×
×
×
Link copied to your clipboard.
×
×