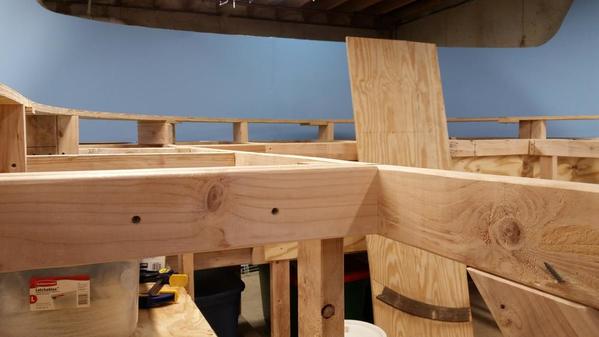
I have completed the removal of the old layout and have begun building the new larger layout. I was able to get a hold of 2X4's for a great price so I am using those this time as opposed to 1X4's... the 2X4's are not needed and are a bit much but for the $ I couldn't pass them up. These will be topped in areas with 3/4 sanded ply and the rest will be a open grid. The height right now is at 49 inches so after homasote the track will be at 50 inches ish. All updates I will post here as I progress. The back drop is being recycled from my old layout and once the screw holes are filled and sanded the plan is to cover them with back drops so don't fuss on all the holes too much...![]()
First photo shows the first couple sections of the new bench work
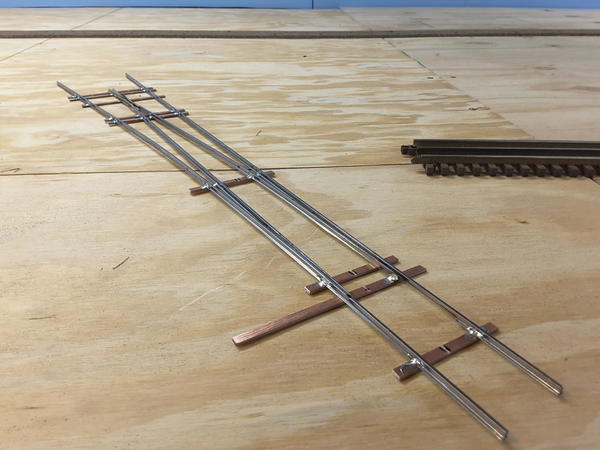
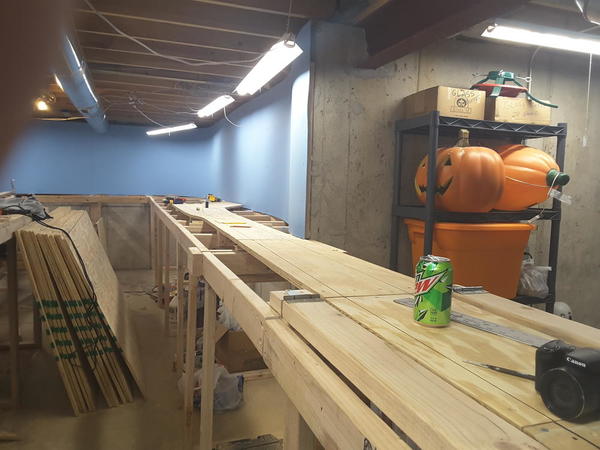
2nd photo shows more bench work in place and the old back drop sections going back up
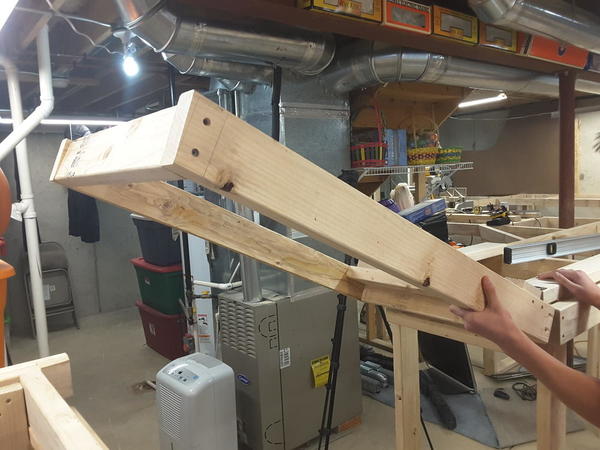
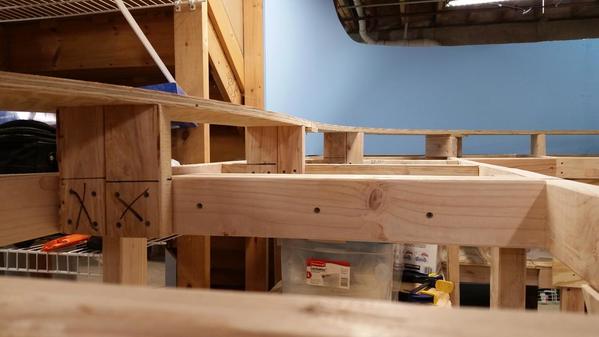
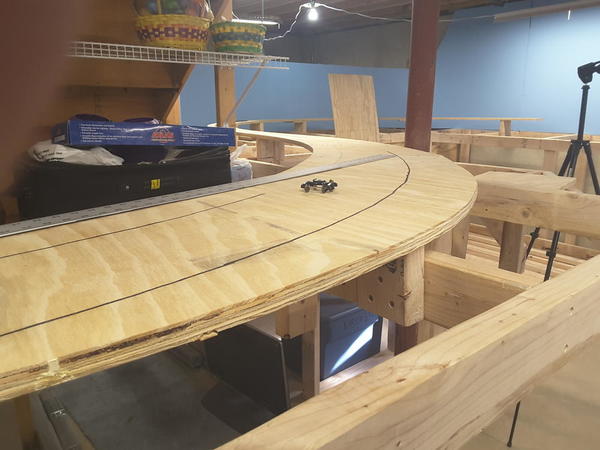
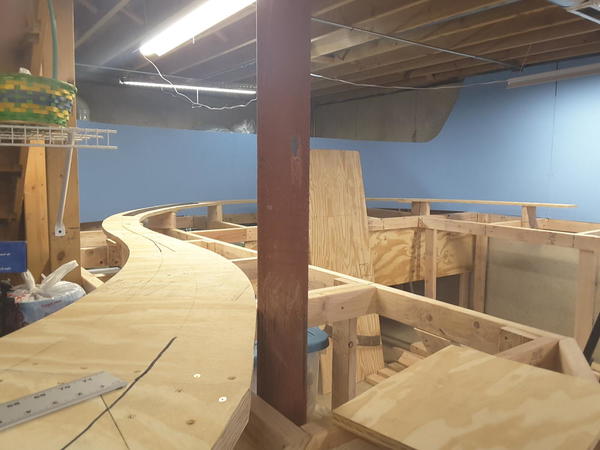
3rd photo shows the length of this portion of the layout which is going to be going up to the wall I'm leaning against to take the photo which will put it at 44 feet and it will turn to the right in the photos and continue down for another 22 feet. The bench work is very solid right now, once it all is completed I will build shelves underneath that will tie the legs together allowing for more strength in the legs and a bunch of storage space. Once at a more completed stage a fascia will be added with some type of curtain/drape material to cover things up below. The wide sections in the layout will incorporate lift up sections for access/maint. reasons. I also just completed a video showing my mess....errr I mean progress. ![]() Also the angular portion of bench work closest to the camera is where the roll out section I am going to build will go to allow access to the breaker box and sump pump, the bench work will then continue onward....
Also the angular portion of bench work closest to the camera is where the roll out section I am going to build will go to allow access to the breaker box and sump pump, the bench work will then continue onward....![]() Not a bunch done but I'm plugging along.
Not a bunch done but I'm plugging along.


![20170129_170450[152] 20170129_170450[152]](https://ogrforum.ogaugerr.com/fileSendAction/fcType/0/fcOid/71256347393343804/filePointer/71256347393343849/fodoid/71256347393343842/imageType/MEDIUM/inlineImage/true/20170129_170450%255B152%255D.jpg)
![20170211_143932[148] 20170211_143932[148]](https://ogrforum.ogaugerr.com/fileSendAction/fcType/0/fcOid/71256347393343804/filePointer/71256347393343851/fodoid/71256347393343844/imageType/MEDIUM/inlineImage/true/20170211_143932%255B148%255D.jpg)
![20170211_143950[149] 20170211_143950[149]](https://ogrforum.ogaugerr.com/fileSendAction/fcType/0/fcOid/71256347393343804/filePointer/71256347393343852/fodoid/71256347393343845/imageType/MEDIUM/inlineImage/true/20170211_143950%255B149%255D.jpg)
![20170129_170450[152] 20170129_170450[152]](https://ogrforum.ogaugerr.com/fileSendAction/fcType/0/fcOid/71256347393343804/filePointer/71256347393343849/fodoid/71256347393343842/imageType/SQUARE_THUMBNAIL/inlineImage/true/20170129_170450%5B152%5D.jpg)
![20170211_143932[148] 20170211_143932[148]](https://ogrforum.ogaugerr.com/fileSendAction/fcType/0/fcOid/71256347393343804/filePointer/71256347393343851/fodoid/71256347393343844/imageType/SQUARE_THUMBNAIL/inlineImage/true/20170211_143932%5B148%5D.jpg)
![20170211_143950[149] 20170211_143950[149]](https://ogrforum.ogaugerr.com/fileSendAction/fcType/0/fcOid/71256347393343804/filePointer/71256347393343852/fodoid/71256347393343845/imageType/SQUARE_THUMBNAIL/inlineImage/true/20170211_143950%5B149%5D.jpg)
![20170212_175700[172] 20170212_175700[172]](https://ogrforum.ogaugerr.com/fileSendAction/fcType/0/fcOid/71256347393343804/filePointer/71256347413767928/fodoid/71256347413767916/imageType/MEDIUM/inlineImage/true/20170212_175700%255B172%255D.jpg)
![20170212_194039[174] 20170212_194039[174]](https://ogrforum.ogaugerr.com/fileSendAction/fcType/0/fcOid/71256347393343804/filePointer/71256347413767929/fodoid/71256347413767917/imageType/MEDIUM/inlineImage/true/20170212_194039%255B174%255D.jpg)
![20170212_194114[176] 20170212_194114[176]](https://ogrforum.ogaugerr.com/fileSendAction/fcType/0/fcOid/71256347393343804/filePointer/71256347413767930/fodoid/71256347413767918/imageType/MEDIUM/inlineImage/true/20170212_194114%255B176%255D.jpg)
![20170212_194135[177] 20170212_194135[177]](https://ogrforum.ogaugerr.com/fileSendAction/fcType/0/fcOid/71256347393343804/filePointer/71256347413767931/fodoid/71256347413767919/imageType/MEDIUM/inlineImage/true/20170212_194135%255B177%255D.jpg)
![20170212_194145[178] 20170212_194145[178]](https://ogrforum.ogaugerr.com/fileSendAction/fcType/0/fcOid/71256347393343804/filePointer/71256347413767932/fodoid/71256347413767920/imageType/MEDIUM/inlineImage/true/20170212_194145%255B178%255D.jpg)
![20170212_194209[179] 20170212_194209[179]](https://ogrforum.ogaugerr.com/fileSendAction/fcType/0/fcOid/71256347393343804/filePointer/71256347413767933/fodoid/71256347413767921/imageType/MEDIUM/inlineImage/true/20170212_194209%255B179%255D.jpg)
![20170212_194221[170] 20170212_194221[170]](https://ogrforum.ogaugerr.com/fileSendAction/fcType/0/fcOid/71256347393343804/filePointer/71256347413767934/fodoid/71256347413767922/imageType/MEDIUM/inlineImage/true/20170212_194221%255B170%255D.jpg)
![20170212_194425[180] 20170212_194425[180]](https://ogrforum.ogaugerr.com/fileSendAction/fcType/0/fcOid/71256347393343804/filePointer/71256347413767935/fodoid/71256347413767923/imageType/MEDIUM/inlineImage/true/20170212_194425%255B180%255D.jpg)
![20170212_194435[181] 20170212_194435[181]](https://ogrforum.ogaugerr.com/fileSendAction/fcType/0/fcOid/71256347393343804/filePointer/71256347413767936/fodoid/71256347413767924/imageType/MEDIUM/inlineImage/true/20170212_194435%255B181%255D.jpg)
![20170212_175700[172] 20170212_175700[172]](https://ogrforum.ogaugerr.com/fileSendAction/fcType/0/fcOid/71256347393343804/filePointer/71256347413767928/fodoid/71256347413767916/imageType/SQUARE_THUMBNAIL/inlineImage/true/20170212_175700%5B172%5D.jpg)
![20170212_194039[174] 20170212_194039[174]](https://ogrforum.ogaugerr.com/fileSendAction/fcType/0/fcOid/71256347393343804/filePointer/71256347413767929/fodoid/71256347413767917/imageType/SQUARE_THUMBNAIL/inlineImage/true/20170212_194039%5B174%5D.jpg)
![20170212_194114[176] 20170212_194114[176]](https://ogrforum.ogaugerr.com/fileSendAction/fcType/0/fcOid/71256347393343804/filePointer/71256347413767930/fodoid/71256347413767918/imageType/SQUARE_THUMBNAIL/inlineImage/true/20170212_194114%5B176%5D.jpg)
![20170212_194135[177] 20170212_194135[177]](https://ogrforum.ogaugerr.com/fileSendAction/fcType/0/fcOid/71256347393343804/filePointer/71256347413767931/fodoid/71256347413767919/imageType/SQUARE_THUMBNAIL/inlineImage/true/20170212_194135%5B177%5D.jpg)
![20170212_194145[178] 20170212_194145[178]](https://ogrforum.ogaugerr.com/fileSendAction/fcType/0/fcOid/71256347393343804/filePointer/71256347413767932/fodoid/71256347413767920/imageType/SQUARE_THUMBNAIL/inlineImage/true/20170212_194145%5B178%5D.jpg)
![20170212_194209[179] 20170212_194209[179]](https://ogrforum.ogaugerr.com/fileSendAction/fcType/0/fcOid/71256347393343804/filePointer/71256347413767933/fodoid/71256347413767921/imageType/SQUARE_THUMBNAIL/inlineImage/true/20170212_194209%5B179%5D.jpg)
![20170212_194221[170] 20170212_194221[170]](https://ogrforum.ogaugerr.com/fileSendAction/fcType/0/fcOid/71256347393343804/filePointer/71256347413767934/fodoid/71256347413767922/imageType/SQUARE_THUMBNAIL/inlineImage/true/20170212_194221%5B170%5D.jpg)
![20170212_194425[180] 20170212_194425[180]](https://ogrforum.ogaugerr.com/fileSendAction/fcType/0/fcOid/71256347393343804/filePointer/71256347413767935/fodoid/71256347413767923/imageType/SQUARE_THUMBNAIL/inlineImage/true/20170212_194425%5B180%5D.jpg)
![20170212_194435[181] 20170212_194435[181]](https://ogrforum.ogaugerr.com/fileSendAction/fcType/0/fcOid/71256347393343804/filePointer/71256347413767936/fodoid/71256347413767924/imageType/SQUARE_THUMBNAIL/inlineImage/true/20170212_194435%5B181%5D.jpg)




![20170219_112754[214] 20170219_112754[214]](https://ogrforum.ogaugerr.com/fileSendAction/fcType/0/fcOid/71256347393343804/filePointer/71397233933710193/fodoid/71397233933710188/imageType/MEDIUM/inlineImage/true/20170219_112754%255B214%255D.jpg)
![20170219_112805[215] 20170219_112805[215]](https://ogrforum.ogaugerr.com/fileSendAction/fcType/0/fcOid/71256347393343804/filePointer/71397233933710194/fodoid/71397233933710189/imageType/MEDIUM/inlineImage/true/20170219_112805%255B215%255D.jpg)
![20170219_112754[214] 20170219_112754[214]](https://ogrforum.ogaugerr.com/fileSendAction/fcType/0/fcOid/71256347393343804/filePointer/71397233933710193/fodoid/71397233933710188/imageType/SQUARE_THUMBNAIL/inlineImage/true/20170219_112754%5B214%5D.jpg)
![20170219_112805[215] 20170219_112805[215]](https://ogrforum.ogaugerr.com/fileSendAction/fcType/0/fcOid/71256347393343804/filePointer/71397233933710194/fodoid/71397233933710189/imageType/SQUARE_THUMBNAIL/inlineImage/true/20170219_112805%5B215%5D.jpg)


![20170220_150303[224] 20170220_150303[224]](https://ogrforum.ogaugerr.com/fileSendAction/fcType/0/fcOid/71256347393343804/filePointer/71397233949292203/fodoid/71397233949292196/imageType/MEDIUM/inlineImage/true/20170220_150303%255B224%255D.jpg)
![20170220_150309[225] 20170220_150309[225]](https://ogrforum.ogaugerr.com/fileSendAction/fcType/0/fcOid/71256347393343804/filePointer/71397233949292204/fodoid/71397233949292197/imageType/MEDIUM/inlineImage/true/20170220_150309%255B225%255D.jpg)

![20170220_150303[224] 20170220_150303[224]](https://ogrforum.ogaugerr.com/fileSendAction/fcType/0/fcOid/71256347393343804/filePointer/71397233949292203/fodoid/71397233949292196/imageType/SQUARE_THUMBNAIL/inlineImage/true/20170220_150303%5B224%5D.jpg)
![20170220_150309[225] 20170220_150309[225]](https://ogrforum.ogaugerr.com/fileSendAction/fcType/0/fcOid/71256347393343804/filePointer/71397233949292204/fodoid/71397233949292197/imageType/SQUARE_THUMBNAIL/inlineImage/true/20170220_150309%5B225%5D.jpg)



![20170225_161518[239] 20170225_161518[239]](https://ogrforum.ogaugerr.com/fileSendAction/fcType/0/fcOid/71256347393343804/filePointer/71397234050729579/fodoid/71397234050729569/imageType/MEDIUM/inlineImage/true/20170225_161518%255B239%255D.jpg)
![20170225_161533[240] 20170225_161533[240]](https://ogrforum.ogaugerr.com/fileSendAction/fcType/0/fcOid/71256347393343804/filePointer/71397234050729580/fodoid/71397234050729570/imageType/MEDIUM/inlineImage/true/20170225_161533%255B240%255D.jpg)
![20170225_172827[241] 20170225_172827[241]](https://ogrforum.ogaugerr.com/fileSendAction/fcType/0/fcOid/71256347393343804/filePointer/71397234050729581/fodoid/71397234050729571/imageType/MEDIUM/inlineImage/true/20170225_172827%255B241%255D.jpg)
![20170225_172833[235] 20170225_172833[235]](https://ogrforum.ogaugerr.com/fileSendAction/fcType/0/fcOid/71256347393343804/filePointer/71397234050729582/fodoid/71397234050729572/imageType/MEDIUM/inlineImage/true/20170225_172833%255B235%255D.jpg)
![20170225_193813[236] 20170225_193813[236]](https://ogrforum.ogaugerr.com/fileSendAction/fcType/0/fcOid/71256347393343804/filePointer/71397234050729583/fodoid/71397234050729573/imageType/MEDIUM/inlineImage/true/20170225_193813%255B236%255D.jpg)
![20170225_193818[237] 20170225_193818[237]](https://ogrforum.ogaugerr.com/fileSendAction/fcType/0/fcOid/71256347393343804/filePointer/71397234050729584/fodoid/71397234050729574/imageType/MEDIUM/inlineImage/true/20170225_193818%255B237%255D.jpg)
![20170225_193838[238] 20170225_193838[238]](https://ogrforum.ogaugerr.com/fileSendAction/fcType/0/fcOid/71256347393343804/filePointer/71397234050729585/fodoid/71397234050729575/imageType/MEDIUM/inlineImage/true/20170225_193838%255B238%255D.jpg)
![20170225_161518[239] 20170225_161518[239]](https://ogrforum.ogaugerr.com/fileSendAction/fcType/0/fcOid/71256347393343804/filePointer/71397234050729579/fodoid/71397234050729569/imageType/SQUARE_THUMBNAIL/inlineImage/true/20170225_161518%5B239%5D.jpg)
![20170225_161533[240] 20170225_161533[240]](https://ogrforum.ogaugerr.com/fileSendAction/fcType/0/fcOid/71256347393343804/filePointer/71397234050729580/fodoid/71397234050729570/imageType/SQUARE_THUMBNAIL/inlineImage/true/20170225_161533%5B240%5D.jpg)
![20170225_172827[241] 20170225_172827[241]](https://ogrforum.ogaugerr.com/fileSendAction/fcType/0/fcOid/71256347393343804/filePointer/71397234050729581/fodoid/71397234050729571/imageType/SQUARE_THUMBNAIL/inlineImage/true/20170225_172827%5B241%5D.jpg)
![20170225_172833[235] 20170225_172833[235]](https://ogrforum.ogaugerr.com/fileSendAction/fcType/0/fcOid/71256347393343804/filePointer/71397234050729582/fodoid/71397234050729572/imageType/SQUARE_THUMBNAIL/inlineImage/true/20170225_172833%5B235%5D.jpg)
![20170225_193813[236] 20170225_193813[236]](https://ogrforum.ogaugerr.com/fileSendAction/fcType/0/fcOid/71256347393343804/filePointer/71397234050729583/fodoid/71397234050729573/imageType/SQUARE_THUMBNAIL/inlineImage/true/20170225_193813%5B236%5D.jpg)
![20170225_193818[237] 20170225_193818[237]](https://ogrforum.ogaugerr.com/fileSendAction/fcType/0/fcOid/71256347393343804/filePointer/71397234050729584/fodoid/71397234050729574/imageType/SQUARE_THUMBNAIL/inlineImage/true/20170225_193818%5B237%5D.jpg)
![20170225_193838[238] 20170225_193838[238]](https://ogrforum.ogaugerr.com/fileSendAction/fcType/0/fcOid/71256347393343804/filePointer/71397234050729585/fodoid/71397234050729575/imageType/SQUARE_THUMBNAIL/inlineImage/true/20170225_193838%5B238%5D.jpg)
![20170228_185112[260] 20170228_185112[260]](https://ogrforum.ogaugerr.com/fileSendAction/fcType/0/fcOid/71256347393343804/filePointer/71538114003530040/fodoid/71538114003530032/imageType/MEDIUM/inlineImage/true/20170228_185112%255B260%255D.jpg)
![20170228_185122[259] 20170228_185122[259]](https://ogrforum.ogaugerr.com/fileSendAction/fcType/0/fcOid/71256347393343804/filePointer/71538114003530041/fodoid/71538114003530033/imageType/MEDIUM/inlineImage/true/20170228_185122%255B259%255D.jpg)
![20170228_185127[258] 20170228_185127[258]](https://ogrforum.ogaugerr.com/fileSendAction/fcType/0/fcOid/71256347393343804/filePointer/71538114003530042/fodoid/71538114003530035/imageType/MEDIUM/inlineImage/true/20170228_185127%255B258%255D.jpg)
![20170228_185112[260] 20170228_185112[260]](https://ogrforum.ogaugerr.com/fileSendAction/fcType/0/fcOid/71256347393343804/filePointer/71538114003530040/fodoid/71538114003530032/imageType/SQUARE_THUMBNAIL/inlineImage/true/20170228_185112%5B260%5D.jpg)
![20170228_185122[259] 20170228_185122[259]](https://ogrforum.ogaugerr.com/fileSendAction/fcType/0/fcOid/71256347393343804/filePointer/71538114003530041/fodoid/71538114003530033/imageType/SQUARE_THUMBNAIL/inlineImage/true/20170228_185122%5B259%5D.jpg)
![20170228_185127[258] 20170228_185127[258]](https://ogrforum.ogaugerr.com/fileSendAction/fcType/0/fcOid/71256347393343804/filePointer/71538114003530042/fodoid/71538114003530035/imageType/SQUARE_THUMBNAIL/inlineImage/true/20170228_185127%5B258%5D.jpg)




![20170312_121342[392] 20170312_121342[392]](https://ogrforum.ogaugerr.com/fileSendAction/fcType/0/fcOid/71256347393343804/filePointer/71678964447385397/fodoid/71678964447385390/imageType/MEDIUM/inlineImage/true/20170312_121342%255B392%255D.jpg)
![20170312_121353[391] 20170312_121353[391]](https://ogrforum.ogaugerr.com/fileSendAction/fcType/0/fcOid/71256347393343804/filePointer/71678964447385398/fodoid/71678964447385391/imageType/MEDIUM/inlineImage/true/20170312_121353%255B391%255D.jpg)
![20170312_121359[390] 20170312_121359[390]](https://ogrforum.ogaugerr.com/fileSendAction/fcType/0/fcOid/71256347393343804/filePointer/71678964447385399/fodoid/71678964447385392/imageType/MEDIUM/inlineImage/true/20170312_121359%255B390%255D.jpg)
![20170312_121412[389] 20170312_121412[389]](https://ogrforum.ogaugerr.com/fileSendAction/fcType/0/fcOid/71256347393343804/filePointer/71678964447385400/fodoid/71678964447385393/imageType/MEDIUM/inlineImage/true/20170312_121412%255B389%255D.jpg)
![20170312_121342[392] 20170312_121342[392]](https://ogrforum.ogaugerr.com/fileSendAction/fcType/0/fcOid/71256347393343804/filePointer/71678964447385397/fodoid/71678964447385390/imageType/SQUARE_THUMBNAIL/inlineImage/true/20170312_121342%5B392%5D.jpg)
![20170312_121353[391] 20170312_121353[391]](https://ogrforum.ogaugerr.com/fileSendAction/fcType/0/fcOid/71256347393343804/filePointer/71678964447385398/fodoid/71678964447385391/imageType/SQUARE_THUMBNAIL/inlineImage/true/20170312_121353%5B391%5D.jpg)
![20170312_121359[390] 20170312_121359[390]](https://ogrforum.ogaugerr.com/fileSendAction/fcType/0/fcOid/71256347393343804/filePointer/71678964447385399/fodoid/71678964447385392/imageType/SQUARE_THUMBNAIL/inlineImage/true/20170312_121359%5B390%5D.jpg)
![20170312_121412[389] 20170312_121412[389]](https://ogrforum.ogaugerr.com/fileSendAction/fcType/0/fcOid/71256347393343804/filePointer/71678964447385400/fodoid/71678964447385393/imageType/SQUARE_THUMBNAIL/inlineImage/true/20170312_121412%5B389%5D.jpg)
![20170312_135002[404] 20170312_135002[404]](https://ogrforum.ogaugerr.com/fileSendAction/fcType/0/fcOid/71256347393343804/filePointer/71678964450220276/fodoid/71678964450220268/imageType/MEDIUM/inlineImage/true/20170312_135002%255B404%255D.jpg)
![20170312_135006[405] 20170312_135006[405]](https://ogrforum.ogaugerr.com/fileSendAction/fcType/0/fcOid/71256347393343804/filePointer/71678964450220277/fodoid/71678964450220269/imageType/MEDIUM/inlineImage/true/20170312_135006%255B405%255D.jpg)
![20170312_135022[401] 20170312_135022[401]](https://ogrforum.ogaugerr.com/fileSendAction/fcType/0/fcOid/71256347393343804/filePointer/71678964450220278/fodoid/71678964450220270/imageType/MEDIUM/inlineImage/true/20170312_135022%255B401%255D.jpg)
![20170312_135059[402] 20170312_135059[402]](https://ogrforum.ogaugerr.com/fileSendAction/fcType/0/fcOid/71256347393343804/filePointer/71678964450220279/fodoid/71678964450220271/imageType/MEDIUM/inlineImage/true/20170312_135059%255B402%255D.jpg)
![20170312_135104[403] 20170312_135104[403]](https://ogrforum.ogaugerr.com/fileSendAction/fcType/0/fcOid/71256347393343804/filePointer/71678964450220280/fodoid/71678964450220272/imageType/MEDIUM/inlineImage/true/20170312_135104%255B403%255D.jpg)
![20170312_135002[404] 20170312_135002[404]](https://ogrforum.ogaugerr.com/fileSendAction/fcType/0/fcOid/71256347393343804/filePointer/71678964450220276/fodoid/71678964450220268/imageType/SQUARE_THUMBNAIL/inlineImage/true/20170312_135002%5B404%5D.jpg)
![20170312_135006[405] 20170312_135006[405]](https://ogrforum.ogaugerr.com/fileSendAction/fcType/0/fcOid/71256347393343804/filePointer/71678964450220277/fodoid/71678964450220269/imageType/SQUARE_THUMBNAIL/inlineImage/true/20170312_135006%5B405%5D.jpg)
![20170312_135022[401] 20170312_135022[401]](https://ogrforum.ogaugerr.com/fileSendAction/fcType/0/fcOid/71256347393343804/filePointer/71678964450220278/fodoid/71678964450220270/imageType/SQUARE_THUMBNAIL/inlineImage/true/20170312_135022%5B401%5D.jpg)
![20170312_135059[402] 20170312_135059[402]](https://ogrforum.ogaugerr.com/fileSendAction/fcType/0/fcOid/71256347393343804/filePointer/71678964450220279/fodoid/71678964450220271/imageType/SQUARE_THUMBNAIL/inlineImage/true/20170312_135059%5B402%5D.jpg)
![20170312_135104[403] 20170312_135104[403]](https://ogrforum.ogaugerr.com/fileSendAction/fcType/0/fcOid/71256347393343804/filePointer/71678964450220280/fodoid/71678964450220272/imageType/SQUARE_THUMBNAIL/inlineImage/true/20170312_135104%5B403%5D.jpg)
![20170316_202600[412] 20170316_202600[412]](https://ogrforum.ogaugerr.com/fileSendAction/fcType/0/fcOid/71256347393343804/filePointer/71819767780556313/fodoid/71819767780556305/imageType/MEDIUM/inlineImage/true/20170316_202600%255B412%255D.jpg)
![20170316_202605[411] 20170316_202605[411]](https://ogrforum.ogaugerr.com/fileSendAction/fcType/0/fcOid/71256347393343804/filePointer/71819767780556314/fodoid/71819767780556306/imageType/MEDIUM/inlineImage/true/20170316_202605%255B411%255D.jpg)
![20170316_202619[413] 20170316_202619[413]](https://ogrforum.ogaugerr.com/fileSendAction/fcType/0/fcOid/71256347393343804/filePointer/71819767780556315/fodoid/71819767780556307/imageType/MEDIUM/inlineImage/true/20170316_202619%255B413%255D.jpg)
![20170316_202628[414] 20170316_202628[414]](https://ogrforum.ogaugerr.com/fileSendAction/fcType/0/fcOid/71256347393343804/filePointer/71819767780556316/fodoid/71819767780556308/imageType/MEDIUM/inlineImage/true/20170316_202628%255B414%255D.jpg)
![20170316_202600[412] 20170316_202600[412]](https://ogrforum.ogaugerr.com/fileSendAction/fcType/0/fcOid/71256347393343804/filePointer/71819767780556313/fodoid/71819767780556305/imageType/SQUARE_THUMBNAIL/inlineImage/true/20170316_202600%5B412%5D.jpg)
![20170316_202605[411] 20170316_202605[411]](https://ogrforum.ogaugerr.com/fileSendAction/fcType/0/fcOid/71256347393343804/filePointer/71819767780556314/fodoid/71819767780556306/imageType/SQUARE_THUMBNAIL/inlineImage/true/20170316_202605%5B411%5D.jpg)
![20170316_202619[413] 20170316_202619[413]](https://ogrforum.ogaugerr.com/fileSendAction/fcType/0/fcOid/71256347393343804/filePointer/71819767780556315/fodoid/71819767780556307/imageType/SQUARE_THUMBNAIL/inlineImage/true/20170316_202619%5B413%5D.jpg)
![20170316_202628[414] 20170316_202628[414]](https://ogrforum.ogaugerr.com/fileSendAction/fcType/0/fcOid/71256347393343804/filePointer/71819767780556316/fodoid/71819767780556308/imageType/SQUARE_THUMBNAIL/inlineImage/true/20170316_202628%5B414%5D.jpg)
![20170322_145031[561] 20170322_145031[561]](https://ogrforum.ogaugerr.com/fileSendAction/fcType/0/fcOid/71256347393343804/filePointer/71819767918091899/fodoid/71819767918091890/imageType/MEDIUM/inlineImage/true/20170322_145031%255B561%255D.jpg)
![20170322_145050[562] 20170322_145050[562]](https://ogrforum.ogaugerr.com/fileSendAction/fcType/0/fcOid/71256347393343804/filePointer/71819767918091900/fodoid/71819767918091891/imageType/MEDIUM/inlineImage/true/20170322_145050%255B562%255D.jpg)
![20170322_145100[563] 20170322_145100[563]](https://ogrforum.ogaugerr.com/fileSendAction/fcType/0/fcOid/71256347393343804/filePointer/71819767918091901/fodoid/71819767918091892/imageType/MEDIUM/inlineImage/true/20170322_145100%255B563%255D.jpg)
![20170322_162245[558] 20170322_162245[558]](https://ogrforum.ogaugerr.com/fileSendAction/fcType/0/fcOid/71256347393343804/filePointer/71819767918091902/fodoid/71819767918091893/imageType/MEDIUM/inlineImage/true/20170322_162245%255B558%255D.jpg)
![20170322_162258[559] 20170322_162258[559]](https://ogrforum.ogaugerr.com/fileSendAction/fcType/0/fcOid/71256347393343804/filePointer/71819767918091903/fodoid/71819767918091894/imageType/MEDIUM/inlineImage/true/20170322_162258%255B559%255D.jpg)
![20170322_162306[560] 20170322_162306[560]](https://ogrforum.ogaugerr.com/fileSendAction/fcType/0/fcOid/71256347393343804/filePointer/71819767918091904/fodoid/71819767918091895/imageType/MEDIUM/inlineImage/true/20170322_162306%255B560%255D.jpg)
![20170322_145031[561] 20170322_145031[561]](https://ogrforum.ogaugerr.com/fileSendAction/fcType/0/fcOid/71256347393343804/filePointer/71819767918091899/fodoid/71819767918091890/imageType/SQUARE_THUMBNAIL/inlineImage/true/20170322_145031%5B561%5D.jpg)
![20170322_145050[562] 20170322_145050[562]](https://ogrforum.ogaugerr.com/fileSendAction/fcType/0/fcOid/71256347393343804/filePointer/71819767918091900/fodoid/71819767918091891/imageType/SQUARE_THUMBNAIL/inlineImage/true/20170322_145050%5B562%5D.jpg)
![20170322_145100[563] 20170322_145100[563]](https://ogrforum.ogaugerr.com/fileSendAction/fcType/0/fcOid/71256347393343804/filePointer/71819767918091901/fodoid/71819767918091892/imageType/SQUARE_THUMBNAIL/inlineImage/true/20170322_145100%5B563%5D.jpg)
![20170322_162245[558] 20170322_162245[558]](https://ogrforum.ogaugerr.com/fileSendAction/fcType/0/fcOid/71256347393343804/filePointer/71819767918091902/fodoid/71819767918091893/imageType/SQUARE_THUMBNAIL/inlineImage/true/20170322_162245%5B558%5D.jpg)
![20170322_162258[559] 20170322_162258[559]](https://ogrforum.ogaugerr.com/fileSendAction/fcType/0/fcOid/71256347393343804/filePointer/71819767918091903/fodoid/71819767918091894/imageType/SQUARE_THUMBNAIL/inlineImage/true/20170322_162258%5B559%5D.jpg)
![20170322_162306[560] 20170322_162306[560]](https://ogrforum.ogaugerr.com/fileSendAction/fcType/0/fcOid/71256347393343804/filePointer/71819767918091904/fodoid/71819767918091895/imageType/SQUARE_THUMBNAIL/inlineImage/true/20170322_162306%5B560%5D.jpg)


