John.... I but I like your repairs. With MTH demise and my obsession with MTH, I’ll “NEEEED” you. But yup, better to play!
Well, there's just a little extension of the time to turn some repairs/upgrades around. I'm waiting on parts for weeks now for several upgrades, and with the holidays and lots of family stuff, it's been slow slogging the last few weeks. I also am resolved to get trains running soon, that will probably actually help the repair work, I'll have a real test track!
Gotcha, my early sketches had about two dozen switches and as of Thanksgiving I just hit 110. However do not sell yourself short, anyone can lay nice right of ways in 0 flex. GG flex can be a real challenge for many to lay out smooth transitions and fixed curves.
When I said your layout is like eye candy it is primarily because of the flow of your track laying and turnout selection and placement.
Tom, you're simply out of control, I think you're trying to pave the whole basement with track. I suggest you at least leave a path to walk on! ![]()
![]()
John I’ve thoroughly enjoyed following along. Your construction and track work are top notch (I know Tom played a big part, but so did your skill). Getting the track work right is key to enjoying your layout.
Andy
John, Nice to see your progress! This is looking like a super start, now on to the wiring.
I’ve enjoyed watching the progress on your layout. We purchased a new house with a finished basement around the same time you did, so I’ve been keeping close attention on your posts and picked up many tips for mine by watching yours.
I already had most of the track, but it’s Fastrack. Since Fastrack is rigid, I had the opportunity to somewhat reverse the method of construction. I’m a layout building rookie, so I didn’t know if my initial plan would work how planned. So, I picked up a 4 ft role of brown paper and taped it down to the concrete floor. Then built and heavily modified the track layout on top. Followed with wiring and locating the buildings. Even built the modules for the elevated sections.
I am now testing the layout with various trains for the holidays to insure proper clearances and wiring. In January, the temporary layout will be disassembled, but not before tracing out the entire layout, marking each piece and wire location. I will then have a full size template to build the benchwork.
I will be building my own since I have a fairly equipped woodworking shop. Just need to finish the walnut bedside tables that were promised to the wife for Christmas.
@gunrunnerjohn posted:Marty, I just had to stop spending all my time on repairs and upgrades and take a little time to do work on the layout. Still quite a ways from running trains, there will be a lot of wiring coming next!
John, I'm glad to see you doing something for yourself. Now i think it's time for me to follow your lead and get back to my layout. A little less on upgrades and repairs and more enjoyment for myself, only thing is we most likely will soon be empty nesters (one or two years ). Won't need this large home any longer . So as i build it will be bittersweet for me, i won't go crazy because it will only have to be dismantled.
Your track work is looking fabulous !
Alex
Thanks guys, I'm hoping to FINALLY be able to run trains at home on a decent sized layout. ![]()
Alex, that's a bummer that you have to take it apart again. Are you building it in a modular fashion so it's easy to disassemble? I can assure you, mine is NOT modular, large hammers and a couple of Sawzalls will be required to get this layout out of the basement! ![]() I don't plan on moving anytime soon, and I'm pretty sure this is the last layout I'll be building.
I don't plan on moving anytime soon, and I'm pretty sure this is the last layout I'll be building.
@gunrunnerjohn posted:Tom, you're simply out of control, I think you're trying to pave the whole basement with track. I suggest you at least leave a path to walk on!
Guilty as charged.
"I suggest you at least leave a path to walk on!"...That is exactly what I have left. Paths. The basement now is pretty much full of free form finger modules forming puzzle paths. Even my modules have grown modules. However the nice thing is that there are no duck unders for running trains, total stand up walk around, and I do mean walk around. I believe this layout could keep at least six people busy operating.
Due to repeated casts I have been using a knee scooter to get around. Duck unders were out of the question.
I think I may be subconcsiously building endless benchwork to avoid starting scenery. ![]() Have not done serious scenery in half a century.
Have not done serious scenery in half a century.
John, your RR is an example of what could be a wise goal of most all layout builders. A sensible balance of layout size to room ratio, ease of operation, full visibility, and total access.
A posters comment I am looking at seriously. Could a drone be used to film a large layout?? Could a good operator be able to maneuver a video drone around a basement layout with an 8' ceiling?
Gotta run, just got in the rail joiners from Justrains that I needed for my 3 rail Atlas track on my 5th level subway layout. Something for the neighborhood kiddies to run if we ever get to having visitors again.
Tom, my ceiling here is 7 1/2 feet high and the layout top is 41" high. I'm sure someone could fly a drone in that 4' space, but it ain't me! ![]()
@gunrunnerjohn posted:Thanks guys, I'm hoping to FINALLY be able to run trains at home on a decent sized layout.
Alex, that's a bummer that you have to take it apart again. Are you building it in a modular fashion so it's easy to disassemble? I can assure you, mine is NOT modular, large hammers and a couple of Sawzalls will be required to get this layout out of the basement!
I don't plan on moving anytime soon, and I'm pretty sure this is the last layout I'll be building.
It's not really modular , but it will be quite easy to dismantle when the time comes. One thing is for sure, my next home will make certain for it to be the forever home and the layout will be the last one too. Next move will be our fourth, getting tired of lugging everything from home to home lol. I've actually spent some time in my layout room the past two weeks, made some changes and was able to make some progress. Hoping i can enjoy this current layout for two years.
Alex
Alex, where's your layout progress thread? ![]()
@gunrunnerjohn posted:Alex, where's your layout progress thread?
I will post on it right after the holidays, want to get a bit more done. Most likely two weeks
Alex
I'll look forward to it. ![]()
Gunrunner John, your layout is looking so good, it’s a lot more work, thinking, planning than a lot of folks can imagine. Your trackwork is great, I used Gargraves a little bit, mostly Atlas O and ross custom track and turnouts. I did use Ross’s pre curved track because I’m not good at bending gargraves track. My smallest diameter is 072, largest 0120, I just had to watch for clearances, using the inter-modal cars and the VL GG1’s for heights, and kept a 2 percent grade. Yes, soon you are going to love running those larger scale Big Boys and Challengers on your layout, it’s a great time to be in the model railroading hobby. Thank you for making this fun to read thread, your ideas, model work is amazing. Happy Railroading Everyone and Merry Christmas.
I am looking forward to seeing my big iron chewing up the track. ![]() It's been quite a while since I could actually run something large at home, I used to have to pack them up for club runs. Someday soon... I'm starting to get the hang of Gargraves flex track, but I don't hold the ultra precision that some do, I am just shooting for wide enough curves and no big kinks in the track. If it looks good and everything runs good, trackwork is done.
It's been quite a while since I could actually run something large at home, I used to have to pack them up for club runs. Someday soon... I'm starting to get the hang of Gargraves flex track, but I don't hold the ultra precision that some do, I am just shooting for wide enough curves and no big kinks in the track. If it looks good and everything runs good, trackwork is done. ![]()
I will say, this being larger than anything I've attempted before, it is a butt-load of work, and it's not nearly done yet! Wiring is still to come...
Things slowed down for the holidays, but I have started to make a little progress. I have all the main level track in place with drops for power dangling under the table. I also decided to use the CSM2 breakout boards for the DZ-2500 switch machines, so I'm waiting on twenty-odd boards to come in to get those underway. With the switches wired and the power drops in on the main level, I was able to put the second level deck back in place, it's just propped up right now, working on the permanent supports, trying to make them a bit more attractive than plain wood. Some changes in the exact track position have made the supports more "interesting" to do, there'll have to be some creative solutions in a couple of places.
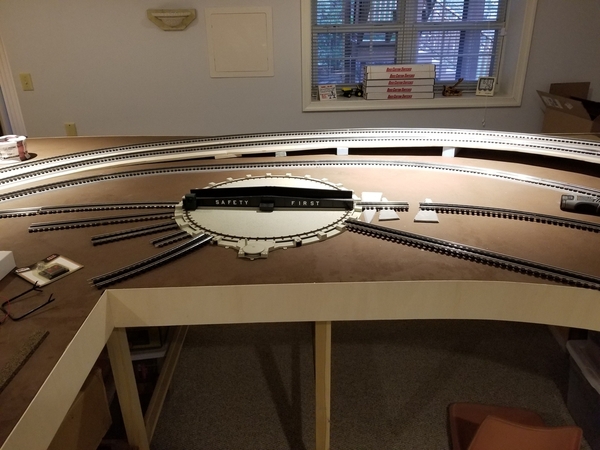
I was mulling over the turntable idea I had, but the 32" one I was considering was a non-starter, no way I could possibly fit it in. However, just for fun, I found the Atlas 24" one, and it will actually fit in. Takes up a big chunk of the one end of the table, but I'll have my TT. Of course, this is changing a bit of the track I had already completed, there's always that issue that crops it's head.
I know it's a low-cost TT, but with the little motor drive fitted, it actually works better than I expected, the alignment is more consistent than I would have imagined coming from either direction. It's also very easy to install since it doesn't have the recessed pit that would have required me to tear up a bunch of the benchwork below and brace it for the hole for the pit. I think it'll be a fun addition to the layout, and it looks like I can park a bunch of my smaller steam and some diesels here, that will be nice. The power for the TT, whisker tracks, and TT control will all be controlled by manual switches and also through some Lionel SC-2's so I can command control it from the remote. Someone complained that the Atlas TT had trouble swinging a heavier locomotive, so I plopped my battery powered camelback on it. While the camelback wouldn't be that heavy, the three pounds of batteries add to it's "heft", so it's actually as heavy as any of my smaller steam and a lot heavier than most of the diesels. The TT had no issue at all swinging that. As many others have said, I took it out of the box and in about ten minutes the motor drive snapped the installed belt, that had been on there since manufacture and had obviously dried out a bunch. I'm going to round up the recommended Danko O-ring as a replacement for the remaining belt I have installed now, I have no idea how long it'll last. (Note the picture is still the hand crank).
Another brainstorm popped into my head in looking at my three hidden yard tracks, there was a possibility of adding about 30" to each of them. Can't have too much yard space, so I made a little lift-out panel and it'll get the track extensions. I needed it to lift out to be able to freely access the sump pump box under it in case (or rather when) I need to deal with any sump pump issues. I just used four dowels glued into the 3/4" panel to align it exactly to the main table surface, it's ready for some track.
Attachments
Some of my brainstorms turn into Cat 5 hurricanes John ![]() Better be careful!
Better be careful!
I like the TT and added yard space is always a plus.
Bob
John is that tt the old one or the new one. Just wondering if the new one has the same problem with the o ring as the old one
@RSJB18 posted:Some of my brainstorms turn into Cat 5 hurricanes John
Better be careful!
I like the TT and added yard space is always a plus.
GAD! If I have a CAT 5 Hurricane, I won't have to worry about the layout! ![]()
![]()
I am looking at how I'll link in the TT now, I think I have the one lead figured out from the side next to the bridge. I just have to move a switch and I can get enough straight lead before the O72 curve to insure I get lined up with the TT bridge. I was contemplating a second track out the other side to that connection, that allows an engine to drive out of the TT and go either way on that track, that would be a nice feature. Getting enough straight lead at the TT seems a bit more problematic on that side, so it may or may not happen. Of course, I can always back the train out and accomplish the same directional running, so I'm not going to stand on my head to get a second lead out of the TT.
@trainbob posted:John is that tt the old one or the new one. Just wondering if the new one has the same problem with the o ring as the old one
It was NIB, but I have no idea how "new" it is. The supplied O-rings are still a square profile, so I suspect that didn't change. I'm going to get over to Ace Hardware, they have the Danko 35747B # 33 O-ring that seems to be the best replacement, I'll get a few of those to be ready for the next belt breakage.
You can tell by the product number the old one is 6990 I think
Mine is Atlas #6910, so is that the new or old? I'd think the lower number might be the older model.
Finished the yard extension, track and drops added. Over eight feet of new yard track from previously unused and wasted space. ![]()
On to the TT install, that might take a bit more time!
Attachments
That turn table is cool! I didn't know there was a 24" version.
Great to see things coming along!
Just checked the train world website and the new number is 6999 so you have the old one
I hadn't considered the little one, I was fixated on being able to swing the Challengers, Y6b, and Big Boys, but that ain't happening on this layout. ![]() Since playing with it, it's not half bad for a couple hundred bucks. It's no Millhouse TT, but then that would have been about 10x what this one cost!
Since playing with it, it's not half bad for a couple hundred bucks. It's no Millhouse TT, but then that would have been about 10x what this one cost! ![]()
I have made it up page 14 and am now totally intimidated. I have plans for simple two loop(O72 and O84) on a 3 section table 8.5 x 16 feet total bolted together with inside space for a 24 inch turntable and 7 stall roundhouse that I crudely started building over 30 years ago as well as multiple switching tracks. It will be built in a garage bay with help from my carpenter and will be simplified at every step as much as possible. I plan on half inch plywood with foam board on top and trim around the edges to protect the foam. I found the rounded corners to be a good idea. I was going to use modified Super O but have decided to go with Ross and Gargraves. I am going to use John Brennan's method of ballasting using N scale cork to get the proper slope. I plan on using hand throws in the yard to simplify wiring. I run conventional with a ZW, two KW'S, and two LW'S. The one thing I cannot do is take four years- I am 73. I would like to be able to run the Big Boy Alex sold me as well as the Challenger although they are too big for the roundhouse- all the Hudsons should fit nicely. I thought I could simplify enough to do this but reading the above has given me pause. I will finish the last 14 pages tomorrow.
Well, I figure I will likely not build another one, so this has to be my "end all". ![]()
Excellent thread John. The turntable is a nice feature, adds a good amount of operational interest. Extending the tracks 30” is a nice add on.
Andy
The new turntable is physically in, all the tracks are aligned and nailed down. No wiring yet, that's yet to come. It's handy that I have one battery powered LC+ locomotive, it was useful in driving on and off to check all the alignment. I'm actually reasonably pleased with the operational aspects of the Atlas 24" TT, it certainly isn't a $2,000 model, but it works pretty well for what it is. Since the maximum size locomotive (including overhang) it'll swing is about 27" (24" or less wheelbase obviously), I made the longest whisker tracks 30" if there was space, no sense in having longer tracks there since I can't get a larger locomotive to them. The short tracks will be great for stuff like the new 0-6-0T switcher, track speeders, and I'm sure I'll park a Wienermobile on one of them. ![]()
![]()
Attachments
Looks great John.
Chipping away Don, there's still a lot of road in front of me before I'm moving revenue freight and passengers. ![]()
@gunrunnerjohn posted:The new turntable is physically in, all the tracks are aligned and nailed down. No wiring yet, that's yet to come. It's handy that I have one battery powered LC+ locomotive, it was useful in driving on and off to check all the alignment. I'm actually reasonably pleased with the operational aspects of the Atlas 24" TT, it certainly isn't a $2,000 model, but it works pretty well for what it is. Since the maximum size locomotive (including overhang) it'll swing is about 27" (24" or less wheelbase obviously), I made the longest whisker tracks 30" if there was space, no sense in having longer tracks there since I can't get a larger locomotive to them. The short tracks will be great for stuff like the new 0-6-0T switcher, track speeders, and I'm sure I'll park a Wienermobile on one of them.
Looks great John. Having a larger variety of power on the layout ready to roll will be a big plus. IIRC you have the ability to turn the big boys on a Y. Yes?
John the layout is definitely coming along and looks great!
It looks great, John!
The BB doesn't fit here. I suppose I can park one really large locomotive on one of the leads to the TT, that's the benefit of having two lead tracks. ![]()
@CBS072 posted:Looking Good, John.
I did not have room for a roundhouse. So I just built the foundation for a roundhouse, long torn down.
Thanks, I like the idea of the torn down roundhouse. I haven't really thought about the possibility of having any roundhouse, but it looks like it would be difficult to fit one in.
You did a fantastic job fitting that whole arrangement into the available space. One time I made the mistake of forgetting to account for the track length taken by bumpers. But I imagine your biggest challenge will be to scratch-build an elliptical roundhouse ![]()
I think the roundhouse might be over the top, that would be a big challenge. One mistake I almost made was not having enough straight track on the leads to the TT. However I remembered our club layout at Harry's place where the engines were hitting the TT bridge sides because the curve was too close to the TT. That meant I had to move the switches for the leads so I could allow at least 20" of straight track leading onto the TT to get the incoming engine aligned with the TT bridge.
I stuffed as many tracks as I could around the TT, I figured even the short ones would be useful for small stuff. I also realize that having engines and rolling stock readily available on the layout is going to be a key requirement, so I'm still thinking on somehow adding additional sidings. I already have the planned future 8-track yard off the current platform, we'll have to see if I can squeeze in a couple more places... ![]()
John,
Have you considered a subterranean yard for storage? Putting several under the layout in elliptical form would give you lots of made up train storage, and leave more track for freight and revenue runs.


