I’ve often thought about/wished I could put a turntable on my layout. That one looks like it worked out great for you and the location is ideal. Too bad you need access to the sump pump, otherwise you could have had more 27” long whiskers. The short whiskers will be perfect for handcars and speeders. Excellent that you could have two leads to it. Only drawback is that you don’t have much room left for scenery and structures.

You will also need about a dozen of these.

300-SY Safety Yellow Track Bumper - HENNING'S TRAINS (shoplightspeed.com)

@Ron_S posted:

Have you considered a subterranean yard for storage?  Putting several under the layout in elliptical form would give you lots of made up train storage, and leave more track for freight and revenue runs.

I thought about it, but with the Mianne benchwork, I would have to do a lot of bracing to get the ramp down to the storage in.  I'd have to go about 10" down, and that's a lot of distance for the ramp if I stick to a 3% of less grade!


@Lehigh74 posted:

I’ve often thought about/wished I could put a turntable on my layout. That one looks like it worked out great for you and the location is ideal. Too bad you need access to the sump pump, otherwise you could have had more 27” long whiskers. The short whiskers will be perfect for handcars and speeders. Excellent that you could have two leads to it. Only drawback is that you don’t have much room left for scenery and structures.

You will also need about a dozen of these.

300-SY Safety Yellow Track Bumper - HENNING'S TRAINS (shoplightspeed.com)

I am going to use the Atlas O track bumpers, I have a few and I ordered eight more.  I'm probably going to need a few more yet.  I'm sure I'll be able to stick some scenery around the edges, and there's lots of other real-estate that is still open.

@Tom Tee posted:

If you curve a couple of your opposing long whisker tracks a couple of the short whisker tracks may be able to be made longer.  A rotary grinder will make the bridge easier to clear.  I'm not one to play by the RR police rules.

The whisker tracks that are short are because they run into the service loop that goes around the area.  I'm not willing to hack up the bridge to curve them, but I did briefly consider that.

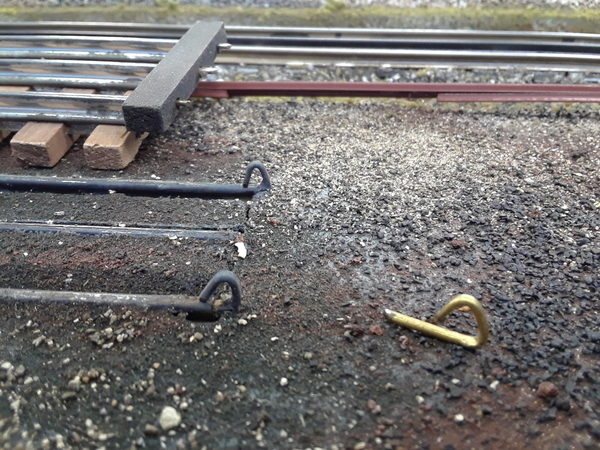
John, I know you are planning to use Atlas bumpers.  Here is a picture of two types of bumpers that I used on my layout.

One is just a GG tie turned upside down and slipped over the end on the GG track (may work on other brands on track)

And the other is too bend a GG track pin with needle-nose pliers and insert into the end of the GG track.

20210119_131832

In this picture the tie is just placed  over the GG pins, just to take this picture. On the layout I drive the tie over the end of the track without the pins in the end of the track.

Attachments

Images (1)
  • 20210119_131832
@CBS072 posted:

John, I know you are planning to use Atlas bumpers.  Here is a picture of two types of bumpers that I used on my layout.

One is just a GG tie turned upside down and slipped over the end on the GG track (may work on other brands on track)

And the other is too bend a GG track pin with needle-nose pliers and insert into the end of the GG track.

20210119_131832

In this picture the tie is just placed  over the GG pins, just to take this picture. On the layout I drive the tie over the end of the track without the pins in the end of the track.

Well, you're going to crack up when you see this.  Yesterday I was contemplating how to do this for free, and what I came up with...  Yep, I flipped the tie upside down on the rail, and then added a screw for good measure so it won't slide off.  Job done for zero dollars spent.  Well, I guess the 18 track screws cost something...

Attachments

Images (1)
  • mceclip0

I added a connection panel that will terminate all the turntable connections.  I still have to print out the labels for the connections.  The panel has a couple of relays for directional control, AC-DC converter for motor power, so all I need is a contact to ground to rotate in either direction.  The switch on the bottom is for local control when I'm tinkering with the TT.  When all is said and done, the panel will be hidden by the skirting around the layout.

Attachments

Images (1)
  • mceclip0

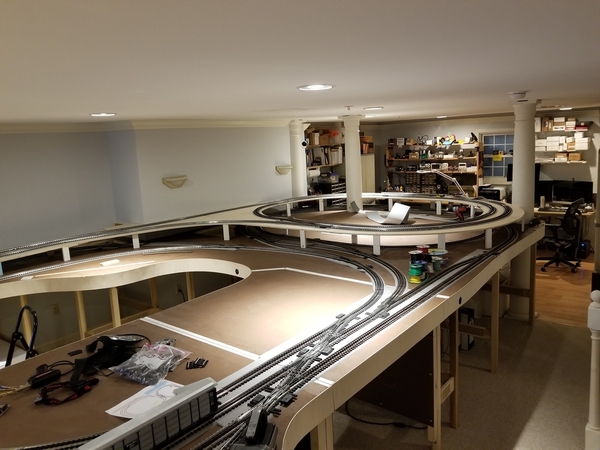
Another minor milestone.  The second level is in place and all permanently supported, ready for track!  I still have a little work to do on the approach grade, it's still got some of the temporary foam supports in place, but that's coming.  I'm pretty pleased with the visibility to the lower level, I have a lot of freedom of what I do to add scenery to support the look I'm trying to achieve.

20210120_13323320210120_133252

Attachments

Images (2)
  • 20210120_133233
  • 20210120_133252

I figure on some removable tunnel sections to give some interest to when it's running around the lower loop, but some openings so you can see the train as well.  The removable sections are so I can do any required maintenance to track/switches and to grab any errant cars that refuse to stay on the tracks.  I don't think I'll be covering the workshop side at all, that will be more ready access to the tracks as well.  Besides, my maintenance track is on the workshop side, and it clearly has to be exposed.

The side of the grade ramp will be mostly filled in, obviously the first section where the track goes under to the hidden yard will remain exposed.  I'm thinking of some kind of tunnel portal there to make it look like things continue on.

FYI, it probably doesn't look so "polished" if you were up close.   I'll be trying to dress it up as much as possible in the future, first step is to get some trains running!

For reversing, you just need one track, drive in, spin around, and drive out.

I wanted parking for locomotives, so I put whisker tracks wherever they fit.  Five of the whisker tracks are 30" long.  I couldn't see making them any longer as the TT will spin at a maximum about 27" with overhang, obviously no more than a 24" wheelbase.  So, the widest real-estate is roughly 85", and then the shorter tracks were just sized as big as I could make them before they ran into an obstruction.

BTW, you do realize this track will likely not be useful, right?

If you have a curve entering the TT, you'll hit the bridge sides.

Part of the issues I had placing the TT is allowing at least about 20" of straight track on the entry to the TT on my lead tracks.  I did two lead tracks so I could drive out onto the service loop in either direction.

Attachments

Images (1)
  • mceclip0

Another minor milestone.  The second level is in place and all permanently supported, ready for track!  I still have a little work to do on the approach grade, it's still got some of the temporary foam supports in place, but that's coming.  I'm pretty pleased with the visibility to the lower level, I have a lot of freedom of what I do to add scenery to support the look I'm trying to achieve.

20210120_13323320210120_133252

What a train room you've got now! Very nice.

You are reading my mind,  tonight I started mocking up some tests (sounds familiar?) to see if an 054 or 072 would cut the corner???...... You may have saved me some experimental time!  I am with you on the storage for engines, I was also hoping to have some easy yard access, hence the extra track.   But,  I may be guilty of doing the blivet ....trying to put  20 gallons in a 19 gallon tank!  Or turn a 20x30 layout into a 13x10...NOT!

BTW, you do realize this track will likely not be useful, right?

If you have a curve entering the TT, you'll hit the bridge sides.

Last edited by hokie71
@hokie71 posted:

You are reading my mind,  tonight I started mocking up some tests (sounds familiar?) to see if an 054 or 072 would cut the corner???...... You may have saved me some experimental time!

Lessons learned the hard way for the club layout, we had a turn too close to the TT.   It's obvious when you think about it, just look at almost any locomotive on the curve and the close spacing of the bridge sides on the TT.

What a train room you've got now! Very nice.

@E-UNIT-79 posted:

Looking great John. Won't be long now.

Thanks guys, it is starting to look kinda' like a layout now.  I'm certainly wanting to get something running.  Trying to wire up all the tracks of the TT now, I think I'm going to have a lot of wire under there before this layout is done!

Somewhat to be determined Steve, I'll have mainly industry, and I'm still contemplating the overall look.  I did mine backwards from many folks, the primary purpose was to have a place to run trains, then the scenery comes into play.  I had a definite idea of the type of track plan I wanted, so that's where I started.

I was going to use the overhead shelf for a town, but I realized that all the way in the back it would probably not be all that easy to see any detail.  So, the shelf went and my hidden yard replaced it.  I will be doing partial cover back there and having some kind of buildings above the yard, probably some will be building flats along the walls.

I did mine backwards from many folks, the primary purpose was to have a place to run trains, then the scenery comes into play.  I had a definite idea of the type of track plan I wanted, so that's where I started.

Man, does that ever apply to me... even, after 15 iterations of planning before construction, I still made major changes thereafter.   Actually, maybe I did it inside out????

Last edited by Dennis-LaRock

Everyone seems to have their own way of doing a layout.  My track layout came first, then we'll fill in with the scenery.  Until I know basically what the track was going to look like, I have great difficulty imagining what the scenery might be.  Gosh, the turntable that I just dropped in was an afterthought, I was looking at an industrial complex in that spot.  However, the lure of being able to park a bunch of engines for ready access was just too much, so the TT was hatched.

All of the supports are at least 3.25" from the center rail, that was my check for clearance.  The BB should clear that.

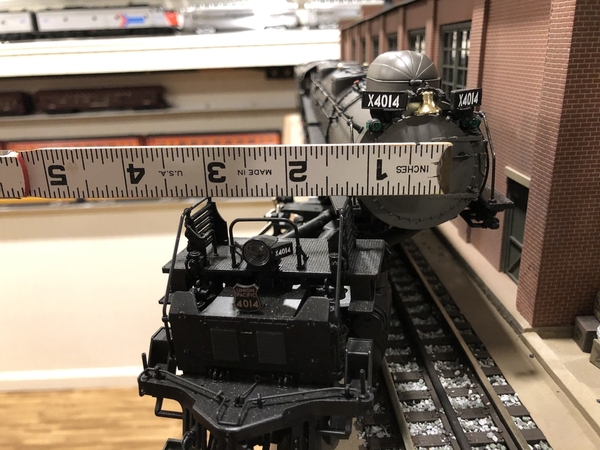
Hey John, I did a very unscientific measurement of the swing on my Vision Line Big Boy. Look at the folding rule. I swung the front drivers out as far as I could while on tangent track. It looks more like 4” or so from center rail. Not trying to be a wise guy, just wanted to pass this along.

Don

90F66933-43DE-4E05-817C-B5756663DE4695BF24E1-1937-4489-BA32-052AD33B738C

Attachments

Images (2)
  • 90F66933-43DE-4E05-817C-B5756663DE46
  • 95BF24E1-1937-4489-BA32-052AD33B738C

I did my measurement on O72 track, and all the curves down here are wider than that.   I got onto the curve, then pulled the boiler as far over as I could and measured.  However, in the interest of being "sure", I just took the VL-BB and pushed it around all the corners to check the supports and insure my measurements were right.  At each support I pulled the boiler out as far as I could and it cleared them all by more than 1/4", so I think I'm fairly safe.

For good measure, I tired the C&O M-1 Turbine as well, 25" long, but it clears about the same as the VL-BB.

Last edited by gunrunnerjohn

Thanks Andy, I REALLY can't wait to see something running!  The TT wiring to it's junction panel is done, but that's just the tip of the iceberg!  Once the second level track is on, hopefully I'll get to that tomorrow, I'll get those drops in and start the under-table wiring for power and the switches.  I'm also still waiting on the CSM2 breakout boards for the DZ-2500 switch machines, those appear to make the wiring a bit cleaner for each switch.  There's going to be a LOT of wires converging on the control panel location, each switch will have a CAB5 cable from the switch to the panel location.  They will all terminate at a bunch of punch-down blocks for connection to the panel.  Then I have to wire all the power blocks back to home base as well.

Miles to go before we run trains...

Almost at the finish line for the basic track laying task.  I'm still missing one switch that I should be getting from Ross in the next few days, so there's about 8-9 feet of track on the outside top level loop waiting for that switch.  The grade, inside loop, and most of the outside loop is in place.

20210124_100021

Obviously, the huge job of wiring all this stuff is still in front of me, but we're making steps...

This is the section just finished, still waiting on the green circled switch.  I have to cut the switches a couple of inches to allow sufficient inter-track spacing and keeping them on the straight section.

__track laying final

Attachments

Images (2)
  • 20210124_100021
  • __track laying final

Add Reply

Post

OGR Publishing, Inc., 1310 Eastside Centre Ct, Suite 6, Mountain Home, AR 72653
800-980-OGRR (6477)
www.ogaugerr.com

×
×
×
×
Link copied to your clipboard.
×
×