


That is great news
Nice, John. Inspirational because I am laying my track and wiring my new layout, too.
Congratulations John.
That’s awesome! Looks great. Big milestone!
Thanks guys! ![]() I was really pumped when everything ran perfectly, all the loops were wired right, TMCC/Legacy and DCS appear to work great, and all my siding wiring worked. The only glitch I found was one place where I hadn't completed a cut and one siding was still connected to one of the loops. I found that right away and a touch with the Dremel and all is well.
I was really pumped when everything ran perfectly, all the loops were wired right, TMCC/Legacy and DCS appear to work great, and all my siding wiring worked. The only glitch I found was one place where I hadn't completed a cut and one siding was still connected to one of the loops. I found that right away and a touch with the Dremel and all is well.
I was really happy that the Watchdog generators do what they are designed to do and kept the DCS stuff silent when I turned on a siding.
Just about filled the one power panel, but the other one has some space. That already is getting another relay board and three of the DCS-RC units with the Watchdog board in them. After I add a couple more power supplies, it'll be pretty full as well. All the switch wiring comes into the center of the punch-down blocks, and the external wiring comes out the sides. These blocks are for the switches, that wiring comes next.


Attachments
Images (2)
OK, now when is the Golden Spike ceremony ???![]()
What is the watch dog generator and who makes it?
@Hump Yard Mike posted:What is the watch dog generator and who makes it?

@Hump Yard Mike posted:What is the watch dog generator and who makes it?
It was a solution to the problem of turning on a track and a DCS locomotive coming up in conventional mode with smoke and sound. This box keeps it quiet until you actually want to start it up.
Proposed Solution to DCS Watchdog in Yard Tracks (DCS-RC WD Gerber Files Added to First Post)
@modeltrainsparts posted:OK, now when is the Golden Spike ceremony ???
Well, technically it's already been done as all the rails are joined. However, I still need to get the switches wired and SC-2's installed for the turntable to be usable, then I'll break out the brass spike (can't afford gold). ![]()
![]()
Thank you for the videos John. Nice neat wiring is key, and you are well on your way. The wiring for my next layout will look more like your than it does now 🤪.
Andy
If you run in super TIU mode with multiple TIU’s do you need a watchdog generator for each TIU or just one? If only one does it have to be connected to TIU # 1?
Congrats, John......it looks beautiful!
Peter
A lot of action there with four trains running at once time. I bet you could easily run two trains on the main line using two operators or DCS to keep them at the same speed.

Looks great John. Congrats!
Bob
Thanks guys, I'm getting more excited now that I've actually seen trains running! ![]()
@Steamfan77 posted:Thank you for the videos John. Nice neat wiring is key, and you are well on your way. The wiring for my next layout will look more like your than it does now 🤪.
My wiring is far from the neatest I've seen, I'm just trying to keep it somewhat organized. I will say, I've seen worse, so I don't feel too bad. ![]()
@amtrack5899 posted:If you run in super TIU mode with multiple TIU’s do you need a watchdog generator for each TIU or just one? If only one does it have to be connected to TIU # 1?
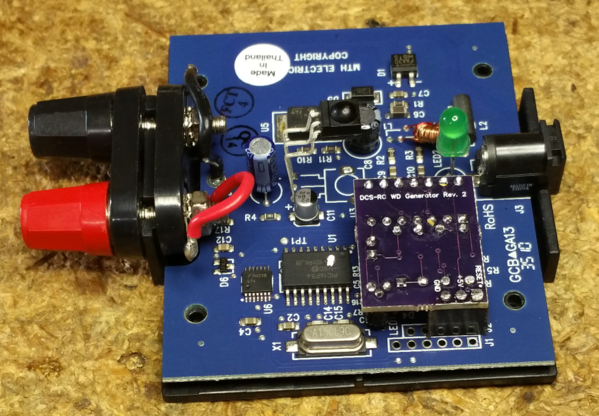
To use the DCS-RC with the WD generator board, you need one on every transformer feed that you want that capability for. If you have two TIU channels that you want the watchdog generator on, you need two watchdog generators. In case you don't know, this is the thread that discusses the project.
Proposed Solution to DCS Watchdog in Yard Tracks (DCS-RC WD Gerber Files Added to First Post)
This is the DCS-RC with the WD board connected.
John,
This was great to see, I’m glad you’re doing things for yourself, I have to start practicing what I preach and do the same ! Enjoy !
Alex
Does Henning’s trains sell the watchdog generator? I did a search on their website and I couldn’t find it.
Looking great John. Nice to see steam and track mobile(?) running around the tracks.
@amtrack5899 posted:Does Henning’s trains sell the watchdog generator? I did a search on their website and I couldn’t find it.
No, this was a little "side" project that we cooked up in that lengthy discussion thread. If you want one, send me an email and I can fix you up.
@Alex M posted:This was great to see, I’m glad you’re doing things for yourself, I have to start practicing what I preach and do the same ! Enjoy !
Thanks Alex, you getting trains running was one push for me. I finally just had to put the repairs and upgrade on hold for a spell, there's just too many forces pulling me in too many directions. I also seem to have underestimated how much work it would take to wire all of this, there are a LOT of wires down there, and I'm only half done. Still have the switches and TT to wire! I counted them up, 24 switches and 26 switch machines (two on each DSS). That doesn't count the ones that will be added for the 8 track yard that is yet to be built.
@Dave NYC Hudson PRR K4 posted:Looking great John. Nice to see steam and track mobile(?) running around the tracks.
Thanks Dave. The track speeder is the RMT model that got a total re-do. Paint, lighting, and of course, command control. I wanted to checkout all the power districts, so far better than I would have expected. As expected, some locomotives stall on the double-slip switches, I do really need to wire those relays in to power the dead rails.
Great to see all four trains running smoothly after all this time. TIME FOR SOME FUN!
Even more fun when you get the Switches and TT wired and can do some operation. Then on to scenery.
@gunrunnerjohn posted:Thanks Alex, you getting trains running was one push for me. I finally just had to put the repairs and upgrade on hold for a spell, there's just too many forces pulling me in too many directions. I also seem to have underestimated how much work it would take to wire all of this, there are a LOT of wires down there, and I'm only half done. Still have the switches and TT to wire! I counted them up, 24 switches and 26 switch machines (two on each DSS). That doesn't count the ones that will be added for the 8 track yard that is yet to be built.
Thanks Dave. The track speeder is the RMT model that got a total re-do. Paint, lighting, and of course, command control. I wanted to checkout all the power districts, so far better than I would have expected. As expected, some locomotives stall on the double-slip switches, I do really need to wire those relays in to power the dead rails.
That’s exactly how I feel!!! Ever since I posted my little progress , I haven’t been able to even walk into my layout room. I’m being pulled away from it due to a million repairs and upgrades. I very much enjoy what I do , but there’s no Time for enjoying my own layout. So it’s up to us to push them aside a bit and enjoy our own things.
Alex
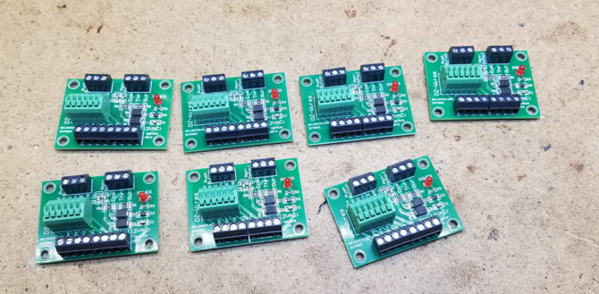
@gunrunnerjohn posted:Gathering up more CSM2 DZ breakout boards to mount for the DZ-2500's, testing how limber my body is!
John, you and I discussed this board and you expressed some doubt as to its value. Obviously, your view has changed. Can you enlighten me as to how and why you are using these?
Thanks,
George
George, when I looked at being under the layout and soldering all those wires, not to mention when I have to change a DZ-2500 (already had to remove one), I decided it would be a lot easier to slide a wire into the terminal block and tighten the screw than solder over my head, been there, done that, got the burns to prove it! They also add the recommended diode protection to the non-derailing leads, something I wasn't aware was needed before. I went for ease of use and decided to go for it.
GRJ, Thanks for the reply about the wire sizes and where you got it from. Im at least a yr away from even beginning wiring, but want to stock up as i go. I believe i will also have a slip switch, so i'll be back to you on that wiring topic eventually. I found the powerhouse discussion interesting. Your layout looks great. Thanks to you and all the other guys on this forum for offering their knowledge and expertise. Appreciate it very much. Tom
@gunrunnerjohn posted:George, when I looked at being under the layout and soldering all those wires, not to mention when I have to change a DZ-2500 (already had to remove one), I decided it would be a lot easier to slide a wire into the terminal block and tighten the screw than solder over my head, been there, done that, got the burns to prove it! They also add the recommended diode protection to the non-derailing leads, something I wasn't aware was needed before. I went for ease of use and decided to go for it.
Cool, thanks for the explanation.
George
@TomSuperO posted:I believe i will also have a slip switch, so i'll be back to you on that wiring topic eventually.
I've realigned my thinking on the DSS, I was under the misimpression that it operated like two separate switches back-to-back. I finally applied power and ran an engine through it with all the combinations of switch positions. Turns out, it's not as simple as it looks, and there are valid and erroneous combinations of positions for the left and right side. For the relay, you really do have the right side control the left relay and vice-versa. Just looking at the switch, I never would have suspected that. I plead ignorance of the DSS operation, it's the first time I used the DSS. ![]() This is one time that there was no substitute for experience, it's not really obvious at first glance how the paths through the DSS work, and actually having one and running through it a few times really clarifies the operation.
This is one time that there was no substitute for experience, it's not really obvious at first glance how the paths through the DSS work, and actually having one and running through it a few times really clarifies the operation.
Nice to see trains running. Bravo! That is some layout. Good luck with the DSS. Always fun to figure something new out. Keep going with the switch wiring, there is light at the ending of the tunnel. I never minded wiring. I love the smell of melted flux in the morning. Smells like... progress.
Cheers, W1
I'm avoiding flux smells under the layout, I use the Lever Nuts for all the track wiring, and since I'm using the CSM2 Breakout Boards for all the switches, all of those connections will be with a screwdriver. ![]()
I need to get switches working so I can actually use the sidings, the DZ-2500 switch machines don't do anything without power! ![]()
John, everything is great!!! I'm with you on no soldering over my head anymore. I still have a scar from a soldering mishap that happened at least 30 years ago. I know it was that long, because our daughter Heidi hadn't been born yet when my wife had to do first aid on me. She has been quite a blessing in so many ways, but being an RN didn't hurt either. I used the lever nuts as well, and while the levers can be a bit stiff with arthritis, they sure beat soldering mishaps. If I was that uncoordinated in my mid 30s, I surely am worse now in my mid 60s. ![]()
I'm going to send you an email about the watchdog board also. Now that I have all the track wired, I can see that may be of benefit.
Just keep going and going till it’s done. Then you’ll find some Ross switches with the diodes in backwards and you’ll be scratching your head why it doesn’t work like it’s supposed to. It is a beautiful thing when you work all the bugs out and you know you can flip a power switch and everything works. Have fun.
I miss my layout...
Hopefully, the CSM2 breakout board were not assembled incorrectly, so I won't have reversed diodes. ![]()
We ran all the wires for the switch machines last night, so now I have to find my elusive punch-down tool to wire the punch-down panel connections. Then I'll be climbing back under to connect each of the switch wires to the breakout boards, that should be a real treat! ![]()
![]()
@gunrunnerjohn posted:Then I'll be climbing back under to connect each of the switch wires to the breakout boards, that should be a real treat!
You aren't under the layout now??? ![]()
I'm out for lunch. ![]()
Finally have all the switches wired to the power panel and punched down into the connection blocks. Just mounted the terminal blocks for the power & serial data. Given all the talk about the DZ-2500 switch machines all grouped might be an issue if one malfunctions, I'm splitting them up into groups of three for power and serial data. This allows me to isolate small groups of switch machines for debugging if necessary. I'll also be tapping the three CSM2 boxes for serial data for six switch machines, and the final six will be driven from the SER2 serial output. That gives me four serial data sources to minimize the loading and also any possibility of one switch machine affecting the whole lot. The first two punch-down blocks are full, they have 24 switch machines routed to them. The third block will be for expansion, I have six more switch machines for the future freight yard, and that leaves me with the possibility of adding another six after that before I run out of block space.
I feel I'm rounding the final turn and I can see the finish line for switch wiring in the distance! ![]()

Attachments
Images (1)
Got all the switches programmed for TMCC control, but not without some gnashing of teeth and the like!
First off, the switches are somewhat "picky", they don't always pick up the programming on the first try. However, going back a couple of times for the picky ones got them working. I also had to replace two of them as they simply refused to behave.
The bigger issue is, the serial data out of the Legacy LCS SER2 apparently doesn't work for these! I started using that output, and I see the serial data on the output with my 'scope, but the switches totally ignored it! I broke out the DZ-2001L line driver module (good thing I bought it) and connected that up. With that in the picture, all 24 switch machines are now connected.
The $64,000 question is, what's wrong with the data out of the SER2 box? I have it's ground going to the outside rail and the output data going to the DZ-2500 serial data line. The data out of the SER2 is totally ignored no matter what I do. Obviously, I have to accommodate the DZ-2001L in the configuration, very disappointing that the Lionel junk doesn't work right!
To compound the insult with the LCS stuff, which I'm getting less and less impressed with, the three CSM2 boxes have a serial data output that's specifically intended to drive the DZ-2500 switch machines. However, even though I see the data light blinking on those when I send a command from the remote, there is NO data on any of those output lines! Nothing in the manual suggests you have to do anything special to make them output the serial data, so I'm at a loss why they don't work. I'm guessing I'm going to be really disappointed when I try to connect them up to the switch status lines as well, I'm getting the feeling I wasted a lot of money on the LCS crap! ![]()
One step forward.....a giant leap back John. At least the hardware side is nearing completion. Software issues are a never ending treat.
I like the punch down blocks idea. I will steal that one day! ![]()
Bob
John, Sorry to give a *Like* to your last post... but, I'm learning an awful lot from you right now!!!
Maybe some adruino boards are in the future... I could be a lot more helpful on that front
Yep, I'm really disappointed in the LCS boxes, none of them seem to work like they are supposed to! ![]() I have to go back now and take my alligator clip kludge for the serial data out and route all the serial data to the DZ-2001L board. What a PITA!
I have to go back now and take my alligator clip kludge for the serial data out and route all the serial data to the DZ-2001L board. What a PITA! ![]()
Add Reply
Sign In To Reply
