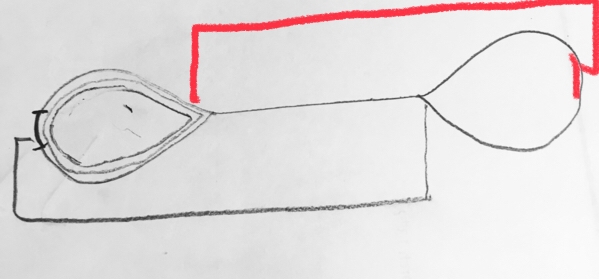
Is there a method for doing this? 

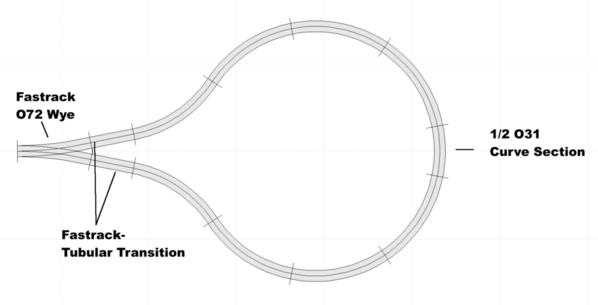
Gfx_O31 O72 Wye Loop

In the above loop,  I'd like to have the trains always enter the loop to the right.   As it stands with the anti-derail circuitry in place, trains going through would alternate left and right,  which is undesirable.  

Ideas?  

Thanks! 

Mitch 

Attachments

Images (1)
  • Gfx_O31 O72 Wye Loop
Original Post

Replies sorted oldest to newest

John D. posted:

How fancy do you want to get? I bet my dad could rig you up some automation to always flip it right when the train clears from the left. 

This is going on the museum layout,  so what I'm looking for is "tear out the motor and put in a spring" level of KISS simplicity and reliability.   

I assume switching to another brand of wye is not in the cards.

Not on my current budget,  no.   

Mitch

Mitch, because of the internal design I don't think you can do a spring switch by simply removing the motor. There is an over-center spring in the linkage that finishes the throw any time the points are forced partly over. WRT a genuine spring switch, just my opinion but I think any spring weak enough to allow the points to be forced without derailing normal-weight cars would be too weak to be reliable. I can't speak to the longevity of Fastrack switch motors under heavy use but their reliability for me so far has been good. I use (9) Fastrack remote switches on my largely switching pike (lots of switch throwing) and have had one DOA problem and one failure of a solder joint on the tiny motor itself. Took a second to repair once I'd removed the switch from the layout. I'd be tempted to use a down-track sensor to throw the switch after the train is through the reversing loop and see how it stands up.  

Lew

Last edited by geysergazer

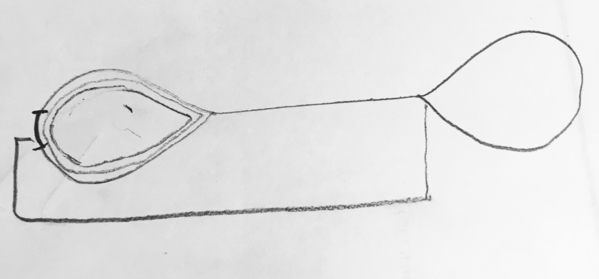
Here's the complete layout:  

Gfx_A&M Museum Layout IIb

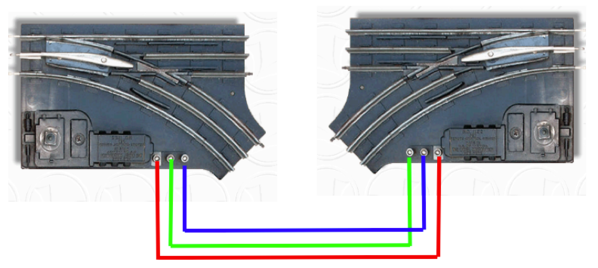
Now, I've had experience with 1122 switches in the past, and I know that if you connect the ground posts of the switches while cross connecting the contact posts thusly:

1122-wiring

A train going through the left hand anti-derail circuit on one switch will throw the other switch so that it's set to go to the right.    Would I have to do something similar here? 

Mitch 

Attachments

Images (2)
  • Gfx_A&M Museum Layout IIb
  • 1122-wiring

Yes, same concept. Although I confess I don’t have experience with fastrack switches, I think their anti derail works the same way. I would insulate the rail at the furthest point from the switch you are controlling so you can allow longer trains, rather than using the left switch to control the direction of the right switch.


6E2847D8-439E-4224-8852-1913E15A732E

Not knowing the specific nuances of fastrack switches, I can only guess at tapping into the switch controller wiring or soldering directly to the control rail of the right Y. 

Attachments

Images (1)
  • 6E2847D8-439E-4224-8852-1913E15A732E
Last edited by JD2035RR

Mitch, it's quite simple to implement. A wire will run from a short pice of insulated outer rail (just Dremel-cut the rail and fill the gaps with hot glue, making sure to remove the cross-connect piece on the underside) to one of  two terminals on the terminal block on the underside of the track switch used by the Remote to control switch position. On left and right Fastrack switches the two terminals are marked "thru" and "out" but I don't know how they're marked on a wye switch. You see, the Fastrack remote control works by grounding the appropriate control wire. Inside the switch the non-derail segments are simply wired in to the control wires.

Lew


Here's how a low-tech approach might look. This is a manual switch I used my own motor on. Eliminate the motor, and you have a spring switch.

switchWire is 0.039 music wire. The throw is styrene, glued to the original throw with Loctite's "plastic bonding system" (two-part, purple bottles, comes on a card) because nothing else I tried worked. Distance from the throw to the brass pivot is 1.5".

I have seven switches with this setup. I have often run the "wrong way" through these, and nothing derails. That includes modern cars with plastic trucks (metal wheels tho). If I were going to set this up to "groove the switch" as a normal thing, I think I would increase the length of the wire. As it is, it is very firm when closed - more than necessary, really.

Attachments

Images (1)
  • switch
geysergazer posted:

Mitch, it's quite simple to implement. A wire will run from a short pice of insulated outer rail (just Dremel-cut the rail and fill the gaps with hot glue, making sure to remove the cross-connect piece on the underside) to one of  two terminals on the terminal block on the underside of the track switch used by the Remote to control switch position. On left and right Fastrack switches the two terminals are marked "thru" and "out" but I don't know how they're marked on a wye switch. You see, the Fastrack remote control works by grounding the appropriate control wire. Inside the switch the non-derail segments are simply wired in to the control wires.


Okay, but I want to do that effect at both ends...  How would that work?

Last edited by M. Mitchell Marmel
M. Mitchell Marmel posted:
geysergazer posted:

Mitch, it's quite simple to implement. A wire will run from a short pice of insulated outer rail (just Dremel-cut the rail and fill the gaps with hot glue, making sure to remove the cross-connect piece on the underside) to one of  two terminals on the terminal block on the underside of the track switch used by the Remote to control switch position. On left and right Fastrack switches the two terminals are marked "thru" and "out" but I don't know how they're marked on a wye switch. You see, the Fastrack remote control works by grounding the appropriate control wire. Inside the switch the non-derail segments are simply wired in to the control wires.


Okay, but I want to do that effect at both ends...  How would that work?

Repeat at the other end, a "sensor" rail with a wire running to the switch at the opposite end. The two are independent. I'd be real tempted to try NICKAIX's technique, knowing that it works without derailing trains.

Lew

geysergazer posted:

How did you attach the extension to the switch bar? Super glue?

Lew

Lew, the throw is styrene, glued to the original throw with Loctite's "plastic bonding system" (two-part, purple bottles, comes on a card) because nothing else I tried worked. I think half of it is super glue (smells like it anyway) and half of it is something proprietary.

The brass pivot is actually glued down -- maybe I should say, entombed -- with super glue, tho!

With all due respect to the spring method, if you have powered switches, nothing could be more simple or more reliable than an insulated rail section on one end controlling the switch on the opposite end. 

F4614385-2F6B-4173-A3F4-8EB600A2E04E

If your switches are manual with no switch motor, I see the value of the spring method. 

Attachments

Images (1)
  • F4614385-2F6B-4173-A3F4-8EB600A2E04E

FC884835-E7DF-48AE-B8EA-65AF107A2534After thinking a little more about it, and looking at the fastrack terminals, you can add wiring as follows, then dust off your hands because you’re done!

You are using the insulated rail of the switch to throw the other switch. Assuming ‘’Out” is to the right of the Y, it won’t throw the other switch until you go all the way around the balloon to the “Thru” side of that Y. At that time it will throw the other Y to the “out” position. Same thing will happen on that end. 

Attachments

Images (1)
  • FC884835-E7DF-48AE-B8EA-65AF107A2534
Last edited by JD2035RR
nickaix posted:
geysergazer posted:

How did you attach the extension to the switch bar? Super glue?

Lew

Lew, the throw is styrene, glued to the original throw with Loctite's "plastic bonding system" (two-part, purple bottles, comes on a card) because nothing else I tried worked. I think half of it is super glue (smells like it anyway) and half of it is something proprietary.

The brass pivot is actually glued down -- maybe I should say, entombed -- with super glue, tho!

Thanks! I knew there was a problem gluing to those throw bars and you solved it. I have this exact situation wherein I would like the train to always enter the return loop the same way and what I have there is an O36 manual switch. Looks like I have a future project.

Lew

JD2035RR posted:

FC884835-E7DF-48AE-B8EA-65AF107A2534After thinking a little more about it, and looking at the fastrack terminals, you can add wiring as follows, then dust off your hands because you’re done!

You are using the insulated rail of the switch to throw the other switch. Assuming ‘’Out” is to the right of the Y, it won’t throw the other switch until you go all the way around the balloon to the “Thru” side of that Y. At that time it will throw the other Y to the “out” position. Same thing will happen on that end. 

JD, you figured it out. Each switch (at the opposite end from the train)  will throw twice, once when the train enters the return loop and once when the engine leaves the return loop but that isn't an issue. Yup, problem solved quick, cheap and simple 

Lew

JD2035RR posted:

Looking at the fastrack terminals, you can add wiring as follows, then dust off your hands because you’re done!

You are using the insulated rail of the switch to throw the other switch. Assuming ‘’Out” is to the right of the Y, it won’t throw the other switch until you go all the way around the balloon to the “Thru” side of that Y. At that time it will throw the other Y to the “out” position. Same thing will happen on that end. 

Mitch 

M. Mitchell Marmel posted:
JD2035RR posted:

Looking at the fastrack terminals, you can add wiring as follows, then dust off your hands because you’re done!

You are using the insulated rail of the switch to throw the other switch. Assuming ‘’Out” is to the right of the Y, it won’t throw the other switch until you go all the way around the balloon to the “Thru” side of that Y. At that time it will throw the other Y to the “out” position. Same thing will happen on that end. 

Mitch 

LOL  

Add Reply

Post
The Track Planning and Layout Design Forum is sponsored by

AN OGR FORUM CHARTER SPONSOR

OGR Publishing, Inc., 1310 Eastside Centre Ct, Suite 6, Mountain Home, AR 72653
800-980-OGRR (6477)
www.ogaugerr.com

×
×
×
×
Link copied to your clipboard.
×
×