Chris,
I agree the green windows really look good and pop on the station. I really like what you are doing with your rolling stock. Really transforms the cars.
Dave


|
|
Chris,
I agree the green windows really look good and pop on the station. I really like what you are doing with your rolling stock. Really transforms the cars.
Dave
Chris,
I agree with Dave, the windows really stand out. The weathering looks good too.
Andy
I finished the abutments front and back. Below are the front abutments cut and placed. I’ll rough up the abutments a little. Don’t want the edges to be too sharp.I will attach them with some adhesive, then start painting.
Andy


@Steamfan77 posted:
I finished the abutments front and back. Below are the front abutments cut and placed. I’ll rough up the abutments a little. Don’t want the edges to be too sharp.I will attach them with some adhesive, then start painting.Andy
Very nice work Andy, It's nice you gave it some depth and a top to put scenery on.
I added a few more trees here and there on the layout.


@Dave Ripp. posted:I added a few more trees here and there on the layout.
Dave, Trees in the neighborhood, looking great! Nice plumbing building and rustic driveway. :-) Awesome!
@Steamfan77 posted:
I finished the abutments front and back. Below are the front abutments cut and placed. I’ll rough up the abutments a little. Don’t want the edges to be too sharp.I will attach them with some adhesive, then start painting.Andy
Andy,
It's great what you have done with styrofoam. This kind of work is an art in itself. Congratulations on your efforts.
Dave
Did some scenic on the front expansion adding a service road and some loose ballast. Got some locomotive service mechanics, small service shack, and SF truck for trackside inspection and repair. Planning on adding some more railroad junk after I weather some stuff. Also, I will be adding some bushes and some small trees in the corner by the shack.
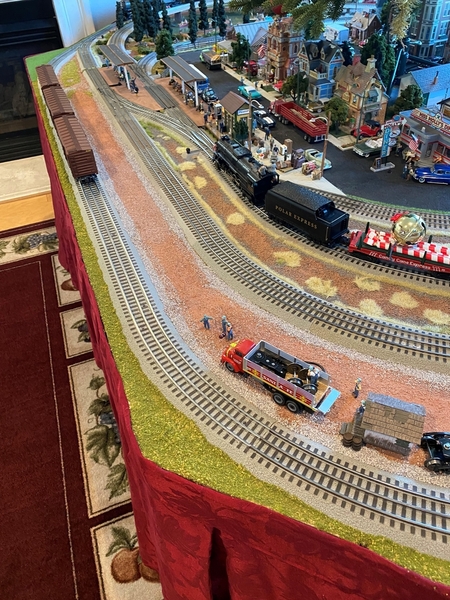
Plus, my wife made a new skirt for the layout and it looks first class IMO. Many thanks to her!


Scott, skirt looks great. It really makes the grass outside of the tracks pop. The view from inside and outside the window are phenomenal. Also your bump out is coming along good.
Andy great job engraving that foam .... I have done more of that than I care to admit to. Here's some ideas and photos of coloring options, on some of mine I did the mortar lines with fine spackling, larger walls that are behind the station I just did the multicolor and washes.


")
")

@ Dave Ripp Thanks Dave. I like the additions you’ve made. The neighborhood is really coming together.
@Dave luvindemtrains, Thank you Dave, I’ve long admired your work.
@ Scott the skirt looks great, gives it a nice finished look.
@ Chris, thank you for the kind words. Your work has inspired me to undertake this project. I will keep your tips in mind.
Andy
@chris a posted:Andy great job engraving that foam .... I have done more of that than I care to admit to. Here's some ideas and photos of coloring options, on some of mine I did the mortar lines with fine spackling, larger walls that are behind the station I just did the multicolor and washes.
Chris, that stone work looks real, especially in the last photo, incredible! Thanks for sharing with us OGR folks!
@Dave Ripp. posted:Scott, skirt looks great. It really makes the grass outside of the tracks pop. The view from inside and outside the window are phenomenal. Also your bump out is coming along good.
Thanks Dave, I will tell the wife. I've been trying to get her involved with the layout because she's very artistic and creative. I was going to attempt the skirt myself, I've used a lot of machines, but not a sewing machine. When I mentioned I was gonna take a stab at it she jumped all over it and had the skirt done in a couple of days. Even with all the other stuff that goes on this time of year. Amazing!
Scott, thanks for the kind words. On the last 2 sections I decided to change it up and try the fine light spackling which is the same product I use for brick mortar on plastic buildings. Learned about using the lightweight spackling as a better alternative to white/gray/beige latex acrylic paint here on OGR of course.
I also meant to mention, that the stone cap on wall in that same "last photo", is Midwest Cork Roadbed. Sometime back the light bulb went on, and I tried using is for sidewalks and street curbs, It worked so well, I figured it'd make great caps on rock and masonary walls.
Chris, What light spackling are you using on your buildings?
Finished up soldering feeder wires and jumper wires to each piece of Fastrack in a six piece section. Connected all the feeder wires to Barrier Strips, turned on the Z1000 transformer, started dialing up power, and breaker popped. Started troubleshooting, found one hot wire solder joint just touching the connecting common strip causing a short, fixed that, got one more section causing a short, unhooked that section, powered up okay. Filled in that section, powered up all the way, okay, so put a locomotive and tender on the track and ran it, found one bad piece of Fastrack Grade Crossing that was rusted and locomotive tried to stall out every time over it. Put a 10 inch straight in place and it ran fine. Will get a new grade crossing and work on troubleshooting that one section tomorrow to find that short. So glad I tested it on top of the layout first!😁
Brad, Container says: DAP Fast N Final - Lightweight Spackling. Just note that once you've painted & weathered the brick or stone wall, you absolutely have to seal it with clear, before applying the spackling. When you're packing the spackling into the mortar lines and then pulling off any excess, it will mix with the weathered colors on the wall if it's not sealed.
NO need to use the expensive Testors Dull coat any can of Flat Clear Coat by Krylon or Rustoleum will work fine and last alot longer than the Testor's cans. Same sealing requirement if you're going over a stone wall engraved out of pink insulation board and painted and weathered with acrylics.
Found my short, a solder string from the center hot terminal on one of my Fastrack switches was making contact with the common inside and outside rail connector strip. Only way I could see it was by shining a flashlight and seeing the solder string. Now I can turn the Z-1000 Transformer power all the way up without tripping the breaker anymore. Also ordered a new Grade Crossing piece to replace the bad rusted one. Will be electrical taping any exposed wiring and solder connections to make sure they don't short against the bottom plate on the switches and putting them all back together later today after an appt. Of course it had to be the most complex section with 3 switches, 45° crossover, and uncoupling track, and the last of the 3 switches where I found the problem! Now it works fine!
Busy with Christmas decorating all weekend but I found the issue with my BEEP lighting board. The wire missed the solder joint and is not making contact. It will take longer to heat up the soldering iron than to make the repair.
I also received a bunch of goodies from GRJ.


Glad you found the issue Bob.
Andy
Hi guys, I haven't got a lot done lately as the boss has a lot done before the first snow falls, so I have been working on that as you never know when it will really happen! LOL
@Dave Ripp., love the new trees and new picknick tables for your park area. I dig the idea of the RIP company! What a great idea!
@Steamfan77, Outstanding job on the foam carving! I can tell you really have taken your time with this project! Looks Great!
@chris a, the windows look perfect! Also, thanks for sharing your photos of your stone wall work again! I always like seeing your work!
@WesternPacific2217, nice job on your extension to your layout and I like the siding! Way to put the MOW crew to work so fast working on the road!
@RSJB18, I sure am glad you found the problem and it's going to be an easy fix.
Well guys, I have been in the train room before the sun comes up just trying to get all my building that I have place so far, but it's hard to get going so early in the AM. I found one small problem when you have 12v and 4.5v building and you don't mark the wires! LOL
I had to spend extra time wiring in new 4.5v LED's. So now every wire is marked before it even goes through the bench top! LOL I have 1 more building to drill hole for, then I can run the correct wire to the correct buck convertor!
I hope you all have a great night!
First post to this thread. A brass band for my little town.
Bob


I haven’t read this thread in a long time. Fantastic work all around!
@chris a posted:Today's project, mount a whole bunch of BackDrop buildings I purchased.. These are from Trackside Flats purchased on eBay. About to go out and set up the spray adhesive work station as I have been cutting for over an hour.
Those are nice Chris, I used most of those on my double sided fascia. I'm very happy with the results.
@Bob "O" posted:First post to this thread. A brass band for my little town.
Bob
Exceptionally nice figures Bob. Great looking ground cover. 👌
@RSJB18 posted:Busy with Christmas decorating all weekend but I found the issue with my BEEP lighting board. The wire missed the solder joint and is not making contact. It will take longer to heat up the soldering iron than to make the repair.
I also received a bunch of goodies from GRJ.
Good to see you have an easy fix Bob ![]()
Now you look like you are going to have a ball with your purchases from GRJ. ![]()
@Dallas Joseph posted:Good to see you have an easy fix Bob
Now you look like you are going to have a ball with your purchases from GRJ.
My next two victims are my SantaFe F3's and a K-line Box cab. Just waiting for coil couplers to arrive from Lionel.
Short term project is to get the Christmas tree done so I can get the trains running underneath.
Bob
Hey guys, I hope you all had a great day!
@Bob "O", Nice to have some music in the park, Looks great!
@chris a, and here to think I thought you bought your back drops already done! Looks like a lot of work and I bet my last dollar that they are going to turn out Amazing just like everything else you do!
No photos from me today and probably for the next couple day as life is getting in the way. But I sure love everything that everyone is doing!
@RSJB18 posted:My next two victims are my SantaFe F3's and a K-line Box cab. Just waiting for coil couplers to arrive from Lionel.
Short term project is to get the Christmas tree done so I can get the trains running underneath.
Bob
Bob, so from the photograph I see these boards are specific to the two engine's sounds. Does John put sounds on them or do they come from ERR with the sounds. I have an ProtoSound F3 set that I want to upgrade with ERR.
@Bob "O" posted:First post to this thread. A brass band for my little town.
Bob
Bob O, Excellent scene for your first post here. I agree the band members look fantastic.
Chris, those are really nice looking backdrop buildings.
Hey Mike G: About 4 hours into this "BackDrop" project today, I was wondering why I didn't just spend the extra $$ and buy them already mounted !!!! Anyway, got the long sheet done - it contained 15 running linear feet of buildings.
After I finally got them cut after mounting on the foam core, I went downstairs and started playing with possible locations. The photos definitely help with the planning and trying different ideas, then I can sit here at the monitor and compare. I have many more to place, but it was time to call it a night.
Bob, I love the Band, great idea for a scene. Nice job.


@RSJB18 posted:My next two victims are my SantaFe F3's and a K-line Box cab. Just waiting for coil couplers to arrive from Lionel.
Short term project is to get the Christmas tree done so I can get the trains running underneath.
Bob
" MY NEXT TWO VICTIMS " ........not sure Bob , but is this a good thought to start a new project with ? ![]()
![]()
@Dallas Joseph posted:" MY NEXT TWO VICTIMS " ........not sure Bob , but is this a good thought to start a new project with ?
Excellent observation 😄
Installed LED light strip in a club member's LIONEL 15" NP NCL full dome car using a board designed by @gunrunnerjohn, using @Rod Stewart's BOM, and @Ted W's assembly directions. There are four cars in the set. I'll get a photo of an original with the incandescent bulbs for comparison with the LED installation and post this week-end.
The comparison of hot spots v. even lighting. (Not shown is the absence of flicker.)
Being at a distance diminishes the "hot spot" effect. It's more noticeable close up:
And the absence of hot spots with the LED strip lights.
My latest monstrosity. I bought this Ives cum interurban on the Bay some years back. I'm swapping out the Vulcan chassis it came with for a Bowser single truck unit. By happy chance, the old bolster holes line up neatly with the former headlight mounting holes, so assembling the thing should be simple. I plan to pick up an old 520 boxcab chassis and shell and mount the Vulcan therein, thus giving it lead and trailing trucks... ![]()

You have three guesses who's "helping", and the first two don't count. ![]()

Also, I've raised a new question on the Tinplate forum:
https://ogrforum.ogaugerr.com/...s-or-other-electrics
Mitch
I did a little work on the expansion in the right corner of the layout today and added some lights to the little trackside service shack. I used Woodland Scenics Just Plug accessories.
I removed the roof of the shack and managed not to break it, thanks to the fact there wasn't much glue holding it on. Drilled a 1/8th" hole just above the door and fed the lamp wires through and used CA glue to mount the light.

Attached the stick on LED to the underside of the roof.

Drilled another hole in the bottom of the shack using a 5/16" drill so I could get the Just Plug connector through it.

Threaded the wires out the bottom of the shack.

Back in one piece.

I drilled another 5/16: hole in the layout to thread the wires. Placed the shack over the hole in the layout and connected them to the Woodland Scenics Just Plug light hub.

It took me about a half hour in all, I'm happy with the results.


@Mark Boyce posted:Bob, so from the photograph I see these boards are specific to the two engine's sounds. Does John put sounds on them or do they come from ERR with the sounds. I have an ProtoSound F3 set that I want to upgrade with ERR.
Mark- You order the sound board that you want from ERR. You can check them all out here . I have the F3 set for my diesels and the gas doodlebug for my boxcab upgrade.
@Dallas Joseph- They are victims of the mad scientist.
Although, I believe that title belongs to a certain Grand Poobah
@WesternPacific2217 posted:I did a little work on the expansion in the right corner of the layout today and added some lights to the little trackside service shack. I used Woodland Scenics Just Plug accessories.
I removed the roof of the shack and managed not to break it, thanks to the fact there wasn't much glue holding it on. Drilled a 1/8th" hole just above the door and fed the lamp wires through and used CA glue to mount the light.
It took me about a half hour in all, I'm happy with the results.
Looks familiar. I did something similar with this shack. I scratch built my lights though. Nice work on yours.
Now I may need to go back and add an interior light. ![]()


Access to this requires an OGR Forum Supporting Membership


