
I had a 6-17534 Diamond T Flat Car with 2 Corgi Trucks and got another one cheap. My plan was to repaint the trucks for use with my semi-trailers. The Lionel scale tractors are beautiful but too big for the traditional-size trailers and too rich for my budget. First, I repainted the extra 6-17534 flatcar for PRR and placed two of the new Menards Power Wagons on it.

20220918_144657

Then I repainted one of the trucks for PRR, making the interior look a little better than the solid black plastic that it was. I stripped all the original paint off the front of the truck body before repainting, but it still turned out to be a disappointment. A bigger problem than the paint is the fact that the engine compartment has no motor, so I don't even know how it's supposed to pull a trailer.

20220918_135921

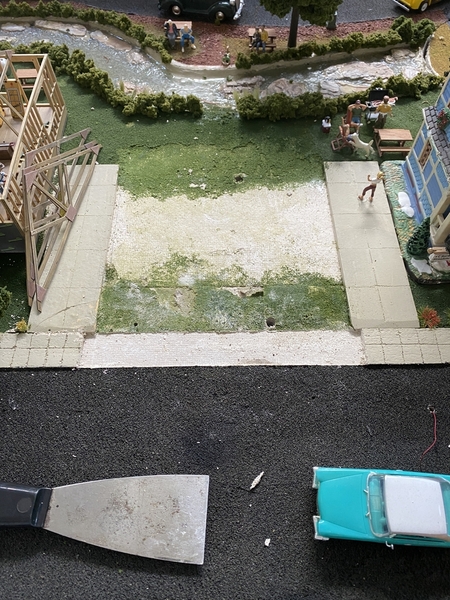
The repainted tractor is pictured here in what will someday be a partially car-level intermodal and REA facility. An un-prototypical, implausible, and impracticable setup to be sure, but given our space limitations, the guys down there will have to make it work. I have full confidence in them.

20220918_145346

Looks great to me, can't see the engine anyway. I like the style of the truck

@RSJB18 posted:

@Putnam Division- I've become a scrounger and saver of junk too Peter. My wife is convinced I've lost my mind.....she may be right.....The back yard scene is shaping up.
@Genemed- Nice work on the pipe loads. I'll have to catch up on your rebuild. Welcome to the Forum.
@Alan Rogers- The buildings look great. What scale are you working in?
@Bill Webb- You folks are on a roll with the wiring and programming. I guess once you get a method down it makes sense to keep going. Can't wait to see the second and third levels come to life.

Bob

I work in On30. Finally getting some stuff done on the layout that I delayed due to other things.

Last edited by Alan Rogers

It's been a few weeks since I've posted, mostly due to taking care of items which take a decent amount of time.  I mean, no one wants to see me paint 8 feet of rock wall one layer at a time, nor build a beach and seawall in several stages..lol

I finished the base layer of my beach and seawall.  Vegetation, bathers and creatures to be added at a later date:

20220919_09234020220919_092205

Added some of the rocks I painted along with vegetation and ballast to the southern incline.  I also placed the base layer of plaster cloth and painted a base coat for the next section:

20220919_09222820220919_092327

And lastly I ballasted about 6' on the lower mainline. I know, thrilling progress..lol  Did I ever say how much I hate ballasting??

20220905_225600

-Greg

Attachments

Images (5)
  • 20220919_092340
  • 20220919_092205
  • 20220919_092228
  • 20220919_092327
  • 20220905_225600
Last edited by Greg Houser
@Greg Houser posted:

@Genemed   Nice craftsmanship on the buildings!  At least you'll have no trouble selling the ones you don't use.

-Greg

Thanks Greg, I’ll probably put the ones I don’t use on a display shelf. Having a few extra dollars in my pocket couldn’t compare to seeing them when I’m running trains. Thanks again for your input when I started this layout.

Gene

Installing my new WS Emilio's Ristorante Italiano buiding on main street just behind the passenger station. This building is pre lit with WS Just Plug LED's.

It fits perfectly where the Lemax fire station was. I'll be moving the fire station over near the Emporium building in the near future.

Grass removal using hot water and putty knife.

New concrete foundation using cork cabinet liner painted with WS concrete paint. Replacing the  side walk in front as well, the old sidewalk is crumbling. I discovered cork cabinet contact liner at Home Depot, and now I use it for streets and concrete. Cut to fit, paint and stick it on. I use some CA glue in the corners for insurance. BBQ party going on at the Clark's next door to the construction!

More to come, I have some figures for the outdoor tables too.

Attachments

Images (3)
  • mceclip0
  • mceclip1
  • mceclip2

Installing my new WS Emilio's Ristorante Italiano building on main street just behind the passenger station. This building is pre lit with WS Just Plug LED's.

It fits perfectly where the Lemax fire station was. I'll be moving the fire station over near the Emporium building in the near future.


Grass removal using hot water and putty knife.


New concrete foundation using cork cabinet liner painted with WS concrete paint. Replacing the  side walk in front as well, the old sidewalk is crumbling. I discovered cork cabinet contact liner at Home Depot, and now I use it for streets and concrete. Cut to fit, paint and stick it on. I use some CA glue in the corners for insurance. BBQ party going on at the Clark's next door to the construction!


More to come, I have some figures for the outdoor tables too.

Looking good Scott. I also have this building in my downtown.

@Genemed  I'm glad to hear you have room to display them - much better than selling them!

@WesternPacific2217 I like the idea of using cork for roads myself and am glad to see yours turned out nice.   A few years ago I was given a box of Midwest Cork products, cork sheets which are 11 3/4" x 36".  I was planning to cut to size and use as roads.

-Greg


New concrete foundation using cork cabinet liner painted with WS concrete paint. Replacing the  side walk in front as well, the old sidewalk is crumbling. I discovered cork cabinet contact liner at Home Depot, and now I use it for streets and concrete. Cut to fit, paint and stick it on. I use some CA glue in the corners for insurance. BBQ party going on at the Clark's next door to the construction!

More to come, I have some figures for the outdoor tables too.

@WesternPacific2217

I love your Italian restaurant scene. Also, I have searched the past 20 year for the perfect road surface as well as sidewalk materiel and paint. I am currently leaning toward roofing tiles for road surface, though your cork is superb and probably easier to cut and shape. Is your road cork painted with Woodland Scenics (WS) asphalt coating? Are your sidewalks cork also and painted with WS concrete coating? Do you put a primer coat on the cork before the final finishing color? What do you do to create the joints between concrete sections in the sidewalks? Again, Bravo on your great scenic effects and thank you for any information that you can provide me.

Installing my new WS Emilio's Ristorante Italiano buiding on main street just behind the passenger station. This building is pre lit with WS Just Plug LED's.

It fits perfectly where the Lemax fire station was. I'll be moving the fire station over near the Emporium building in the near future.

Grass removal using hot water and putty knife.

New concrete foundation using cork cabinet liner painted with WS concrete paint. Replacing the  side walk in front as well, the old sidewalk is crumbling. I discovered cork cabinet contact liner at Home Depot, and now I use it for streets and concrete. Cut to fit, paint and stick it on. I use some CA glue in the corners for insurance. BBQ party going on at the Clark's next door to the construction!

More to come, I have some figures for the outdoor tables too.

I am surprised that you have every thing tidy,hats off on your work

Genemed the buildings look good. Bet that you find a place for most of them.

Greg you have made a lot of progress, even if some was not a lot of fun. But… ballast done today is off the list for tomorrow.

Scott the building is a great addition. Thanks for the info on the cork. We will check it out.

Finally we have all of the freight and passenger yard turnouts rewired and working in DCS. They have been loaded into two remotes and the I-pad. We tested them with the yards and have one bug to track down involving power to one track. I expected a lot worse since we had ignored this side of the layout for almost two years while completing the engine service area and passenger station. But all is not coming up roses.

PROBLEM. HELP NEEDED WITH ROUTES.

Does anyone have experience with setting up routes? I have spent two days + trying to get them to work and it is not happening. The freight yard has eleven turnouts and often 4-6 or more need to move when a route is selected.

We have Tortoise switch machines which require the use of additional relays to accommodate the longer time that they require to fire. The AIU pulse is not long enough to operate the Tortoise thus separate relays are needed.

They work with no trouble individually.

When the route is activated, the AIU relays fire but a few of the secondary relays flicker but do not lock.

Power to the switch machines is 12 volts/2 amps DC and quite a number of turnouts are being powered… like 40+. My guess is that we need to increase power and I have a 12 volt 10 amp transformer that can be used.

We know very little about routes and are wondering if they work well or are there problems that we need to know about. Before I start switching things around, I thought that it would be a good idea to get other opinions.

This afternoon I built a three turnout route using wi-fi and the I-pad. I thought that the lower number of turnouts might solve the problem. When the route was triggered, 2 turnouts operated, one did not; so much for that idea.

We will appreciate your help/ideas/suggestion. Routes are a real necessity on our layout given the complexity of the yards.

Thanks so much.

Bill and Paula

Rock formations usually leach water. The New Haven had trouble with this section of track because of that. The road bed was removed and replaced with heavy ballast. Now casual runoff water collects along side the track and cattails among other vegetation is beginning to grow around it. ...........................Finished some poly trees and other grong vegetation and joined the two areas with trees and other vegetation. Still plenty more to do.water 1water 2trees 1

Attachments

Images (3)
  • water 1
  • water 2
  • trees 1

@WesternPacific2217

I love your Italian restaurant scene. Also, I have searched the past 20 year for the perfect road surface as well as sidewalk materiel and paint. I am currently leaning toward roofing tiles for road surface, though your cork is superb and probably easier to cut and shape. Is your road cork painted with Woodland Scenics (WS) asphalt coating? Are your sidewalks cork also and painted with WS concrete coating? Do you put a primer coat on the cork before the final finishing color? What do you do to create the joints between concrete sections in the sidewalks? Again, Bravo on your great scenic effects and thank you for any information that you can provide me.

Hi Randy,

Here's a photo of two different methods of road on my layout. The road closest to the camera is the cabinet cork liner with adhesive backing that has been painted with a mixture of Woodland Scenics "Top Coat Asphalt" and "Top Coat Concrete". I applied 3 coats of this mixture with about 2 hours drying time in between.

In front of the SP Daylight GS-2 is the method I used for most of my layout, a mixture of white glue and Woodland Scenics black cinder ballast. This is a tedious and messy method, but looks pretty good. If you want to see how it's done, Eric Siegel aka "Erics Trains" has a video on YouTube The link is below. Eric uses a product to called Flexxbed for his road ways and rail crossing with the mixture applied to the top of it, I applied my roads directly to my layout.

https://youtu.be/u6pYk_N1h1Q

For concrete sidewalks and driveways I used 3 different methods, Woodland Scenics Lightweight Hydrocal Plaster, drywall mud works too, and dries much harder. Finally, I really like the cabinet cork liner sold by Home Depot, and other supply stores, under the name Con-Tact Natural Cork. For concrete I use the Woodland Scenics Top Coat Concrete. I did not use a primer.

Note: I just replaced the WS Hydrocal plaster sidewalk with the cork in front of the new WS building. The Hydrocal is very light weight and doesn't hold very well for sidewalks.

Hope this helps.

Attachments

Images (1)
  • mceclip0
Last edited by WesternPacific2217
@Wood posted:

@Bill Webb

RE: FAILING ROUTE SWITCHES

I do not have preset routes on my layout.  I have 43 switches and I have had switches fail. My switches are all Z products. I called the company and they told me to increase the voltage. I went up to 14 volts and that solved the problem.  Sometimes it can be the simplest solution. Hope that helps.

Wood

What a difference a volt makes! Zstuff told me to reduce the voltage to 13,volts when their relay is involved. It all has the same voltage source when the relay plugs into the switch motor. ???

@pennsyfan posted:

What a difference a volt makes! Zstuff told me to reduce the voltage to 13,volts when their relay is involved. It all has the same voltage source when the relay plugs into the switch motor. ???

@Wood posted:

@Bill Webb

RE: FAILING ROUTE SWITCHES

I do not have preset routes on my layout.  I have 43 switches and I have had switches fail. My switches are all Z products. I called the company and they told me to increase the voltage. I went up to 14 volts and that solved the problem.  Sometimes it can be the simplest solution. Hope that helps.

Wood

Thanks Wood. I expect that this is the problem. We power the AIUs and relays from the same 12 volt source… both specify using 12 volts. I have been concerned that we were probably getting close to capacity and needed to “split” the load by using another source for some of this.

Stan and John are probably good people to ask and have helped us before. I will try to contact them. One or both have probably run into this problem. This stuff, especially the AIUs, has gotten so expensive that it might be smart to divide the load in case something shorts out (this is my wiring after all).

Look forward to seeing your video. The hotel is going to be a hit.

@Bill Webb posted:

Thanks Wood. I expect that this is the problem. We power the AIUs and relays from the same 12 volt source… both specify using 12 volts. I have been concerned that we were probably getting close to capacity and needed to “split” the load by using another source for some of this.

Stan and John are probably good people to ask and have helped us before. I will try to contact them. One or both have probably run into this problem. This stuff, especially the AIUs, has gotten so expensive that it might be smart to divide the load in case something shorts out (this is my wiring after all).

Look forward to seeing your video. The hotel is going to be a hit.

Bill- been following along. To me it sounds like you are slightly overloading the circuit. Correct me if I'm wrong, but you are firing several switches at one time via the route programming? Have you tried each switch individually? If they all work then splitting the feed may be the solution.

Bob

Bill- First I would not power an AIU and a bunch of relays with the same supply.  You said you could have multiple relays activate at the same time which would put a lot of noise on the line when the relays deactivate.  Use a different source for the AIU power.

As far as the problem, as suggested above it is probably an overload situation.  Fire just one and get the voltage reading at the relay. Keep doing it adding one more relay each time until you reach failure.  The voltage is probably a few volts less than what you started with, and this just confirms you need more power. Try a power source with maybe 14-16 volts and see if that works.  If you don't have a supply like that berak your feeds down to several 12 volt sources assuming you have more - keep at it, you will get it.

Hi guys, it's been a while, sure has been a lot of life's BS that has gotten in the way of my train time! I finally got today to just sit back and relax and get caught up on what has been going on here! I had to go back 4 or maybe 5 pages to get back to where the last time I was here! I can tell you all it has been way to long! Anyways I handed out a truck load of likes and unlike most other times, no book from me today. I only have a few comments.

First off:

@TimMacPA Hi Tim welcome to the forum and into the hobby! I too was like you I got my first train set from my son's grandfather, the son had no interest in it and from that point I was hooked! I just wanted to let you know you are probably one of the luckiest guys to join this forum, cause even though you just want a table to get your trains up and running, but I know when the time comes that you want to upgrade you are in the right place! Not only do you have the folks here to help you, but I know there are a lot of people in PA that are into model trains and love to help others! I know you say you want to keep it simple, but yet you're clearing out space, I hate to tell you, but you have been bitten by the train bug! No matter what you do please have fun!

@AGHRMatt Matt I love the layout plan! I hope you will keep us posted on how things go! If you can share the SCARM file that would be cool!

@WesternPacific2217 Scott, the new building looks great and I like the idea of cork! Chris from the forum does the same thing! I am really going to have to give it a try!

I hope you all are doing well and finding time to have fun with your layouts and trains!

So this is my 1st shot at an Anyrail plan. I spent the better part of the day working this out. My back needed the rest after yesterday.

20 x 8 with the 4 x 4 yard in the lower right. I want a large yard because I won't have any real display area. I have additional room in the lower left for another wing for future expansion. There will be more track added to the center area, and I plan for a trolley system plus at some point an elevation

This part is 072 track, for that time, hopefully, I get a larger trains.

So tomorrow we get back to humping wood to the basement.

Attachments

Images (1)
  • mceclip0
@TimMacPA posted:

So this is my 1st shot at an Anyrail plan. I spent the better part of the day working this out. My back needed the rest after yesterday.

20 x 8 with the 4 x 4 yard in the lower right. I want a large yard because I won't have any real display area. I have additional room in the lower left for another wing for future expansion. There will be more track added to the center area, and I plan for a trolley system plus at some point an elevation

This part is 072 track, for that time, hopefully, I get a larger trains.

So tomorrow we get back to humping wood to the basement.

Tim, that is a nice simple layout with plenty of room for changes and like you said expansion! I think will like it in the beginning, but as some have stated things change over time! There is almost always an answer to any question you can come up with here!

Like I said before the biggest thing is to have FUN!!!

Started packing everything thing up and getting ready to re do the basement. 42EDE2DF-FADC-4191-A1CF-C34A12B29DFF

Just curious Nate, what kind of 3-tone car/engine is that in the lower left corner? Looks a little flighty to me BTW, very nice looking crane & work caboose - who made that? Good luck on the re-do of the basement, been there done that on the dining room kitchen, both bedrooms, basement, family room and all 4 bedrooms on the house I sold in OH. It was a labor of love up to a point

George

@Bill Webb posted:


Look forward to seeing your video. The hotel is going to be a hit.

@pennsyfan

I promised a video and here it is.  This is a video overview of my layout.  First some comments about the layout. It is what I call a medium size layout. 20' x 17'.  The layout is operated from the center of the Layout with a 32" lift out bridge for the entrance. That choice is because I like to be in the middle of the action both running trains and life in general. I used Lionel O27 profile tubular track, mostly because I had so much.  Each piece of track is spray painted with Rust Oleum camouflage paint and 8 ties are inserted under the track. All the tracks are ballasted. I chose the O27 profile because there is plenty of it, it has great conductivity and I like the low profile.  O Gauge track just looks too tall.  I used O42 curves. with GarGraves O42 switches.  There are truly 43 switches on the layout.  The reason for that is because if you put an engine on the rails you can negotiate with every other piece of track on the layout.

I did not comment in the video so I will tell you the info first.

1.  Canadian Pacific on its way to Banff Springs resort in Banff, Alberta Canada. something I rendered from scratch.

2. Overview of the Engine and Stock yard.

3.  My control station.

4. Foss Farm a rendition of my Brother's farm in Maine. scratch built.

5. Town village

6. 4 tunnels

7. Cat Factory - scratch built

8. Wood mill

9. Englewood Station by Harry Hieke

10. Brown Stone apartments by Andre

11. Canadian Rockies mural

12. Power Station

13. Campsite

14. Elevated Railway by Jim Robinson's BridgeBoss

15. Wall hangings.

16. Alley Katz and Cleat's Sports club an early rendition of my company.

17. One more look of the yard, an overview of the whole layout and my desk and workshop.

Last edited by Wood
@GeoPeg posted:

Awe-Some!!!! Love your layout. Hard to believe O27 track could look that good! So how many years has it taken to reach this point?

George

Thanks George.

I've been building this since 2007. 15 years. It started on a 4x8 piece of plywood. Slowly kept adding another piece. I always did Chritmas layouts but this one was never put back in the attic. I went on eBay and typed in Lionel. 10, 000 items popped up and I never stopped buying. It's been fun.

@Wood,

WOW! What a fantastic layout. The details are amazing. You make me wonder why I ever discarded my 027. I so much wanted to click the video on my phone while having breakfast; I’m glad that I waited to bring it up on the iPad and screen share it to the TV. I’m going to go back and watch it again using the pause button to take it all in! Did you scratch build the sailboats; or modify a skating rink?

Thanks so much for sharing!!

@pensyfan

I do like what I did with the O27 and I saved a lot of money. I also used some GarGraves track in areas where I had to bend the track to make it all fit. If I were starting from scratch I would use Gargraves. It is also tubular with good connectivity.

The sail boats were Christmas tree ornaments. I used magnets attached to the bottom and built a track circle under the lake. Used a Geep and attached strong magnets to it. In the video the sail boats were flying around the lake. All I can say is that it was a very windy day. LOL.

So glad you like the layout. It's been fun.

Wood

@TimMacPA posted:

So this is my 1st shot at an Anyrail plan. I spent the better part of the day working this out. My back needed the rest after yesterday.

20 x 8 with the 4 x 4 yard in the lower right. I want a large yard because I won't have any real display area. I have additional room in the lower left for another wing for future expansion. There will be more track added to the center area, and I plan for a trolley system plus at some point an elevation

This part is 072 track, for that time, hopefully, I get a larger trains.

So tomorrow we get back to humping wood to the basement.

I would move the crossover to the "left" (more towards the mid-point of the inner loop) so that trains coming off the crossover are not immediately in or coming off a curve.

Depending on what you do in the center, you also might want to try and incorporate a reversing curve into the plan.

@Richie C. posted:

I would move the crossover to the "left" (more towards the mid-point of the inner loop) so that trains coming off the crossover are not immediately in or coming off a curve.

Depending on what you do in the center, you also might want to try and incorporate a reversing curve into the plan.

I definitely will be looking for a turn around, and yes the switches need to be moved.

Add Reply

Post

OGR Publishing, Inc., 1310 Eastside Centre Ct, Suite 6, Mountain Home, AR 72653
800-980-OGRR (6477)
www.ogaugerr.com

×
×
×
×
Link copied to your clipboard.
×
×