paul 2 posted:

Next Wednesday I host my local small train group. That gives me a week to clean up the floor area again. Going through boxes to see what stays in the attic and what gets transferred to the basement. I hate cleaning up after myself so in order to force myself I ran trains. That seems to put me in cleanup mode. Pics.......Paul

Paul,

Excellent idea to run trains while you cleanup!!

I didn't do anything on the layout yesterday, but my wife and I did something for the layout. The locomotive roster is already large and getting larger. It was time to get organized. I give you the Loco Log...

My wife did most of the work using Excel, I just took the pictures and guided her with the formatting.

IMG_6901

Each engine has a page printed on heavy stock, with space for listing all maintenance and other notes.

IMG_6902

The record continues onto the back of each page for plenty of space.

IMG_6903

Matt's here, more later. Time to actually work on the layout.

Attachments

Images (3)
  • IMG_6901
  • IMG_6902
  • IMG_6903

Elliot,

I really like your idea on the "Engine Log Book" and the space for recording of maintenance.  With over 200 engines, myself, this is a good idea I should really consider, and make an effort to do.  I do have my motive power, and all pieces in my roster, on an Excel formatted inventory, with pics of each, already.  Now, just to separate, define and print.  Perhaps it may not be as difficult as I may believe.  Just to find the time in between all other endeavors........ and work more on the layout.... and the repairs to the CCII Niagara...... and upgrades to the K Line Hudson... and the 844....... put up more shelving....... run trains to relax from working on the property (more storms last night!)......  don't you all just love it!  But really, Elliot, a great way to maintain record and pass along the idea to others.  Many thanks.....

Jesse   TCA  12-68275

Big_Boy_4005 posted:

I didn't do anything on the layout yesterday, but my wife and I did something for the layout. The locomotive roster is already large and getting larger. It was time to get organized. I give you the Loco Log...

My wife did most of the work using Excel, I just took the pictures and guided her with the formatting.

IMG_6901

Each engine has a page printed on heavy stock, with space for listing all maintenance and other notes.

IMG_6902

The record continues onto the back of each page for plenty of space.

IMG_6903

Matt's here, more later. Time to actually work on the layout.

You could probably market that

imageimageimageimageimageimageimageimageI've been adding more scenery details (ground cover, trees, donkey engines, etc.) to our logging area, Soap Creek. It's getting closer to being complete. So I took some pictures today after adding some more trees and details. Then, later I was looking back at how the area looked and the progress. So I thought it might be fun to see how Soap Creek developed. 

The last three pictures are of Soap Creek  from today. Soon I'll work on filling in the river section on the other side of the layout. 

Attachments

Images (8)
  • image
  • image
  • image
  • image
  • image
  • image
  • image
  • image
ChessieMD posted:

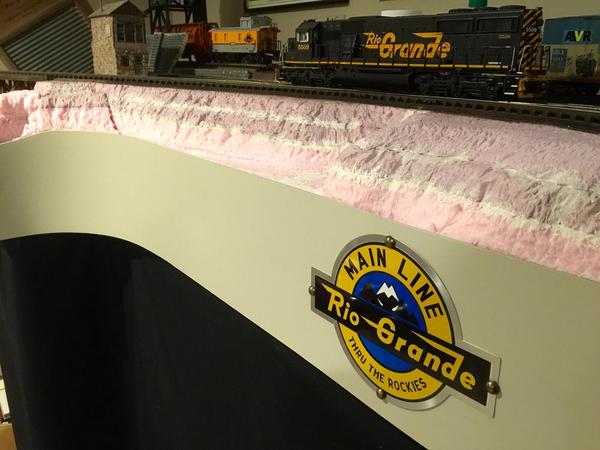
Painted the fascia board, installed my Rio Grande livery sign and the DCS remote holder.  All in all a very productive day!


IMG_1607IMG_1615IMG_1602

As an inspiration for those that are thinking of modeling O-Scale in a small area, below is  shot of the Rio Grande switching layout which is 7.5' by at it's greatest width 27.2" (at Crystal Lake-foreground) and most narrow 18" (near the smoke stack in the distance).  The layout consist of four switches , a run around track area and right now three industries, which might be expanded.  I also have enough room for two siding, near the Furniture plant and one over the lake.  Anyway, another angle of this emerging world.  Thanks.

IMG_1616

Attachments

Images (1)
  • IMG_1616
WP posted:

imageimageimageI've been adding more scenery details ...So I thought it might be fun to see how Soap Creek developed.

Hi WP/ John, You certainly  appear to be a master at making meaningful use of a narrow strip and a corner of real estate. That really looks good, and I esp. appreciate how you have used the premium trees up front, emphasizing depth and interest in the area. Congratulations on your continued success at the project.

FrankM.

WP posted:

I've been adding more scenery details (ground cover, trees, donkey engines, etc.) to our logging area, Soap Creek. It's getting closer to being complete. So I took some pictures today after adding some more trees and details. Then, later I was looking back at how the area looked and the progress. So I thought it might be fun to see how Soap Creek developed. 

The last three pictures are of Soap Creek  from today. Soon I'll work on filling in the river section on the other side of the layout. 

John,

Thank you for the photos showing added detail in time.  I really like what you are doing.

Anthony K posted:

Working on installing switch motors for the staging yard last night.

IMG_1963

I also worked on cross-bracing for my PRR-style signal bridge kit-bashed from two plasticville bridges spliced together.  I'll be mounting Custom Signals PRR-style interlocking signals for three tracks on the bridge.

IMG_1961


Anthony,

You have certainly made good progress since I last saw some photos.  You will have a few trains running with that staging yard!!

Running a little behind, Saturday was a very busy and long day. After my last post Matt came over and we worked all afternoon, then had dinner. When he left, I switched gears, had my sports buddy over and watched boxing for the rest of the evening, then Sunday was football.

Matt continued to work on the manual switch throws, and finished another 10. The work is rather unglamorous but very important to the functioning of the railroad.

Here's all we see when he's done.
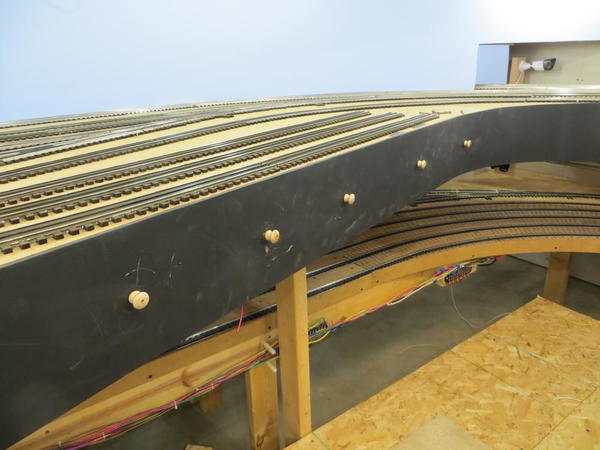
IMG_6918

Knobs on the fascia.

IMG_6919

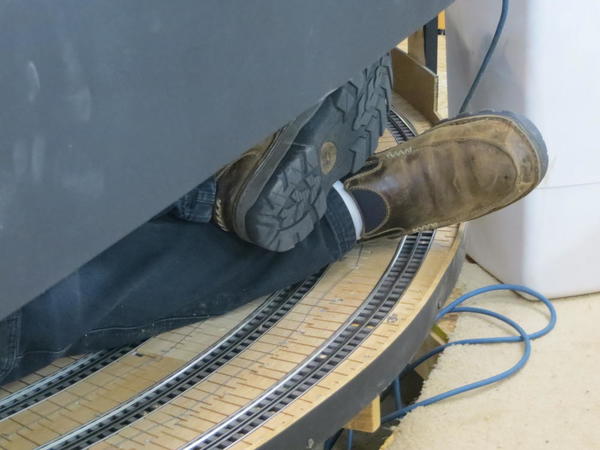
Here's what I see when he's working. He managed to cram himself into the hidden yard! A place I surely would not fit.

IMG_6912

It looks as if the layout ate him.

IMG_6913

While Matt was doing that, I finished the last 2 sections of the south wall backdrop.

IMG_6915IMG_6916

Another 20' and the entire backdrop will be done. It may take a while to get to that though, as there are some things in the way that will need to be relocated first.

IMG_6917

Going to head down in a little while to work on the fascia.

Attachments

Images (8)
  • IMG_6918
  • IMG_6919
  • IMG_6912
  • IMG_6919
  • IMG_6915
  • IMG_6916
  • IMG_6917
  • IMG_6913

No photos, but on Saturday, I went to Portland to hit the hobby shops and the engine house where SP4449 is housed (just because I love looking at all the neat stuff there). About halfway down, I ran over something on I-5 and got a flat and the puncture was too bad to be fixed. If I was lucky with this at all, it was that it happened right at the exit for what I think was the only tire place in the area. I wasn’t there for very long before I was on my way, but kicking myself for having it happen anyway even though I was just going down the highway and doing nothing wrong. I'd lost over $250 before I got to the first hobby shop!

When I finally got to Portland and the hobby shops, I found several good pre-made trees. All that is coming to the layout very soon. That’ll be the last major element for the layout itself, once the trees and bushes are in place. From then on, it’ll all be tweaking and changing the little things, and adding extra details here and there.

I also bought some minor detail stuff. For example, some pre-painted HO scale feed sacks were just about perfect in size/color for O scale sandbags, so I got them.

I also still need to pace all the rural mailboxes along the roads, too, now that they have numbers and names on them.

Big_Boy_4005 posted:

Running a little behind, Saturday was a very busy and long day. After my last post Matt came over and we worked all afternoon, then had dinner. When he left, I switched gears, had my sports buddy over and watched boxing for the rest of the evening, then Sunday was football.

Matt continued to work on the manual switch throws, and finished another 10. The work is rather unglamorous but very important to the functioning of the railroad.

Here's all we see when he's done.


Knobs on the fascia.
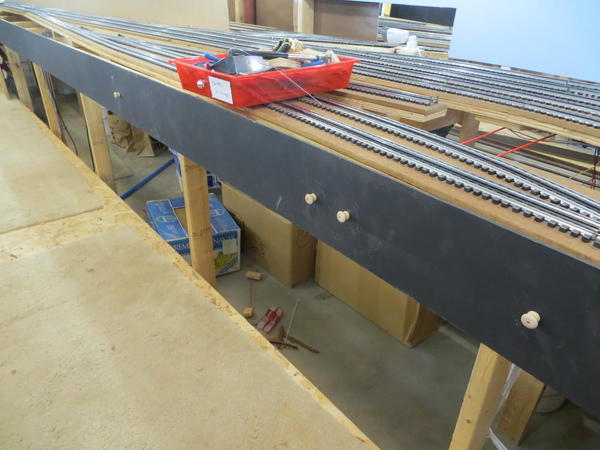
 

Here's what I see when he's working. He managed to cram himself into the hidden yard! A place I surely would not fit.
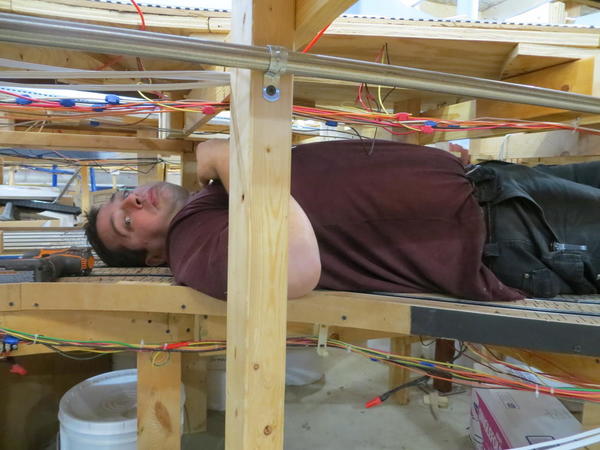
IMG_6912

It looks as if the layout ate him.

IMG_6913

While Matt was doing that, I finished the last 2 sections of the south wall backdrop.
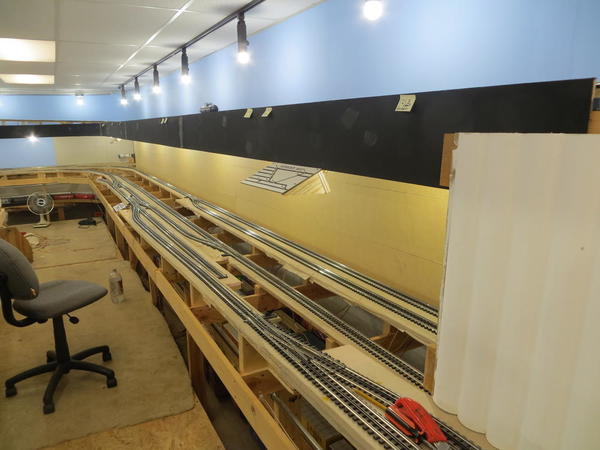
 

Another 20' and the entire backdrop will be done. It may take a while to get to that though, as there are some things in the way that will need to be relocated first.


Going to head down in a little while to work on the fascia.

Matt laying down on the job again!!  LOL

Excellent work Elliot and Matt!!!

Big_Boy_4005 posted:

Running a little behind, Saturday was a very busy and long day. After my last post Matt came over and we worked all afternoon, then had dinner. When he left, I switched gears, had my sports buddy over and watched boxing for the rest of the evening, then Sunday was football.

Matt continued to work on the manual switch throws, and finished another 10. The work is rather unglamorous but very important to the functioning of the railroad.

Here's all we see when he's done.

IMG_6918

Knobs on the fascia.

IMG_6919

Here's what I see when he's working. He managed to cram himself into the hidden yard! A place I surely would not fit.

IMG_6912

It looks as if the layout ate him.

IMG_6913

While Matt was doing that, I finished the last 2 sections of the south wall backdrop.
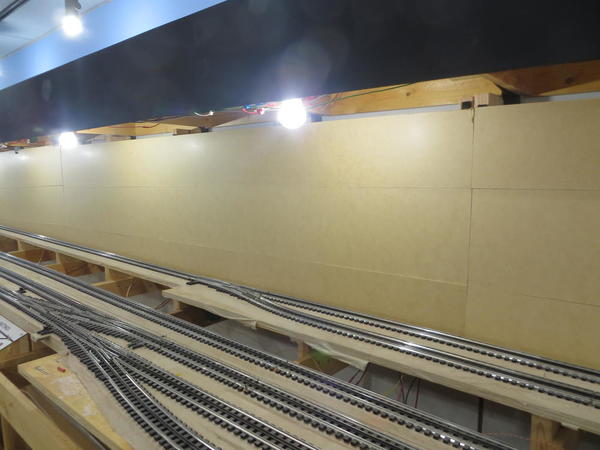
IMG_6915IMG_6916

Another 20' and the entire backdrop will be done. It may take a while to get to that though, as there are some things in the way that will need to be relocated first.
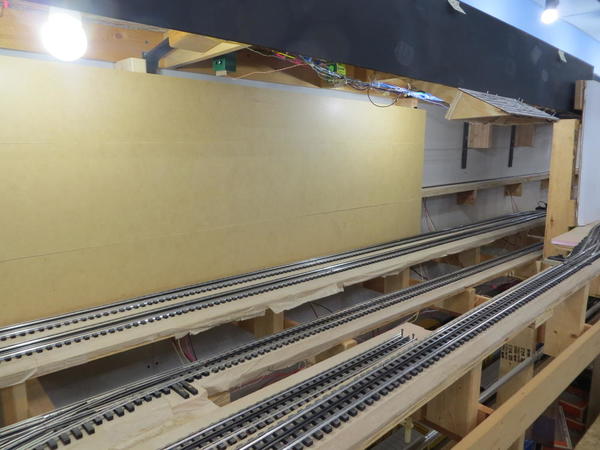
IMG_6917

Going to head down in a little while to work on the fascia.

Elliot and Matt, Great looking work. Its a good thing Matt is a little skinny! LOL you have some truly good friend to help you!

p51 posted:

No photos, but on Saturday, I went to Portland to hit the hobby shops and the engine house where SP4449 is housed (just because I love looking at all the neat stuff there). About halfway down, I ran over something on I-5 and got a flat and the puncture was too bad to be fixed. If I was lucky with this at all, it was that it happened right at the exit for what I think was the only tire place in the area. I wasn’t there for very long before I was on my way, but kicking myself for having it happen anyway even though I was just going down the highway and doing nothing wrong. I'd lost over $250 before I got to the first hobby shop!

When I finally got to Portland and the hobby shops, I found several good pre-made trees. All that is coming to the layout very soon. That’ll be the last major element for the layout itself, once the trees and bushes are in place. From then on, it’ll all be tweaking and changing the little things, and adding extra details here and there.

I also bought some minor detail stuff. For example, some pre-painted HO scale feed sacks were just about perfect in size/color for O scale sandbags, so I got them.

I also still need to pace all the rural mailboxes along the roads, too, now that they have numbers and names on them.

Hey Lee, even with the flat tire, it still sounds like a fun day!

mike g. posted:

Hey Lee, even with the flat tire, it still sounds like a fun day!

Yep, any day you get to look into the cab of SP 4449 and stand next to a ALCO PA unit (well, the restored shell of one, anyway), as well as hitting multiple hobby shops (and finding something good at each of them) , it's a good day.

My tire situation weighed heavily on my mind until I first hit the massive Powells books main store downtown, and scored the parking space closest to the intersection right in front of the main entrance. I've never been that lucky before. I found some good books there, too.

And best of all, my wife didn't give me any grief about the flat tire, even though I felt bad about it the whole day (even though I didn't do anything but drive down the interstate).

Moonson posted:
WP posted:

imageimageimageI've been adding more scenery details ...So I thought it might be fun to see how Soap Creek developed.

Hi WP/ John, You certainly  appear to be a master at making meaningful use of a narrow strip and a corner of real estate. That really looks good, and I esp. appreciate how you have used the premium trees up front, emphasizing depth and interest in the area. Congratulations on your continued success at the project.

FrankM.

Thank you Frank M. 


Mark Boyce posted:
WP posted:

I've been adding more scenery details (ground cover, trees, donkey engines, etc.) to our logging area, Soap Creek. It's getting closer to being complete. So I took some pictures today after adding some more trees and details. Then, later I was looking back at how the area looked and the progress. So I thought it might be fun to see how Soap Creek developed. 

The last three pictures are of Soap Creek  from today. Soon I'll work on filling in the river section on the other side of the layout. 

John,

Thank you for the photos showing added detail in time.  I really like what you are doing.

Thank you Mark. 

As the signature implies I'm beginning to feel like Thomas Edison, after a couple of weeks of delving into 3D software for the first time I feel like I may be able to see the surface of the pool (not quite there yet, but getting closer).  With numerous attempts the attached is where I'm at currently.  After suggestions from some of the great forum members (Mike G. comes to mind for one) regarding some modeling supplies/techniques  I decided to take a different approach and try getting something 3D printed.  I'm not sure how it will turn out, but hopes are high.  The attached is not yet complete but thought I'd get any opinions/comments before proceeding.  The 3D is aimed at the Posts & Railing I think I've got the grated road bed covered (at least for now ... lol).  I appreciate any input, thanks, bd

Carbon fiber ... maybe that's the ticket!

Attachments

Images (2)
  • Road Bed Mod 1_0
  • KI Bridge 07_14_2007

As usual great work. Elliot What a better way to Keep track  of your engines and what maintenance performed.  Got the station back on the layout. Still need to do a few things more, but will do at a latter time when house isn't going crazy.  Station is now set up as plug and play which also makes easier to pull off the layout. At the same time I was able to add the trees to that section.  Now its at a point where I feel comfortable posting pics and video in Alan's thread. Editing should be finished by tomorrow. 

Before very old pics 2013 when station was first built. Don't laugh to hard.

1-DSCF10991-DSCF11031-DSCF11051-DSCF1109

After reconfiguration

1-DSCF52931-DSCF52941-DSCF52951-DSCF52961-DSCF5297


Attachments

Images (9)
  • 1-DSCF5293
  • 1-DSCF5294
  • 1-DSCF5295
  • 1-DSCF5296
  • 1-DSCF5297
  • 1-DSCF1099
  • 1-DSCF1103
  • 1-DSCF1105
  • 1-DSCF1109

I managed to get the floor area cleaned up in time for my turn to host the club. I wonder how long I will keep it clean. Anyways the get together went well. But the layout reared it ugly head for the first time.....curse it... gremlins. Couldn't get my legacy switchers to go they just sat there. Then I had to switch out an engine because I could not get it to go in reverse because a coupler opened up on the freight train so I had to switch that one out. Other then those happenings everyone enjoyed themselves. So tomorrow I start working on the layout again.........Paul

paul 2 posted:

I managed to get the floor area cleaned up in time for my turn to host the club. I wonder how long I will keep it clean. Anyways the get together went well. But the layout reared it ugly head for the first time.....curse it... gremlins. Couldn't get my legacy switchers to go they just sat there. Then I had to switch out an engine because I could not get it to go in reverse because a coupler opened up on the freight train so I had to switch that one out. Other then those happenings everyone enjoyed themselves. So tomorrow I start working on the layout again.........Paul

Paul,

Glad you got it cleaned up to host the group!!  Yes, those things will happen at the most in opportune time.  Glad everyone had a good time!

suzukovich posted:

As usual great work. Elliot What a better way to Keep track  of your engines and what maintenance performed.  Got the station back on the layout. Still need to do a few things more, but will do at a latter time when house isn't going crazy.  Station is now set up as plug and play which also makes easier to pull off the layout. At the same time I was able to add the trees to that section.  Now its at a point where I feel comfortable posting pics and video in Alan's thread. Editing should be finished by tomorrow. 

Before very old pics 2013 when station was first built. Don't laugh to hard.

1-DSCF10991-DSCF11031-DSCF11051-DSCF1109

After reconfiguration

1-DSCF52931-DSCF52941-DSCF52951-DSCF52961-DSCF5297


Your station and surrounding scenery look GREAT! I am a real sucker for a winter scene, Yours is outstanding!

I also like the use of the mirrors to double the size of the station and the layout. We put mirrors around our city scene with a union station scene against the mirror. The Union station is double track between the station and the mirror. So, to help the mirror image make sense to the viewer, we built a 1/2 wide platform against the mirror to make it look as if it is a whole platform serving both the the double tracks reflected in the mirror and the double tracks on our layout.

As I said, I really love your winter scene and have been following it as you post your GREAT photos.

Mark Boyce posted:

Suzukovich,

Randy is absolutely right!  Great winter scenes!!  This is the first I have seen the red double bus on the streets!  Looks great!

Randy, Frank, and Mark thanks for the comments and likes.

Mark the red articulated bus is a MAN Lion City 1:50 made by Siku    https://www.siku.de/en/sortime...html?___store=sor_en    I also have the Non articulated version in blue. Funny thing happened while I was making the video. My S gauge Berk threw a traction tire and I needed to replace it. Since it didn't come with spares like the MTH engines. On a whim I used Black liquid Tape that I had been using to insulate wiring.  It actually worked as a replacement fore the traction tires. I wonder if anybody else has tried this?

liquid tape


Attachments

Images (1)
  • liquid tape

After hosting last night and having a few gremlins pop up today started with a package from Beth at Public Delivery Track. "Oh Happy days"  Another Weaver flat with trailer and I think I got the last one in that road name. If so I am glad I did not wait to order it. Also I got a separate Yale Weaver trailer. My thinking on that is maybe at some train show I will find a flat car minus the trailer. So I added the new car to the others. Pics of my buys.........Paul

DSCN2523DSCN2527 

Attachments

Images (2)
  • DSCN2523
  • DSCN2527

Add Reply

Post

OGR Publishing, Inc., 1310 Eastside Centre Ct, Suite 6, Mountain Home, AR 72653
800-980-OGRR (6477)
www.ogaugerr.com

×
×
×
×
Link copied to your clipboard.
×
×