HMorgan125 posted:

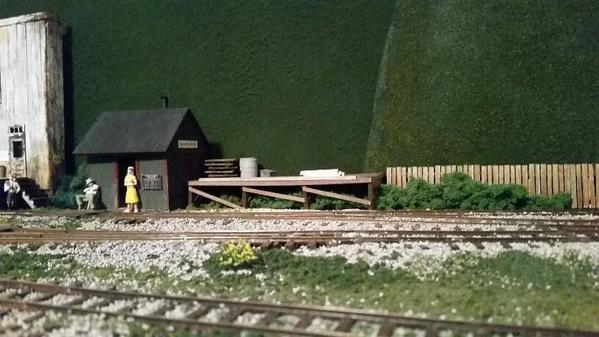
Over the last few days I received, weathered (somewhat) and installed a new MTH Dry Goods Transfer Warehouse (from OGR sponsor Mario's Trains) and added a gravel lot to my small industrial area.

I am waiting to wire these buildings until all of my planned remaining structures have been purchased and set in place.  This will take awhile based on my current monthly hobby budget.

HMorgan125, what product did you use for the gravel on your lot?

Gene Dickerson posted:
HMorgan125 posted:

Over the last few days I received, weathered (somewhat) and installed a new MTH Dry Goods Transfer Warehouse (from OGR sponsor Mario's Trains) and added a gravel lot to my small industrial area.

I am waiting to wire these buildings until all of my planned remaining structures have been purchased and set in place.  This will take awhile based on my current monthly hobby budget.

HMorgan125, what product did you use for the gravel on your lot?

Gene,

Based on suggestions on OGR, I used "Chick Grit" from a local Tractor Supply store.  I took a small portion of the grit and put it in two separate quart size plastic bags and added burnt umber acrylic paint to one and gray acrylic paint to another.  Shook the two bags, allowed the paint to dry and then added these colored pieces to the remaining white grit.

In retrospect I wish that I had added a bit of light gray sand or dry concrete mix to the top of the grit as the pieces are still a bit large for what I had in mind.  I may still experiment with this in the future.


HMorgan125 posted:
Gene Dickerson posted:
HMorgan125 posted:

Over the last few days I received, weathered (somewhat) and installed a new MTH Dry Goods Transfer Warehouse (from OGR sponsor Mario's Trains) and added a gravel lot to my small industrial area.

I am waiting to wire these buildings until all of my planned remaining structures have been purchased and set in place.  This will take awhile based on my current monthly hobby budget.

HMorgan125, what product did you use for the gravel on your lot?

Gene,

Based on suggestions on OGR, I used "Chick Grit" from a local Tractor Supply store.  I took a small portion of the grit and put it in two separate quart size plastic bags and added burnt umber acrylic paint to one and gray acrylic paint to another.  Shook the two bags, allowed the paint to dry and then added these colored pieces to the remaining white grit.

In retrospect I wish that I had added a bit of light gray sand or dry concrete mix to the top of the grit as the pieces are still a bit large for what I had in mind.  I may still experiment with this in the future.


I did the same thing (chick grit) based on a suggestion here. I regret having glued it down without waiting for a few days to be sure I was happy with it. Eventually I'll either redo the space with HO ballast or cover it with joint compound paving. Chick grit seems more like bank rock size than gravel. Fortunately it's inexpensive so I don't have a problem covering it up.

joe

Last edited by dobermann

Today I got the area under the stairs to basement cleaned out. Stuff had been under there since we bought the house fourteen years ago. Now I can focus on taking down some of the walls in that area to open it up. I picked up an LED 4' shop light while shopping at Sam's Club replacing the old shop light that was only firing on one bulb. What a difference in light that made. Almost need sun glasses down there now. So the rest of the week it will be pulling down those walls.............Paul

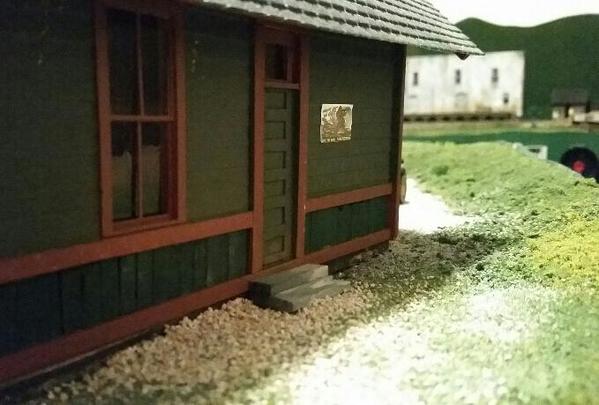
I just installed some back steps on one of my Depots, because as I looked at it I realized it was one heck of a drop from the threshold down to the gravel. That's what I'm doing with the layout now, I'm looking at things with an eye to determine whether they actually make any kind of real sense or not. If they don't, they get changed or corrected to what it would normally be like. So, there's no way a drop this high would still exist on the back door of the Depot like that.

I think it's little details like that, that makes a layout better...20160919_234014_resized-1

Attachments

Images (1)
  • 20160919_234014_resized-1

OK - Methinks you are over complicating the situation.  Go to your local sand and gravel supplier (NOT Home Depot or another one of the big box stores) where you will find they offer several varieties (in both color and size) of washed sand. Pick out one that replicates the area you are modeling. It can be applied using the traditional white glue and "wet" water method. If you have some yard or industrial areas that need a dirtier look just lightly spray those areas with some rattle can black (from WallyMart) held about a foot away from the sand. I paid $4 for an 80Lb. sack. After all what emulates real dirt better than real dirt?P1000163P1000152

Today with the floor area still clean from hosting my small club last week I got one of the bar stools I bought at Menards a little while back and put it together. It only took more then 12 years to get a chair up there. I must be getting older and need a place to rest my weary bones. I had some parts left over but I didn't panic. Looks like it was a universal parts package. Got one more to do for up there. A couple of pics..........Paul

DSCN2547DSCN2548

Attachments

Images (2)
  • DSCN2547
  • DSCN2548
paul 2 posted:

Today with the floor area still clean from hosting my small club last week I got one of the bar stools I bought at Menards a little while back and put it together.

DSCN2548

It's not the age, I think having a stool on a layout is good for several reasons:

  • It usually gets you more eye-level with the layout without stooping over
  • It keeps you from standing up all the time
  • They make for great temp tables for small projects around the layout

I'm in my 40s and I've noticed the difference between running trains from a standing v/s sitting position.

I bought two of these to use on the layout, as they look like tall Pullman passenger car steps to me:

paul 2 posted:

Bryan, good to finally see a post from you. I would of thought with October 4Th being a crucial day you would of been burning the midnight oil to complete more seeing you be will be put under the microscope and scrutiny of the Tuesday night group. So much pressure and so little time to be ready LOL...........Paul

If I would have been trying to get that upper level track laid then I would have been up many nights. Not going to kill myself getting that in when this will be the first viewing for the Tuesday night crew, so there will be plenty of new stuff for everyone to see.  Did want some more movement though besides the trains so that is why I'm trying to get the carnival attractions up and running.  

btw:  what time are you going to Dennis's on Saturday.


Over the last two weeks, we have laid a good amount of roadbed to the track, added an American Power and Light Building, a MTH 2 bay Engine Shed, but most importantly we have finished the second entrance to the yard with just the tracks to the engine shed to go.  We have also laid out the tracks to the power plant, with the hope of finishing that tomorrow/later this morning.   I have tried to save a little by using some Atlas uncouplers, but in the process of moving them, I have pulled two of the three I purchased apart.  Need to be more careful.  Up next is finishing the elevated track, while hoping all of the track and switches get magically wired............ 

My work space has not gotten any cleaner, but we are still making some progress and learning valuable lessons as we go!

IMG_1227IMG_1230IMG_1231IMG_1232

Attachments

Images (4)
  • IMG_1227
  • IMG_1230
  • IMG_1231
  • IMG_1232
mike g. posted:


It's looking good Lee, I like the bushes along the fence and your tree placement. What did you do to get the texture on the back drop?

Thanks, Mike. For the backdrops, I cut MDF board in the profile of far-off mountains, painted them green, then covered them in very fine ground foam.

The idea, of course, is to make them look like far-off Hills. I'm not 100% sure how they look in photos, but I think in real life they work okay.

mike g. posted:

That's why I asked, I just might have to copy that idea from you if that's ok!

Of course you're welcome to do that. I stole the idea from Chuck Ricketts' On30 layout

I would suggest that if you're doing layers to show more far-off hills behind the others, to use a lighter base coat of paint underneath. I did that but I put the ground foam on too thick and you can't easily make out any difference...

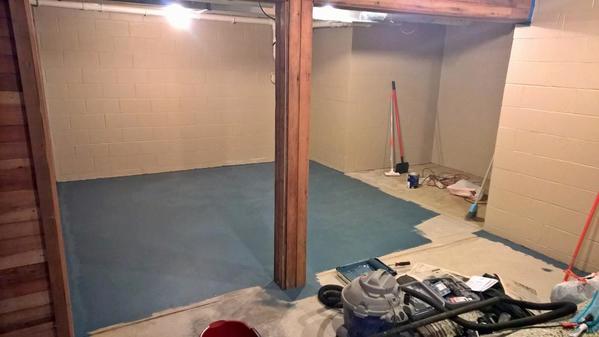
Got about 40% of the first coat of paint down this evening.  Still have some adhesive to strip off in the alcove, but I've got about as much of that off as I'll probably get.  It'll at least be enough to move some furniture to that part, making room for the old carpet rolls in the other part of the basement until the dumpster comes. Hoping a single coat does it - it's Sherwin-Williams garage & porch paint, but it's still going onto bare concrete, and it does seem to suck it up fast.... 

WP_20160924_23_04_26_Pro

Attachments

Images (1)
  • WP_20160924_23_04_26_Pro

I spent some time inspecting and running new Atlas O 53'Well cars.  All the track power blocks are installed under the table with a reach of less than four feet to the nearest MTH 1014 Terminal Block. I used 35 for track power, wired in a circle under the mainline and to the ZW-L transformer.  It was an expense that has proven valuable when trying the trace a wire. (I am not having to chase 28-feet to the transformer trying to separate out one wire among hundreds.) The reduce power run-lengths saved wire costs that helped pay for the MTH 1014 Terminal Blocks. (The small 4' by 4' block areas allow me to see all wires for that one small area.)

I am running another power loop to the Atlas O Signals, off a different transformer handle.  Buildings will use the Woodland Scenics LED wiring system. Distinct wiring systems make it easier to know what wires I am working on.

I stated the layout quickly in mid-October, 2015. Two months were spent building the custom table. Two more months were spent laying and re-laying track to get the rough appearance of my original track sketch. (Modifications had to be made.)  Then I started running trains, rather than finishing the layout. How time slipped away...  A little work one day, a lot of running trains the next.

Attachments

Images (2)
  • DSCN1462: CSX ES44ACs & BNSF SD70MAC pull a string of seven 53' well cars on "Valley of Bridges"
  • DSCN1464: Crossing the Double Pratt Bridge. A great viewing point.

Fall 2016 at the OMRA Train Show, Springfield MO, and the Razorback Traction/Gi-raffe Express was there!  ;-)

GEDC2570

Gi-raffe snacks! 

GEDC2571

I cornered the world market in $5 freight cars:

GEDC2573

That's a KMT Minneapolis and St. Louis boxcar sans trucks for $2.  Got it riding on a set of MPC archbar trucks for the time being...

There was precisely ONE gi-raffe car in the whole place, and I FOUND IT!!!  ;-) 

GEDC2574

Well, the shell, anyhow. 

As always, the kiddies were enthralled!

GEDC2569GEDC2578GEDC2582GEDC2583

The Crimson Comet took over Amtrak duties after the Alco FAs proved allergic to the antique tubular track:

GEDC2580

The award for "Best Use Of A Mercedes Convertible":

GEDC2592

More pics below the cut! 

Mitch

Attachments

Images (24)
  • GEDC2569
  • GEDC2570
  • GEDC2571
  • GEDC2572
  • GEDC2573
  • GEDC2574
  • GEDC2575
  • GEDC2576
  • GEDC2577
  • GEDC2578
  • GEDC2579
  • GEDC2580
  • GEDC2581
  • GEDC2582
  • GEDC2583
  • GEDC2584
  • GEDC2585
  • GEDC2586
  • GEDC2587
  • GEDC2588
  • GEDC2589
  • GEDC2590
  • GEDC2591
  • GEDC2592

Add Reply

Post

OGR Publishing, Inc., 1310 Eastside Centre Ct, Suite 6, Mountain Home, AR 72653
800-980-OGRR (6477)
www.ogaugerr.com

×
×
×
×
Link copied to your clipboard.
×
×