Today so far I just enjoyed running some trains. While doing that I thought I would try some different angles on the layout for pics. Here are a few..............Paul


|
|
Today so far I just enjoyed running some trains. While doing that I thought I would try some different angles on the layout for pics. Here are a few..............Paul
Hi Jim, that sounds like a very good tip. I'm going to try it on some cold winters day on a couple of pieces that need a little cleaning but I was afraid to mess with.
Paul,
The train running photos look great!!
Thanks Mark. Afternoon project was I had some Masonite strips that I painted black. They are going to go under the upper level running the length of the freight yard. I still have to get either building flats in plastic or card stock to glue on them. ...........Paul
In this installment; I published a new You Tube Video today.
I purchased a refurbished Canon DSLR, T6i from Canon USA and this is my first video using this camera. Most of the video was shot at 28mm to get a wide angle and more information into the images. 30 frames per second, with auto sound and white balance.
In this video I will also show you The Detroit Model Railroad Club’s Calendar for 2017. I am Mr. December for 2017.
Hope this video helps with, Show and Tell for today. Remember if you are ever in Southeastern Michigan, hit me up with an e-mail to see my train room.
Gary
Last night I painted my Masonite strips. They are going to go in the freight yard. One strip against the back wall and the other on the three dowels supporting the upper layout. Thought this would at least hide the trains for a bit in that area. Still not quite sure which way to go for buildings yet. Whether to go with just plastic building flats or card stock flats or a mixture of the two. Pics...............Paul


Let's see, super chuffer install in a Kline berk and new wicking in the smoke unit. Plus a chuff generator install in a 3rdrail Hudson.

In this installment; we will take a look at a full scale Ameri-Towne Structure in downtown Holly, Michigan. Two doors south of the Detroit Model Railroad Club.
Today was the first open house at the DMRRC for the 2016 - 17 season. It is fun to leave my man cave and work on a large layout. Today being an open house I was an engineer operating a Chicago and Northwestern steam locomotive, Hudson.

1. These buildings look like the Ameri-Towne flat structures on my layout.

2. The street sign, leading the way to the DMRRC, maybe I will try to make a sign on my layout, like this one.

3. The front of the DMRRC today, well this may have to be added to my bucket list of flat structures.
Hope these photos help with, Show and Tell for today. Remember if you are ever in Southeastern Michigan, hit me up with an e-mail to see my train room or the DMRRC.
Gary


Wow, That's a lot of signals Should need any terminal Blocks. Please take a look at Bang good.com Also,take some Pictures down the Road to see how your progress.
Our using Relay's or Circuit Boards ?
Good luck, John
 600V 15A 8P Double Row Screw Terminal Block Wire Connector(14)Added : Jul 09, 2016
NYC,SUBWAY TRANSIT SIGNAL posted:Wow, That's a lot of signals Should need any terminal Blocks. Please take a look at Bang good.com Also,take some Pictures down the Road to see how your progress.
Our using Relay's or Circuit Boards ?
Good luck, John
- US$1.65
Price alert- Add Cart
thanks for the information i can use plenty of these i will post pics as i work to complete the system
This weekend, I took a 60+ year old layout that was in bad condition, and turned it into a "blank slate". My original plan was to refurbish this old layout, but it was too far gone: track rusted, wiring brittle, switches showing no sign of life,etc. I did save the ZW transformer, as it works fine.
A new 027 track plan is in the works, and tracklaying may start next weekend. I promised my grandson we would have at least one train running by Thanksgiving day.
Before and after photos:


As of today nothing yet. Yesterday I ran trains, replaced a B&O passenger train with my new F3 AA units leading, with an express freight with same locos leading..... looks great!! Modified the freight on the inner loop by adding a SW - 9 B unit to BL2 leading the train, and deleted a few cars from this train. Nothing like watching the train run!!! Lots of fun and enjoyment!!!
Cut the depth of some buildings down for more city street space.
Rod Miller

Replaced two Atlas switch machines with two tortoise switch machines under the yard and above the staging area. It was my first remote mount tortoise installation. The work space is about six inches tall and eighteen inches back from the edge. Not fun, but the result was worth it.
Andy


Got to post two new videos. 1 railfanning the Altoona area and the other is my O scale locomotive roster! Tomorrow I will be going back up to Altoona to do more railfanning!
Links below!
Grandsons; Noah and Adam painting Thanksgiving Placemats for the kids table in the train room. We are using water based paint, also can be used for painting scenery. We may try painting a boxcar or do some kind of art for the center of the kids table. Thanksgiving Boxcar.


Happy Thanksgiving - Gary


I can't think of a Thanksgiving scene better then the one you shared.
Mr. Brown dropped off my CTTA tank car today so I went up and put it on the track and ran trains. Bryan just had to mentioned too last nights get together was great, had a good time. But also I wanted to show you that I put things on the layout right away and not find new stuff buried under the table LOL. pic of the new car...............Paul

Steamfan77 posted:Replaced two Atlas switch machines with two tortoise switch machines under the yard and above the staging area. It was my first remote mount tortoise installation. The work space is about six inches tall and eighteen inches back from the edge. Not fun, but the result was worth it.
Andy
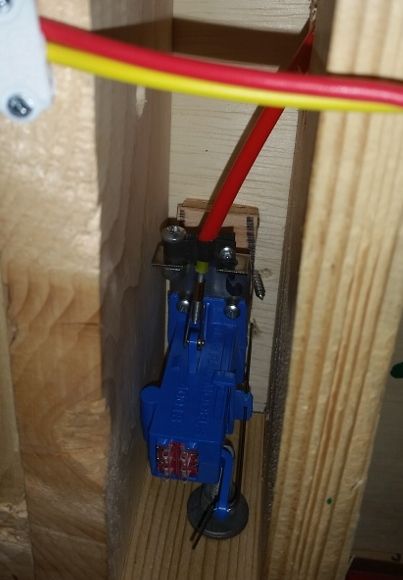
I can related to putting turnout controllers into very tight spaces. I lucked up (I think) in that one of my turnouts had points exactly between to 1X4 uprights in the benchwork. Putting a blue point under wasn't as bad as I thought it'd be, but more than 1/8 inch to either side and it wouldn't have worked:
It is another night of painting Preiser 65602 Unpainted Seated People for my SP, UP, and Pennsylvania passenger cars when they arrive in 2017. I have done 120 of 504 so far.

The Razorback Traction Co. GG1, "Big Red", progresses apace...

I'll probably be borrowing the power chassis from the G behind Big Red for the moment. ![]()
Mitch
Ran trains this morning as I got dressed and last night before going to bed. What a great way to begin and end a day!!!![]()
![]()

Last night, I took some of the Scenic Express "super tree" armatures from the big box I bought quite some time ago, and hit them with some spray paint, then some ground foam, and then some hairspray to seal the whole thing. I have about a dozen of them, drying from overnight.
Been meaning to try this for quite some time, has a long one of the walls in the backdrop is looking a little bare.
They tend to be pretty fragile, so they can't really be in the foreground. But I think they should look really good in the background.
I can't wait to place them into that background tonight.
P51, I also had super trees sitting around for awhile. You do have to watch out with them because they are fragile but I also use them at the front of the layout. What I like about them is you can get so many different variations out of them. I also use the smallest ones as bushes.................Paul

Another delivery today. This time from USPS and Beth at the Public Delivery Track. This time the trip was rough. Had a broken piece but was able to glue it back in place. So Bryan yet another that did not come from under the table. I am saving those for Christmas. But for two days in a row I enjoyed running trains. A couple of pics...............Paul
Darn it, two days in a row with an itchy trigger finger of posting before attaching. pics........Paul


paul 2 posted:P51, I also had super trees sitting around for awhile. You do have to watch out with them because they are fragile but I also use them at the front of the layout. What I like about them is you can get so many different variations out of them. I also use the smallest ones as bushes.................Paul
Looking good, Paul! I use pre-made commercial trees for the foreground, with plastic trunks, as they're far more durable. Super trees look great for background work, but if I had to do it over, I wouldn't have bought the big box of them I have. I will never need that many trees, and they pack them in so tight, a great deal of them are bent at an angle and you can't straighten them.
Couldn't resist and framed out the last of our benchwork here and placed a sheet of plywood to get the inside main up and running. Still waiting on some switches, so some of it will be temporary, but I want my son to be able to operate some trains and show everyone for Thanksgiving. Cut an access hole, laid the last switch for the yard/tracks to the engine shed,


 and was able to wire that up also. I have a delivery of wire on the way later today so I can start wiring all these switches up. Still haven't finalized where all the controls for them will go.


Just finished at a bunch of trees on the layout, and these aren't all the only ones that I planted. The paint cans in the one photograph are to keep two of the trees standing upright until the glue dries.
I used a mixture of super trees and premade ones from various vendors...


I also put a photographer figure at one of the main grade crossings.


Lee
The trees came out really nice and really brings out the perceived depth of the back ground trees. As for the photographer nice touch. I noticed that the civil war memorial is located in a grassy patch across from the warehouse. Perhaps location has a historical significance?
Thaddeus posted:Couldn't resist and framed out the last of our benchwork here and placed a sheet of plywood to get the inside main up and running. Still waiting on some switches, so some of it will be temporary, but I want my son to be able to operate some trains and show everyone for Thanksgiving. Cut an access hole, laid the last switch for the yard/tracks to the engine shed,
Looking good, it will be nice to run some trains for Thanksgiving! Plus it will keep the son interested!
Lee, Once again you have done a wonderful job showing detail on your layout. The trees sure dress up the area and give it some depth! I really like it.
mike g. posted:Thaddeus posted:Couldn't resist and framed out the last of our benchwork here and placed a sheet of plywood to get the inside main up and running. Still waiting on some switches, so some of it will be temporary, but I want my son to be able to operate some trains and show everyone for Thanksgiving. Cut an access hole, laid the last switch for the yard/tracks to the engine shed and was able to wire that up also. I have a delivery of wire on the way later today so I can start wiring all these switches up. Still haven't finalized where all the controls for them will go.
Looking good, it will be nice to run some trains for Thanksgiving! Plus it will keep the son interested!
I agree with Mike!!
You are making very nice progress!!
suzukovich posted:Lee
The trees came out really nice and really brings out the perceived depth of the back ground trees. As for the photographer nice touch. I noticed that the civil war memorial is located in a grassy patch across from the warehouse. Perhaps location has a historical significance?
Thanks, I like how the trees turned out.
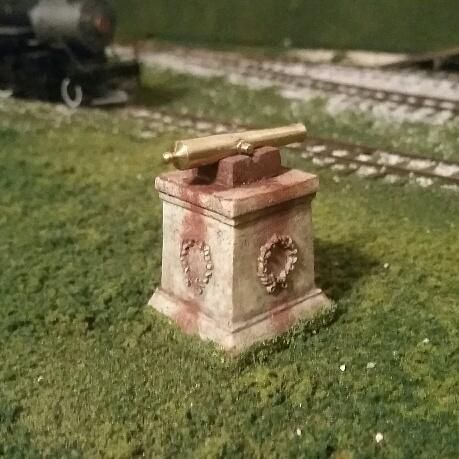

The barrel was child's play for Dad. He once built a perfect scale 14-pounder James rifle in 1/6 scale, with all hand made parts, on a whim. He has built several civil war guns, including a 3/4 scale 6-pounder that we used to actually shoot.
mike g. posted:Lee, Once again you have done a wonderful job showing detail on your layout. The trees sure dress up the area and give it some depth! I really like it.
Thanks, Mike!
Some nice work since my last post. About a year ago I had taken the plunge and purchased a 3rd Rail CB&Q ABA Ft from Scott Mann. Best decision I had made. Anyway about a month in the lead unit 113D started having a mind of its own. Wouldn't answer to TMCC commands , would not run in conventional, No reverse, No speed control, or my favorite would start up and only move at a crawl and not answer any more commands and just keep on moving until I cut power. After trouble shooting and checking connections. Same issue. so I just put the engine up and ran as AB set up. Fast forward to Wednesday. Getting ready to install Kadees on the B unit( A units had Kadees from the start) I discovered the diaphrams do not come off. pulled 113D and pulled the shell and started tracing wires again. Found three lose wires in the connectors and a loose antenna wire. First wire was from the run program switch pulled it out from the connector(What a pain in the ####) recrimped and reinstalled, Found one of the hot leads had also had come lose, Same process. found a purple wire Same process. Now I have conventional control but same issues in TMCC. Start looking at leads into the Cruse commander Find a brown and another purple wires lose, Same process. Other then the wire from the run/Pgm switch I have know idea what there functions were but the engine now runs fine. When I rezip tied the wiring I left some slack in them. Before they were real tight and was pulling the wires from the connectors. That I believe was ultimately the cause of my problems. Why did I wait so long? Lionel and MTH engines I don't even think twice about working on. The 3rd Rail I was afraid I would screw it up worse, but then again that's what Gunnruner and GGG are for, right?

Now running fine

suzukovich posted:Some nice work since my last post. About a year ago I had taken the plunge and purchased a 3rd Rail CB&Q ABA Ft from Scott Mann. Best decision I had made. Anyway about a month in the lead unit 113D started having a mind of its own. Wouldn't answer to TMCC commands , would not run in conventional, No reverse, No speed control, or my favorite would start up and only move at a crawl and not answer any more commands and just keep on moving until I cut power.
Wow, you have a lot of issues like this with motive power, it seems. Good thing you have the skills to take care of it!
Great video, as always. I love watching vids from your layout! ![]()
Lee ,
trust me on a whole I have very little issues, But have upgraded engines over the years (PS2/3). Other than worm gear misalignments on the Lionel 6 wheeled trucks and the odyssey lurch or in the Atlas case, factory error. I have found that most of the causes were due to wiring being zip tied to tight. (MTH PS3s signal issues).. In the FTs case I figured what did I have to lose. Either turn it into a dummy or send it out.
suzukovich posted:Lee ,
trust me on a whole I have very little issues, But have upgraded engines over the years (PS2/3). Other than worm gear misalignments on the Lionel 6 wheeled trucks and the odyssey lurch or in the Atlas case, factory error. I have found that most of the causes were due to wiring being zip tied to tight. (MTH PS3s signal issues).. In the FTs case I figured what did I have to lose. Either turn it into a dummy or send it out.
Other than inadvertently frying a board ( one R2LC down ), I've found that every non-Lionel TMCC issue could be traced back to continuity problems in the wiring. When intermittent, they were awfully hard to diagnose. Often the shortcut is to just re and re the entire wiring harness. Pinched wires due to no wire ties can be just as frustrating, but it's always good to leave some slack in the ties and wire length. Only one Lionel engine ever gave me TMCC woes. It ended up being a loose rivet holding the common connection to the brush plate....almost a wiring issue.
Bruce
Access to this requires an OGR Forum Supporting Membership


