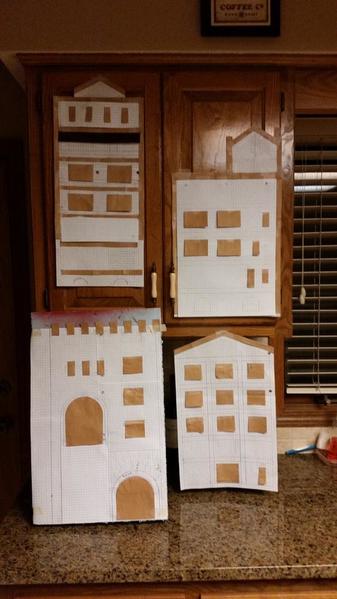
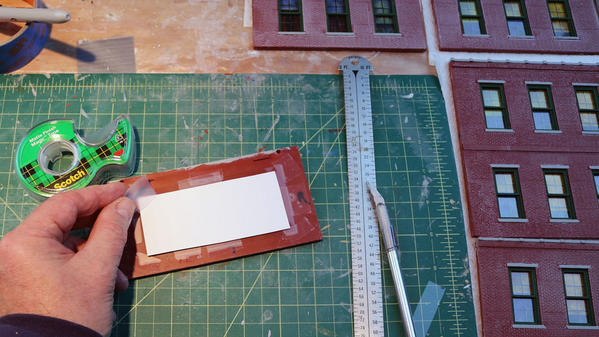
The continuing saga, Flat Structures.

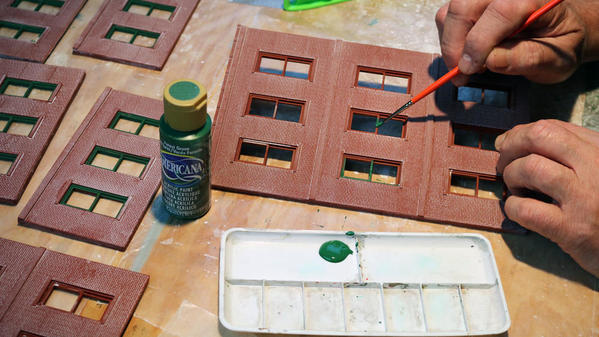
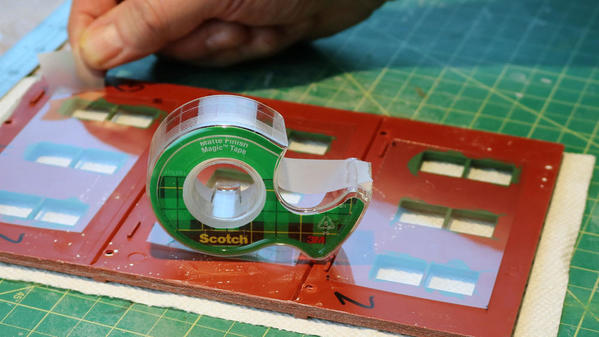
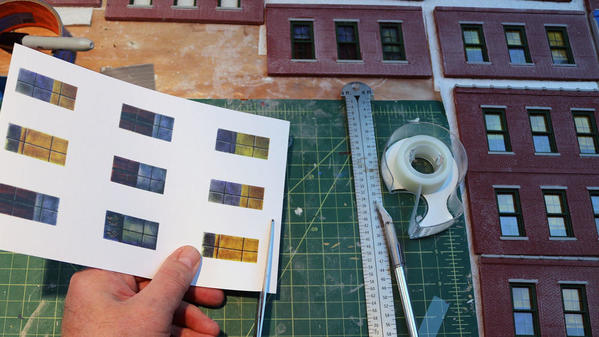
Painting the windows with Forest Green, Acrylic Paint, sold at big box art stores. Installing the windows with 3M Scotch, Matte Finish Magic Tape. This brand of tape will hold for almost ever and will not yellow and break away.  Using glue can become an issue, not needed.

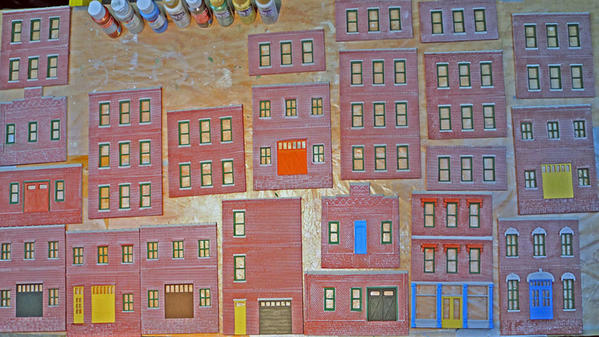
13 Paint windows green14 All the flats painted15 Installing windows flat structures

Gary

Attachments

Images (3)
  • 13 Paint windows green
  • 14 All the flats painted
  • 15 Installing windows flat structures

I use wire nails  about 1" long and they go through the indoor carpet in to the Homosote and hold pretty good. Used it on my O gauge too. I like them because they are easy to pull up. I think it  did increase the noise level somewhat  but I plan to put strips of  cloth weather stripping between the rails and that will help. I am amazed how smooth and quiet the Standard gauge runs so a little noise isn't bad. Actually quieter than my O gauge. I have an Ives engine that just hums around the track. These trains are heavy and without being fastened down the track flexes a lot. my  Standard gauge loop in the bedroom has this screws holding it down. I salvaged two Ives couplers, which work great, from a clunker car I got last Sunday and one will go to the adapter coupler I plan to make tomorrow. The leaves can wait-they won't go anywhere.

pennsynut posted:

Most of the leaves are still on the trees here in KC, so between other chores and some college football I repainted an old trackside produce loading dock. I  have 5 more bldg flats to design and build this winter and need to practice back drop painting as well. Here's a pic of  the produce dock.

Well the leaves are mostly on the ground here in Western Pennsylvania.  I spent 6 hours on leaves today and do feel my 60 years.  You did a great job on that dock Pennsynut!!

Oh yes, there are still some leaves coming down.  Also, I haven't even started on my mother-in-law's leaves.  I guess no layout work for a while.

jim pastorius posted:

I use wire nails  about 1" long and they go through the indoor carpet in to the Homosote and hold pretty good. Used it on my O gauge too. I like them because they are easy to pull up. I think it  did increase the noise level somewhat  but I plan to put strips of  cloth weather stripping between the rails and that will help. I am amazed how smooth and quiet the Standard gauge runs so a little noise isn't bad. Actually quieter than my O gauge. I have an Ives engine that just hums around the track. These trains are heavy and without being fastened down the track flexes a lot. my  Standard gauge loop in the bedroom has this screws holding it down. I salvaged two Ives couplers, which work great, from a clunker car I got last Sunday and one will go to the adapter coupler I plan to make tomorrow. The leaves can wait-they won't go anywhere.

Jim,

That's great the standard gauge is working out so well.  I like Homasote.  Good deal on the leaves!!  

I certainly getting my money's worth out of my big box of Standard gauge cars l bought last weekend. Started to salvage the trucks off an Ives Observation car that was beyond reasonable repair  when a loose coupler assembly fell out of the one truck where it had lodged.  So this AM  I mounted it on one end of a Lionel flat car to make it a transition car. That gave me a nice Lionel latch coupler and I bolted a homemade hook to the free end so now I have a hook to latch adapter.  My big 380 Lionel engine has hook couplers and I might put a latch coupler on one end. Now I can run just about any car with any engine. Almost but not quite. There is a height difference between Lionel 200 series trucks and the 500  because the200 has larger wheels but I don't have a lot of the 200s.  Have several of the 100 series  freight cars, want to look for a few more.

I believe this is my 11th video. Just finished it up today!

Here is a classic postwar locomotive from Lionel, a 1666, circa 1946. This engine is an excellent runner, even though it was produced prior to Magne-Traction, which means it has a limited load capacity. The consist it pulls is made up of a prewar 816 hopper that the previous owner changed to have postwar trucks and couplers, a postwar 3559 dump car, and my usual MTH Pennsylvania caboose. It is very likely that this was received by a young boy on Christmas morning in 1946, 70 years ago.

I added some "ambiance" to the area. 

I put up some framed posters. 

image

The crazy angle is to cut out the glare.... The three on the right are from some half-marathons I ran in Midway,KY.  The run is called the Iron Horse, and they are all train themed. The first years finishers medal was a spike with a date plate on it, after that they went to medals, in the design as depicted on the posters. I haven't been able to get back to run it since we moved, even though we still have a house there. Hopefully next year!!

I made the on e on the left. I often listen to the scanner while working in on the layout, so I got google earth pro (it's free) and found a good scaled in view of Harrisburg. Then with the help of Wikimapia, I typed in "CP-xxxxxx" and it gave me coordinates, which I then transferred back to the google earth image. Once I had all the ones in and around Harrisburg marked, I saved it as a high res image, and sent it off to Costco to have it done up in poster size, 20x30.

image

I've also done some image searches for the prototypes of the engines I have, and have had luck with a couple. I still need to pick up some frames for those.

Attachments

Images (2)
  • image
  • image

I began assembly of my Korber textiles building and finished the track work into and around it. Probably the easiest kit I've built in awhile once all the pieces  are prepped. Next I will paint all the brick inserts and windows and finish the job. I should probably choose a color for the wall before I permanently attach the building. IMG_1674

Attachments

Images (1)
  • IMG_1674
M. Mitchell Marmel posted:
Apples55 posted:

Mitch;

All you're missing on that Peter Witt PTC is a gi-raffe trolley pole   

He should know better than that, right, folks? 

GEDC2659

Mitch

A zebra stipe unit, who would have guessed?

You don't have two more do you? The top of that GG looks pretty barren

Those horns ought to hold the line pretty well. A new design! Now all you need is guts and something to stretch a line for catenary....

Stretch...guts...cat..Oh my god, run Norma! Run!

Mo985 posted:

I added some "ambiance" to the area. 

I put up some framed posters. 

image

The crazy angle is to cut out the glare.... The three on the right are from some half-marathons I ran in Midway,KY.  The run is called the Iron Horse, and they are all train themed. The first years finishers medal was a spike with a date plate on it, after that they went to medals, in the design as depicted on the posters. I haven't been able to get back to run it since we moved, even though we still have a house there. Hopefully next year!!

I made the on e on the left. I often listen to the scanner while working in on the layout, so I got google earth pro (it's free) and found a good scaled in view of Harrisburg. Then with the help of Wikimapia, I typed in "CP-xxxxxx" and it gave me coordinates, which I then transferred back to the google earth image. Once I had all the ones in and around Harrisburg marked, I saved it as a high res image, and sent it off to Costco to have it done up in poster size, 20x30.

image

I've also done some image searches for the prototypes of the engines I have, and have had luck with a couple. I still need to pick up some frames for those.

Hey Chris, I really like the idea of the map. The things people thing of here some times blow my mind with all the great ideas!

Lee the photos came out pretty good.  

  For me  Been working issues with my newly arrived Atlas CBQ SD40.  Removed the shell and trucks, surprise.   No grease and the fly wheel was lose and not spinning with the motor. ( It came right off). Greased and reset the fly wheel . Good thing no more chirping( fly wheel lose was the one with the tach tape) or sticky gears.. Bad, cant find my Cab1 to fine tune the EOB.

Here it is on its first run mu to my legacy GP35.


Attachments

Videos (1)
1-Exported Videos9

After several months of procrastination, I installed my Legacy system onto my DCS system without any problems. I then proceeded to install my new Western Maryland Lionmaster Challenger. This also went well. The big problem is that the Challenger does not run on O31 radius track (as advertised). It runs flawlessly on my 072 radius track. My solution is to take out the 031 (FasTrack) and replace with 072 MTH Scaletrax. I tried the FasTrack on my latest layout and I was not happy with the noise, or even the look of the track.

As a note I built this current layout with  track that I had on hand at the time. It ended up being FasTrack on the curves and Gargraves on the straight away.  When the trains rolled around onto the straightaways, the noise reduced significantly.

I think that the Lionel FasTrack is a great plug and play system, but just not for me.

I recently moved back to Maryland from Florida and brought all my Florida layout with me. This layout featured  MTH ScaleTrax. I loved the realistic look of this track and track noise was not an issue.


mike g. posted:

Great Pictures Lee, you must be a photographer also!

suzukovich posted:

Lee the photos came out pretty good.     

Thanks again, gents!

Mike, I have some reasonable skills with a camera, but I know plenty of people with greater skills. I used to be halfway decent at model shots with a manual 35MM but haven't really messed around with doing so with a digital camera until not long ago (about the time I started doing op sessions on other decent layouts and got mine to a state where I wanted to photograph it). I really had to re-learn a lot of stuff to get okay shots with decent depth of field. As for these pacing shots, I took them as a joke after seeing a guy with real skills doing the same on my layout, earlier the same day.

I was going to get a pal of mine to shoot the photos of my layout for the magazine article I'll be getting together soon (as soon as I can get more detail stuff out on the layout and a bunch more trees in place). But after the first set of long exposures, I think I can get something useable myself. I'm tempted to ask him to get some stuff of his own to see what his vision is, as the owner of a layout often doesn't see things the way others do.

Making slow but steady progress on my basement layout that was relocated from one end of the basement to the other.   Tracks are down, ready for wiring.   3 tunnels through the walls to connect adjoining rooms,  multiple levels, working on bridges and supports the next couple of days and then track wiring after that.

Hope to run some trains again before end of this week or early next week at latest.

After that, building lighting project will take place, then Christmas village installation, and finally the scenery will be completed when I get to it. 

Big thanks to my neighbor Doug for joining the construction crew and coming up with great ideas.

Kind of an update from earlier post.

Spent the morning trouble shooting and repairing.  Gunrunner  steered me towards the TAS/EOB installation manual was a great help. 

Pulled the shell yesterday and found the following.

No grease in the trucks, Rear motor The fly wheel had been pushed down to the extent that it was binding on the motor and touching the wires leading into the motor from the board . 

  Next was the fact that the flywheel literally pulled right off. I found this out while reinstalling the motor when realigning the worm gear. I started turning the fly wheel. As soon as I hit resistance the fly wheel turned but not the shaft. The fly Wheel also has a built in tach Tape.  This was a brand spanking new engine. 

The fix: Obviously greased the worm gear.

Put some epoxy in the hole of the flywheel and reattached insuring plenty of clearance from the motor and aligning it centered to the tach reader. then let it cure overnight.

Remounted the motor into the truck. When I tightened the screw that holds down the motor mount. All the way motors and wheels would not turn. Back off a half a turn wheels move. Issue worm gear not aligning with the gear in the truck.

The fix: I decided to look at the washer thing that the worm gear end sits in. I pulled it out and on a whim I reinstalled with the flat side up. Remounted the motor and tightened the screw and no issue. everything move freely. Now here is the weird part. The front truck washer thing was left in its original position with flat side down.  There were no issues with the truck assembly.

Reassembled the engine and tested.

Set it at 128 step no jerking or binding at 1-5 SMPH forward and reverse.

Set it at 32  step some jerking(odessy Jerk) but not really noticeable.at 1-3

Ran the engine for half an hour in 32 no issues but still had the very slow start speeding up gradually to set speed of 9,  

Same for 128 no issues with slow start.

Engine seams happiest running at 128 Step. Ran for an hour pulling about 20lbs of rolling stock. No issues.

Next is to fine tune the EOB as soon as I can figure out where I put my CAB1. Hopefully by Thursday when Mario's kadee mounts arrive and are installed, I will have found my remote. Also at that time I will re mu with legacy GP35 to confirm both will operate smoother in 128 step. Otherwise there weren't any issues with the mu together and ran fine.  


Running Happy now with dummy MTH SD24.


Running happy mued  with Legacy GP35 day of arrival before repairs.


Attachments

Videos (3)
1-Exported Videos10
1-DSCF5812
1-DSCF5792

Changed train consists yesterday.  Put the MTH Premier BL2 ( WM )  in charge of a train of 5 gons of scrap, 2 depressed center flats with transformer load, and two loaded 50 ton hopper cars and a caboose.  B&O  Docksider in charge of 3 ore cars on the Mountain Div.  Two Williams F3 A ( B&O ) units in charge of a mail and express train.  

Great to watch em all run!!!  Both yesterday and today

suzukovich posted:

Running Happy now with dummy MTH SD24.

Wow, sounds like a lot of work, but it seems good, now!

Sure is a nice sense of satisfaction, fixing something like that, isn't it?

Yeah, would have been better has a new engine not had the issues, but still, there's always a caveman-like sense of, "Ugh, I fix things, I am man!" when you're able to square away something like that...

Great job!

Today was more a day of getting things for the layouts. This morning my four pack of Atlas Niacet tank cars came from MrMuffin. After lunch I headed for Menards to pick up my station that came to the store last night. The station has a big foot print. One nice sized building. While there I went to the train aisle and picked up a couple of die cast flat bed trucks for repainting. So it was a great day. Except for Bryan. He asked me to get him some die cast Pepsi and  Mountain dew trucks but I could get half of what he wanted. They were out of the Mountain Dew trucks Sorry Bryan Pics......Paul

DSCN2649DSCN2645DSCN2653

Attachments

Images (3)
  • DSCN2649
  • DSCN2645
  • DSCN2653
p51 posted:
suzukovich posted:

Running Happy now with dummy MTH SD24.

Wow, sounds like a lot of work, but it seems good, now!

Sure is a nice sense of satisfaction, fixing something like that, isn't it?

Yeah, would have been better has a new engine not had the issues, but still, there's always a caveman-like sense of, "Ugh, I fix things, I am man!" when you're able to square away something like that...

Great job!

Lee

The funny part The issues with the Flywheel, gear alignment and lack of grease was a surprise. The issue of the lurch and slow start up speed in 32 was an TAS/EOB issue and still is. The other well surprise, surprise. When I discovered that the flywheel was pushed all the way to the top of the motor, I'm thinking great need a new motor since I don't have a puller. When the flywheel came off. Figured ok try to push it back on. It went all the way down and spun like a top on the shaft, I thinking great now what!  You know how us army guys are. So I did the down range thing and improvised. Took some epoxy(18000lbs per square inch) I had been using for kadee mount install and figured what the heck.  filled in the hole on the fly wheel and the remounted it. Surprise, it worked. When the worm gear still would not seat right against the gears, the flipping of the washer thingy was an after thought. Surprise that worked too. The real issue was who ever pressed on the flywheel and worm gear blanked it up and how the engine got past QAQC who knows.  Nice thing is the engine is New old stock and had been sitting on this guys store shelf in Canada for years. (had that new engine smell.) Ok fixed it. Feels good, but had better things to do. Good thing I was able to confirm Mario's SD40 mount will work with some modes in the pilot. Now if I can just remember where I put the CAB1 then I am good.

p51 posted:

I took some poly puff pieces out, sprayed them with adhesive, dipped them in a bowl filled with ground foam, then covered the whole lot with several coats of cheap Hairspray.2016-11-06 20.29.27-1

Not bad for less than a half hour's work, huh? 

Lee

I was thinking about this. I hope you didn't find them missing and your wife had made Brussel sprouts to go with dinner.

Doug

suzukovich posted:
p51 posted:

2016-11-06 20.29.27-1

I was thinking about this. I hope you didn't find them missing and your wife had made Brussel sprouts to go with dinner.

No issue as I will NEVER eat another Brussel Sprout, having dealt with the British Army in the past and having had to eat a lifetime's worth.

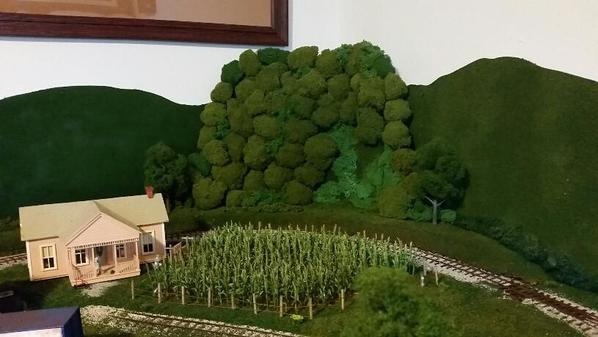
Got another corner done, with tree cover, last night.2016-11-08 07.29.57

I made another set of poly puff balls with ground foam, in a slightly different color, for the opposite peak (to the left, just out of this photo). That should go in tonight.

These corners are concavely-curved to hide the right angles in the wall/backdrops and edges of the layout. All the outside right-angles along the wall have them.

Attachments

Images (1)
  • 2016-11-08 07.29.57
Last edited by p51

Kyrian and I spent a painful hour getting one more riser in place at the far back end of the layout; an area which should have been done first.  Now have to figure out some sort of platform to build over the existing tracks to access that far back area.  Reaching up through the existing benchwork is a huge PIA for an old guy.  The power driver just fits between the cracks.   

Also "discovered" we have collected way more trains/engines/cars than will ever see the light of day on the layout, or the display shelves.

Considering selling many of the earlier Lionel and MTH "conventional control" locomotives, rather than upgrading them.  Many are NIB .. never run.  Ebay or TrainZ or ... what's the best site for selling do you-all think?

Think I'll just take a ride on the Harley and "thunk about for a while."

Last edited by Kerrigan

Add Reply

Post

OGR Publishing, Inc., 1310 Eastside Centre Ct, Suite 6, Mountain Home, AR 72653
800-980-OGRR (6477)
www.ogaugerr.com

×
×
×
×
Link copied to your clipboard.
×
×