Brian - Not easy, is it? You could always use the Great Alaskan RR of Ohio or GARROO!
If it was KANSAS GREAT ALASKAN RR OF OHIO, it could be KANGAROO!
I’m a bit partial to your Alaska RR collection.
thanks Bob ! I really like the slogan...
no worries Matt, the Alaska room will stay all Alaska trains...
the NS & EW rr will be out in the new train room... will get back to working on that soon...
Finally added some people to the station platforms in my expansion section.
Attachments
your station area is looking great Kevin ! like all the station platforms lined up, looks good...
briansilvermustang posted:
your station area is looking great Kevin ! like all the station platforms lined up, looks good...
Thanks, Brian. I had a pretty bad short circuit that ate up most of my weekend, melted wires and all. First time I actually tripped the circuit on my postwar ZW. I guess that's part of the fun!
Hi Folks,
It's been a while, but I finally got started in earnest on the upper loops of my 10x12 layout. Here is a youtube video of the update and some train running in the train room last night: https://youtu.be/-3zJhyuCUGI
Hope you enjoy!
just watched your video Gerhardt , very nice !!
great layout, and really like all your Canadian trains ![]()
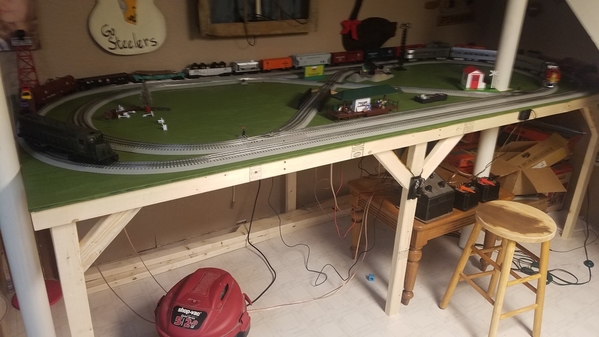
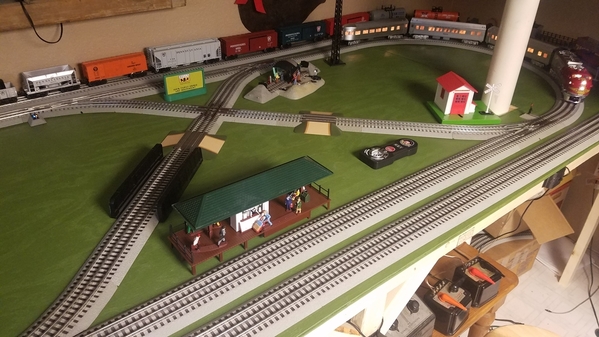
I inherited my grandfather's 226e with correct 12 wheel tender around Christmas of 2018. Had it serviced and got bit by the bug. Several locomotives later...it was time to get off of the floor.
This is my first layout. I have a 3.5 year and 9 month old so time is tight. Just bought a lionchief set (santa fe superchief) so my older son can run it with the remote and sounds, he loves it.
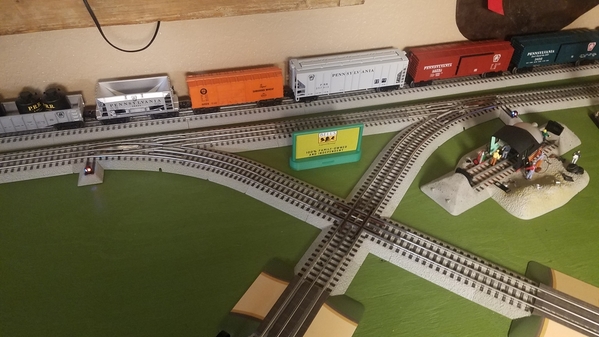
My main goal was to have a place to run 2 trains simultaneously and this was the space I had, 4' x 10'. I just wired my 2 remote switches in the back today. My outside loop is missing a 1.75" piece which will put it flush along the front edge, had to steal that piece while installing the switches for the inner figure 8.
I am already planning an elevated level so I can run 3 trains or possibly a smaller elevated bumper track for a gang car, but that won't be for a while.
Attachments
Great work everyone, I handed out a lot of likes and wish I had time to comment but its dinner time then bed. I will be nursing a bad back so I can get back to work on the house! I hope everyone had a great day and an even better tomorrow!![]()
Johan, the cars and backdrop look great!
Brian, NS&EW, That is the perfect name for your railroad!!
Kevin, the station area looks great!
Gerhardt, You are doing a great job fitting in a lot of layout in 10x12!!
Rick, the layout looks great so far. You are doing a good job, and I hope your little ones will enjoy trains with you. I see a Go Steelers sign on the wall. Do you live in the Pittsburgh area? Also, check your wanted to buy post, I replied there also.
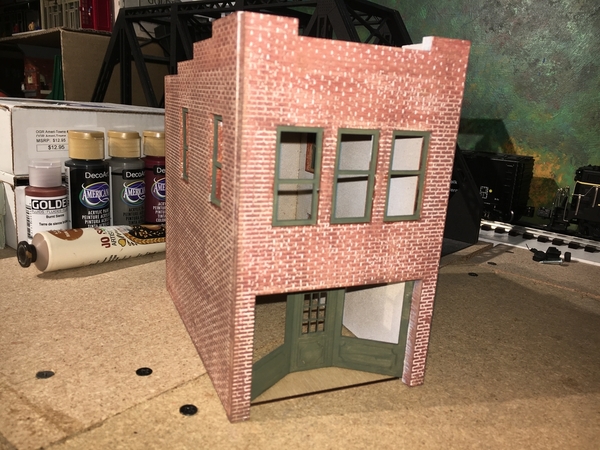
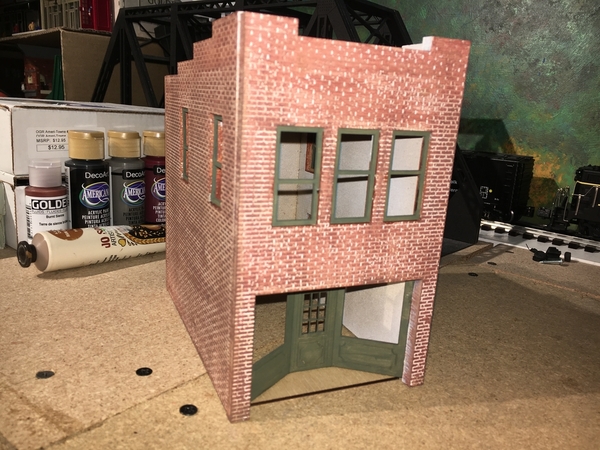
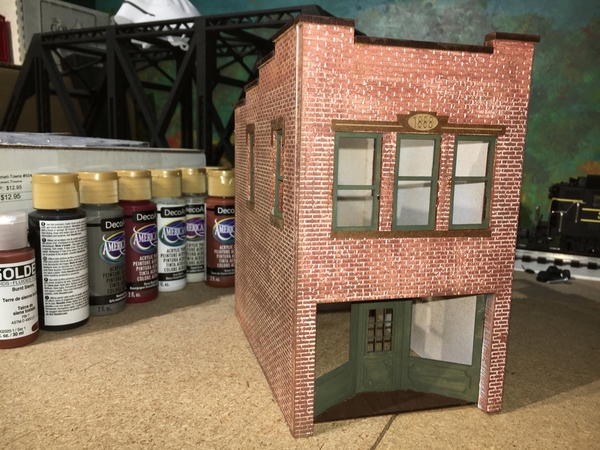
While waiting to get some better colored paint for the AmeriTowne window sills, I dug out all the parts for this River Leaf Models building I started a long time ago. I'm thinking I put it all on the shelf back in 2014-15 when I had carpal tunnel issues and surgery for the second time and never got it back out. I trimmed, sanded and attached all the windows and doors today. Yes, I see I need to do something with the interior on this one. Who knows what I was thinking 5 years ago. ![]()
Attachments
briansilvermustang posted:
just watched your video Gerhardt , very nice !!
great layout, and really like all your Canadian trains
Me too I like those homemade shelves 👍
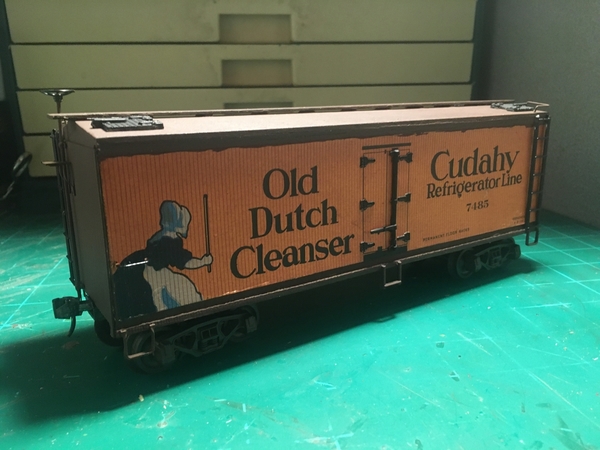
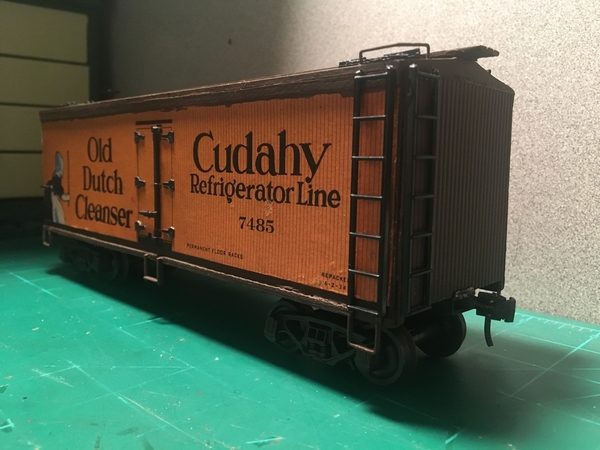
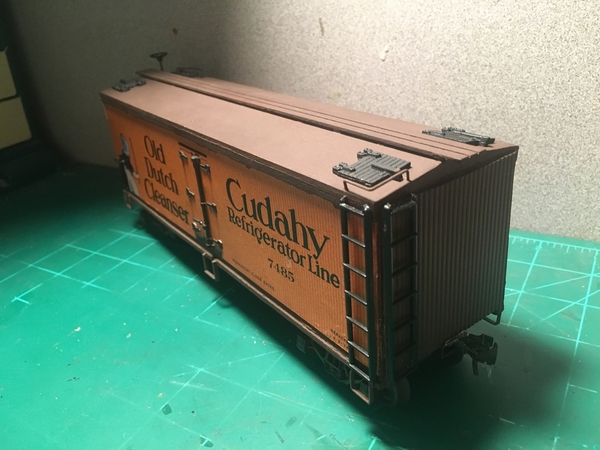
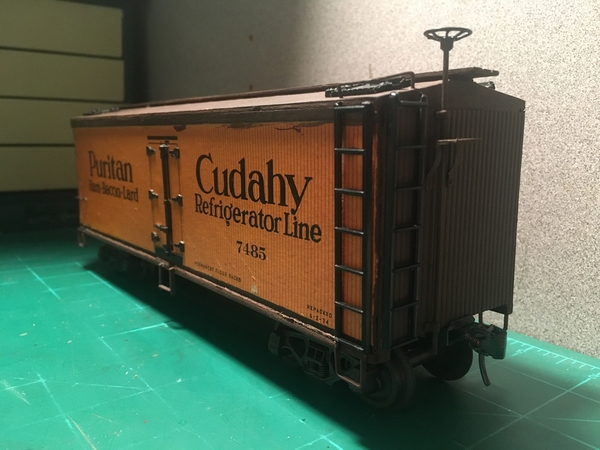 Calling this Reefer Car done I want to say a special Thank You to Brian for sending me this reefer car. Brian thank you so much for sending this to me it was really uplifting and a joy to rebuild. I will get some pics of the Reefer on the layout soon. Thank you guys for all the comments and likes on this build
Attachments
lee drennen posted:briansilvermustang posted:
just watched your video Gerhardt , very nice !!
great layout, and really like all your Canadian trains
Me too I like those homemade shelves 👍
I forgot to mention I like them too!
Lee, the reefer is so much better now!
Thanks Mark it was a fun restoration
After three days of painting 38 Preiser double figures, they are ready for final inspection and correction. These double figures take more time than the usual single figures. I have painted approximately 165 Preiser 65602 24-Seated People packs. This double figure was used, but not as often as the adults with babies, old woman with a cane, and others.
I am panting the few leftover figures from when I would open a new package to get a specific figure from a 24-pack for a passenger car I detailed. I created 10 variations of these figures in order to have variety in a seven-car passenger train. Preiser only offers two variations in their factory painted packs.
I also save significant cost by painting the figures myself.
Sincerely, John Rowlen
Attachments
Mark Boyce posted:Johan, the cars and backdrop look great!
Brian, NS&EW, That is the perfect name for your railroad!!
Kevin, the station area looks great!
Gerhardt, You are doing a great job fitting in a lot of layout in 10x12!!
Rick, the layout looks great so far. You are doing a good job, and I hope your little ones will enjoy trains with you. I see a Go Steelers sign on the wall. Do you live in the Pittsburgh area? Also, check your wanted to buy post, I replied there also.
While waiting to get some better colored paint for the AmeriTowne window sills, I dug out all the parts for this River Leaf Models building I started a long time ago. I'm thinking I put it all on the shelf back in 2014-15 when I had carpal tunnel issues and surgery for the second time and never got it back out. I trimmed, sanded and attached all the windows and doors today. Yes, I see I need to do something with the interior on this one. Who knows what I was thinking 5 years ago.
Mark. Thank you. The building looking really nice.🤝
Johan
Attachments
John Rowlen posted:After three days of painting 38 Preiser double figures, they are ready for final inspection and correction. These double figures take more time than the usual single figures. I have painted approximately 165 Preiser 65602 24-Seated People packs. This double figure was used, but not as often as the adults with babies, old woman with a cane, and others.
I am panting the few leftover figures from when I would open a new package to get a specific figure from a 24-pack for a passenger car I detailed. I created 10 variations of these figures in order to have variety in a seven-car passenger train. Preiser only offers two variations in their factory painted packs.
I also save significant cost by painting the figures myself.
Sincerely, John Rowlen
John one word Amazing
mike g. posted:Great work everyone, I handed out a lot of likes and wish I had time to comment but its dinner time then bed. I will be nursing a bad back so I can get back to work on the house! I hope everyone had a great day and an even better tomorrow!
Take care of your self MikeG we all know you like our works and you don’t have to comment all the time it gets a little bit overwhelming sometimes to do that
Johan, Thank you about the building!
Lew, You are absolutely correct. I am going to leave the roof unattached and not add a base so I can ponder an interior, which I never did in HO and especially N scale. Myles (Trainman2001) offers tremendous information about building interiors in his 'Continuing Saga...' topic. I think I will finish the exterior, so I don't lose the parts ![]() then set it aside while I think about interior treatments, methods, and materials.
then set it aside while I think about interior treatments, methods, and materials.
John, I also am always so impressed and encouraged about all your painted passengers! I had a different thought than Mitch. The photo looked like a formal photograph at a sock hop from the days not long before I was in high school. Boys wore a jacket and ties, the girls wore bobby socks. (In my day, the fellows didn't need a tie and the girls were allowed to wear slacks instead of dresses that were required for classes. Both boys and girls could wear jeans as long as there were no rivets on the pockets that would scratch the bleachers.) Fantastic!
lee drennen posted:
Thank you Lee! Yes, suggestions are always welcome! The kit is marketed as a drug store and has an RX sign is suggested to hang off the second floor corner, but I wouldn't have to use it on this kit.
Mark I like the idea of a RX drug store you could do that or a meat market/ grocery store. What year do you model
Morning guys Its Hump day!
Mark, Looks like a good start on the River Leaf building. You could always put an apartment on the second floor for the owners to live in and on the main floor a train store or hobby shop!
Lee D, Outstanding work on the Reefer car! It really looks great! I will look around to see if there is something I can send your way so you don't run out of projects! LOL Thanks for your earlier comments, I got some rest over night and will see how long the back last today!
John, Amazing job on all your couples! One thing though, I don't see any gray haired couples, and from what I see in pictures a lot of couples that ride trains are gray! LOL
I hope everyone has a great day and finds time to have fun with there layout and trains!
Mark Boyce posted:Johan, the cars and backdrop look great!
Brian, NS&EW, That is the perfect name for your railroad!!
Kevin, the station area looks great!
Gerhardt, You are doing a great job fitting in a lot of layout in 10x12!!
Rick, the layout looks great so far. You are doing a good job, and I hope your little ones will enjoy trains with you. I see a Go Steelers sign on the wall. Do you live in the Pittsburgh area? Also, check your wanted to buy post, I replied there also.
While waiting to get some better colored paint for the AmeriTowne window sills, I dug out all the parts for this River Leaf Models building I started a long time ago. I'm thinking I put it all on the shelf back in 2014-15 when I had carpal tunnel issues and surgery for the second time and never got it back out. I trimmed, sanded and attached all the windows and doors today. Yes, I see I need to do something with the interior on this one. Who knows what I was thinking 5 years ago.
Mark, your structure is coming along very well. I wanted to do a drug store and had some Ameritowne fronts so made a double building which had the drug store, music school, a locksmith and next door is the Royal Plaza Hotel. I thought awnings would really dress things up so made them from file folders.
Attachments
I've been working on a factory for my layout. It's going to be fairly large, but not the largest one planned. Approximate 31X15X18 high. All made from 1 sheet of 1/2 inch MDF and 1/8 inch tempered hardboard. The MDF was ripped on my table saw to 1/2 inch square pieces then cut to length. They were all marked for their position a day then 1/2 inch dadoes were cut to form half laps for each piece.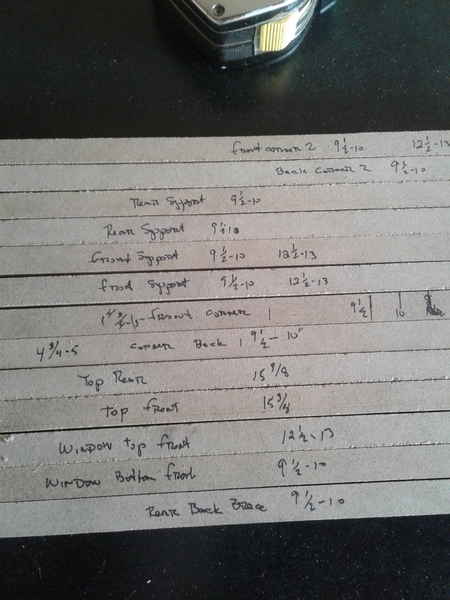
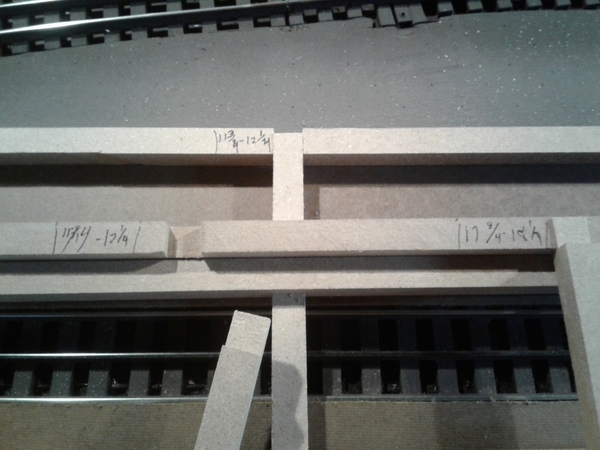 all the pieces were glued and assembled and attached to a 1/4 inch hardboard base. The interior was give a rattle can coating of red oxide paint. Then the 1/8 inch hardboard sheets went on to give the building some strength.
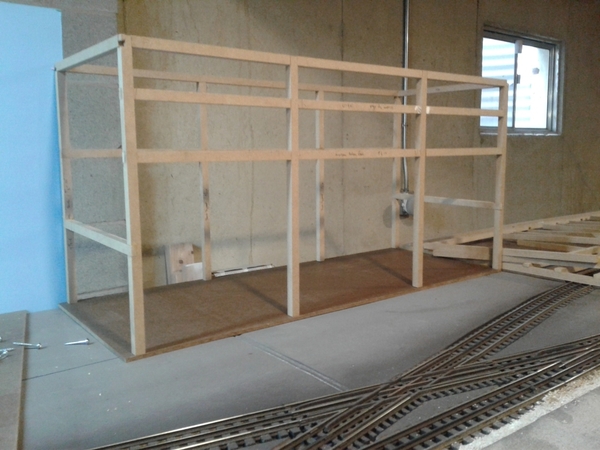
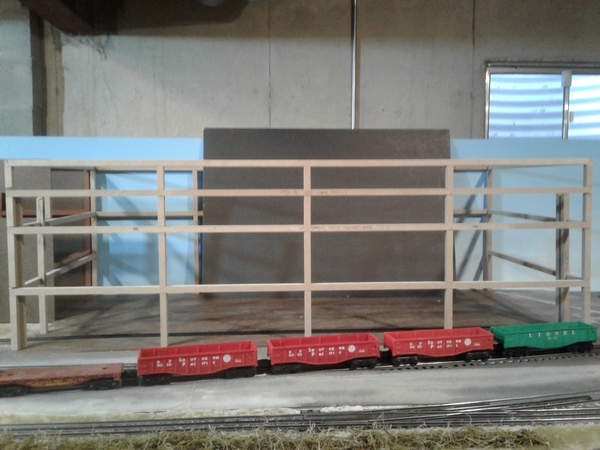
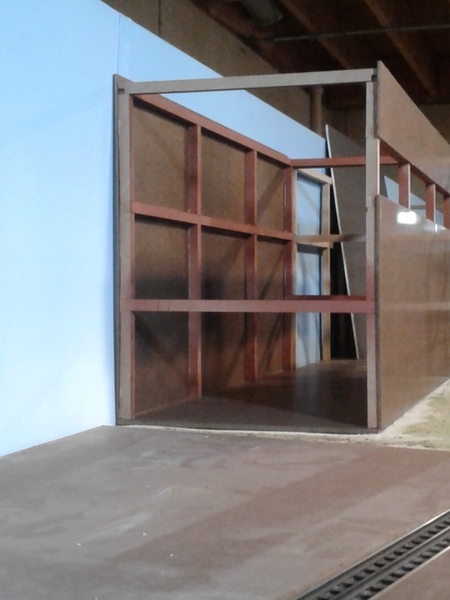
The work isn't finished. I still need to cut the sides to roof height and build windows. Lastly will come the roof. I also will be adding a skin of corrugated metal on top of the hardboard. Adjacent to it will be my electric arc furnace building. That one will be 48x24X22 high, possibly with an open front so I can detail the interior.
Stay tuned for more.
Attachments
Lee, Mike, Thank you very much! I model 1950's, steam to diesel transition era. The recessed door with windows on either side reminds me of so many stores, and yes the upstairs would be an apartment. A pharmacy, meat market, hobby shop are all good ideas.
Ray,
Your buildings look great! Yes, the buildings with offices in the upstairs is a possibility too. It reminds me of Philip Marlow's upstairs office. Years ago, our insurance man had an upstairs office like that. The awning looks good, and awnings are definitely a good detail to add.
Bill, That factory is huge, and the planned one with it will definitely dwarf the trains, but suggest a big reason for rail service!
I haven't done much work yet, but I have run trains on the layout the last few nights.
I am, however, getting ready to model a new structure for the Army at their spur. Really looking forward to that!

I finished the rough cut on brown carpet
Tomorrow I start green carpet I hope it cuts with less trouble
My goal is to start laying track this weekend
Attachments
Mark, I'd be very tempted to do a butcher shop but of course Roomie's Granddad and later her Uncle had a butcher shop in Aspinwall. ![]() Seriously though, that building is actually smaller than it looks and a butcher shop would fit in it without looking overcrowded. It could be pretty simple with a white meat case crossways about a third of the way back that would show up nicely through the front windows. A beef quarter hung behind the meat case to one side and a butcher-block to the other and you would have a believable scene. You could even get carried away and put up two walls in one back corner with a door and you'd have a walk-in cooler. Oh, and a ring of sausage hung. Can't forget that!
Seriously though, that building is actually smaller than it looks and a butcher shop would fit in it without looking overcrowded. It could be pretty simple with a white meat case crossways about a third of the way back that would show up nicely through the front windows. A beef quarter hung behind the meat case to one side and a butcher-block to the other and you would have a believable scene. You could even get carried away and put up two walls in one back corner with a door and you'd have a walk-in cooler. Oh, and a ring of sausage hung. Can't forget that!
Heh. EDITED FOR CLARIFICATION. It's not that I get Mike and Mark mixed up as people but rather that my senior brain sometimes takes over the fingers on the keyboard.
Mark Boyce posted:I dug out all the parts for this River Leaf Models building I started a long time ago.
Mark, thanks for the kind words. That building that you're working on is coming along very nicely, the brick facade looks great! I live in Hershey. I grew up in Beaver County and my grand parent did crafts and wood working before they passed. The stuff on that back wall is things that they made which don't really fit in upstairs but I could never part with!
Folks, is it really necessary to reply with quotes so frequently? And without editing the quoted post? I visit this thread almost daily and to see so many "reply with quote" posts that do not need such treatment makes the post a "spam-like" repetition. And using "reply with quote" doesn't mean the quoted post can't be edited to remove photos or unneeded text; there's no need to include the entire post's non-germane content.
Post what you will, but please do so with a sense of courtesy to prospective readers.
P51 : I really like what you are doing with the Trench engine. FYI - I was watching an episode of "Antique Roadshow" last night from "Bonanzaville, Wis" wherever that is, but the point was that one of the items shown was an artistically painted WW1 helmet that had been decorated (according to the person who brought it to the show) on the boat home from Europe with a combat scene. What is interesting to your effort is that the owner of the helmet was an Engineer (US Army) who worked on the trains that fed the front lines or the Tench RR's. When I heard that I thought of your effort. The fellow who brought the helmet was the grandchild of the engineer but he had some neat stories and a bit of paperwork confirming his grandfathers role in operating those RR's.
Best Regards, Don
I'm with you Carl. I do like to support our fellow modelers but I've been hitting the "like" button more and commenting less lately. If I reply with quote I will try and edit the post as well.
If we can all agree that a click on the like button constitutes a thank you then we would be able to stay on topic more.
Alan commented again earlier and I think we would all hate to see this thread vanish.......
Did some little things today. I added a fourth wash to the brick and now it's ready for gluing together and the windows and doors are ready for painting. Mark you had made a mention about the Hotel Antlers on my one backdrop. I didn't realize it at the time but I had blocked it out with the new flat in front. Seeing it had two water towers I cut the one off to show the sign again. The flats are now ready to be set in place. I decided I am going to cut a piece out of the tall tan building between the loading door and the row of windows. Going to add a loading dock the length of the building and that would of block out the building flats behind it totally. Pics..........Paul 2
Attachments
Mark Boyce posted:Ray,
Your buildings look great! Yes, the buildings with offices in the upstairs is a possibility too. It reminds me of Philip Marlow's upstairs office. Years ago, our insurance man had an upstairs office like that. The awning looks good, and awnings are definitely a good detail to add.
Bill, That factory is huge, and the planned one with it will definitely dwarf the trains, but suggest a big reason for rail service!
thanks for the compliment. That building will be the annex for the electric arc furnace building. I've started on its framework. 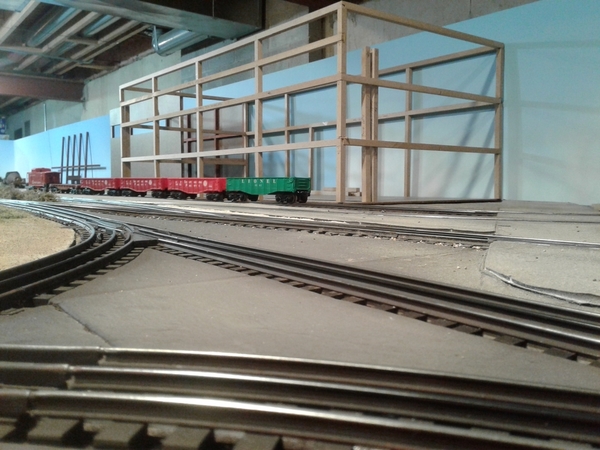
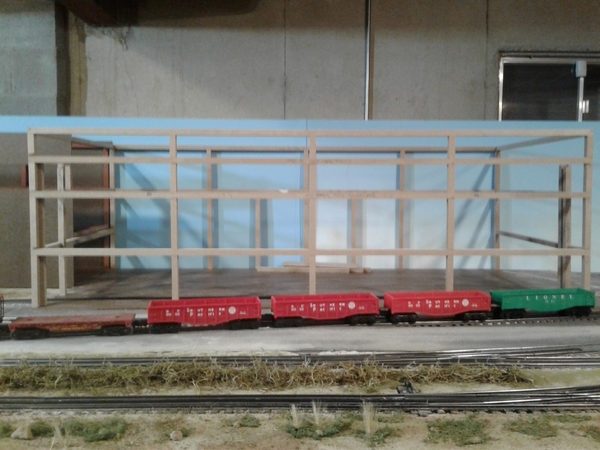
Those are 5 MPC cars in front of it to give you a perspective of its size. I would cut more hardboard walls for both buildings but my table saw is in the garage and it's only 32 degrees here in Chicago.
I have to wait until the temp reaches at least 40 degrees to work somewhat comfortably there.
Attachments
Thanks Mike trust me I have plenty of projects to work on hope your feeling better
Ray, great job on the drug store and the awnings!
Bill, WOW that is going to be a very impressive fac tory!
Mark, I am sure whatever you decide for your store front I am sure its going to look wonderful!
Lee, everyone needs to take time and run trains every now and then or it just seams like a lot of work!
Steve, The brown carpet is a nice touch!
Lew, I just love how you pull these ideas out of thin air! LOL
Paul 2, Things sure are looking great, Seams like your reaching the end of the line on the wear house row!
I sure hope everyone had a great day and are able to make tomorrow even better!
Finished off the evening painting the windows and doors. I used a brown primer on them. Pic..........Paul 2
Attachments
Well, I'm quite pleased with my progress this last week.
BTW, what's the SOP for posting to the "my layout" thread, and also here? My feeling would be to post the link to my other post, like this: and NOT to double post. How do you feel?
https://ogrforum.ogaugerr.com/...5#133052342749440845
I put a coat of paint on the lintels and sills last night. It's going to need a second coat. I also need to find a slightly smaller brush than the one I used. Hard to control the goofs.....
Windows will be white and I haven't decided what color to do the doors yet.
I also cut out the buildings for the wall in the background. Working on another image to put behind these.
Bob
Attachments
mike g. posted:
Lew, I just love how you pull these ideas out of thin air! LOL
I sure hope everyone had a great day and are able to make tomorrow even better!
Mike, sorry for the slip. ![]() It's not that I mix people up but rather that my sometimes-senior brain takes over my fingers on the keyboard.
It's not that I mix people up but rather that my sometimes-senior brain takes over my fingers on the keyboard.
I went back and re-read your Post wrt how you added traverse movement to your 282 Crane. Is that the system you will use? When I thought about using similar I couldn't figure out how to make room for the long slot through the deck.
Bob. That’s Looking good
Attachments
I am still painting the left over figures from the 165 boxes of Preiser 65602 Seated figures I painted in the last six years. The 38 couples are done.
Last night I finished the 14 "Woman with a purse". The other 151 "Woman with a purse" are in my 21" passenger cars already. When I started painting figures six years ago, I could do no more than 12 Seated People a night. That rate of production still holds true today. The figures below have five colors of dresses, two colors of purses and shoes, and two colors of hair. (No grey Mike, Sorry.)
I have tried a variety of skin tones, but the paint from three different dealers quickly dried, forming a skin layer (No pun intended) on top of the newly opened bottle. The colors were overly glossy for a flat paint, and the figures did not look realistic. I used up the remaining "Dark Skin Tone Flat Acryl" paint for leather jackets on the "Man with a Baby & Bottle". The paint quickly dried and was unusable. When painting, the newly applied paint would skin-up. off the figure. if I re-painted a wet area.
I am ready to start painting my remaining new, unopened packs of 24 Seated People, Preiser 65602. I will take pictures of the steps I use and post them as the figures develope.
The six Canadian Pacific 21" passenger cars are supposed to arrive today. It snowed last night, turning my yard into a winter wonderland. I need to put out peanuts for the squirrels. Thanks for reminding me.
Sincerely, John Rowlen
Attachments
John Rowlen posted:
I am sure I am not alone in looking forward to reading and seeing photos of your process, John.![]()
I got a little more done on the River Leaf building. I added the window and door sills and lintels. Also the trim at the top of the brick walls. I decided to make all of that painted fairly dark and representing wooden pars and not sandstone. I think I will set it aside and do the interior and finish the removable roof when I am ready.
Attachments
Finished off the last section of building flats. The tan building flat I cut a section out to move the doors up. I set that building and the valley building higher then the tabletop. Then I painted black below the two buildings so now they are ready for loading docks which I have to make up tomorrow. Pics......Paul 2
Attachments
Well, it was a weekend in the last month. But I just got back on the forum and wanted to post my progress. So here it is: 24' X 2 ft down the long back wall and 2 4'X4' corners on the ends. 2 loops started out of 3, O-72 and O-80, #3 will be O-84 or O-88. The other long side will be 24 X 6 or 8, depending on the space left inside. It will host a mountain for several desired settings. Track will spiral up the mountain to a sawmill on top. Inner Track is live power with DCS for about 8 feet. Lots of ScaleTrax and some buildings are on the top. The next add on this end is a Tilt-Up set of bridges for entry to inside the layout. Why so Big? I have the new MTH Scale Big Boy 4014 to run on it.
Attachments
Help me out Here!
So I have this corner on the layout that I am looking for ideas for development . Although I have a lot of scale equipment and structures, I still have the calling for some plasticVille and I thought about putting a Plasticville farm setup on slightly elevated terrain above the track. Thought about putting a scene break just to the right of the corner in the form of a Highway grade crossing on the upper level that could continue over the lower level as an elevated highway crossing.
So I am asking for your thoughts here on what to do with this corner. We all have dealt with corners before nd maybe you have done the perfect solution for my real estate here. Send some photos of what you may have done and maybe I can replicate it on this layout.
Here is the corner.
And here is the Plasticville Farm
l
Attachments
The Canadian Pacific 1927610 4-pack arrived today, so I inspected the cars for flaws. Three of the Canadian Pacific name stripes had to be coaxed to lay flat by using an Excel knife to raise the stripe as I moved the bump toward the car door end.
When I inspected the baggage car, one window was blocked so I opened the car. I discovered that the letter sorting desk used in the shorter Santa Fe baggage car was also in this car, but the shorter floor piece placed the desk in front of the longer Canadian Pacific door window.
I removed the desk and shifted it to the opposite side of the door. The interior was then painted and some extra freight I had was added to the car. Since the doors do not open on this longer baggage car, the type of freight was not as important, and I used some pieces several times. I placed tall workers in front of the windows to attract attention to the interior freight inside the baggage car.
I did not plan on detailing these cars now, since I am still painting Preiser Seated People for the entire set of passenger cars. It turned out to be a nice break from painting people the last several days.
Have a good weekend.
Sincerely, John Rowlen
Attachments
LIRR Steamer posted:Help me out Here!
So I have this corner on the layout that I am looking for ideas for development . Although I have a lot of scale equipment and structures, I still have the calling for some plasticVille and I thought about putting a Plasticville farm setup on slightly elevated terrain above the track. Thought about putting a scene break just to the right of the corner in the form of a Highway grade crossing on the upper level that could continue over the lower level as an elevated highway crossing.
So I am asking for your thoughts here on what to do with this corner. We all have dealt with corners before nd maybe you have done the perfect solution for my real estate here. Send some photos of what you may have done and maybe I can replicate it on this layout.
Here is the corner.
And here is the Plasticville Farm
l
LIRR- I think the Plasticville will look good up in that corner. Since it's small in scale terms it will have the appearance of being off in the distance. The road and bridges would be a good break between the scenes and could partially block the view of the farm to hide the size difference a little more. A proper backdrop on the wall of a farm will finish it perfectly.
Bob
LIRR Steamer posted:Help me out Here!
So I have this corner on the layout that I am looking for ideas for development . Although I have a lot of scale equipment and structures, I still have the calling for some plasticVille and I thought about putting a Plasticville farm setup on slightly elevated terrain above the track. Thought about putting a scene break just to the right of the corner in the form of a Highway grade crossing on the upper level that could continue over the lower level as an elevated highway crossing.
So I am asking for your thoughts here on what to do with this corner. We all have dealt with corners before nd maybe you have done the perfect solution for my real estate here. Send some photos of what you may have done and maybe I can replicate it on this layout.
Here is the corner.
And here is the Plasticville Farm
l
LIRR, I know the problem in deciding what to do, had an impossible corner and I went up because of very little room to go out. I put the footprint size into the computer and started doing what ifs and came out with this design and am very pleased with the outcome. I don't know how to do a farm there but there may be a way, good luck.
Attachments
Morning guys, its been a few day and a lot had happened so here I go. Oh By the way I read Alan's psot so this is all train related!
Paul 2, Your buildings are coming along nicely! Great idea on the backdrops and the loading docks! I cant wait to see them in place!
Bob, your building is going to be a nice addition to your layout! I agree that the backdrops at the end of the siding need its own backdrop behind them, but things are turning out very nice!
Lew, I plan on using the same system, but have to make it smaller as it now will be right above my Z4000 and wiring from my control panel. That will be one of my next projects along with getting the retaining wall along the back wall so I can ballast and be done back there so I can set building where I think I want them! As for the slot I am not sure if I will do that again, I might just ad some weight to the control wire so it will retract when the crane moves back and forth!
Johan, the scene your Santa Fe MP15 is in is just outstanding! Great work!
John, wonderful job on the women! I am glad you mentioned the problem with the paint as it gives me something to watch out for in the future. Nice work on the Canadian Pacific baggage car!
Mark, the building is looking really good! I am wondering what you are going to do for a floor as I see there is not one right now?
Patrick, Nice work on the signals! Are you getting your relays from Azatrac ?
Russel, Great description of what your doing and nice photos of what you have done sofar! I was wondering in your next post if you might be able to post your track plan?
Ray, WOW! That looks amazing! Start to finish what great work! Makes one want to get a 3D printer and learn Cad! But CAD is a rough thing for slow learners like myself! LOL
I hope everyone has a great Friday and a wonderful weekend! Oh and don't forget to find some time for your trains and layouts! If anything just go out and run your trains till your happy!![]()
LIRR, I am with Bob that I like the farm concept for the same reasons. It is slightly smaller than scale, so it can give a bit of an illusion of distance.
Ray, your treatment of that corner really turned out well. You hid some of the back curves and made a imaginative industrial building that really is a focus for attention.
Mike, Yes, the River Leaf buildings are great on the exterior, but as you point out they don't include a floor or even foundation. I am thinking of what business to put in the building. I am thinking of taking an approach of Myles Trainman2001, of building the interior on the base with a foundation, even if it is just a picture of the inside of the store and the exterior one block high. The same for the second floor. The kit comes with nice venetian blinds and clear plastic windows that I am not going to install until I have painted the interior walls. All suggestions are welcome.
Last evening, I put my town buildings back on the family room layout upper level mainly so we don't bump and break any of them when I get my sons-in-law to help me move lumber in the little train/workshop room. I don't have a date set for them to help. I'm letting our younger son-in-law transition from working for two employers to full time with the newer one.
Attachments
mike g. posted:Morning guys, its been a few day and a lot had happened so here I go. Oh By the way I read Alan's psot so this is all train related!
Lew, I plan on using the same system, but have to make it smaller as it now will be right above my Z4000 and wiring from my control panel. That will be one of my next projects along with getting the retaining wall along the back wall so I can ballast and be done back there so I can set building where I think I want them! As for the slot I am not sure if I will do that again, I might just ad some weight to the control wire so it will retract when the crane moves back and forth!
I hope everyone has a great Friday and a wonderful weekend! Oh and don't forget to find some time for your trains and layouts! If anything just go out and run your trains till your happy!
Mike, I think I see what you mean. You could attach a cable to the nut that is moved by the screw and with a pulley or two get from under the benchwork to above the deck and then it would look a lot like what I ended up with.
This whole assembly could be conveniently mounted under the benchwork with the operating cable attached to one of the tabs.
Attachments
Mark, layout looks like it's coming along very nicely, I had the same feeling as you about the interior of the Rexall Drug store I had shown you before. It's not that you can see much through the windows but it's just knowing there is an interior of sorts.
So found pictures of scenes I thought would go well and scaled them to fit, I really like the picture of the baby boy. AHAHAHA
Attachments
Ray, those are all great looking rooms! Yes the baby boy is a hoot! I'm hoping to get to some layout benchwork building fairly soon. Working on a few building kits is just a diversion while I am recuperating. I can use the time when I start back on benchwork for collecting interior ideas, materials, and photographs to use later on the interiors.
Mark, I agree with Ray that the interiors can be pretty sketchy and still be just fine because you don't really see in there all that well. Don't forget interior lighting though! Of course, lit at night the interiors would show more so maybe more detail needed.....Projects, projects. I can come up with stuff to keep you and Mike both busy. ![]()
Lew, Mike and I have probably thought up enough projects on our own that will take longer to complete than the time we have left. ![]()
Well guys, finally back to work. My current project is adjacent to the layout. I am finally installing the Glenn Display shelving that I purchased about a month ago. This will give me much more storage than I currently have and I plan to use the first one or two shelves as a "ready track" for trains that I run but I cannot store on the layout (too many trains and not enough track ![]() ). This picture is just the start of the job with the shelving location grid marked on the wall and the studs found. Today or tomorrow I hope to drill and install the shelving. More pictures to follow as the job goes on.
). This picture is just the start of the job with the shelving location grid marked on the wall and the studs found. Today or tomorrow I hope to drill and install the shelving. More pictures to follow as the job goes on.
Here you can just see the blank wall and our tools laid out as we penciled in the location grid. One of the 7 shelves is laying up against the wall ready to be marked for drilling.
Best wishes to all
Don McErlean
Attachments
Finally got 2020 LIONEL order in, got in caboose siding, and am getting caboose roof material, this last with thanks to Posters on here!
I finally spent some serious time working on my "Knights of Atlantis" lay-out today. I scrubbed all of my HO tracks with rubbing alcohol, and my trains run much better.
I went back to Michaels and found a better color for the window sills, etc on the AmeriTowne Marvin's Drug Store. Funny, I had this color in my hand the other day, but for some reason put it back. Deco Art calls it Fawn. I think it tones it down a lot. Too bad I didn't have it for the mortar also.
Attachments
Ran trains most of the day, getting ready for tomorrow's op session:
Wheel noise after engine fades out.
https://www.youtube.com/watch?v=8kxV7MxSpOs
Alot of work in the train room this week. I added 48 feet of display shelf. Replaced the ceiling tile that house a heating duct; it was starting to sag. Re-did the top of my mountain adding the Menards nuclear plant and the spaceship re-doing the surrounding scenery. A bought 2 halloween MTH ES-44 with 16 operating cars all in Halloween scheme. So the train room been a bustling. Next project is mounting lighting strips to the back of the layout facing the back wall so colored light shines up the wall.
Mark - the building looks good as is. The colors seem correct. The sills are cement & the bricks were laid with mortar. Two different mixes. Your bricklayer may have used a bit too much lime. 😊
Morning Lew, The picture you posted was my first try and after installing it things just went bad! LOL The allthread would just bounce up and down as the motor turned and there was no way to add a support system for the rod. So I went with something like yours with a pully system that ran 50 Lb fishing line on. I will try and get a picture of it before I take it down to rework it for the cranes new location. I also added a few other things to try and make it run back and forth smoother, but will post photos of that when I get it all installed. Mark is right I know I have more projects then time, but please keep them coming and I will just add them to my huge list of things to do on the layout!
Ray, great work on the building interiors! I agree the baby boy is something else! LOL
Don, Looks like a good start. I look forward to seeing the shelves up and trains on them!
Mark, Look good! The Fawn color worked perfect! I think its going to look great on the future layout! Keep your eyes open you should be getting the parts for your crane today!
Bob, You have been busy! When you get a chance I sure would like to see the MTH Halloween train along with some photos of your layout and train room!
Well I hope everyone is having a great weekend! I hope to get to the train room today if not for sure tomorrow and it will be trains and NASCAR! I am taking the day off! LOL
I hope everyone finds time for there layout and trains! But most of all I hope everyone has a great weekend and has some fun!
It occurred to me today that I missed the 4 year anniversary of my layout. ![]()
1/31/16
Today
Everyone have fun with your trains today!
Attachments
mike g. posted:Morning guys, its been a few day and a lot had happened so here I go. Oh By the way I read Alan's psot so this is all train related!
Paul 2, Your buildings are coming along nicely! Great idea on the backdrops and the loading docks! I cant wait to see them in place!
Bob, your building is going to be a nice addition to your layout! I agree that the backdrops at the end of the siding need its own backdrop behind them, but things are turning out very nice!
Lew, I plan on using the same system, but have to make it smaller as it now will be right above my Z4000 and wiring from my control panel. That will be one of my next projects along with getting the retaining wall along the back wall so I can ballast and be done back there so I can set building where I think I want them! As for the slot I am not sure if I will do that again, I might just ad some weight to the control wire so it will retract when the crane moves back and forth!
Johan, the scene your Santa Fe MP15 is in is just outstanding! Great work!
John, wonderful job on the women! I am glad you mentioned the problem with the paint as it gives me something to watch out for in the future. Nice work on the Canadian Pacific baggage car!
Mark, the building is looking really good! I am wondering what you are going to do for a floor as I see there is not one right now?
Patrick, Nice work on the signals! Are you getting your relays from Azatrac ?
Russel, Great description of what your doing and nice photos of what you have done sofar! I was wondering in your next post if you might be able to post your track plan?
Ray, WOW! That looks amazing! Start to finish what great work! Makes one want to get a 3D printer and learn Cad! But CAD is a rough thing for slow learners like myself! LOL
I hope everyone has a great Friday and a wonderful weekend! Oh and don't forget to find some time for your trains and layouts! If anything just go out and run your trains till your happy!
Mike. Thank you very much. 🤝
Johan
Attachments
mike g. posted:Bob, Very nice! You got a lot done in 4 years~! Looks great!
Lew, here are 2 rough photos of what I did for the crane along the back. I plan on using the same thing somewhat just a cut down version!
Got it, Mike! ![]()
You should be able to cut away most of the side-pieces. Do you also plan on shortening the shaft to reduce the width as well?
Thanks Brian.
I've been having fun working on it too.
Your turn to get started now.......![]()

hoping to be back working on it in a couple weeks... ![]()


can't wait to get back building again... ![]()


yeah, let's get back busy working on this !!!


Attachments
Matt, Thank you. Yes that one side especially looks like the bricklayers put that stuff in the mix these days that lets them lay bricks in colder weather without the mortar freezing as well. It leaches out after a while. ![]()
Mike, Thank you! Annie is watching. The regular mailman already came and left stuff in the box. She gave him an ear beating, no doubt because no packages. But sometimes they run a separate guy around with packages, so she is still on guard for him! ![]()
Brian, You had better listen to Izzy!
I washed the parts last night for the AmeriTowne #301 Real Estate Office, that I think looks like a coal country company store. At least that's what I'm going to use it for. I'll make a thin wash of that Fawn color for the mortar on this one. ![]()
decoynh posted:Brian - I wish that I lived closer, i'd come over and give you a hand. You have a lot to do my friend.
Good luck. Using clicker training with Lucy the conductor as well as hand signals. She's picking up quickly but I'm not getting any train time. LOL.
thanks Matt ! bring Lucy along, I'm sure Izzy will keep her busy... ![]()

I do have the upstairs, 12x35 all Alaska room I could use a hand with too... ![]()

have a great weekend !!
Attachments
Well guys, my effort on mounting the Glen Snyder display shelves continued today. We mostly positioned and mounted 7 of Glen's 6 foot O gauge display shelves. These are really quality products and the extrusion is top notch. You do have to drill them for mounting, which makes sense as you have to align the mounting holes with your wall studs. It's a two person job as the 6 ft length is not heavy but cumbersome to align with only one person. My wife agreed to help and so the two of us put the 7 shelves mostly in place. They are fastened on both ends, leveled, and spaced so all hard detail work is done. I now have to go back tomorrow an add the remaining support screws in the stud holes I drilled. Candidly at 76 and 75 the hardest part of this effort is that the drilling equipment is in the garage and the layout is on the second floor. Stair climbing was harder than working on the shelves![]() So here is 42 ft of extra display shelving almost ready to hold trains.
So here is 42 ft of extra display shelving almost ready to hold trains.
Have a great weekend
Don McErlean
Attachments
Painting Preiser 65602 Seated People 24 pack.
These are a few of the pictures for the post on painting the Preiser 65602 figures. I am showing pictures and leaving notes today on issues I want to discuss as I revise this final post.
The Four Unpainted Sprues sell for an average of $37.50 (US) in Preiser 65602 24 pack. If Preiser painted them, the five factory packs total over $150.00 for the 24 people. This is why I paint my own figures.
Tamiya XF-15 "Flesh" flat acrylic paint. Paint should dip downward and run up into the brush by capillary action. When paint pushes downward only, like a drumhead, it is time to stir or shake the paint and rinse the brush.
Quality brushes yield a quality paint job. I have used Atlas brushes for years and recently switched to Tamiya brushes at $10-12.00 each. 87153 - Ultra Fine, 87154 - Extra Fine, 87155 - Fine. As the number increases, the bristle length is longer. Ultra Fine for ties and repairing final inspection errors. Extra Fine for most painting of figures, Fine for painting the interior of passenger cars.
The 24 figures have received the first coat of XF-15 Flesh flat acrylic paint. Mold parting oils can cause open white unpainted spots to appear on the flesh of the figures. Check for needed touch-up. Avoid too heavy a coat of paint on faces - the eyes can be filled in and detail lost due to too much paint.
Paint neck ties, walking canes and Ultra Fine details of clothes after flesh is dry. (Opps, sloppy painted ties and brown cane and purse will be trimmed by white shirts and blue dresses in next step.)
Paint shirt on either side of neck tie. Paint Coat on either side of dress shirt, or paint dresses.
Paint hair and shoes.
There are very fine lines molded into the Preiser 65602 figures for hairlines and act as guides when painting. The similar figures from China do not have these fine lines, or eye and face details, and need an extra coat of paint to cover the China figures.
I will be updating this post until all ideas are recorded. Any questions are welcome. Picture updates of the 24 figures will be pictured here as I paint them, step by step: ties, shirts, coats, hair, then shoes.
UPDATE: 2/16/20 - I painted Women in BLUE clothes. Next box will be Pink, Yellow, Green and Lavender pastel colors I mixed. The men will have light grey and tan suits. Hair colors will be Earth Red, Sandy Blonde, and Rust Red with some Grey for older figures. It is time to pull figures off the Sprues to continue painting. I use an emery board to sand the sprue points off the figures. (The Dremel Tool is to severe and creates a scratching that does not paint well.)
The figures are off the sprues and getting painting of clothes, hair and shoes. Anyone can do this painting of Preiser 65602 Seated People when taken one step at a time. It is time to do the final inspection and touch up.
UPDATE: 2/17/20 - I have started the second box of 24 Seated People in Pink and Grey clothes. The Pink are ready to come off the Sprues. Yellow will be next. Now doing Green.
Have a good week.
Sincerely, John Rowlen
Attachments
John Rowlen, thank you for the photos, product info, and descriptions of your proven process.
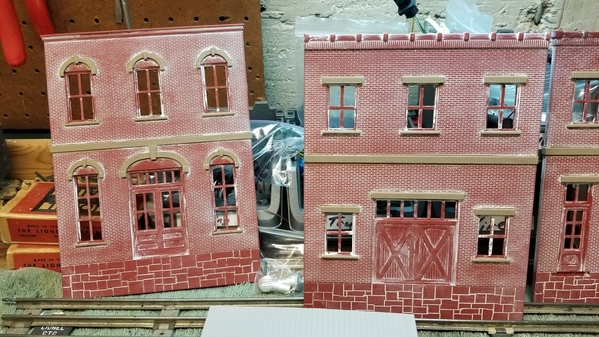
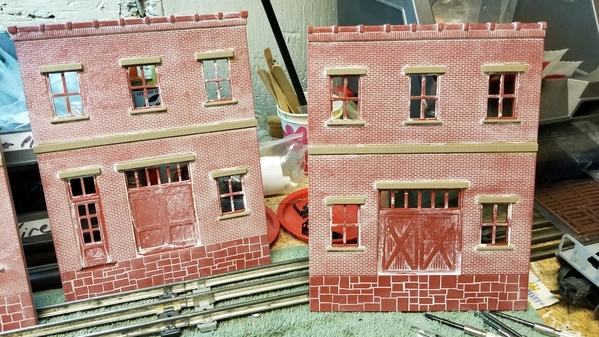
I'm continuing on my machine shop build. I put the second coat on the lintels and sills and started on the windows.
I noticed that the building looked short sitting next to the track on my bench so I put a car in front and the dock is about a 1/2" lower than the car door. I think it will be easier to raise the terrain for the building to sit on than adding to the foundation. Once I get it assembled and on the layout I will decide.
Attachments
YEA! the shelving job is finished. Thanks to 23 hand driven screws into studs that seemed hard as rocks, they are all up and fully fastened. These seem so solid I could climb them like a ladder but Glenn Systems does not give any advice on using every stud or every other stud etc. so I used every stud in the 6 ft length. It may take several days for the arthritic thumb / hand joints to recover but the job is done. By the way, if you try to use this system and I do recommend it, as the material is very high quality, you will need a couple of extensions on both your drill and your driver. The 4" width of the shelf itself makes it hard to power drive the screws without interference to the drill body unless you have an extension (I of course did not...![]() )
)
Here is a picture of the first "Completion Ceremony Train Arrival" - just like Promontory- It s a1938 uncataloged Lionel freight consisting of a Gunmetal / Nickel trim 249E , a Lionel 1717 Gon in orange / wood trim, a Lionel 1719 Box in green and blue roof, and the Lionel 1722 Caboose in orange with red roof. Lionel never put these lithographed , "Ives transition" cars in the catalog but did offer them in some uncatalogued sets.
Have a great Sunday fellas...I am taking the rest of the day off and soaking my hands!!
Don McErlean
Attachments
Bob, the machine shop building looks good so far!
Don, the shelves look great! I have issues with my hands and especially thumb joints too! It was worth it in your case putting up those excellent shelves!
Thanks Mark - wife is a 40 year career RN, prescription is soak in cold water, not sure if this is revenge or cure ![]() Thanks for the compliment on the shelves.
Thanks for the compliment on the shelves.
Don
LIRR Steamer, corners are sometimes hard to come up with something. With the way your tracks are if I had that corner I would come out of the corner with a small river to a waterfall under the top track to a bridges on the lower tracks coming out the side of the table.
Mark, nice work on your building so far.
Today I have been working on the loading docks. Decided to do one wooden dock and one concrete dock. The wooden dock has the leg supports. The other dock I had to add another 1 1/2 inches for length. Once the glue dries I can do some more work on them. Pics...............Paul
Attachments
Attachments
Mark that color does look very nice, I'm trying to decide between reddish or brownish on my front. I have a reddish building already near it so the brownish would break it up a lot and there will be much old concrete around many windows to brighten it up.
Ray, Thank you. I think you are on the right track to go with the brownish color so the buildings don't look too much the same.
I like it Mark! ![]()
Paul- great idea using your long straight edge to place the posts for the dock.
Bob
This morning I got the wooden loading dock stained. Glued the front piece to the concrete loading dock. Later this afternoon after the glue dries I'll glue the side pieces on and when those dry use spackling compound to fill in the gaps before I add the concrete paint............Pics........Paul 2


