

 This morning I added some HO Decals and installed my scratch built Hitches. Now it’s done time to add some trailers
Attachments
Images (3)


|
|
This morning I added some HO Decals and installed my scratch built Hitches. Now it’s done time to add some trailers

 Yesterday I received a second Lionel passenger coach 6-15558 for my local train, modeled after the Eastern Region NY Zone 1 train list provided by Rob's PRR website. So now I can mix and match PRR cars for different local trains with just 4 cars. Today I am running a daily, Washington to Harrisburg #555, a MS60, BM70 followed by two coaches, headed up by an Atlantic.
@mike g. posted:NS Nice work around the tower!
Brings up my next question, who made your yard tower?
It is an older model made by MTH.
Today I finished my skyscraper scene a la this post from way back in 2013. Thank you, @Jim Policastro for the inspiration. I hope I didn't usurp too much of your work! ![]()


I usurped plenty of work from Jim. Always liked his buildings and intersting layout.
Today project: Built new platform for Chicago Great Western’s Gladbrook Iowa Steelox depot. Used 1/2 birch and 1/8 hardwood. Plan to paint gray as concrete.


Clifford. Your layout is just beautiful hang in there.
Re-learned how to solder today by hard wiring all the Fastrack curve sections that make up the compound O44.5 end curves of the inner loop. Soldered the feeders also. There have been no connection problems but adding some prevention during the build. Also carpet under the hollow roadbed decreased the high pitch, skating sound significantly.


@Miggy posted:perhaps "Cat Cam" mode. Looks great Mitch, well done. What do you use for camera stand/smartphone mount?
Generally, my two hands, occasionally resting an elbow on the table or on a knee.
Me camera is a GE X5, a decade or so old but still does the job! ![]()
Mitch
@pennsynut posted:I usurped plenty of work from Jim. Always liked his buildings and intersting layout.
Thanks, guys. Always happy when I can provide some inspiration. ![]()

Jim

 Added the mudflats this evening calling these two done
Worked on the aluminum casting I got from the Age Of Steam Roundhouse over the past couple of days...

I drilled the holes last night to match some 1/4" by 3/4" celvis pins. Going to run picture wire through the holes in the pins, onto a hook on the wall.

Then, I painted it in a dark steel spray paint and will let that sit for a couple days.

Black paint will cover that once it really dries over a couple of days, and then I'll rub that paint off some edges while it's wet, and then add a light touch of rust weathering powders as the real plates were cast iron.
Lots of great projects everyone.
Yesterday, I finished connecting all my track wiring temporarily until my two AIUs come in to my Local Hobby/Hardware Shop. Nothing special to see, but it all checked out okay. Next up is the @mike g. Mike G. Lift Bridges! I think I have all the parts necessary; but will probably have to pick up something at the hardware store when I go to pick up my GarGraves flex track for my new shelves. I guess that's two things up!!!
Lee, You could go online to NAPA, cut out and re-size their logo, and add it to the mudflaps. Those trailers do look great!
I wired up about 25% of my lights today. I still need to do the accessories. There is about half of the layout shown in this video:

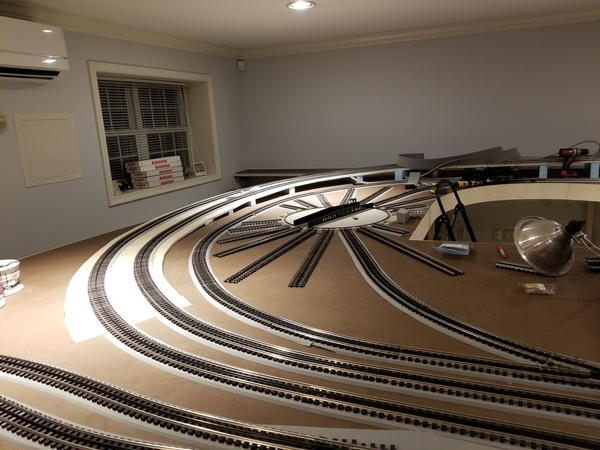
Worked on adding my turntable, got a bunch of the tracks down, a couple more to go. I could only fit a 24" TT in, but it'll be useful for much of my stuff.

How are you getting such a uniform road bed? It looks like you're cutting homasote board.
NFL playoffs 😁😄
And in the "timing is everything" and "if it weren't for dumb luck (bad luck?), I'd have no luck at all" categories... this evening, after a long weekend building my skyscrapers, I decided it's time to subscribe to the digital magazine. (I had been a paper version subscriber for many years, "back in the day" when that was the only option.) Wouldn't you know, the first page I see is some very interesting ways to build and decorate... wait for it... skyscrapers! Ugh! Oh, well, now I have some new ideas if I ever decide to renovate them!
Just re-upped my OGR subscription, as well as the one for RMC and my NMRA membership tonight...
Made my Menards/Miller Signs 4.5 DC transformer box to power them all!

@Windy City posted:How are you getting such a uniform road bed? It looks like you're cutting homasote board.
It's foam roadbed. I actually like it better than cork now that I've had a chance to lay several hundred feet of it. I bought it on eBay after looking at Woodland Scenics and FlexBed samples, this stuff is ever bit as good and was way cheaper. It comes in six foot lengths, very convenient. I'm going to finish the turntable tracks today. ![]()
John, what is the name of the product? I’ve checked on the bay and the coloring is different from yours.
Thanks,
Jay
The guy sells multiple colors, the guy's seller name is sparks00033. The color I got was the gray. He will also send you a free sample so you can actually see and touch it, that's how I compared it to the other stuff.
His paper with the stuff says: Search for "SOUND FOAM ROADBED" on eBay, and indeed that brings up a bunch of his listings, in both HO and O. He also has the wide pads for under switches, I haven't trimmed those yet after placing the switches, still to come...
Thank you John
Gunrunner John, your layouts looking really good, the Atlas O turntable looks great and one thing for sure, it will work correctly, meaning it will line up properly at the push of a button. I’m going back to your main thread to catch up on all of your progress, it’s a very nice plan. Today, we replaced an Atlas O Custom signal that was in a derailment accident. Happy Railroading Everyone 
Thanks Larry, it's got a long way to go, but I'm looking forward to actually being able to run trains. ![]()
I didn't make much progress over the weekend on the tunnel but I did manage to steal a few minutes here and there. I finished roughing in the foam and got the plaster cloth on last night. I'm satisfied so far ![]()
I added a few more walls above the tunnel for the higher terrain

Plaster cloth is great stuff!


Bob


That plaster cloth does work wonders, it's looking really good! ![]()
Replaced the black roofing on the front and rear of my Korber Roundhouse with clear acrylic and added three chimneys on the rear.
Looks like there's nothing there (but you can see the "floating" chimneys if you look close), so it must have come out well !!
BTW, for anyone interested, the gray foam roadbed used by GRJ also comes in widths for Fastrack and it looks good in that application as well.


Grandson visiting. We were running trains when for unkonwn reasons, crates were ejected from a boxcar causing a derailment. So, I ran the train around and just randomly sopped it to unload whatever crares reamined in the car and, no kidding, no staging, no Photoshopping...the crate was ejected and this happenned:
 Knowing no one would believe us, my grandson decided to try and recreate it so we could video it. This was the result:
Then we ran the Acela:
He just turned 9. He's been running my trains since, maybe 2. He loves'm. Because of Covid he's in remote "no-learn" mode and today, whenever he has a break, he runs down to the train room and fires them up for as long as he has a break. I'm hopeful his love for trains will never end.


@ToledoEd posted:Grandson visiting. We were running trains when for unkonwn reasons, crates were ejected from a boxcar causing a derailment. So, I ran the train around and just randomly sopped it to unload whatever crares reamined in the car and, no kidding, no staging, no Photoshopping...the crate was ejected and this happenned:
Knowing no one would believe us, my grandson decided to try and recreate it so we could video it. This was the result:
Then we ran the Acela:
He just turned 9. He's been running my trains since, maybe 2. He loves'm. Because of Covid he's in remote "no-learn" mode and today, whenever he has a break, he runs down to the train room and fires them up for as long as he has a break. I'm hopeful his love for trains will never end.
![]() Completely outstanding Ed'.. That is very cool'...Shut the remote no learn down. Zack will learn more running trains'... Electricity, centrifugal force, timing and speed, mathematics'.. meters, to inches, etc'..
Completely outstanding Ed'.. That is very cool'...Shut the remote no learn down. Zack will learn more running trains'... Electricity, centrifugal force, timing and speed, mathematics'.. meters, to inches, etc'..
BTW, your camera takes a crystal clear photo and video'.. WHat are you using again. Truly impressive'....😁👌📷
@gunrunnerjohn posted:That plaster cloth does work wonders, it's looking really good!
Thanks John.
@RSJB18 posted:I didn't make much progress over the weekend on the tunnel but I did manage to steal a few minutes here and there. I finished roughing in the foam and got the plaster cloth on last night. I'm satisfied so far
I added a few more walls above the tunnel for the higher terrain
Plaster cloth is great stuff!
Bob
That looks awesome Bob
RSJB18
I see you used the plaster cloth. I believe I will do a test run with the cloth really soon and use the foam like you show in the photos you have shared. In the background I see the Titebond glue I find a Lowes. I use that in my wood shop and I do believe that I can tell a difference when I glue boards together and then run them through the planer. I feel with this glue, the boards are not separating near the ends as with other glues I have used. Not as dangerous.
For my ballast I also used Titebond as well. My ballast dries together and lasts really well. So I can recommend that product. I apparently have missed those smaller containers when I am buying glue. I need that smaller type of dispenser.
I will watch to see how that you finish and color the plaster cloth when it dries! I believe I will use about the same amount of foam as you have when I get to that part of finishing off the exterior tunnel walls.
Thanks !
Ed, What do you use for your streets and roads. The center lines are great.
Thanks
Bob, very good job. That corner is going to look great. I have been using the combination of foam and plaster cloth for years now. I bought an inexpensive heat knife at Menards to cut the foam.
The only thing I have managed to do so far is I took a black marker and did the edges of the emery strips before I glue them down. ...............Paul 2
@Seth Thomas posted:RSJB18
I see you used the plaster cloth. I believe I will do a test run with the cloth really soon and use the foam like you show in the photos you have shared. In the background I see the Titebond glue I find a Lowes. I use that in my wood shop and I do believe that I can tell a difference when I glue boards together and then run them through the planer. I feel with this glue, the boards are not separating near the ends as with other glues I have used. Not as dangerous.
For my ballast I also used Titebond as well. My ballast dries together and lasts really well. So I can recommend that product. I apparently have missed those smaller containers when I am buying glue. I need that smaller type of dispenser.
I will watch to see how that you finish and color the plaster cloth when it dries! I believe I will use about the same amount of foam as you have when I get to that part of finishing off the exterior tunnel walls.
Thanks !
Seth- I've used titebond for years. It's by far the best IMHO for wood and other porous materials. I used that for the foam, and white glue for the prints and balsa application. I use diluted white glue and water with a few drops of dish soap for ballast and scenic work.
@paul 2 posted:Bob, very good job. That corner is going to look great. I have been using the combination of foam and plaster cloth for years now. I bought an inexpensive heat knife at Menards to cut the foam.
The only thing I have managed to do so far is I took a black marker and did the edges of the emery strips before I glue them down. ...............Paul 2
Thanks Paul. I use a Dremel multi-max to carve the foam. I don't want to worry about the fumes. I keep my shopvac running to catch the crumbs.
My next step is to cover the plaster with thinned joint compound to smooth over the fabric and then I should be ready for ground cover.
@lee drennen- Thank you too!
Looking good Bob, can't wait until you get it in place to see it come together. I like the Titebond as well, go through a lot of it with building the layout.
Took a break from the railroad to get some carpet put down and just finished my Sealtest milk distribution center. Got it powered up this morning.
Stay safe,
Scott


@B&O Fan posted:Looking good Bob, can't wait until you get it in place to see it come together. I like the Titebond as well, go through a lot of it with building the layout.
Took a break from the railroad to get some carpet put down and just finished my Sealtest milk distribution center. Got it powered up this morning.
Stay safe,
Scott
Scott
great looking pics I really like that Sealtest building
Lee,
Thanks, it's been slow on forward progress due to attempting to upgrade the basement to a more finished look at the same time.
Scott
@B&O Fan posted:Looking good Bob, can't wait until you get it in place to see it come together. I like the Titebond as well, go through a lot of it with building the layout.
Took a break from the railroad to get some carpet put down and just finished my Sealtest milk distribution center. Got it powered up this morning.
Stay safe,
Scott
Scott;
Wow... Sealtest - there’s a name I haven’t heard in years!!! looks really sharp. And the brewing company is great too.
I agree on Sealtest! I remember they were all around Western Pennsylvania. The building looks great!!
WOW everyone is doing such great work and having so much fun! I want to join in! LOL
Ed, wonderful phots and video, but more impressive is the story line and that your grandson enjoys the trains! I have tried to get mine to enjoy them. But they are more into computer games!
Bob, your doing a great job back in the corner! You must have spent quite a bit of time in the corner as a child! LOL I really like the tow truck and your plaster work is really topnotch!
Larry, all I can say is the same thing I always say about your layout and photos, I really love the look of your layout and drool over the photos you post of it!
Scott wonderful work, The building looks outstanding even though I have never heard of the company! Looks like a well known company for what others have said.
Well for me I finely got my 182 crane working, been working on that for the past 5 or 6 days. I could not figure out why it would spin but not raise and lower the hook. It seamed like the coil didn't have enough power to pull the plunger in to engage the clutch. I talked to Jeff the train tender then Bob Hamnon about the coil and it was testing out ok, so I ordered plungers and springs from Jeff, He said he thought it was a mechanical issue and he was right. The plunger for the hook had been bent just enough to where it was binding as it tried to go in. A little bending here and there and now it works. Just wish it wasnt so loud! LOL
I hope everyone has a great night and is staying safe! Also please find time to have fun, life is just to short!
Mike, I’m glad you got the crane working!!!!!
Managed to get 2 erections taken care of today
Excellent trouble shooting Mike.
"Reply by Jim Van Every
Managed to get 2 erections taken care of today"
Wow Jim, ya lucky dog! (Sorry Gang, but someone had to say it)
@p51 posted:Worked on the aluminum casting I got from the Age Of Steam Roundhouse over the past couple of days...
I drilled the holes last night to match some 1/4" by 3/4" celvis pins. Going to run picture wire through the holes in the pins, onto a hook on the wall.
Then, I painted it in a dark steel spray paint and will let that sit for a couple days.
Black paint will cover that once it really dries over a couple of days, and then I'll rub that paint off some edges while it's wet, and then add a light touch of rust weathering powders as the real plates were cast iron.
Just got the plate done. I strung wire through the back of the clevis pins which worked well, and it fit on two hooks I'd already had on the wall of the train room.

You can see I simulated paint wear, and later I'll put small patches of rust in some spots as the real plates were cast iron.
Kind if dull in black, but that's what the real ones were painted.
I liked the clevis pins as the holes were too close to the inside edges of the back of the plate to put any nuts on standard bolts...
@Quarter Gauger 48 posted:
Completely outstanding Ed'.. That is very cool'...Shut the remote no learn down. Zack will learn more running trains'... Electricity, centrifugal force, timing and speed, mathematics'.. meters, to inches, etc'..
BTW, your camera takes a crystal clear photo and video'.. WHat are you using again. Truly impressive'....😁👌📷
Ted, thanks. I use an iPhoneSE. I like it. I edit videos using iMovie and transferring video files to that application is a breeze.
@mike g. posted:WOW everyone is doing such great work and having so much fun! I want to join in! LOL
Ed, wonderful phots and video, but more impressive is the story line and that your grandson enjoys the trains! I have tried to get mine to enjoy them. But they are more into computer games!
Bob, your doing a great job back in the corner! You must have spent quite a bit of time in the corner as a child! LOL I really like the tow truck and your plaster work is really topnotch!
Larry, all I can say is the same thing I always say about your layout and photos, I really love the look of your layout and drool over the photos you post of it!
Scott wonderful work, The building looks outstanding even though I have never heard of the company! Looks like a well known company for what others have said.
Well for me I finely got my 182 crane working, been working on that for the past 5 or 6 days. I could not figure out why it would spin but not raise and lower the hook. It seamed like the coil didn't have enough power to pull the plunger in to engage the clutch. I talked to Jeff the train tender then Bob Hamnon about the coil and it was testing out ok, so I ordered plungers and springs from Jeff, He said he thought it was a mechanical issue and he was right. The plunger for the hook had been bent just enough to where it was binding as it tried to go in. A little bending here and there and now it works. Just wish it wasnt so loud! LOL
I hope everyone has a great night and is staying safe! Also please find time to have fun, life is just to short!
Thanks Mike. He plays those too, but mostly plays with trains when he visits. By the way, I spent many weeks in Sofia, Bulgaria in the early 90’s just after the USSR broke up. Really enjoyed it...😁
B&O Fan
I remember the Sealtest Ice cream. One of my favorites. Funny thing was I recognized the logo instantly and it brought so many memories back. Thanks. Well gotta go as Now I want ice cream.
@p51 posted:I just shot these for the heck of it:
Nice Video’s Lee. That’s the kind I like to shoot for the heck of it


 I did some Truck work on this Weaver Boxcar last night so I can get it back on the layout roster. It’s been down for almost 5 years.
Hello Lee,
Sorry that I did not know if your I’ll health until recently. Hopefully you are doing better now and bounce back to full measure...
Please correct me, but, believe you experienced a recovery from something else in recent years. So this process isn’t new to you.
I attempted a private message with you but got a stop signal 😏
I recall I began my wonderful journey with OGR Forum about the time your daughter finished her high school career where she played sports.
So I also wish the wife and girls are doing well!
lastly, the many times that I enjoyed playing the board game Monopoly, I always made my way by riding the rails via the Reading.😊
@Seth Thomas posted:Hello Lee,
Sorry that I did not know if your I’ll health until recently. Hopefully you are doing better now and bounce back to full measure...
Please correct me, but, believe you experienced a recovery from something else in recent years. So this process isn’t new to you.
I attempted a private message with you but got a stop signal 😏
I recall I began my wonderful journey with OGR Forum about the time your daughter finished her high school career where she played sports.
So I also wish the wife and girls are doing well!
lastly, the many times that I enjoyed playing the board game Monopoly, I always made my way by riding the rails via the Reading.😊
Thanks Seth. I’ll see what’s up with my email it should be ok. I’m not bouncing yet I’m at a hop. This was one of my first weavers I purchased.
Fixed a low coupler and posted videos of passenger train on What did you run. . . thread.
Decided to run my MTH Premier Southern Queen & Crescent Limited. The engine is a PS3 20-3465-1 and the cars are 20-4077. As much as I like the consist, it does not fit with what I am modeling, so I am listing it on the forum for a few days. (both are now in the hands of new owners Feb 2021) Had my camera mic off - so no sound. Enjoy.

Scouting Dad
Your heavyweights with your Crescent, what brand and series number are they.
And the Engine and tender, what’s the brand maker and series number
thank you for your help !
Replaced an incandescent bulb/holder in my LIONEL PW Northern Pacific F-3 B unit with an LM2596HV buck converter (w/ 22uh choke) and 5W 3528 string LED's (2 sets of 3 LED's) using JST mini-connectors.
Been a little while since I've posted on here, but we've decided to redo the layout to allow two trains to run at the same time. Been slowly working out how to do it and what makes sense with our layout.
Rough draft so far for the "East" section of the layout
@NS1975 posted:I tried to improve one of the corners of the layout. It was covered with just blended turf as seen in the extreme up right corner under the trees. Now there is a dirt path and what is supposed to be the edge of a parking area, along with some greenery.
Hi, I like how you dressed up the look of your Fastrack. What type/size ballast did you use? Would enjoy seeing an overall shot or two or a track plan. Great Job!
Thanks, Michael
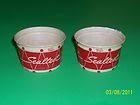
Speaking of Sealtest, remember these? Dixie cups circa 1960 vanilla or chocolate. Just don't get any on the trains.


 Today I decided to try fixing a nagging problem with my K-line Scale K4s. A part of the drive wheel rod connections on one side have been binding. There is brass part that attaches to the side of the shell secured by the flanges of the part and a screw. That part has an arm that secures the ends of two valve gear rods. One end of a rod is secured to a connector on the center drive wheel. After several binding events one of the brass parts suffers bent flanges. After several attemps to fix it I finally removed the brass part and the offending connection rod. I am going to try to find a new brass part. It might even be the same part is on the Lionel remake of the engine. In any event, the loco now operates without binding. Maybe it's time to look for a Legacy K4s.
First attempt at “paving asphalt”. I am building a trans loading area that is loosely modeled after a local facility near me. The asphalt in the yard where they load and unload is in fairly decent shape, and you can tell it’s been repaved a time or two. But the little road on the ROW to get to it however will beat you to death. It just gets patched over and over. So I attempted to replicate. Going to start putting Brennan’s chain link around it tonight


@ Jesse ferguson
Jesse: What did you use for the asphalt?
I give the credit to Eric’s trains. It’s just a 1 to 1 mix of white glue and woodland scenics fine ballast “cinders”. He has a great tutorial on YouTube. The only different thing I did was I “paved” a base layer with a 1 to 1 mix of Brennan’s yard ballast and white glue. I let it dry and then “pave” over it with the woodland scenics fine ballast for the final layer. To give it the look of being re paved.
@Jesse ferguson posted:I give the credit to Eric’s trains. It’s just a 1 to 1 mix of white glue and woodland scenics fine ballast “cinders”. He has a great tutorial on YouTube. The only different thing I did was I “paved” a base layer with a 1 to 1 mix of Brennan’s yard ballast and white glue. I let it dry and then “pave” over it with the woodland scenics fine ballast for the final layer. To give it the look of being re paved.
Thank you Jesse. They look is superb!
Jesse, Randy is correct, looks outstanding and I should know I paved for many years for the local government! Now I just dream about days gone by!
This week's project. I was tired of that bridge suspended in mid-air for 15+ years. ![]()
Here is a link to a really good artist on YouTube who provided the technique. He's really good and straightforward !


Love what you did, Brad!
Thank you, Lee!
Looking at it now in the picture, I kind of wish I had added another layer of foam on the left pier and overshot the baseboard. Oh, well, maybe in my next lifetime!
@Brad Trout posted:Thank you, Lee!
Looking at it now in the picture, I kind of wish I had added another layer of foam on the left pier and overshot the baseboard. Oh, well, maybe in my next lifetime!
It looks great, Brad!
I am starting an attempt to put some flat against-the wall background landscape. I cut some foam shapes and have glued them together. Next will be a layer of plaster cloth to add texture and some folds along the vertical sides to give more detail interest. Then I plan to paint it to simulate rock, add some turf. I was thinking some 1-2" trees on parts of the upper ridge line, and taller ones on the lower one to force perspective.

Also added some scenery around Wally's service station. Waiting for a few electrical components to install the sound system for cars stopping in for service.

Update on my K-line K4s: After I removed the short faulting rod I ran the engine again forward and reverse several minutes on a stretch of track earlier today, I repeated the test tonight and varied the speed to see if it would bind. It ran well so I made up a shot mail train (PRR B-60, PRR B-70, PRR BM-70 and New Haven B-60) and ran it for a while through the layout. So far, so good. Cheers.
I coated the plaster cloth on the tunnel with thinned joint compound to smooth over the fabric. Nothing photo worthy but I can attest to the fact that it happened. ![]()
Bob
@Lirr Fan1 posted:Hi, I like how you dressed up the look of your Fastrack. What type/size ballast did you use? Would enjoy seeing an overall shot or two or a track plan. Great Job!
Thanks, Michael
I use a variety of Woodland Scenics products for my ballasts and trackside details.


Added plaster cloth and painted part of the flat background hills today- should I add trees to both layers , or just to the front?
Before/after pics


Scott - if you are modeling Alaska, shouldn't everything be snow covered and white? Nice job on the details so far. Trees do not grow above the tree line, so you should not have trees above about 11,000 feet. Seems to me the back set represent high elevation and rugged terrain unlikely to support trees. The nearer ones look about the same. But certainly on the tunnel portals there should be fairly heavy forestation. just my two pennies since you asked.
Scott,
I like the way to added the plaster to the flat depth mountains. I have the same sort of shallow depth mountains on one part of my layout and haven't been happy with the look. I'm going to try that.
Mike
Working on a wall in my train room to display a couple oil cans and torches . I cut the wall brackets out of a 2X8" on the band saw, they still need to be painted to match the wall.


Can anyone tell me how these torches were used ?

Doug


Continuing touch-up work on the four LIONEL 15" off-set vista domes: took care of the white stripes on the car shells and plastic ends. Will tackle the little light green and dark green touch-up needed this week-end.
Reassembled my previously painted NP NCL diner. I borrowed its plastic car ends and attached them serially to the four cars I'm painting to define the white stripe locations. Basically, I'd attach the painted car ends then mask the stripe to match the car ends. Then I'd remove the pre-painted car ends; install the unpainted pieces; and, reattach the tape that I'd pulled back slightly. Worked pretty well.
Photos soon.
Doug, I would suggest that it’s a smudge pot which was used to keep switches operational during winter storms/freezing conditions.
What did I do on my layout today? I have two through truss bridges, one an Atlas that another Forum member modified and the other is the Menards, both are single track. The Atlas needs a bit of gluing since there was minor damage in shipping. No big deal. The Menards looks way too tall in comparison, and I had thought of seeing if another Forum member could use it. Well, cancel that thought. I was moving it and dropped it on the concrete floor. It is spare parts now. ![]() I am at least glad it wasn't an engine. My grip is not what it used to be. No Lew, I am not posting a photograph in the hopes that since there is no photograph, it didn't happen!
I am at least glad it wasn't an engine. My grip is not what it used to be. No Lew, I am not posting a photograph in the hopes that since there is no photograph, it didn't happen! ![]()
I did finish setting up some shelves my wife assigned for my use when she was taking her Christmas decorations down. I was more careful than I was with the bridge. Now I can have all my engines out between here, the shelves below the layout and a couple on the layout. I have a couple Menards boxes on the lowest shelf behind the B&O Mike just to try for size. If I do something similar with wood I could display a number of cars also!! Also, please note the license plate, cup, and ash tray commemorating the Butler Pullman Standard factory closed in 1982. Also, the caboose on the Menards box is lettered for Armco Butler Works.


 Hey Mark, nice looking trains on the shelves. My basement train layout room is semi neat and organized when I get around to cleaning off the work/project table. I noticed the Baggage/Mail or RPO car on your shelf. It's nicely proportioned. Who made that train set?
Tonight I got around to some layout to dos. I was in Menards to spend a rebate of $20 and bought 3 long pieces of tubular track to place on a 10 foot girder spur. I painted one side of the track earth brown camo and attached it to the girder sections. Then I found a few older cars to put on the track to see how it looked. I ran the local passenger train around the inner loop a few times to make sure the cars cleared the girder supports. I made a couple of rough timber track bumpers for a couple of spur ends.
@pennsynut posted:
Hey Mark, nice looking trains on the shelves. My basement train layout room is semi neat and organized when I get around to cleaning off the work/project table. I noticed the Baggage/Mail or RPO car on your shelf. It's nicely proportioned. Who made that train set?
Tonight I got around to some layout to dos. I was in Menards to spend a rebate of $20 and bought 3 long pieces of tubular track to place on a 10 foot girder spur. I painted one side of the track earth brown camo and attached it to the girder sections. Then I found a few older cars to put on the track to see how it looked. I ran the local passenger train around the inner loop a few times to make sure the cars cleared the girder supports. I made a couple of rough timber track bumpers for a couple of spur ends.
Pennsynut, thank you. The cars are RailKing Western Maryland heavyweights. I have the RailKing WM PS3 Pacific in front of them. It makes a very nicely proportioned train. There is an additional 2 car set and another single car that RailKing made to match. I saw the whole 7 car consist for sale at York a few years back. I just have these 4. I really don’t have room to run a 7 car train.
I’ve been wanting to do this latest project since visiting the Lionel layout in grand central station two years ago. I kept thinking how I’d approach it but the awning was my biggest stumbling block until two weeks ago when I looked over at my wife’s bathroom vanity (I usual consider this area off limits) and noticed a bottle of facial cleanser/soap. It had the perfect dimensions and curve to be a template for an awning. So I asked permission to repurpose this item and proceeded to cut it up. It looked rather good on the one story Ameritowne building that I bought for this project. 18 gauge copper wire and heavy weight fishing line cut appropriately and glued over the bottle template made the perfect awning frame. Heavy overspray with white primer and a decal search over the Internet led me to complete this project this morning. It still needs some more weathering over the decals when they dry, but I’m pretty pleased. I think even Johnny Ramone would be happy.


Here is the photo I tried to copy, which is exactly like the CBGBs I knew from the late 70s - 

And here is the Lionel display version in grand central station that started me on this project -

Next up I think I’ll take a stab at Pearl Paint and then Carnegie Deli.

The awning looks great!! You did an excellent job modeling that building. What in the world was the place anyway??
@Mark Boyce posted:The awning looks great!! You did an excellent job modeling that building. What in the world was the place anyway??
Thanks Mark. It was the best underground punk rock club in ny during the 70s to 80s that launched the carreers of a number of great bands like the Ramones, talking heads, iggy pop, blondie, etc. It was quite a fun place. Next up, I’m going to model the bathroom inside. That’s an inside joke, as the bathroom was notoriously disgusting, even for an underground rock club in the village of NYC at that time,
@Strap Hanger posted:Thanks Mark. It was the best underground punk rock club in ny during the 70s to 80s that launched the carreers of a number of great bands like the Ramones, talking heads, iggy pop, blondie, etc. It was quite a fun place. Next up, I’m going to model the bathroom inside. That’s an inside joke, as the bathroom was notoriously disgusting, even for an underground rock club in the village of NYC at that time,
Interesting. So that's why the two characters out on the sidewalk. Kind of like The Cave in Liverpool where The Beatles started?
What a great project Ray. I love it. I never went there but My Fathers Place in Roslyn was a regular stomping ground for us suburbanites 😁
I'd love to do that building one day on a bigger layout. The building was actually not to far from the LIRR Oyster Bay line so it could happen.
Bob
@RSJB18 posted:What a great project Ray. I love it. I never went there but My Fathers Place in Roslyn was a regular stomping ground for us suburbanites 😁
I'd love to do that building one day on a bigger layout. The building was actually not to far from the LIRR Oyster Bay line so it could happen.
Bob
I went to My Fathers place a few times back in the day. The best act I caught there was Springsteen. I also caught Sam Kinison doing a comedy act there one late night. It was just me, my two buddies and what seemed like only three other people in the crowd. I grew up in Queens, so the City and the Island were both stomping grounds. Great times!
Ran my PW based, abbreviated (F-3 AB w/ 4 cars) NP NCL on the club layout this AM only to discover my observation car was dark. Fortunately, the club has a very complete service/repair area, tools, and supplies so I was able to make the necessary wiring repair and put the car back in service.
Got a coat of paint on the plaster cloth. Ground cover and trees are next. Then I have to figure out how to get it set in place.


Access to this requires an OGR Forum Supporting Membership


