


Today I put a second application of earth color on the plaster. When that dried I put down some grass foam and then applied ballast to the areas in the front of the yard. Glued it all down but as I was doing it I had a train running on one of the upper loops......................Paul
Working on an under the city red light district. Found images online then using photo shop was able to design a city block. Put them onto cardstock and spray adhesive them to some wood. Made sidewalks for the front to the buildings.


Attachments
Images (3)
Originally Posted by Bryan in Ohio:
Working on an under the city red light district. Found images online then using photo shop was able to design a city block. Put them onto cardstock and spray adhesive them to some wood. Made sidewalks for the front to the buildings.
Nice Detail
-Pete
I bought a 100 light LED "rope" today, powered by a small solar panel. Let it charge this afternoon and just finished messing with it a little. I didn't pay much attention to the LED discussions earlier. Was wondering if anyone has done anything with these. The base holds one little NiCad battery !! 1 1/2 volts ?? Cut open the plastic tube a little and the light is a little brighter but not a lot of output, for sure.
Bryan: That's a real cute idea, there, decorating the usually left alone, underside of a section. Like what you've done to it. I'd like to try that, myself, on my layout, except that my "underneath" is so far away from actual contact from me that it would be impossible to get there. I'll just have to apologize to my 1/48 passengers for the lack of attention down there.
Paul Fischer
With the decal hunt successful, but other chores to do, just got in some brass bar stock
with which to play with maybe generating an extended pilot on this Lionel 0-8-0, to
accept that pilot truck. Looks like holes to drill and soldering...will see how this goes!
Originally Posted by Choo Choo kenny:
Pingman Eric's Train videos are on Youtube and he explains how to mix up this 2 part foam that is flexable and to put petroleum jelly on the rock molds so the foam wont stick. Choo Choo Kenny![]()
Kenny, big THANK YOU for the tip to check the videos.
Just installed working headlights in my bump and go cable car conversion.

Norma Bates Kitteh decided to help me test out the headlights by playing "Invasion of the Monster Kitteh". ROWR! ![]()
Mitch
Attachments
Images (1)
A couple of pics of what I finished yesterday. I cut down the base of the Korber switch tower and it set in-between the track and hill to the grade up nicely. I guess today I'll start near the top of the grade and work my way down laying down ground foam and planting trees...........................Paul


Attachments
Images (3)
Originally Posted by Big_Boy_4005:
"Belt and suspenders." Exactly! (I've never heard this before. But I like it)
Originally Posted by pelago:
Originally Posted by Big_Boy_4005:
Originally Posted by Adriatic:
Originally Posted by Big_Boy_4005:
While Matt was doing that, I worked on prepping a bunch of uncoupler magnets.
Hot gluing the magnet to the rail.

Have you done this before with hot glue?
Those magnets seem to get hot pretty quick.
I've owned one since I was a boy, but didn't use it much outside of wooden stage coach kits. But, I've been using hot glue "a lot" for the first time recently, urged by the heavy use among folks here.
I avoided it due to heat concerns mostly, but moved past that with the help of people here.
I find it great for fast scenery/structure work.
But (like I thought) I find it really doesn't take much heat to soften it again, and have had a few things "drop" from being around things I consider "warm".
I think silicone would be a better choice, or at least a back up faster considering you likely done hot gluing.
I used the hot glue on the ends farthest away from the magnet coil. Looking back at some of the ones I did a long time ago, I had super glued them. I can still go back and hit the edges, which would be a good idea from the sound of it. Belt and suspenders.![]()
not sure i understand this, hot? they only get hot when power applied for long time arent these used as momentary on/off deal? do you hold the button down and keep it down?
Sometimes...
...but more often when I was a boy![]() .
.
Lean wrong, or leave a kid standing near it alone for 20 second, and you might have a very hot magnet ![]() .
.
"Sometimes"-
My Grandfather also had many modified cars that used the magnets as a trigger too. Not exactly designed for it, but old school PW guys, used what they had on hand, to get what they wanted. Shoe pickups/track were not as common, so this allowed more universal operation visiting "simpler" layouts too. (I still have a giraffe that comes out for a look, only when over a magnet & the button is pressed. I think photos/diagrams of it, are in this thread about twenty pages back.(or one of Mitchell's). The trip mech for the giraffe car hits some engines & cars (which I forget?). They also needed to be down for a long, low, curved tunnel, and the trip mech didn't fit in visually on a hi-rail layout of the day (high-rail to us being a detailed, mostly realistic layout, with realistic track. Not quite 3RS)
Nice work Paul!
What brand of ballast are you using?
Originally Posted by paul 2:
A couple of pics of what I finished yesterday. I cut down the base of the Korber switch tower and it set in-between the track and hill to the grade up nicely. I guess today I'll start near the top of the grade and work my way down laying down ground foam and planting trees...........................Paul
Adriatic - Belt and suspenders is a very old expression. I've actually seen it in real life a couple times. Love the red button video.![]()
Since the layout is really intended for adult use, I doubt there'll be any meltdowns. I plan to keep the buttons away from places where they can accidentally be leaned on. That should help a lot.
Today was a BIG day for me! After two years of not being used, I finally got enough junk moved around to be able to run all six of the mainlines on my layout! It did take all day but I feel very good about it none the less! Oh the crud that can accumulate! I hope never again to be in this position again!
I have been working on the lift bridge and work yard on my layout. I have added wood sidings by using match sticks. The bridge is almost done and now would like to add red and green lights on the side. In the yard area I have ran string to look like power lines and added ground cover. Hope you enjoy the pictures.
David


Attachments
Images (3)


I 'installed' Cranky the Crane today.

Attachments
Images (1)
Originally Posted by Pingman:
Originally Posted by Choo Choo kenny:
Pingman Eric's Train videos are on Youtube and he explains how to mix up this 2 part foam that is flexable and to put petroleum jelly on the rock molds so the foam wont stick. Choo Choo Kenny![]()
Kenny, big THANK YOU for the tip to check the videos.
Anyone still unaware of Eric's YouTube fame needs to befriend Google search.
Great stuff, I watched him long before I saw he was here posting.
Originally Posted by Old Uncle Al:
Today was a BIG day for me! After two years of not being used, I finally got enough junk moved around to be able to run all six of the mainlines on my layout! It did take all day but I feel very good about it none the less! Oh the crud that can accumulate! I hope never again to be in this position again!
Glad you are up and running Al!!
Originally Posted by Mark Boyce:
Originally Posted by Old Uncle Al:
Today was a BIG day for me! After two years of not being used, I finally got enough junk moved around to be able to run all six of the mainlines on my layout! It did take all day but I feel very good about it none the less! Oh the crud that can accumulate! I hope never again to be in this position again!
Glad you are up and running Al!!
Hearing this made me grin ear to ear too ![]()
Six lines![]() Roaring fun there
Roaring fun there![]()
Nothing like those first few runs after a break![]()
.
Likely he's fussing with stuff right now!![]() ...???
...??? ![]() (if asleep more so
(if asleep more so![]() )
)
Mine was buried for months till just before Christmas. Shelf layout was holding all my stock from the table layout move too, so I could only run the Martian loop, a perfect circle of 0-27 doesn't make for long operating sessions. Lots of 5 minute flings, but not long ones. Finally I broke down, and began fiddling again. I was so happy to have it all operating again. Allowing me to..goof...
I only had some gloss paint to use on the tower, and it was really only a tiny bit too glossy after some weathering washes, so I thought a light coat of a dull satin might kill off the remaining sheen. I didn't pre-test it, and it turns out it was a can of high gloss, mislabeled as a dull satin....so for now I guess its a creosote, soot & oil shine.
Yea that's the ticket!![]()
Today was a maintenance day. Lubed and greased all engines and repaired my gang car that had some internal broken wires. Even had some time to clean the tracks. Overall everything ran better and looked cleaner!
-Pete
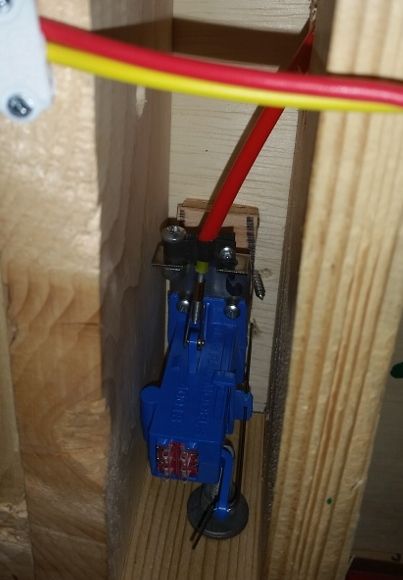
A lot of you have never seen a blue point controller for a turnout, I'd think. They're small and you mount them underneath the turnout directly.
SO, imagine this. You have a slot 2" wide with bolts running through it. You're not 100% sure it'll fit at all in there or line up with the hole. You have to run a section of wire smaller than piano wire, through a hole in the center points tie in a turnout which is exactly the same size, with your arms stretched all the way out because of course, it's the turnout furthest from the edge.
Then, you have to hold it exactly still while you grab a power drill and drill it, one-handed, from above while you hold the rest with your other hand from below. And the pull line is sticking out right into your chest.
Yeah, you could say I'm a little happy it worked out. I was prepared to just buy a ground throw, that's how unsure I was it'd fit at all!
Thought I would change direction and work on the grade planting trees. I had to make up some more last night and today. So here are some pics to show my progress working downhill to the lower mainlines..................Paul


Attachments
Images (5)
Originally Posted by paul 2:
Thought I would change direction and work on the grade planting trees. I had to make up some more last night and today. So here are some pics to show my progress working downhill to the lower mainlines..................Paul
Paul:
Bravo!!! Excellent scenery work!
Got the last black wash on. Going to do some fine detailing with washes tonight after work. Then jump back into scenery. Think my few month long mountain project is nearing completion! Haven't decided how I want the portals to look yet. Not sure if I'm liking the stone or not that's on them.


Attachments
Images (1)
Originally Posted by Lancer:
Got the last black wash on. Going to do some fine detailing with washes tonight after work. Then jump back into scenery. Think my few month long mountain project is nearing completion! Haven't decided how I want the portals to look yet. Not sure if I'm liking the stone or not that's on them.
Absolutely AWESOME!!!!!!!
Very, very nice work, Lance. Really looking good!
Matt was here again this afternoon and continued with wiring.
He got this section finished and all the wires tied up. They had been hanging down above Red Wing for so long, I almost forgot what it used to look like.

He also finished up this section. The black wires are track common. The red are center rail. And the yellow are for detection.

The entire mainline will have detection. Yards and industrial areas will not. Each block on the mainline has 3 detectors, an east, a west and a middle. Matt got these six back to this central location where they can cross under the aisle to a panel where they will be tied to the C/MRI system.

While he was working on that, I continued work on the Ford Plant. With any luck, I should have this done tomorrow.

Attachments
Images (4)
This loco kitbash progress is taking as long as the elevator kitbash, which was finally
finished and photoed: chase parts, brass sheet, strips, etc. I stink at soldering, so
the pilot plate and extension, with the pilot, are not going together well, and one
soldered connection has already broken, to be redone. The extension was cut and
drilled twice, as first did not seen long enough. This second fits the engine's original
pilot mounts much better, too, although engines's original screws would mount and hold either. (if soldering is not successful, will drill and counter sink for screws, so
there is an escape route, except the spoked pilots WILL have to be soldered to the
extender and pilot plate)
With a variety of junk box brass pilot castings to choose, none seem to have the right
steps, so steps may need to be fabricated, and many of the castings would have to be
cut, to provide for swing of Lionel compatible coupler. (next week, Lionel will probably
come out with their own factory version using this boiler casting, so all will be in vain![]() !)
!)
Made up some trees this morning so later today after the glue has dried I'll set them in along with some evergreens and two more sections of the grade will be done. I got halfway down but have to stop because I still have to reach over the grade to do work behind it. Hate to break a tree..............Paul
I didn't want to wake up my wife last night with the drills putting blue points in, so I instead finished painting the boxes for the car cards. I'd bought the ones you can get from micro mark, cut the top inch off the back as they didn't need to be that tall, then painted them the same color as the fascia with natural wood on the insides.
I'll be mounting them sometime before the weekend. Once those and the blue points are in place under the last of the turnouts, I'll finally be able to do op sessions!
I think this is a very entertaining thread, and apparently many others agree, based on the number of views. Thanks for starting it!
Here is my road addition, all done this morning. With snow piled up outside, this was a suitable use of time. 1/64 cars are posed on it, but to my eye they look small. Maybe it's the height of the track on cork roadbed. There are 1/43 models of "small" cars (sports cars, Metropolitan, Karmann-Ghia, Austin, Mini-Cooper) on an adjacent American Flyer section. For some reason they seem to look better.

Attachments
Images (1)

Nicely done, Lance. Thanks for the photo.
Your work looks good, Lancer. And the evergreens fit well with the rocky altitude. ![]()
It was a short work day today. Had a dentist appointment. But I got two more areas just about done. So that puts me about half way down the grade. Can't plant trees because I have to reach over and still do things on the layout behind the grade. But while I have the materials I'll make up trees for later. Anyways here are some pics. I still want to put in some more trees...........Paul


Attachments
Images (6)
Wow Paul! Your layout is looking great!
I had a very productive afternoon working on the layout, and nearly finished the overflow yard for the Ford Plant.
Now that the near ladder is in its proper location, I can finish cutting and fitting the body tracks.

Almost two years ago Patrick and I built the benchwork connection to the helix. I'm not sure what I was thinking back then locating it all the way to the back where that straight edge is sitting.

I put in this new plywood bridge. I had been dreading this project, but it turned out to be fairly easy.

It seems to be a pretty good transition both vertically and horizontally.

I hope to head back down after the hockey game to try and polish this off.
Attachments
Images (4)
I need a refresher course in soldering technique (as if I had one). thechnique, that is...however, since the spool rosin core solder wasn't working, I switched to both paste
solder, between the extender and the pilot plate, and to a thin acid core spool. I clamped them together with miniature C-clamps, applied good hot iron, paste solder boiled out, acid core worked like it was supposed to, and THAT assembly is good. I think I remember there is something you are supposed to use to clean off acid soldered locations? However, none of the pilot trucks I have are right, and the truck wheels and axle have to fit between the coupler and the cylinders. I am now fabricating the truck attachment for possible use with existing trucks, while I wait for another truck to float in. Steps and hand rails will have to be fabricated, too, but that will await getting the
pony truck working.
Since I needed different lengths of girder bridges and one double wide girder bridge, I decided to build my own. I used 3/8" bead board plywood hoping the beads might look a bit like supporting columns. I may add flat pieces to the top and ends of the "girders". I made 7 yesterday and need some suggestions on what color scheme to use on them. I was thinking about black with a rust color dry brushed on top of the black but maybe someone in the Forum might have a better idea.
Thanks, Jim

Attachments
Images (1)
Jim, I would defiantly add the flat trim to both the top and ends, it will be a dramatic change and add to the piece! Looking very nice!
I found out that a 1997 Mercedes E420 CAN fit a Marx store layout, four 6' fold-in-half tables, a dozen or so gym bags and hard cases and a 6 x 10 grass mat...

But it isn't EASY. ;-)
Off to the train show! (Feb 28, Holiday Inn Convention Center, Springdale, AR.)
Mitch
Attachments
Images (1)
I was going to get the last of the blue points in (other than the one borken turnout I plan to fix this weekend) when yet another turnout point bar snapped! Now I have two to fix. Dang it. But now I only have two blue points left to install once the turnouts are fixed.
So, I instead put all the car card boxes into place as that needed to be done anyway.

Man, I'm so ticked about how crummy a design this Micro Engineering turnouts are and how fragile all their stuff is. If I had to do it over, I'd have gone with anyone else's track...
Originally Posted by paul 2:
It was a short work day today. Had a dentist appointment. But I got two more areas just about done. So that puts me about half way down the grade. Can't plant trees because I have to reach over and still do things on the layout behind the grade. But while I have the materials I'll make up trees for later. Anyways here are some pics. I still want to put in some more trees...........Paul
Paul:
Again, spectacular scenery work! I wish I could hire you to work for me.
The show hasn't even started, and I've already adopted a dusty but otherwise functional ZW that some nice little old lady found in her attic and wanted out of the house...

20 volts at all terminals and the pilot and breaker lights work, plus a nice pliable cord. A good omen for this weekend, methinks. ![]()
Mitch
Attachments
Images (1)
Lucky man! ![]()
Here's my setup for the 2015 NWA Train Show!

If you're in the Springdale, AR area on Saturday 2/28 between 9 and 4, stop on by!
http://www.trainshow-nwa.org/
Mitch
Attachments
Images (1)
Originally Posted by M. Mitchell Marmel:
Here's my setup for the 2015 NWA Train Show!
If you're in the Springdale, AR area on Saturday 2/28 between 9 and 4, stop on by!
http://www.trainshow-nwa.org/
Mitch
Looks great, Mitch! I hope you have a good day at the show! I'll bet the kids will like the giraffe train! ![]()
As an aside, I've been to Springdale back in the early '90s. My father-in-law was transferred from Butler, Pennsylvania to the Today's Kids factory in Booneville for the last 10 years he worked. They lived in Fort Smith. Once when we visited, we took a trip to Eureka Springs passing by Springdale. I really liked Northwestern Arkansas!
Mitch, looks great. So, how much is shipping to 30076 for the ZW you bought from the "little old lady"?![]()
Nothing major this week. Installed 3 pr of Weaver Diecast 3Rail trucks on some old Atlas (pola?) O-Scale ore jennies. Still need 5 more pairs. Getting there....
Not nearly enough today. Figured out how to screw the new pilot plate on, using the
original plate's location, vs, first pass of having it held on by coupler mount screws. Tested and experimented with different pilot wheels and axles, and the mounting for the pilot truck. Going to try a Marx #999 pilot truck, as those mounting arms
would work, although I have another Lionel? set of spoked wheels I'd rather use, for
appearance. Lots of wheel and axle sets, but most need to be staked to hold on
the the press fit wheels when used as a pilot truck. Will look at some other upscale locos with spring-loaded pilot trucks to see if I can fabricate something maybe a little more advanced than the Marx gravity pilot truck, although I am fabricating a gravity assembly as the first test version for the spoked wheels, as these wheel are
a lot heavier than the stamped sheet metal Marx ones, and should track better.
I just sand down the throw bars on my two broken turnouts, mixed up and applied a thin layer of JB weld over each. I'll let that dry overnight, then sand down the remaining stuff and try drilling a hole for the blue point wires to control the positions.
I also adjusted two other blue points which weren't quite like I wanted. They both work great now.
All I need is to get these last two turnouts working and get the blue points mounted underneath, then I can operate finally!
I'm also going to the big model train show north of Seattle in the morning and hitting several hobby shops on my way south afterward.
Well; it's not quite yet "What I did on my layout today" but more "What am I gonna do today?" Today the Great Lakes Division, TCA has a train show, open to the public after 10:00 am, here in Cleveland at the Union Hall on Chevrolet Blvd. I will have a table there to see what I might move. Stop by and say hello and see what I might have that you "just can't live without". Not sure of my table assignment but I will have a Milwaukee Road Hiawatha F-7 Hudson out there in plain sight. Look for that.
When I get home this afternoon is when I'll be working on the layout.
Paul Fischer
Originally Posted by fisch330:
Well; it's not quite yet "What I did on my layout today" but more "What am I gonna do today?" Today the Great Lakes Division, TCA has a train show, open to the public after 10:00 am, here in Cleveland at the Union Hall on Chevrolet Blvd. I will have a table there to see what I might move. Stop by and say hello and see what I might have that you "just can't live without". Not sure of my table assignment but I will have a Milwaukee Road Hiawatha F-7 Hudson out there in plain sight. Look for that.
When I get home this afternoon is when I'll be working on the layout.
Paul Fischer
Sounds like a good day planned, Paul!
I still keep watching the schedule, and hope to attend some day.
Originally Posted by M. Mitchell Marmel:
If you're in the Springdale, AR area on Saturday 2/28 between 9 and 4, stop on by!
http://www.trainshow-nwa.org/
Mitch
Mitch, say hi to my Dad, Joe D. He already texted me a picture of the Gi-Raffe Express the Zebra car. Usually PA is better for trains, but today, I miss my home in Arkansas!
Made up a bunch of trees for down the road. After I had planted trees yesterday I thought it might be prudent to grab a scale auto rack to see how it goes down the grade. My grade is 0-80 curves so I found out I had to move a few trees that the car hit. Today I think I'll chill out and run a few trains. Maybe if I run them fast enough I can get the dust off them LOL.................Paul
Today I found a whole new way to operate, using the variable channel on my dcs. I won't do it routinely but it is a fun new option!
Tried to figure out how to wire a passing siding off the unused half of my MRC dual. Layout is 100% conventional. I want to be able to move one train onto it, park it, and run another train around it, and then be able to park the second train on the main line, and pull the other one out of the siding. I did this as a kid, 50+ years ago. Trying to remember how I did it. I used knife switches. I still have two of them.
What am I doing on the layout? I'm vacuuming it. The biggest headache of a floor layout is the unceasing rain of dust! And those miserable dust bunnies crawl in everywhere. Without a vacuum job every week, the layout would soon consist of a vast mound of dust, lint and animal hair. I suppose I could try to pass it off as a fog bank, but I prefer to remove it before it gets that bad.
Hi Diok S,
I have done this with my layout to create five electrical blocks, one of which is my mainline. This allows everything to be shut off for whatever reason.
My layout is an 027 conventional. I created three sidings and an inside loop. The loop being like your siding. I use SPDT switches- basically an off on switch. You will need a plastic pin in the centre rail of the track piece that joins the switch out to the siding from the mainline at both ends of the siding. You will also need the same arrangement for both ends of the mainline between the other arm of those switches. So basically what you are creating now are three electrical segments in your layout. The mainline which is on all of the time and two segments dependent on a switch being thrown to give them power. Then you run a power feed to each of the newly created segments with an off on switch inline of each feed. You may need one or more track power lines to the new siding depending on its length. I cross-connect all of my track-feeds, SPDT-switches, Transformer Power feed to one wiring panel where I easily cross-connect as necessary. I use my other sidings to create 1.a station siding which has a BUDD and Passenger express arrangement, 2. a third smaller D9 diesel with a hopper car. and still a third for future engine use. This arrangement allows me to have three engines on a conventional layout with one transformer. I have attached a couple of PICs to help you understand what I am talking about.
Hopefully this will help you at least get started. Please email me back if you have any questions.
Originally Posted by Diok S:
Tried to figure out how to wire a passing siding off the unused half of my MRC dual. Layout is 100% conventional. I want to be able to move one train onto it, park it, and run another train around it, and then be able to park the second train on the main line, and pull the other one out of the siding. I did this as a kid, 50+ years ago. Trying to remember how I did it. I used knife switches. I still have two of them.


Attachments
Images (4)
lowered some K-Line ore cars by using Weaver trucks and now working on re-lettering them.
Well, not exactly on my layout, but on a layout I sure get my hands into, on, over, and about - Lionel's layout at F.A.O. Schwarz, Fifth Avenue, NY, NY. Today, in the Layout Refinements inventory section of my basement, I finished my plans for and got all the miniatures, ground-covers, foliage, and paints ready to go into NYC to change the Lionel layout over from a Winter/Holiday celebration to a landscape that celebrates Springtime. Lionel's layout stays up all year 'round, in F.A.O., since sales have been so successful there the last several Christmases.

FrankM.
Attachments
Images (1)
I got a cheap box fan from Home Depot and taped a furnace filter to the input side; run it all the time on low in the center of the layout room and it's cut the dust accumulation way down.
Originally Posted by Balshis:
What am I doing on the layout? I'm vacuuming it. The biggest headache of a floor layout is the unceasing rain of dust! And those miserable dust bunnies crawl in everywhere. Without a vacuum job every week, the layout would soon consist of a vast mound of dust, lint and animal hair. I suppose I could try to pass it off as a fog bank, but I prefer to remove it before it gets that bad.
Originally Posted by John D.:
Mitch, say hi to my Dad, Joe D. He already texted me a picture of the Gi-Raffe Express the Zebra car. Usually PA is better for trains, but today, I miss my home in Arkansas!
Your dad very kindly helped me get my stuff home in the snow! ![]()
Mitch
Traction action at the Train Show!
The future of the hobby:

Not strictly train related, but tinplate, made by Marx and nifty:

Why I spend hours and hours on setup and running trains for the kids:

And, for some odd reason, I'm now into G scale. Does anyone have a single truck trolley they wanna let go cheap? ![]()

More pics below!
Mitch
Attachments
Images (18)


Spent another $100 on tools, supplies, and parts to do a $25 repair job--hobby math, again.
Good Idea.NickOriginally Posted by O Gauge Jim:
Since I needed different lengths of girder bridges and one double wide girder bridge, I decided to build my own. I used 3/8" bead board plywood hoping the beads might look a bit like supporting columns. I may add flat pieces to the top and ends of the "girders". I made 7 yesterday and need some suggestions on what color scheme to use on them. I was thinking about black with a rust color dry brushed on top of the black but maybe someone in the Forum might have a better idea.
Thanks, Jim

as i posted earlier I am building a small church, country style, has a steeple with a cross, and using GRANDT Line for windows and doors> This is the window i am putting on each side, four to s aide. These windows are recessed and i had to build a small jig to outline each window on the side and i used the jig to mark on (scale ) 6' centers four windows to a side, front door is double and same deal had to build a cut out jig probably will have a access door on the side.
so far actual labor hours in project (actual sit down with wood or tools in hand) 10
got incredible cedar shingles for roof, can not wait to put them up, so so real looking, and the siding from evergreen is so so real also, it is conventional siding
now to figure out how to color the window paines, five of em, but think they have to have color
suggestions, all i can think is clear acetate and paint??
Try colored felt tip pens for your windows. I ould xpriment first, though. I have used them on various projects.
4270 replies, maybe this thread should get a sticky
Today I looked at the circuit boards for my signal system. Then I spent some time dreaming and planning--mostly dreaming.
Norm
Took the day off from construction to attend a day long NMRA local division meet. It was a day of show and tell and general socializing with a few clinics thrown in for good measure. Much to my surprise and delight there were even a couple other 3 railers there.
I brought my laptop with all my pics and the lower deck track plan and gave virtual layout tours. Seeing as how the layout is totally based on local railroading, it was easy for everyone to understand and appreciate.
In the middle of the afternoon an announcement was made that the 2018 national narrow gauge convention was coming to the Twin Cities and the organizers were looking for layouts to tour. I didn't even have to ask, they asked me. I think my railroad just hit the big time. Guess I better get my butt in gear.![]()
In case you hadn't guessed, I had a good time!![]()
Originally Posted by Big_Boy_4005:
Took the day off from construction to attend a day long NMRA local division meet... ... the organizers were looking for layouts to tour. I didn't even have to ask, they asked me. I think my railroad just hit the big time. Guess I better get my butt in gear.![]() ...
...
If you are not "in gear," I have no idea who is!![]()
FrankM
That new ZW of mine cleans up pretty good...

Still has a bit of a stale cigarette smoke smell about it, tho. Next up: Whistle testing! ![]()
Mitch
Attachments
Images (1)
I fabricated a pilot truck gravity system that appears to work, but won't do a curve as
tight as 0-31, which test track section I was using. Made out of a brass bar, two brass
wires and a staked axle pressed on to the mentioned spoked Lionel wheels. Took much
trial and error as this assembly had to operate around the mounted Lionel coupler, which was tried over and under the brass bar that was screwed to the two original mounting posts. This is a temporary test system...hope to get in some smaller wheels for the pilot truck, and replace soft brass arms with piano wire ones. Now could see that there is room for a shorter pilot plate, so cut an eighth of a inch off the painfully soldered pilot plate, and have it set up in a vise to solder the buffer bar to, tomorrow.
I see I don't have to fabricate elaborate stairs and handrails up from pilot plate, as
photos of Great Western #60 show they were added after 1940. There is a feedwater
heater mounted on the pilot plate, under the smokebox, and two rod handrails and
simple steps that will have to be added.
Originally Posted by Kerrigan:
I got a cheap box fan from Home Depot and taped a furnace filter to the input side; run it all the time on low in the center of the layout room and it's cut the dust accumulation way down.
Originally Posted by Balshis:
What am I doing on the layout? I'm vacuuming it. The biggest headache of a floor layout is the unceasing rain of dust! And those miserable dust bunnies crawl in everywhere. Without a vacuum job every week, the layout would soon consist of a vast mound of dust, lint and animal hair. I suppose I could try to pass it off as a fog bank, but I prefer to remove it before it gets that bad.
I tried a commercial dust filter, and sadly, it didn't do much for my problem. The real difficulty for me is that space considerations force me to put the layout next to the basement stairs. So all the dust, animal hair, lint and other assorted airborne matter from the stairway traffic are constantly getting dislodged from the stairs and onto the layout.
I've considered blocking off the side of the stairs from the basement, but that would make them dangerously dark. Then I'd have to wire up a stairway light...
Nothing's simple.
Originally Posted by Moonson:
Originally Posted by Big_Boy_4005:
Took the day off from construction to attend a day long NMRA local division meet... ... the organizers were looking for layouts to tour. I didn't even have to ask, they asked me. I think my railroad just hit the big time. Guess I better get my butt in gear.![]() ...
...
If you are not "in gear," I have no idea who is!![]()
FrankM
Thanks Frank. In truth, I could try to be more productive with the hours I do spend. I could even spend more hours, and watch less TV, or just work on small projects while watching TV downstairs.
Three years seems like a long time from now, but it really isn't. I think I'm running about 6 months behind where I wanted to be with regard to track laying. This will be the year that the track gets done.
Originally Posted by Lancer:
Hung my new lighting I just picked up. Have to adjust the angles but they really look great! Put in a dimmer switch too!


Nice! What kind of lights and what kind of dimmer? (I work for Lutron, so I have to ask). Maybe I can write off my time on this thread as a work expense?![]()
Well, the track, with its attendant wiring, is the most important, isn't it. If that aspect does not get done right, crawling over scenery, later, to fix problems is no fun (as I discovered with my first layout, being too eager to run trains and have scenery right away. I had to learn to calm down.)
And your taking "time off" to watch TV, for example, seems very good sense to me. When you are "done" with all of it, you want to be able to look back at a happy and rewarding time, not just labor.
IMHO .
FrankM
And your taking "time off" to watch TV, for example, seems very good sense to me. When you are "done" with all of it, you want to be able to look back at a happy and rewarding time, not just labor.
IMHO .
FrankM
No construction yet - basement not nearly ready - but I did score a bunch of lightly used Atlas O track (my track of choice) for cheap.
Went to a train show yesterday and picked up a LionChief Plus engine for my grandson to use on the new layout. By the time I get back to NJ in a few months he will be 3 1/2 and I hope will be able to use the remote.
Originally Posted by pelago:
as i posted earlier I am building a small church, country style, has a steeple with a cross, and using GRANDT Line for windows and doors> This is the window i am putting on each side, four to s aide. These windows are recessed and i had to build a small jig to outline each window on the side and i used the jig to mark on (scale ) 6' centers four windows to a side, front door is double and same deal had to build a cut out jig probably will have a access door on the side.
so far actual labor hours in project (actual sit down with wood or tools in hand) 10
got incredible cedar shingles for roof, can not wait to put them up, so so real looking, and the siding from evergreen is so so real also, it is conventional siding
now to figure out how to color the window paines, five of em, but think they have to have color
suggestions, all i can think is clear acetate and paint??
Pelago:
Tamiya paints makes a series of paints that are translucent. The colors are Clear Green, Clear Red, Clear Orange, Clear Yellow and Clear Blue. Their part numbers are 810XX (green is 81025). We use this with great success on stained glass windows of custom built churches. We use overhead projector transparencies for glass. On the transparency, you dab one color on with ample space between splotches for future colors. Let one color dry before applying the next in a similar fashion. The effect is GREAT!
Another trick we use if a client wants the image of a real stained glass window/s from their church is to take a digital photo of the window from the inside of the church on a sunny day, reduce the photos to the proper size for the window, print them, via color laser printer or copier on the overhead projector transparency and apply them to the window frames.
Though I do not have Tamiya paint on my web site, I can get it for you, but, my wholesaler looks as if he is low on stock. Many local hobby shops carry it, also.
Happy modeling and do share a photo of the finished church with us on the forum.
ZW update: Whistle diodes work fine, but the 1950s circuit breaker tends to hang open. No matter, I'll nip over to O'Reilly's for a 15 amp auto circuit breaker later on.
Mitch
A bit of forgotten postwar vintage whistle tender lore: The impeller bearing was so dry that the squeaking was drowning out the whistle! So, I popped the top and applied some oil. Now, the impeller bearing has a reservoir topped by a spring valve, as seen here:

Putting oil on top of the valve does no good. Using a needle oiler, push down on the spring-loaded ball and fill the reservoir:

The whistle now roars merrily along, nice and loud and clear! ![]()
Mitch
Attachments
Images (2)
Well, I tried for 3 hours to make my damaged turnouts work. One snapped immediately in half again so I'm done trying to fix it.
the other held well and I mounted the blue point under it.
but no matter what I did, even though the turnout points went the right way and looked to be pointing in the right direction, every car derailed and some just went the other way. I'm pretty sure I damaged one rail somehow I just can't see.
I'm done with trying to fix them. Out they'll come.
I'm going to buy two each replacements just to be sure I'll have one that'll work.
I came this far, just at the end of where I need to be ton run trains, to have new things happen to prevent it mo matter what I do.
I was so ticked last night. I keep hearing that this is supposed to be fun.
Hasn't happened yet.
Originally Posted by Randy Harrison:
Originally Posted by pelago:
as i posted earlier I am building a small church, country style, has a steeple with a cross, and using GRANDT Line for windows and doors> This is the window i am putting on each side, four to s aide. These windows are recessed and i had to build a small jig to outline each window on the side and i used the jig to mark on (scale ) 6' centers four windows to a side, front door is double and same deal had to build a cut out jig probably will have a access door on the side.
so far actual labor hours in project (actual sit down with wood or tools in hand) 10
got incredible cedar shingles for roof, can not wait to put them up, so so real looking, and the siding from evergreen is so so real also, it is conventional siding
now to figure out how to color the window paines, five of em, but think they have to have color
suggestions, all i can think is clear acetate and paint??
Pelago:
Tamiya paints makes a series of paints that are translucent. The colors are Clear Green, Clear Red, Clear Orange, Clear Yellow and Clear Blue. Their part numbers are 810XX (green is 81025). We use this with great success on stained glass windows of custom built churches. We use overhead projector transparencies for glass. On the transparency, you dab one color on with ample space between splotches for future colors. Let one color dry before applying the next in a similar fashion. The effect is GREAT!
Another trick we use if a client wants the image of a real stained glass window/s from their church is to take a digital photo of the window from the inside of the church on a sunny day, reduce the photos to the proper size for the window, print them, via color laser printer or copier on the overhead projector transparency and apply them to the window frames.
Though I do not have Tamiya paint on my web site, I can get it for you, but, my wholesaler looks as if he is low on stock. Many local hobby shops carry it, also.
Happy modeling and do share a photo of the finished church with us on the forum.
thank so much, all ext walls very close to being finished, one wall is done, the front door area done, the back is done and the other wall with four windows is cut and painted and waiting for final assembly. windows were time consuming had to make sure jig was as close as i could get to the actual lip/rim of window, so that the final cut would enable the window to pop in, a little glue and its there!
went thru quite apile of scrap siding to get it right, and i have to admit, patience is the key, a steel straight edge along the bottom of the windows showed perfect alignment
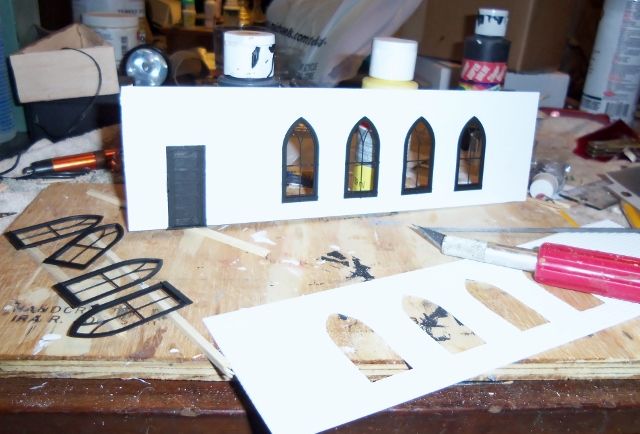
you can see the other wall laying on table with no windows in it and can see the windows drying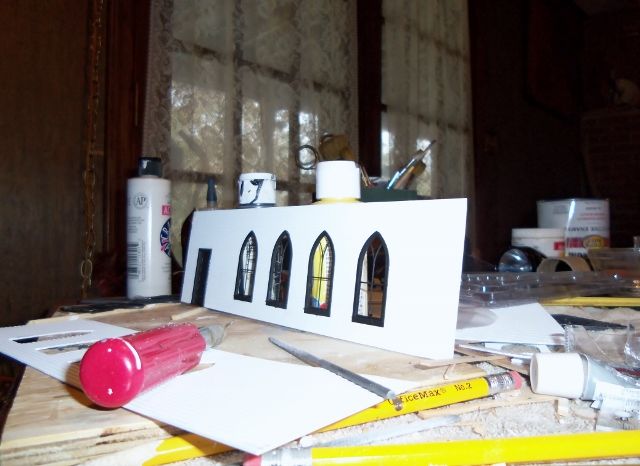
Originally Posted by pelago:
Originally Posted by Randy Harrison:
Originally Posted by pelago:
as i posted earlier I am building a small church, country style, has a steeple with a cross, and using GRANDT Line for windows and doors> This is the window i am putting on each side, four to s aide. These windows are recessed and i had to build a small jig to outline each window on the side and i used the jig to mark on (scale ) 6' centers four windows to a side, front door is double and same deal had to build a cut out jig probably will have a access door on the side.
so far actual labor hours in project (actual sit down with wood or tools in hand) 10
got incredible cedar shingles for roof, can not wait to put them up, so so real looking, and the siding from evergreen is so so real also, it is conventional siding
now to figure out how to color the window paines, five of em, but think they have to have color
suggestions, all i can think is clear acetate and paint??
Pelago:
Tamiya paints makes a series of paints that are translucent. The colors are Clear Green, Clear Red, Clear Orange, Clear Yellow and Clear Blue. Their part numbers are 810XX (green is 81025). We use this with great success on stained glass windows of custom built churches. We use overhead projector transparencies for glass. On the transparency, you dab one color on with ample space between splotches for future colors. Let one color dry before applying the next in a similar fashion. The effect is GREAT!
Another trick we use if a client wants the image of a real stained glass window/s from their church is to take a digital photo of the window from the inside of the church on a sunny day, reduce the photos to the proper size for the window, print them, via color laser printer or copier on the overhead projector transparency and apply them to the window frames.
Though I do not have Tamiya paint on my web site, I can get it for you, but, my wholesaler looks as if he is low on stock. Many local hobby shops carry it, also.
Happy modeling and do share a photo of the finished church with us on the forum.
thank so much, all ext walls very close to being finished, one wall is done, the front door area done, the back is done and the other wall with four windows is cut and painted and waiting for final assembly. windows were time consuming had to make sure jig was as close as i could get to the actual lip/rim of window, so that the final cut would enable the window to pop in, a little glue and its there!
went thru quite apile of scrap siding to get it right, and i have to admit, patience is the key, a steel straight edge along the bottom of the windows showed perfect alignment
you can see the other wall laying on table with no windows in it and can see the windows drying
Pelago:
Your progress photos look GREAT! Keep them coming.
Those particular Grandt Line windows work well with photos of real stained glass windows printed on overhead projector transparancy. Either photograph real windows yourself or get stained glass window photos off of the internet. there are hundreds out there.


"Those particular Grandt Line windows work well with photos of real stained glass windows printed on overhead projector transparancy. Either photograph real windows yourself or get stained glass window photos off of the internet. there are hundreds out there"
considered that, even considered trying to cut out color acetate and putting it in the five frames, but the width of one is 1/32" wide, just the thought of me trying that almost put missiles in the air from frustration of screwing it up, would be nice though
i even have a window design program, but none of the windows are in the catalog. while wandering around michaels i found some gold velum 8X11 sheets f0r 25 cents each, then a pale green, a foggy white, and a pale i mean pale yellow bought a sheet of each
got home and played with some color, the church will be lighted from inside and yeah colored glass would be a eye catcher, tried some red, some pale green, opaque white then i put a piece of gold in there and wow, it really caught my eye, said to my wife look at this and held it up at first no comment then she said hold it up again, and said, that really sets off the black trim and white siding, it looks good, with soft light behind it
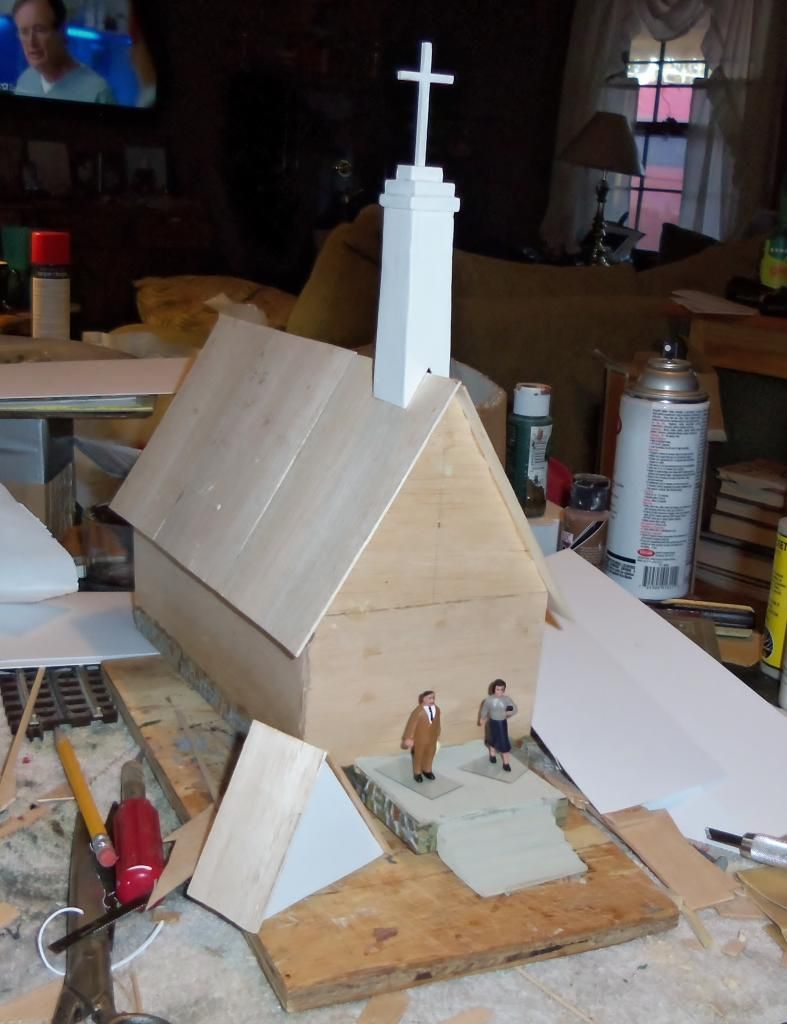
so the plan is gold velum on 8 arched windows, opaque white on entrance, a overhead light on a small porch in the front and a area light on telephone pole in back of church with trees and small picnic table . siding is white, trim black and roof (well just not sure, i have cedar shingles on my garage and on the railroad room and it will be that color)
that window design program works pretty good especially if the bldg is in the software there is a photo of my bride in the bathtub over Granatos Grocery, one of these days she will see it, perfect scale, i mean perfect scale and proportions
Historical Note: For those of you who use various and sundry parts from GRANDT LINE in Concord, CA ... Here is a rare photo taken of the company Founder, "Cliff Grandt" ..
Photo was taken in the 1940's at the old Eastbay Model Engineers Society club in Emeryville, CA (Oakland) ... Thought you'd all like to put a name to a face !
Cheers.
KRK

Attachments
Images (1)
Since I was using my Marx store layout at the train show yesterday, I figured it was only fair to give the Marx train that came with it a little exercise today! ![]()
A little oiling, a little cleaning and a few drops of smoke fluid later, this perky 666 was cheerfully grinding its way around my outer oval, easily pulling its consist! ![]()

Mitch
Attachments
Images (1)
Started the wiring for the passing siding, following Eric's instructions. Thanks so much!!
Today I was building chain link fencing around my oil distribution company, from #8 finishing nails, aluminum screen material and crazy glue gel. The result looks realistic.
Originally Posted by keyrouteken:
Historical Note: For those of you who use various and sundry parts from GRANDT LINE in Concord, CA ... Here is a rare photo taken of the company Founder, "Cliff Grandt" ..
Photo was taken in the 1940's at the old Eastbay Model Engineers Society club in Emeryville, CA (Oakland) ... Thought you'd all like to put a name to a face !
Cheers.
KRK
talk agout reasonable prices! i picked up 8 windows, one entry door, two 5 panel doors with frames. less than 15.00 including shipping, and enclosed was a super catalog, sure internet shopping is great, but me i like to hold the catalog in my hand, that way i can quick refer to pieces and parts
SIMPLE ENOUGH STATEMENT, GOOD PRODUCT, FAIR PRICES, SHIPS REASONABLY FAST. I LIKE DOING BUSINESS WITH THE COMPANY.
They have broadened my project list, farm windmill, water tower, pieces and parts for 'downtown', like the manhole covers
about my church, was commenting about lights and Tammy my wife said, don't "northern up the church" small rural churches were usually poor. but were the center of the community, up to including a cemetery, you were born in the church, raised in the church, went to Boy Scouts in the basement, might have even got your first kiss at some youth group event, you were married in your church, baptized your chidlren, and yes died in the same church. and it is probably as poor as it was the day you were born so don't Northern it up with chandoleers, and bit out door lights, keep it simple
i put in a 3rd line so i now have 3 continuous loops. did some track cleaning too. greased the wheels on my marx 10005's
Finally started laying track again! This is the first new track work since before Thanksgiving. I got the entire Wye constructed and the curved switch leading to the passenger station siding. Tomorrow I'll finish the straights on the inside loop and start laying the last of 4 curve sections. Pictures to follow.
Gilly
Originally Posted by keyrouteken:
Historical Note: For those of you who use various and sundry parts from GRANDT LINE in Concord, CA ... Here is a rare photo taken of the company Founder, "Cliff Grandt" ..
Photo was taken in the 1940's at the old Eastbay Model Engineers Society club in Emeryville, CA (Oakland) ... Thought you'd all like to put a name to a face !
Cheers.
KRK
Ken,
Thanks for the photo of Cliff Grandt.
Grandt Line sold me a large quanity of windows, still on the sprue, unpackaged, that
I haven't yet used because the photos of the stamp mill I want to model are purported to be locked in a vault, and unpublished. GL was accommodating. I have seen a few copies of those stamp mill photos, but not enough to model from. Today I drove through a blizzard (they don't call us train NUTS, for nothing) to a show hoping a parts guy would show up. Nope. I need better choices of pilot trucks for this kitbash. I did solder on the buffer beam and will later look at what else, in addition to the feed water heater, needs to go on the pilot plate. Luckily, it looks like less on the earlier version
i am trying to copy ("model" is the wrong term, as I elected not to grind off the
third dome, so "approximation" might be the right term).
Tonight I continued by trying to get the pilot (cowcatcher) to fit and work with the
factory coupler set up (everything to date has been designed around that, and that
is a problem). I am now test fitting a Weaver plastic "lobster claw" as it has less
vertical width and may clear the pilot opening. Would have to design in and add springs for horizontal return to center, and add a mounting block to the pilot
plate/original coupler mounting posts. Should hold everything until I can get some
different pilot trucks.
Yesterday and today it is train running. My challenge now is to come up with a control panel for the switches and uncoupling tracks and figure out where or how I can incorporate it into the table where the transformers are so I can run all the wires to them. Big hurdle for me because I am not a carpenter. I can measure three times and still not cut the wood right......Paul
Originally Posted by paul 2:
Yesterday and today it is train running. My challenge now is to come up with a control panel for the switches and uncoupling tracks and figure out where or how I can incorporate it into the table where the transformers are so I can run all the wires to them. Big hurdle for me because I am not a carpenter. I can measure three times and still not cut the wood right......Paul
ah-haaaaaaaaaaaaaaaaaaaaah
found your error, "measure twice cut once" that third time did you in
Add Reply
Sign In To Reply
