Moving


|
|
@Fendermain
That's a nice looking layout. Nice space to work in. Good luck on your expansion. Take pics and post them.
Had a good day running my military train on my friends layout.
SIRT, wow, that must be painful packing up your beautiful trains, and I’m wondering if you are moving somewhere near the same area. Hopefully you will be in the Nashville area. I enjoyed seeing your beautiful layout several years ago. Good luck with your move. Happy Railroading Everyone
Great looking train.
I know that layout but I cannot remember the owners handle or name. He helped me with a building. Would you let me know his handle and name?
(Edit) He used to be a prolific poster and I think his Father helped him build the layout. I watched the video again and he also turned me on to the maker of the murals on the walls.
Would enjoy contacting him.
Thanks.
@Fendermain, Wow, super nice layout and I like your new 2-8-0 C&O Consolidation steamer, and it looks like you also have an original American Flyer water tower, and a fun to run layout. @Drummer3, your American Flyer train and tracks brings back good memories to me, are you using the original American Flyer track rubber roadbed, your layout is really interesting, Happy Railroading Everyone 


@SIRT posted:Moving
Sirt, now that is packing up very well, very well indeed(cue John Cleese).
Steve, it looks like you planned well for moving your layout and train related items. Are you moving to a new state or locally? Have a good move!
Back to Pasco CO. FL. (Tampa Bay area)
@SIRT posted:Moving
Sirt,
I don't recall ever seeing the entire room and your entire layout. Do you have any overview/panoramic photos of the layout?
Dave
@Fendermain posted:Wow...lots of activity here and great work. I have not posted much since last spring as summer activities keep me busy.
I have decided to expand the layout and have removed shelves, wall hangings and a cabinet in the photo with the chairs. The last expansion was 15 years ago.
I also ran my new Legacy 2-8-0 and a Kline A5.
Fendermain
So what's the plan?
Bob
Hi Leapinlarry! Yes, this is original Flyer track and roadbed which is in like-new to excellent condition. Then there are some Gargraves straights with wooden ties. I cut strips of in/out grey carpet for the Gargraves road bed, and for the O27 Lionel track. Deadens the sound quite well when running the trains. Thanks for the 'likes' everyone!
@SIRT posted:Back to Pasco CO. FL. (Tampa Bay area)
Sounds like a great plan!! Thank you!
@luvindemtrains posted:Sirt,
I don't recall ever seeing the entire room and your entire layout. Do you have any overview/panoramic photos of the layout?
Dave
All on my link. Was featured in CTT.
Shutterfly 112 Photo Albums, 21,000 model photos here -

@SIRT, WOW, I have that issue of CTT magazine, thank you for all of the pictures you post, I’m almost sure you will have a new and larger layout in your new home. Have safe travels. Happy Railroading Everyone
@SIRT posted:Moving
TO or FROM ? ![]()
Whichever......it seems like an excellent area for model railroading to me. ![]()
@RSJB18 posted:So what's the plan?
Bob
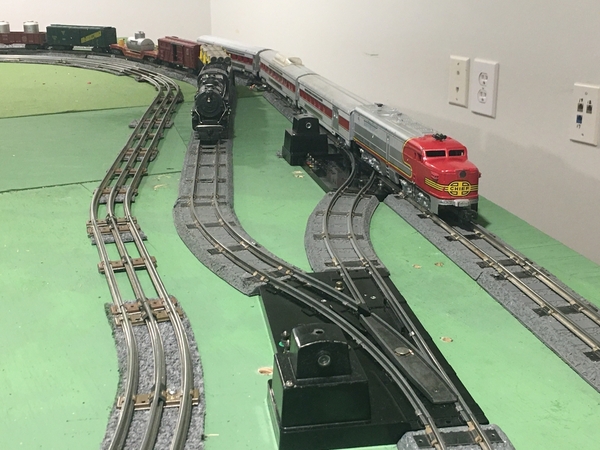
Hey Bob, good to hear from you. The current plan, since I need to reach the trains above, is a 2 ft wide and 8 ft long shelf that is supported with angle braces along the wall. It will have the same top trim as the current layout. An 042 switch will connect a single track from outer loop on the left.
The track will then curve to the right with another section that will have support legs. That section will reconnect to the main layout via a hinged 30 in lift bridge then back to the outer loop with another 042 switch.
The 042 Ross switches are on route from Hennings.
If there is enough room, I would like a spur track, probably 027, on the 2x8. I’m thinking about flats only buildings. Do you have flats on your layout?
Anyway, the plan is to trim it out well to match the main layout. It will not have the bead board below as it would overwhelm the area.
That’s the plan so far. Test fit of the 042 switches is the determining factor. Below is an old photo of the section on the right.
John
Hope the move goes smoothly Steve.
Sounds like fun Lee, enjoy the sessions.
Andy
Lee
Love the layout and the "vintage" photography.
@Steamfan77 posted:Hope the move goes smoothly Steve.
Sounds like fun Lee, enjoy the sessions.
Andy
Thanks Andy, Degnon Terminal area is in the plans next for year.
I haven’t posted in a while. I built a custom three drawer cabinet with full extension, soft close slides for my wife, but now it’s back to the layout. I placed some more trees along the fence track in the Oyster Bay yard. I also resolved the thermostat issue ( I removed it), and hung the signs my wife bought me a while back. I’m happy with this look for now. I might add a backdrop at some point or when we move someday.
Andy


Today and during the past 2 weeks, got all 16 of my 022 switches, two Lionel postwar semephors, a Lionel double signal bridge, a Lionel postwar gantry signal (single track) and 4 Lionel Postwar crossing gates in good operating order. The double signal bridge and crossing gates are activated by insulated rail blocks. Arnold
@Arnold D. Cribari posted:... When I painted my backdrop 25 years ago, what surprised me the most is how much I enjoyed it. That was a surprise because to say I did not distinguish myself in art class in elementary school would be an understatement.
Arnold, I like your comment about being surprised at enjoying your work. A year and some months ago, not knowing what I was doing, I took a can of light blue spray paint to some white poster board and was surprised at how much I liked the clouds and sky that appeared. I still don't know what I'm doing and am often surprised at how well things turn out.
As previously mentioned, the proposed expansion is marked with the blue tape. When you have limited space like this, the allotted area is mandated and track/buildings will be adjusted to fit.
I will probably use this as a switching annex as my layout has three loops with no switching possibilities. Also, my newest engines have Bluetooth control and would be easy to switch with.
I will hold back on the hinged lift bridge for now and contemplate its advantages and disadvantages.
The closeup illustrates the place where the Ross 042 switch will be used.
John


@Steamfan77 posted:Sounds like fun Lee, enjoy the sessions.
Thanks, the afternoon session also went well.
Scotie, enjoy:


This week I removed a little more grass mat by extending the scenery from the corner "mountain" out along the edge of the table about 1.5 feet. (on the right in the top photo and on the left in the bottom photo.) It creates a little more photographic interest for any railfans that may hang out there.


GNRW operating session videos and pictures:
@Fendermain posted:Hey Bob, good to hear from you. The current plan, since I need to reach the trains above, is a 2 ft wide and 8 ft long shelf that is supported with angle braces along the wall. It will have the same top trim as the current layout. An 042 switch will connect a single track from outer loop on the left.
The track will then curve to the right with another section that will have support legs. That section will reconnect to the main layout via a hinged 30 in lift bridge then back to the outer loop with another 042 switch.
The 042 Ross switches are on route from Hennings.
If there is enough room, I would like a spur track, probably 027, on the 2x8. I’m thinking about flats only buildings. Do you have flats on your layout?
Anyway, the plan is to trim it out well to match the main layout. It will not have the bead board below as it would overwhelm the area.
That’s the plan so far. Test fit of the 042 switches is the determining factor. Below is an old photo of the section on the right.
John
John- I like building flats. Gives the appearance of more than what's there without taking up precious space. I only have one flat that I did behind an Ameri-town building. It's paper prints done on cardstock. I added another building backdrop print to give it more depth.


Bob


Great idea Bob, I hadn’t considered using the paper print outs. My plan is to have an elevation along the far side with flats on the edge. The print outs will work on the wall for the deeper perspective. Thank you.
Jay
Hello everyone! Was able to take my O scale Flying Scotsman to the Slaton, Texas Harvey House and run it. The Harvey House asked the local train club to do a set up and a good friend was able to participate. I was able to run my Scotsman around his outer loop. What was neat, the real Flying Scotsman was in Slaton for the 69-70 winter months and was parked in front of the Harvey House in 1970.
Note: this is a 2 rail DC locomotive running on Atlas 3 rail track with a DC transformer.

We have been trying to complete a city on the layout Named for New Haven CT. The work here spans two weekends. We used a hardboard as a plywood cover and then cut more strips from the hard board for building bases, I purchased an Ameritown kit for a high rise apartment building to go around the lally column, The hardboard was sealed first with a primer before painting it and asphalt color for the paved areas. As usual we have a lot more detail to add. The turntable has been eliminated


@Bill Park posted:We have been trying to complete a city on the layout Named for New Haven CT. The work here spans two weekends. We used a hardboard as a plywood cover and then cut more strips from the hard board for building bases, I purchased an Ameritown kit for a high rise apartment building to go around the lally column, The hardboard was sealed first with a primer before painting it and asphalt color for the paved areas. As usual we have a lot more detail to add. The turntable has been eliminated
I'm looking forward to seeing your progress, awesome work so far. Thanks for sharing.
Enjoying being lazy today.....
.............just running trains . ![]()
B&O keeping the rails warm .
Make it a good day and be safe everyone. 

@Ulus Ekerman posted:Had a good day running my military train on my friends layout.
Definitely a good looking military train sir.
Some really sharp looking units on those flat cars .![]()
Been a busy two weeks since I last posted.
I added scenery to the tops and sides of the south side incline/decline as well as ballasted the mainlines to all the way to one of my lift-up sections. I also added basic ground cover:


I built up the southwest corner to ready it for some accessories and laid out my small trailer park/town town scene. The top part will be a pond, a WS Cabin and shed, and Lionel Tire Swing and Family Vacation accessories:


I got the cardboard stripping up and ready for plaster cloth on the final part of the upper level. I also painted the rock molds for the area which will be part rocks and static grasses (rocks not pictured).

I don't expect much progress this week as it's York Week!
As always, I enjoy seeing everyone's work!
-Greg
I climbed on the ladder and looked at what I think I need to do next, jotted down a couple of notes, then I ran a couple of trains for a few minutes. It was fun just to watch them run and I love that Legacy quilling whistle function, the trains sound so much better, I can't believe that MTH never figured that out. I will figure out how I'm going to weather the Atlas track and then after that I will ballast it. Even though it is above the doorway and around the room, I still want to scenic the layout to some extent, it will make it better for videos and stills.
@Greg Houser,
Lots of great work there! I noticed that it appears you are putting track down on raw foam sheets. I am concerned because going back probably 20-30 years there were problems with that. Overheated wires heated the foam to a combustion point. I’m hoping that someone can jump in and tell us that the foam has different characteristics now. My only thought here is to make you aware.
Regards,
Bob
Hi Bob,
I appreciate the thought. I'm using XPS insulation board commonly used in building construction with cork roadbed underneath. I know several folks who use it without issue.
Regards,
Greg
Greg,
I look forward to seeing your progress on your layout.
Late last night I completed the upper level loop shown in the video below. For years I ran a point to point trolley on an elevated section of the layout . At the urging of my grandson, I decided to try to build a complete elevated loop around the layout. The challenge was weaving through the existing layout. It was like building an airplane while flying it. As you'll notice in the short clip of the inaugural test run, I built it without removing any of the existing buildings, track etc. I used a combination of cantilevered supports and traditional "U" supports. Fortunately, I did not have to cut any track to fit. Much is left to do: LEDs under some of the elevated track, finishing the sides, securing track etc., but the look on my grandson's face when he first saw the trolley running was worth every sore muscle, less than appropriate exclamations= (![]() ) and time. Oh, the old adage "measure twice, cut once" well, good adage if you measure CORRECTLY at least once! While planning, I wanted to avoid a simple loop. The "S" curve made looping easier and gave the run some visual interest.
) and time. Oh, the old adage "measure twice, cut once" well, good adage if you measure CORRECTLY at least once! While planning, I wanted to avoid a simple loop. The "S" curve made looping easier and gave the run some visual interest.

looks great Ed; but more importantly it’s all about the kids!
Thanks, Pennsyfan. Yes it is!
Ed - trolley run really looks great. Good job and great that you were able to make grandson happy!
Don
@ToledoEd- great job! Looks like a nice feature added to your layout. And big enough to run more trains if the trolley is in the shop! ![]()
Bob
Not a 'today' post but rather a 'this past week' update. After slow-leaking any kind of scenery on this layout for the past couple of years, I finally started painting in roads and concrete, and planning for the sidewalks. I call this layout the Milwaukee North Western and shooting for a 'big city in a small space' look
Preparing for the mess to come

Only one photo posted here but there was a lot of taping to separate roads, track, and concrete


a couple of the roads are done

I used a couple of different ties under the track - one has detail, the Moondogs have none. However, once they've been placed under the track all that detail pretty much becomes lost anyway


Drawing in expansion joints breaks up the monotony of all that gray even though a lot of it will eventually get covered by buildings and detail


While the main drag is 6" wide, the side streets are narrower (4 1/2" - 5" varied according to what I felt looked right for the location)


Don, thanks for the kind words and your are so right...making the grandson happy and keeping him involved is what's important.
Bob thanks for the comments. You can bet once the roadbed is locked down, anything capable of negotiating O36 curves will be running elevated. My first consist will be my childhood train...a hand-me-down from my big brother... stay tuned! ![]()
@Arnold D. Cribari posted:Good work, Ed.
When I painted my backdrop 25 years ago, what surprised me the most is how much I enjoyed it. That was a surprise because to say I did not distinguish myself in art class in elementary school would be an understatement.
Part of my backdrop appears in the background of thus photo:
Thanx Arnold! I’m no great shakes at painting either but I have settled into a method for doing clouds that I’m comfortable with. As for hills and mountains, wellll that needs some work LOL
I think I’ll pause here with the trees until I figure out the position and type of structure I’m building in this spot.
Andy


Nice looking grass. I would dirty that up a lot. Throw some old ties and rail down a couple of buckets and a mound of gravel. Every RR I have ridden when I look out the window it's junk next to the rails. Just me.
@ToledoEd The "S" curve made looping easier and gave the run some visual interest.
Nice work on the elevated section Ed. Really like the " S " solution for greater interest . ![]()
@Dallas Joseph posted:Nice work on the elevated section Ed. Really like the " S " solution for greater interest .
Thanks, Dallas. It's more work than I thought, but isn't that always the case. But the payoff is worth it. Three trains running is the goal!
Added some people to the layout in a couple areas.

'Sand blasting' an engine, PM 2 engines and 'train running'.
@Wood posted:Nice looking grass. I would dirty that up a lot. Throw some old ties and rail down a couple of buckets and a mound of gravel. Every RR I have ridden when I look out the window it's junk next to the rails. Just me.
Thanks Wood, I’ll keep that in mind for other areas of the layout for sure. I already have a few spots in mind. This is in a park right next to the yard. I was thinking of a small structure to cover a few picnic tables, maybe horseshoes, barbecue grill, etc.
Andy
Rainy day here on LI so what's a guy to do when the outdoor work is rained out? Head to the basement of course! ![]()
Switched out power and rolling stock on the layout this afternoon. It's Pennsy time!

This K-line box cab is scheduled for a ERR upgrade.


Bob


Ok, enough with the "York Fun". Now, it's back to work (which is actually FUN,too).....
I picked these up from Ross at York......having ordered them when I saw that I needed more curves.....


Have a great day, folks!
Peter
Things have been busy as we have been working the rear of the left side where three levels join as seven tracks tracks go their separate ways via two Ross 4-way and 4 Ross 2-way turnouts. In addition the entrance to the steam service yard utilizes a Ross 3-way turnout that feeds the turntable, service tracks, and Roanoke Shops buildings 1 and 2.
Eventually three bridges will be installed. Yeah, it gets confusing.
So, yesterday the grandsons and Mom Alice came over for dinner and tested what was operable. It got kinda crazy as trains were run on three levels and all tracks were busy. Levels 2 and 3 end at the bridge piers; nobody violated the strict instructions concerning how far to advance. Surprisingly, there were few problems and the level 1/2 connector was incident free.
This afternoon Paula painted homasote and N and W J 612 went from the passenger station to the terminus of level 2 without incident. The only way back to level 1 is backwards which we will probably do tomorrow.
Everything is bare wood with a minimal amount of paint. Hills, mountains, retaining walls, etc have not been scheduled. It would be nice to have level 2 mainline track installed by Christmas but that is doubtful. Speckled trout and swordfish are biting.
Seven rear tracks include two empty bridge abutments


Level 3 Bridge is ready for weathering

N & W Cavalier delivers passengers to Level 2 Roanoke Shops


@Bill Webb posted:So, yesterday the grandsons and Mom Alice came over for dinner and tested what was operable. It got kinda crazy as trains were run on three levels and all tracks were busy. Levels 2 and 3 end at the bridge piers; nobody violated the strict instructions concerning how far to advance. Surprisingly, there were few problems and the level 1/2 connector was incident free.This afternoon Paula painted homasote and N and W J 612 went from the passenger station to the terminus of level 2 without incident. The only way back to level 1 is backwards which we will probably do tomorrow.
Glad to hear that the running session went well Bill. Grandson's on the remotes? I'd have my hand on the main power switch the whole time.
This is a great shot with the "J" passing the shops.
Bob
Bob, even though you were disappointed about being rained out, I admire your ability to shift and be productive. You deserve to have a libation for how you handled the day.
Jay
@Tranquil Hollow RR posted:Bob, even though you were disappointed about being rained out, I admire your ability to shift and be productive. You deserve to have a libation for how you handled the day.
Jay
Second glass of Pinot is on the way.....😁😁
@Dallas Joseph posted:Enjoying being lazy today.....
.............just running trains .
B&O keeping the rails warm .
Make it a good day and be safe everyone.
I like that long coal train and the beautiful Autumn scenery!
There's finally a grade crossing over at the Lumber & Hardware. Until now, you might be able to make it across - if could hit that ballast embankment fast enough to get airborne over the center rail. But that was a big if. At least several times a week, Kyle from the Union 76 had his wrecker out there trying to pull a car off the track. Everyone's much happier now. Only thing is, nobody can figure out why a brand-new grade crossing is all rutted and beat up like it's been there for years.


Halloween run today at TTOS Anaheim California
@RSJB18
All that Pennsy power looks great Bob!
I’m feeling like a slacker here. Haven’t accomplished much lately. Today I put the first coat of paint on the damaged trolley body. I had tried to weather the original yellow body and didn’t like the results at all. I’ll do a second coat and then apply some weather. This will be the shack at the bait and boat business. I plan on boarding up most of the windows from the inside; but looking at these pictures Im thinking that the interior needs a coat of black 


Successfully have Lionel Legacy, MTH DCS, and Lionchief up and running on my single track dogbone.
Next up will be a switch control panel using toggles and under layout drawer for all the electronics.

This should have been done a few weeks ago. Twin Pines Railroad is now a pile of rubble - at least the frame work and scenery is. More on TPRR. This is what the room looks lie empty.

An empty pallet.
So what’s the plan… and when???
@Bill Webb Bill - see the short conversations in the August posts on TPRR. Still have not made a decision as yet. Need to live in the space for a while to see what it tells me. ; )
@RSJB18 posted:Glad to hear that the running session went well Bill. Grandson's on the remotes? I'd have my hand on the main power switch the whole time.
This is a great shot with the "J" passing the shops.
Bob
Bob the boys have been running the trains for three years and no dives off the table yet (unlike me). Each of them have a passenger train and know what they cost.
Thanks for the J comment. It was nice to see the train climb the grade. Can’t wait to get the level 2 track run.
I apologize for being MIA for some time on this thread. Lots of great projects by everyone! Page 1150! Wow!
I have been working on my new double track Atlas truss bridge installation and reworking both lift-up bridges while doing fall outdoor chores. Here are a few photographs and videos of that project. I will now be working out the details of the upper level tracks off the open end of the double track bridge.


@Mark Boyce posted:I apologize for being MIA for some time on this thread. Lots of great projects by everyone! Page 1150! Wow!
I have been working on my new double track Atlas truss bridge installation and reworking both lift-up bridges while doing fall outdoor chores. Here are a few photographs and videos of that project. I will now be working out the details of the upper level tracks off the open end of the double track bridge.
Absolutely, brilliant!!!!!!! ![]()
Peter
Reconstruction.......back from York.......Halloween Open House this weekend.....


@Wood posted:
@pennsyfan posted:@RSJB18
All that Pennsy power looks great Bob!
Thanks Guys. The PRR has been my favorite since I can remember.
Nothing screams the golden age like "The Standard Railroad of the World"
I will probably upgrade the Box cab sooner than later. Now that it's back on the layout, and I have the boards in hand....Stay tuned.....😉😉
Bob
@Putnam Division posted:Absolutely, brilliant!!!!!!!
Peter
Thank you, Peter! I received a lot of help from ORG Forum members!!
@Mark Boyce posted:I apologize for being MIA for some time on this thread. Lots of great projects by everyone! Page 1150! Wow!
I have been working on my new double track Atlas truss bridge installation and reworking both lift-up bridges while doing fall outdoor chores. Here are a few photographs and videos of that project. I will now be working out the details of the upper level tracks off the open end of the double track bridge.
"🎶🎶What goes up, must come down🎶🎶
🎶Spinnin wheel got to go round 🎶🎶
Absolutely great Mark. You know how to make an entrance. 🤣🤣
Bob
@RSJB18 posted:"🎶🎶What goes up, must come down🎶🎶
🎶Spinnin wheel got to go round 🎶🎶
Absolutely great Mark. You know how to make an entrance. 🤣🤣
Bob
😆😆 Thank you, Bob!
@Mark Boyce, Mark, wow, your bridges go up and down so smoothly, your layout is coming alive, it’s so neat. Yes, you had some great advice and help here on the OGR Forum, Mike g., and I haven’t seen him chime in lately, probably honey do projects. Keep us in the loop, @Putnam Division, I admire your energy in setting up the multi unit modular layout as it’s got to be hard work, it’s an amazing display layout. I think retirement agrees with you, Happy Halloween, @Bill Webb, Wow, I love watching the building, planning, and operation process of your really nice model railroad, I was near Suffolk earlier this year, wow, so close, but I hadn’t looked at your profile until now, so I missed an opportunity to contact you. Keep up the good work, it’s fun to watch, We ran a few trains today just to see where we need to redo some track work.
Happy Railroading Everyone 


@Mark Boyce, your absence is excused. Your homework more than makes up for it! Great engineering and construction of those bridges.
Mark, the operation of your bridges are remarkable. Please post a video of trains passing through. Well done.
Ed
@John's Trains posted:I like that long coal train and the beautiful Autumn scenery!
Thanks for your nice comment John.
I'll have to get back to " WHAT DID YOU DO ON YOUR LAYOUT TODAY " or things will start to come up " MAIMTANENCE NEEDED ". ![]()
@Mark Boyce posted:I apologize for being MIA for some time on this thread. Lots of great projects by everyone! Page 1150! Wow!
You can " apologize for being MIA " as much as you want Mark.............but this was well worth the wait for our eyes. ![]()
Great videos of a really good piece of ingenuity. Thanks for sharing.
Thank you Larry, Pennsyfan, Ed, Dallas! Yes, I have been in contact with Mike, and he has been tied up with Honey-dos for sure. For those of us in the North, time for outdoor projects is rapidly dwindling! Since this was my second try at this project, it went smother, and is more solid with Mike’s plexiglass!
Joe is 'rail fanning' on the East coast, Ross Club pictures and a major paradigm shift with latest 'new delivery'.
Inspired by others on here who have enhanced the interiors of their passenger cars, I made the attempt to upgrade my PRR passenger cars. Found some historical photos online. Decided to use some card stock wood planking on one car and used embossing material over white glue to make carpet in the second car. I used an old gunpowder measuring spoon with tiny holes drilled in the bottom to gently spread the embossing material over the glue. I 3D printed some ashtray stands, coffee pots, and will add cups and dishes in the dinning car. All in all, I am pleased with my first attempt at this. Waiting to see how it looks all out together and running with lights blazing! Thanks for the inspirations.


Discovered that the front coupler on my K-line A5 is quite weak. The pin doesn't stay up in place to lock the claw closed. I wrapped it with a small rubber band which works until I can replace the coupler.
Ran it for a while too. ![]()

Bob


@LT1Poncho posted:Inspired by others on here who have enhanced the interiors of their passenger cars, I made the attempt to upgrade my PRR passenger cars. Found some historical photos online. Decided to use some card stock wood planking on one car and used embossing material over white glue to make carpet in the second car. I used an old gunpowder measuring spoon with tiny holes drilled in the bottom to gently spread the embossing material over the glue. I 3D printed some ashtray stands, coffee pots, and will add cups and dishes in the dinning car. All in all, I am pleased with my first attempt at this. Waiting to see how it looks all out together and running with lights blazing! Thanks for the inspirations.
Nicely done. I particularly like the idea of using embossing material to create the rug. Thanks for the technique.
Wood
@RSJB18 posted:Discovered that the front coupler on my K-line A5 is quite weak. The pin doesn't stay up in place to lock the claw closed. I wrapped it with a small rubber band which works until I can replace the coupler.
Ran it for a while too.
Bob
Bob, your claw spring is broken. You could push the claw pin out and put a new spring inside. A little touchy to work with but possible. Good luck.
@Wood posted:Bob, your claw spring is broken. You could push the claw pin out and put a new spring inside. A little touchy to work with but possible. Good luck.
The spring is fine. It's the thumbtack arm underneath. It doesn't sit tight against the coupler arm.
The rubber band works for now.
Thanks
@LT1Poncho posted:Inspired by others on here who have enhanced the interiors of their passenger cars, I made the attempt to upgrade my PRR passenger cars. Found some historical photos online. Decided to use some card stock wood planking on one car and used embossing material over white glue to make carpet in the second car. I used an old gunpowder measuring spoon with tiny holes drilled in the bottom to gently spread the embossing material over the glue. I 3D printed some ashtray stands, coffee pots, and will add cups and dishes in the dinning car. All in all, I am pleased with my first attempt at this. Waiting to see how it looks all out together and running with lights blazing! Thanks for the inspirations.
Your FIRST ATTEMPT looks like you have been doing this for years LT. ![]()
Really nice work . ![]()
Just a couple of small projects for the layout. Made a base for the flag pole and a pedestrian crossing at the station area. Once I’m sure of the flag placement, I’ll wire the spot light.
Gene


@Genemed posted:Just a couple of small projects for the layout. Made a base for the flag pole and a pedestrian crossing at the station area. Once I’m sure of the flag placement, I’ll wire the spot light.
Gene
I really like the idea of pedestrian crossing. Not something I have ever thought of. I really like how you made it. Thanks for sharing!
I really like the idea of pedestrian crossing. Not something I have ever thought of. I really like how you made it. Thanks for sharing!
Thank you
@Genemed posted:Just a couple of small projects for the layout. Made a base for the flag pole and a pedestrian crossing at the station area. Once I’m sure of the flag placement, I’ll wire the spot light.
Gene
That pedestrian crossing is very well done. Never saw that before.
@LT1Poncho, WOW! Amazing details.
@Genemed , Great passenger crossing!
@RSJB18, looking good, thanks for the kick you know where. The last time I ran the A5 it was cranky. I never got back to it. Now it’s on the list.
You may recall my plan earlier this month to merge the broken pilots below into one good one:

Here's the final product, with only a bit of shimming needed:

Thomas the TIE Fighter looks on approvingly. ![]()
Mitch
Access to this requires an OGR Forum Supporting Membership