RJT posted:End of day 2.


Rick
If I were you I would put in a suspended ceiling right now while it is easy to do. In my experience open ceilings like you have are always dropping little bits and pieces on the layout.
Al


|
|
RJT posted:End of day 2.
Rick
If I were you I would put in a suspended ceiling right now while it is easy to do. In my experience open ceilings like you have are always dropping little bits and pieces on the layout.
Al
Al Galli posted:RJT posted:End of day 2.
Rick
If I were you I would put in a suspended ceiling right now while it is easy to do. In my experience open ceilings like you have are always dropping little bits and pieces on the layout.
Al
I agree with Al about the endless little bits dropping from the exposed insulation. In my case, for various reasons (including cost), a drop ceiling wasn’t feasible, so I opted for tacking burlap over the joists. I believe I have seen pics on the Forum where someone used black landscaping fabric. Will save a lot of additional cleaning over the years.
Mike G. Not sure I have an Over the top creeper and will decide on hatches after I unpack it and see where I can and cannot reach.
Al and Paul I am planning on installing a ceiling I will screw it to the joists with drywall screws and large countersunk finish washers white side to the room. Much cheaper than a dropped ceiling 200 sq ft roll $65.00 should be able to do the entire basement for under $400. Had to order the washers not available in the local box or hardware stores.and got inpatient looking at all the lumber stacked against the wall.


The day before my wife suggested I use a 12x19 area for my new layout, I had pulled #14 wires from the two loops of the Ceiling Central RR (which is in part of that 12x19 space) to the adjacent 11x11 room where I had started building the Blackwater Canyon Line. My thought was to run the Ceiling Central RR off the DCS TIU and Z4000 and also do testing of the new layout. Previously, I had been running the Ceiling Central conventionally from a ZW.
So, I put all that on hold, while we deliberated over a similar but expanded plan for the "new" Blackwater Canyon Line. Check here for that discussion and plan. Well, I decided Sunday to go ahead and make the terminations and run the Ceiling Central as planned until I am laying track on the new layout, probably next winter.
Now I know DCS is basicly line of sight transmission between the remote and the TIU. I mean I have been working in telecommunications since graduating from college in 1976, where RF mas a major part of the curriculum. So why did I think there was something wrong with my wiring when I couldn't find the engine with my remote? ![]() Well Monday, I had a brainstorm.
Well Monday, I had a brainstorm. ![]() Maybe the walls are blocking the signal!!!
Maybe the walls are blocking the signal!!! ![]() I went into the doorway with the remote and all was well!
I went into the doorway with the remote and all was well! ![]()
So, I am going to swing the TIU and wire terminations around to the other side of the tiny room where I can get a line of sight from both rooms!! ![]()
And after 42 years in the business, I wonder why the telephone company has me only working three days a week, and only on documentation cleanup! ![]()
Mark Boyce posted:The day before my wife suggested I use a 12x19 area for my new layout, I had pulled #14 wires from the two loops of the Ceiling Central RR (which is in part of that 12x19 space) to the adjacent 11x11 room where I had started building the Blackwater Canyon Line. My thought was to run the Ceiling Central RR off the DCS TIU and Z4000 and also do testing of the new layout. Previously, I had been running the Ceiling Central conventionally from a ZW.
So, I put all that on hold, while we deliberated over a similar but expanded plan for the "new" Blackwater Canyon Line. Check here for that discussion and plan. Well, I decided Sunday to go ahead and make the terminations and run the Ceiling Central as planned until I am laying track on the new layout, probably next winter.
Now I know DCS is basicly line of sight transmission between the remote and the TIU. I mean I have been working in telecommunications since graduating from college in 1976, where RF mas a major part of the curriculum. So why did I think there was something wrong with my wiring when I couldn't find the engine with my remote?
Well Monday, I had a brainstorm.
Maybe the walls are blocking the signal!!!
So, I am going to swing the TIU and wire terminations around to the other side of the tiny room where I can get a line of sight from both rooms!!
And after 42 years in the business, I wonder why the telephone company has me only working three days a week, and only on documentation cleanup!
No worries Mark- If I had a nickel for every time I overlooked the obvious I'd be a rich man! ![]()
Repaired this ol' gal - a K-Line PRR E8 A-A pair with TMCC. I'd lost the sounds and I knew I had an electrical gremlin somewhere. I thought they were related but a lot of poking around and trial and error proved they weren't. The Loss-of-sound problem turned out to just be a bad speaker. I rummaged around until I found one with matching impedance and voila! It works. The "gremlin" I thought I had was fixed by installing the 9 volt battery that came with the loco. This is the first and only TMCC loco I own on which I've had to install the battery. Every other TMCC loco I have has been running since day one without the battery. I dunno.
This loco is old enough that the headlight that was used seems dim and yellowish compared to modern, bright LED headlights. I might swap that out too.


RJT Are you going inside the beams or on top of beams -approximately 16” on center? This material may solve my ceiling problem. Thanks for any info. Art
Didn't get to work on anything till now. Had too much running around during the day. Got the screws set in the rails and opened my second order of Korber flats. It will be tedious cleaning the flashing so with a suggestion from CHRIS A tomorrow morning I'll get to the depot to buy a couple of square files to clean the flashing up. That should make the job go faster. Pics...............Paul


Paul, any small step is better then none! Great job!
Is anyone else having a problem when they click a link from email ? I have to refresh the page to comment
Mark,
Go with the DCS wi-fi. Skip the hand held remote all together. You will be glad you did.
John
John, I didn't mention that I have a WiFi because I hadn't gotten that far. I had to stop as soon as I discovered it was the remote positioning. I have had the WiFi for a while, and it worked out good on my temporary Christmas layout that I haven't taken down yet. Here's the photograph I should have included.


I was dogsitting the trainhating dawg today, so I could not run any trains. So I sat looking at my little layout thinking
about what kind of railroad had two loops of track going nowhere and a siding. And of course a Flamingo boot camp.
Odd assortment of buildings, various vintages of rolling stock and lots of things in various stages of repair.
Trains get changed out frequently for different ones. Duh, firm slap to forehead! A train museum. I drive by
one two or three times a day. So now every thing on my layout is justified and correct, no matter what era.
All I have to do I come up with a name.
beardog posted:All I have to do I come up with a name.
Fort Flamingo Railway Museum and Chowder Hall.
Mitch
What I did on my layout today.

Step 1: Fill a hole in the railroads right of way. The groundhogs have been busy.

Step 2: Products needed to take out these groundhogs; 50% white glue / 50% water with a drop of ’Simple Green’, DAP Patch, fake grass, brushes, and Premium Play Sand.

Step 3: Mix the play sand with the glue mixture along with some fake light grass. Fill the hole when the groundhog is home. The rock my grandson found in the backyard, and gave it to me saying: “Grandpa this would look great on the layout”. Well, grandpa being a cool grandpa, I glued his rock to the right of way with, ‘Cyanoacrylate - Insta-Cure+ Glue’
With summer now here, it is time to go fishing.
Have a Great Summer: Gary


Hey TRAINROOMGARY, nice job. I see the little critter,groundhog is up inspecting your work!
btw, who makes that cool little dwarf signal?
Leroof
"What did you do on your layout today?"
Well, I could tell you, but you may not believe what I've been thru!

4th attempt at getting my GGD 20th Century limited cars converted to 2 rail and to roll better. I made a dumb mistake and it came back to bite me. I used new GGD pointed axles in the old stock blunt bushing truck's side frames and they rolled decent for some time. Then they ate the bushings up from being a sloppy fit. I tried a couple of different truck brands and finally ordered more bearings to convert the original trucks to bearings. I re-installed the stock blunt axles with new wheels pressed on. Now the 1st car rolls like it should.
7 more to go... maybe as they wear out? It took hours. Would have helped if I paid attention to the direction that the shell was on originally. About 2 or 3 weeks for the bearings to arrive and I forgot which way. 50/50 shot and it was backwards. Urrgggg!
good start mitch
Leroof posted:Hey TRAINROOMGARY, nice job. I see the little critter,groundhog is up inspecting your work!
btw, who makes that cool little dwarf signal?
Leroof
Leroof, Yes he is keeping an eye on Gary's work. My dad always told me when I was a little tike, that groundhogs always have a backdoor you can't see. Gary just needs to hope the new front door is off the layout. ![]()
ok, this is getting scary. First we have the **** gir-afs everywhere, then the helpful and
cuddly flamingos, now we gots us smelly groundhogs?![]()
Fort Flamingo Railway Museum and Whiskey Bar???
Ralph M posted:Repaired this ol' gal - a K-Line PRR E8 A-A pair with TMCC. I'd lost the sounds and I knew I had an electrical gremlin somewhere. I thought they were related but a lot of poking around and trial and error proved they weren't. The Loss-of-sound problem turned out to just be a bad speaker. I rummaged around until I found one with matching impedance and voila! It works. The "gremlin" I thought I had was fixed by installing the 9 volt battery that came with the loco. This is the first and only TMCC loco I own on which I've had to install the battery. Every other TMCC loco I have has been running since day one without the battery. I dunno.
This loco is old enough that the headlight that was used seems dim and yellowish compared to modern, bright LED headlights. I might swap that out too.
Nice scene, Ralph. It would be a shame to not be able to run that beautiful engine. Glad you were able to fix it.
Art(KATY409) I am attaching to the bottom (exposed) of the joists so it will appear as a flat white ceiling hopping to be able to pull it tight with little to no wrinkles or sags. Than going to mount the hanging LED lights straight to the joust also and add several more as I notice darker areas when I am working on the bench work and other projects.
a great day outside yesterday !!

beardog posted:ok, this is getting scary. First we have the **** gir-afs everywhere, then the helpful and
cuddly flamingos, now we gots us smelly groundhogs?
Well, Beardog, bro, this is the place for a maximum of creative shenanigans
![]() and expressions, huh.
and expressions, huh.![]()
Here's the wildest I ever got, crafting-in what I intended as a seasonal holiday parade featuring "floats" and huge "balloon"-type cartoon characters announcing pre-Christmas cheers...


![]()
![]()


 A bit "crowded" but if you've ever been on Central Park West, NYC, for the "Thanksgiving Day Parade" you know what crowded is, in and around the parade's precincts, right?
FrankM![]()


Frank, You really did show Beardog how crazy with "animals" it can get around here! ![]() You made a great Christmas parade complete with "floats". Those photographs are definitely keepers!!
You made a great Christmas parade complete with "floats". Those photographs are definitely keepers!!
beardog posted:Fort Flamingo Railway Museum and Whiskey Bar???
Le Flamingo Railway Sanitarium??????


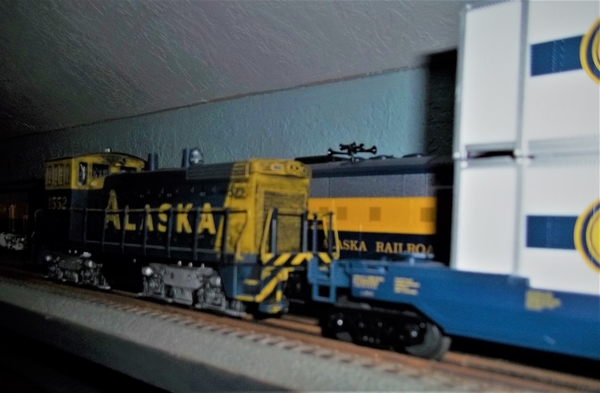
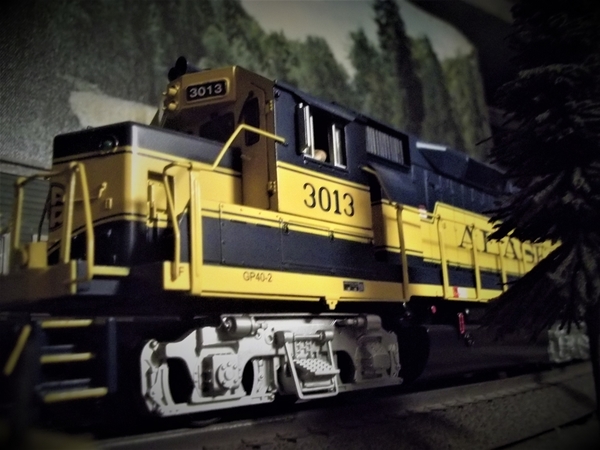
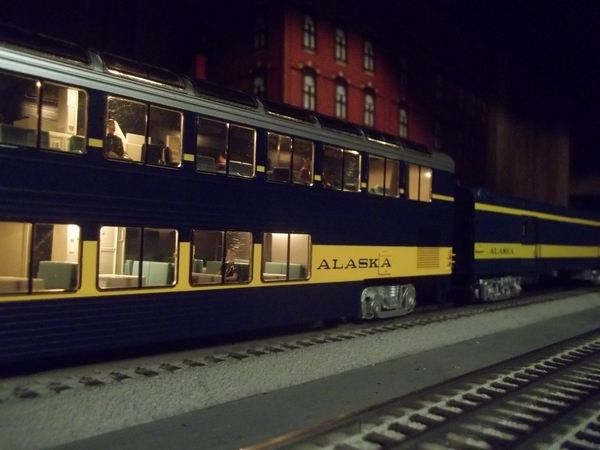
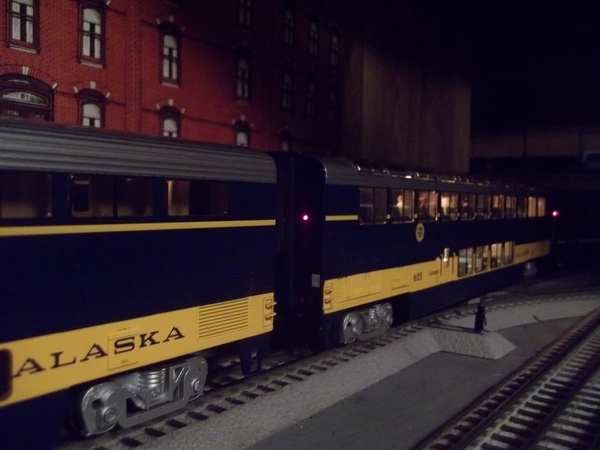
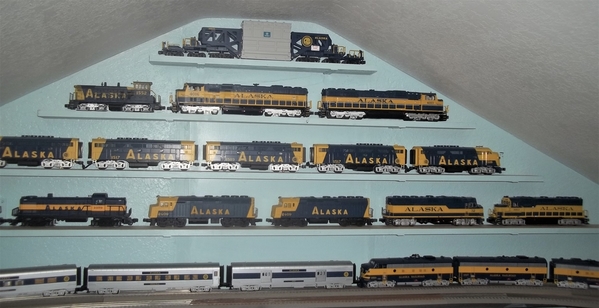
Very nice Alaska equipment, Brian!
Brian, I agree with Mark, Very Nice~!![]()
Mark Boyce posted:Frank, You really did show Beardog how crazy with "animals" it can get around here!
You made a great Christmas parade complete with "floats". Those photographs are definitely keepers!!
Thanks very much, Mark. It's fun getting your viewpoint on that project of mine.
And my Thanks to these forum voices that sent me LIKES:
Briansilvermustang; RSJB18; mike g; M. Mitchell Marmel; Big Boy4005.
Progress continues - Got a lot of the details done, windows glazed and installed, vents, stacks, fortunately the oak loading dock only needed one coat of india ink and alcohol, with very minor touch up after it dried.... Added floor joists to the 2nd floor clapboard "bump out"....
Decided after painting some of the roof smoke stacks flat black, which I have been doing for 30 years.... to change my approach, repainted them primer gray, and did some spot application of rusty metal primer, then I applied two coats of india ink/alcohol - got a much grimier finish ..... this was how I did the window sashes as I didn't want them coming out perfect and universally black.....
Have to figure out the parking area better (far right end)...., and I am going to build an "end of spur" loading ramp so that equipment could be delivered via flatcar, and either driven off, or taken off with forklift... The road is already there, and coming down grade so that it's really close to the bed height of a PS-4 flatcar.... It will give me a good excuse to deliver/pick up a PS-4 flat car to this siding every once in a while....
")
")
")
")
")
")
")
")
")
")
")
")
how about the "FORT FLAMINGO RAILWAY AND DISTILLERY MUSEUM"
briansilvermustang posted:
a great day outside yesterday !!
Brian, I just love your pictures....![]()
Mike ![]()
chris a posted:
Absolutely great work Chris, just beautiful!
Mike ![]()
Mark,
If you had the Wi-Fi, you know how well it works. I now look at my handhelds as dust collectors. After the years of "engine not on track", this is the route to go.
John
Chris, really nice job on that structure. Lot's to take in when studying it. The brickwork, the wooden bump out, blocked out windows, the vents. Things you just don't see in your basic out of the box brick building kits. You gave it the look of a Bar Mills Craftsman wood kit. Except done in brick.
Mike, thanks very much. I love the joke under your signature, needed a laugh tonight.
Dave C: Appreciate your noting all the detail work... Have pretty much given up on a time schedule on this, once I start working the hours start passing by and I keep adding more to do's. It's a great way to spend some time and keep improving my techniques. I never thought I'd like, or do much, scratch-building, but after doing quite a bit on the coal mine module, and a fair amount on this project, I have to admit I like the challenge.
Access to this requires an OGR Forum Supporting Membership