


Paul, don't worry, I have a feeling if your like the rest of us, its not the first or last time!![]()
Jonny, that Fire House and Fire Truck assembly is outstanding! Very clever and well executed.
Paul, you are amazing! It is great to see you stay on course with your eye on the objective, and not get derailed by mistakes. More mistakes will come your way. You obviously enjoy the process, and get satisfaction putting things to rights.

new Illinois Central caboose ?
nope...

Attachments
Images (5)


After opening up my package from Patstrains. It was another two sets of Weaver/MTH die cast trucks I went to the basement. I let the redone flat section dry all night. This morning I applied spackling to the two joints. When that dries I'll lightly sand them down and cover with concrete paint. Once I do that I canset it on some Luan board and trace for a bottom piece and a top pice for the roof. Pics....................Paul


Attachments
Images (3)
HCSader73 posted:Jonny, that Fire House and Fire Truck assembly is outstanding! Very clever and well executed.
Thank you Pete!
With the spackling dry I sanded down the two joints and added the concrete paint to them. Once dried I'll make up a couple of braces to glue at the back to give it some strength. Tomorrow if I have a chance I can make up the rook and bottom for the building. Pics.............Paul


Attachments
Images (2)
Paul, The top photograph angle makes it look a bit like the Flatiron Building in New York.
Incidentally, I like your project table! You are like me, making do with whatever space you can find!! ![]()
Thanks Mark. The washer dryer were the first tables. Then I made the pull out table but I was too lazy to walk around to the other side of the basement to use it LOL. Paul
LOL Paul!
My apologies to Larry and Dave for not mentioning you by name in my last round of thank yous. Simply an oversight on my part, with so many comments.
Dewey - Thanks from both myself and my wife. I keep getting boo boos, and she keeps patching me up. Many of my injuries have come from working on the layout, but not all. Some of the most common for me are scrapes on my legs, from getting under the layout. She has an entire kit of bandages and topical treatments for every disaster that befalls me.
Adriatic - I actually have books on graffiti, even some "how to" stuff. Not that I would ever grab a can and go out and do it, but more to try and understand it, for the purpose of recreating it on my models. I may have my wife use gel pens to hand draw images based on photos of real cars, I have quite the collection. Much of the brightly colored stuff is just the tag of the artist, that has become very stylized over many iterations, in many cases to the point of illegibility. This is a 911 mural, along with the names of the artists. It takes a lot of planning and paint to pull this off. If you want to see it better, copy the image, and zoom in on it.

I have images with political statements, and plenty of profanity, some with an interesting message, but also a lot of generic garbage. Of course I can't post those here, but I could email a few of my favorites if anyone wants to see. I even have 3 degrees of separation from a rather prolific artist, and yes, his work is art. He goes by the name "27". A train buddy of mine, knows his mother. I've never met the kid, but I'd like to. My buddy commissioned him to do his rendition of Milwaukee Road 261 on regular canvas. It hangs at the bottom of the stairs at Gary's house. I have a picture of it somewhere, but I can't find it right now. This one is a favorite of mine. Read the caption!

Here's more of 27's work. No message here, just pure art. I don't have a wall big enough. Take a boring brown car, and create this. I hope my wife can draw this, because a decal would be next to impossible.

Mike - That's not a fair comparison for Paul.![]()
And on that note, in an effort to stay ahead, I unpacked more trains yesterday.
I have five of these Atlas Gunderson sets, and this is the first one out of its box.

Unlike the 53' cars, the connection on these requires that these pins...

be inserted in that hole. I can't get my sausage fingers in there, even a normal person couldn't. Fortunately, I have hemostats, and after a few tries, I learned the trick.

It's starting to look like the real thing. The trains are the scenery! Just wish I had the ballast done. Oh well, it'll be OK.


There are twelve 53' containers left, just enough to populate the two remaining car sets.

I'll put them over at Shoreham.

Pay no attention to my finger, this my container inventory / database. When we get to operations, the containers will stay in their cars. They won't have car cards, just the cars themselves will.

This pile has been entered, but still needs unpacking.

I had a couple loose 40' containers and threw them in. I have an even larger stockpile of these. I only need 50, but I have close to 100. More stacks to use as scenery.

Attachments
Images (13)
You'll have to dig deep to offend me with photos Elliot, mail is in my profile when you get bored enough  .
.
I've only painted signs on buildings.... retail... Not " gang" ![]()
I posted this under the wrong topic because I was not paying attention to what I was doing. Tonight I decided to add two braces to the back of the angular building I am working on. Once I glued them into place I turned the building on its side and used my trusty weight to hold them together till the glue dries. Mark you can see once more I was still too lazy to go use the table I built for this exact purpose. Still hoping sometime tomorrow to cut the roof and base and glue them into place. After looking the building I think I will add clear pastic to the windows on the inside. Pics.................Paul


Been cutting down some large platforms for a smaller but longer portable switching layout. Wanting to preserve the waffle bottoms I sliced the width reduction out of the middle of each module.
Strap gussets join like a clam shell bucket.


Gusset joining the cross members together.

Now a manageable series of 2' X 4' modules.


The existing Homosote was sanded some of the high spots, then a skim coat of Portland surface leveler applied.

Shot of the now four modules drying between coats.

Attachments
Images (10)
Very nice work Tom! I agree 2x4 modules are as large as I will build.
Got my static grass and dirt down, built one side fence (ran out of dowel rods), connected wires from accessories and lights to wiring underneath table (just have to run them back to transformer) If all goes according to plan the field will be done on Sunday.


Attachments
Images (4)
Looks great,Bryan!!
Paul, the building is really starting to come together! If I used that work bench you do I would be living in the train room! LOL![]()
Elliot, I sure like that new green color you brought out! It has a wonderful B on the side, I sure need to get some of then down the road, I don't think as many as you have but a good 10 or 12 would be cool!![]()
Bryan, the fence looks great, are you going to carry it around out in the field like a home run fence?![]()
![]()
Bryan,
I LOVE the baseball field. Most folks making such fields usually do them very small. Yours really looks the part, maybe one of the finest scale ball fields I've ever seen.
Bryan, I agree with Lee. You did the right size for the field and it came out looking good. Good job grasshopper......Paul
Adriatic - Request noted, I'll get you some.
Bryan - The static grass looks so real, especially with the dirt mixed in. I have some, but haven't had the chance to try it yet. Are there any secrets you can share?
Mike - Sorry to say, but I think you're going to be hard pressed to find that BN set. That was produced about six years ago, and you almost never see any of those anymore. Atlas has moved on to do the 53 footers. Don't underestimate their size, they're huge, and they're HEAVY. Die cast, though they pull pretty smoothly. Even on my layout, there will be rules governing their use. Since I only run single, dual motor diesels, trains will be limited to two Atlas sets. The rest of the train will have to be plastic cars, Lionel or MTH, with a max length of 15 cars.
It's a little hard to tell because of a heavy layer of grime, but this is one of those beautiful green sets captured in the wild, Rochelle, Illinois back in 2012. They are getting more and more rare because they are a very early design. Many units have simply had their bulkheads cut off, making them easier to load.

I had to look up these pictures to determine the order of the cars. The end units are A and B, with B being the brake wheel end. E goes next to A, then all the way down the line to B, so AEDCB. There might have been an instruction sheet in the box, but it was more fun to do it this way. BTW, Atlas packages these in two boxes, and they were sold separately, A & B in one box, and C,D and E in the other. Don't buy C,D and E without A and B, they are useless.

Attachments
Images (2)
Thanks everyone and to answer a few questions.
Yes I am planning to run the fence around the outfield but make it a little higher since I am modeling this field after a combination of a few fields that I played at in high school. The one field had a stone wall in left field and above it was railroad track. The right field and center field had regular chain link fence but it was about 10 feet high. I would have been able to finish that yesterday but ran out of the right size thickness dowel rods.
As for scale it is a not quite major league scale with 90ft between bases it is roughly about 68 scale feet. I really wanted this field to be a focal point on the layout and not an after thought used to fill in some empty space on the layout.
As for the static grass I found more success flipping the turning the applicator upside down once in awhile to loosen up the contents; if not it tends to clog after awhile. Also I like to use school glue as my base since it doesn't skin over and allows me to work a larger area and have more working time.
Elliot, thanks for the information! You are right the BN Cars almost look black from the grime! As for the set it will just be something that sits in the back of my mind for when I go to shows or check the local yard sales! LOL![]()
Bryan, that is going to stand out on your layout its such great work done!![]()
Bryan- The baseball field is really looking sharp. Well done Sir!
Paul- Any horizontal surface is a work surface in my world ![]()
Elliot- So the age old question- do you save the boxes or toss them in the trash?
Tom Tee- Very nice bench work.
Bob
All you folks never fail to astound. This layout progress topic has got to be my favorite sub-section of the entire forum. My "go to" place for entertainment.
Bruce
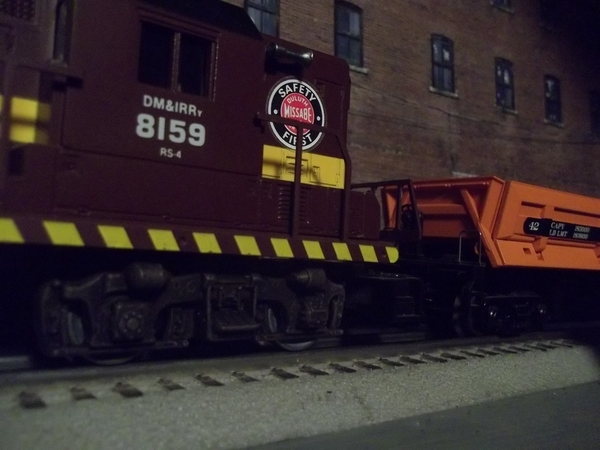
Detailing some diesel cab units is my new diversion from completing the summit forestation project.

All weather cab windows are as much an iconic detail as are high hood bells on DM&IR diesel units.

Shapeways LIC, sells a set of 4 laser printed window units which were designed for Atlas units but were easily modified to fit on my MTH SD24’s.

They also sell a variety of other detailing parts in O scale in addition to providing a custom 3D printing service. Check them out.
https://www.shapeways.com/prod...8&li=marketplace
The first step was to remove the cast-in shade above the side window. A sharp 1/4 inch chisel made easy work of that.

Next I had to file away the back side of the all-weathered window roof in order for it to fit flat against the locomotive cab just below the cast-in drip rail. Note before and after pictures showing the back profile. Left side: after

Test fit.

The windows were primed and painted.

I brush panted the aluminum window frame.

Another test fit before adding window glazing.

I still need to find a suitable (thin) window glazing material before permanently mounting the windows.
Cheers, Dave
Attachments
Images (10)

Hey guys, can anyone help me. All of a sudden I am not getting any responses from the topics I have posted to in my email. All of a sudden they have stopped showing up in my email. Any help is appreciated from a not to tech savy person............Paul
Paul check and see if they are going to your spam,
mine did that yesterday... if so, click on that reply, "not spam ",
and they should start going to your inbox then...

Attachments
Images (4)


Darlander, great job on the windows! I don't think I will go that far, but you never know once everything is out and on the future layout!![]()
Thanks Brian, everything was going to spam. Hopefully I told Yahoo it was not spam. We'll see............Paul
Bryan - Thanks. Out of curiosity, which brand of applicator are you using? I have the $10 home made version with an electric fly swatter and a kitchen strainer.
Mike - You're welcome. Yeah, they do almost look black. The only clue that there's green under there, are those two spots where the grime has been cleaned off. That is my favorite color in my favorite shade. I was bummed when they merged and switched paint schemes. Best of luck on your quest to find one.
Bob - Short answer: YES, I save them. Long answer: When I was a kid, my mother threw away all my train boxes. After seeing what collectors were looking for and some of the prices that they paid for empties, I said never again. Then there's the more practical matter of resale and shipping. Not only do I keep the manufacturer's box, but when available I keep the brown cardboard outer shipper.
Dave - Very nice. You have more patience than I do.


Big_Boy_4005 posted:Bryan - Thanks. Out of curiosity, which brand of applicator are you using? I have the $10 home made version with an electric fly swatter and a kitchen strainer.
I have one of those also and it works okay but once I saw how much area and projects I want to do I upgraded to the Noch Grassmaster 2.0. The one nice feature I like with that applicator is that is comes with some different attachments so you can cover more or less area depending on your needs. The best part is my NMRA division does clinics and if you put one on they pay you a stipend for your supplies. I decided to do a demo on static grass so after 3 clinics that stipend paid for the applicator itself.


Attachments
Images (3)


A little bit of ALCo heaven.
Attachments
Images (1)
Dave, great looking project on the DM&IR engine.
Bryan, great plan on the field.
Lou, the people make for a great scene.
I took the smoke unit apart on the SD70ACe and found it smokes but the fan motor won’t turn. I unsoldered it and put a variable DC supply on it and it won’t turn wether the fan is on it or not. I’ll have to get another motor. In the meantime I taped the wire ends, put the shell back on, and ran it on the Ceiling Central Railroad

Attachments
Images (1)
paul 2 posted:Thanks Brian, everything was going to spam. Hopefully I told Yahoo it was not spam. We'll see............Paul
It happened to me twice a couple weeks ago. I never figured out why.
Started building another section of Halloween town....


Attachments
Images (3)
This morning I took the angled building and penciled out the roof and base for the building. Bascially rough cut them in the basement and sometime I'll take them out and do the final cut with the band saw. Took a couple of pics lining up some of the other flats to start fitting them together. Where the two doors are will be a roof over an unloading platform for box cars. Still have to buy some plastic for the windows, blacken the walls behind the flats and also do some final cutting on them to make the fit better. I'm going to cut the siding in front and the space behind the end of track I'll be putting a few silos for grain storage..................Paul


Attachments
Images (6)
looking GREAT Paul !!!
Add Reply
Sign In To Reply
