


Good comments Paul!
I got the frame put together and painted it. When the paint dries I can flip it over and screw on the plywood. Then it is ready to put in place. pic............Paul

Attachments
Images (1)

Paul,
That's a handy way you are doing it! Stay off the floor as much as possible, is my motto.
Moonson posted:WP posted:Moonson posted:WP posted:Today and the last couple of days I've started building and trying out ideas for our logging operation area of the layout and adding some trees. I still have a way to go.
Hi WP, Do you have any particular circa in mind for the logging site or are you doing this from memory, if I may ask.
FrankM.
Hi Frank: I am more or less free styling this to 30's to 40's. My inspiration (although I am not copying the real source because not enough space) is the Pickering Lumber Corp. Thanks,
John
Hi John, I asked because this city-boy from metropolitan Pittsburgh, who moved to NYC years ago, found himself very, very enthusiastic about modeling (what-the-heck did I know about logging?!) after seeing a modest operation in-progress while visiting Upstate NY. Subsequently, I crafted numerous logging scenes, after conferring with folks at a John Deere dealership on Rt.11, near Cortland, NY. I purchased logging machinery models from them, and once I had finished my first several scenes, I took them back to the dealership for their inspection. Allowing for some compacting due to practical space limits, they pronounced my work very realistic and accurate.
Also, after some research, I custom-modeled an 1890's logging site for a client, and he was pleased. It was great fun learning about such things as horses, oxen, and mules being involved, not to mention such special features as "steam-donkeys" and "skid-roads" and laborers' temporary cabins.
I have no idea what features would be included in the era you intend, but I offer these shots for you because they demonstrate what I found successful, and what machinery is available as models/toys for contemporary logging scenes. I hope this helps, or at least, interests you and, perhaps, others.
I have several more shots of my work...
if you care to see them.


Thanks! You do great work!! I am not doing contemporary logging, though, so it's donkey engines, high lead, heel boom, and Shays or Climax on this one!
John
Actually believe it or not all the wood is from Home Depot. Although I must confess my step father picked it all out and brought it up in his truck. He is very particular when picking out wood so I am sure he spent a good hour going through all the pallets until he got all the good ones. Funny side story when I was redoing my deck the last 2 summers (its 2,100 sq ft) we spent over 3 hours at lowes hand picking boards for it.
M. Mitchell Marmel posted:
Remember, keep Monkee-ing around!
Mitch
(also below: Monkeemobile behind-the-scenes pics!)
Mitch nice job on the station. I couldn't help notice that Davy and the boys must of been in a great hurry to get to the station on time. Apparently they drove on a flat( right Front) and completely shredded it of the rim. Hey, Hey we are the Monkey's and cant stop messing around!!!

Attachments
Images (1)

One of my senior high students wanted to see my layout yesterday. He was most impressed with the various vignettes and especially with Mount Randolph! He enjoyed the stories of the many locomotives, especially the GG1 number 4876 and the 1953 wreck of the Federal ... of which I have photos. He also enjoyed the J class 611.
Its always fun to share the layout!!
Well Bryan I was a sleepy head this morning and got up late so you must be well on your way with construction by now. I'm just getting ready to mosey down and finish the table. Going to get as much done as possible today to stay a head of you but sometime through the day I feel the need to run some trains. And Mark you are right. Getting down on the floor and getting back up does take me longer now so that's why I started to paint before putting the table down. That just leaves me bolting the table to the other one and drilling holes between the tables for wires and leveling........Paul
There has been some nice work being done.
I just keep going back to Old Toymaker's bridges. All I can saw is Wow!!!!
Lee : The back drops look good. Look forward to seeing how you layer it giving it the 3d and increased depth..
Mitch: Just one question. The giraffe that's dressed like a Zebra. Is that the one who checked in your rehab center with identity issues?
Any way. here's mine. Another engine converted to Kadees using Mario's Lionel GP 9 mounts. https://www.shapeways.com/shops/gandyman Weaver NP RS 11 # 915 with earlier Lionel NP GP9 conversion.


Attachments
Images (6)
After 3 years of planning (but mostly procrastinating) I began my 3x4 extension to the midwest portion of my layout. All the supplies were in place, plans drawn, space made, and yet another rainy day in Maryland. My dear son did a great job cutting the grass yesterday (one of about 2 nice days in the last 40) so pop is gonna play in train land.
I got the table all set to go into place but decided to do a few more rows of tile first. Now I have to wait for the adhesive to set. Once that happens I can put the table in place and start adding the Masonite backdrop. A couple of pics............Paul


Attachments
Images (2)
trumptrain posted:One of my senior high students wanted to see my layout yesterday. He was most impressed with the various vignettes and especially with Mount Randolph! He enjoyed the stories of the many locomotives, especially the GG1 number 4876 and the 1953 wreck of the Federal ... of which I have photos. He also enjoyed the J class 611.
Its always fun to share the layout!!
Excellent! A senior high student, no less. Was that due to the magic of trains, your magic, or, as is likely the case, both ? Teaching is a wonderful profession - it's amazing what we can accomplish, isn't it.
FrankM.
WP posted:Moonson posted:WP posted:Moonson posted:WP posted:Today and the last couple of days I've started building and trying out ideas for our logging operation area of the layout and adding some trees. I still have a way to go.
Hi WP, Do you have any particular circa in mind for the logging site or are you doing this from memory, if I may ask.
FrankM.
Hi Frank: I am more or less free styling this to 30's to 40's. My inspiration (although I am not copying the real source because not enough space) is the Pickering Lumber Corp. Thanks,
John
Hi John, ..I have no idea what features would be included in the era you intend, but I offer these shots for you because they demonstrate what I found successful, and what machinery is available as models/toys for contemporary logging scenes. I hope this helps, or at least, interests you and, perhaps, others.
Thanks! You do great work!! I am not doing contemporary logging, though, so it's donkey engines, high lead, heel boom, and Shays or Climax on this one! John
Well, then, John, this should be very interesting to see develop, if you are going to share its progress with us here, or if you are going to show it to us when finished. Either way, you will have my rapt attention, especially since the era you intend modeling is largely unfamiliar to me. Have fun! This is going to be fun!
FrankM., the steel-town guy who loves logging.

There's one thing missing from most early era logging layouts. And that would be a shiny red "Overpack Big Wheel".
Maybe it was more regional than I had assumed? ![]()
Table six is leveled and bolted into place. I started boxing in the opening to get it ready for the Masonite. I would of had that in and done but because I decided to add those rows of tile I had to wait till the adhesive set up. But there is tomorrow. So track laying gets pushed back another day or two. Pics...............Paul

Attachments
Images (2)
While Tom and I were on our honeymoon in Niagara Falls, three boxes arrived. My daughter had already set up the Happi-Time barn, and this evening she helped me put up the litho doll house, and I placed a NEW Barclay lady on the layout. This particular train figure from Barclay has really terrific details.


Attachments
Images (2)
Just messing with some photos to see if I could drop a real sky into them...
Switching some cars at Cape Shark RR Yard
A short video. https://www.youtube.com/watch?v=qTcd03o7yvA
Attachments
Images (1)

BAR GP7 #63 That was a great video. I enjoyed watching. So much detail. Nice job on a great looking layout.....Paul
Paul, I second that! Great video! Love the weathered cars along with the details. Great camera work as well!
Made a view-block

....more importantly......I have all my fingers.....
Peter
Attachments
Images (1)
Todd Knoll posted:Paul, I second that! Great video! Love the weathered cars along with the details. Great camera work as well!
I agree fully.
Great video, and excellent model work!
Well today I made some headway. I got the last of the Masonite up on the main tables of the layout. I will continue the backdrop on the other side of the opening eventually. Tomorrow I'll start early painting it and then I'll start placing buildings and track around to see what will look good but make for some interesting switching. When Bryan stopped by he got me to thinking that I should have some staging tracks so I can bring trains into the numerous yards and take cars out. So with that in mind Bryan you will get the jump on me and get to track laying before me. Couple of pic of work done today ..........Paul


Attachments
Images (2)
It seems like every posting today, I'm thanking someone. There are just so many people who have helped or contributed to the construction of my layout. Yesterday my good friend Jerry came over to help me pull wire. To be blunt, it is nearly impossible to do this alone.

Wiped-out the last of 500' of power feeders from the box on the right and close to half of the box on the far left. Today I ordered another two 250' boxes of 14 ga wire. The gray spool on the bottom used to contain 500' of 4 conductor 22 ga wire. I am using this for wiring the switch motors.

Power feeders (7) have been pulled for Block "4". For reference the yard area is Block"3" and the track above the control panel is Block "2".

I am using this 2" LB to route wire through my knee wall. While we're pulling wire, I have temporarily removed bead board.

I have switch wiring pulled for 15 of 24 switches.

Attachments
Images (5)
Tom and I got the coat of Minwax Express Color wood stain in Mahogany on all the facing boards of the Art Deco style layout table. It looks great! (sorry for all the train boxes underneath and the Barclay folks laying on paper napkins on the table messiness)
Polyurethane coat 1 of 5 next.


Attachments
Images (2)
Polyurethane coat one, I'm helping...![]()
The unfortunate result of a Warp 1 Smoke Command feature. Turns an otherwise beautiful cabin into a Salvador Dali sculpture.

I decided to utilize what was left of the N5C and make a fantasy PRR crane tender this weekend.

A set of yard lights on top make the combo practical around the clock.

Still loads more to do...mostly detail and painting.

Bruce
Moonson posted:trumptrain posted:One of my senior high students wanted to see my layout yesterday. He was most impressed with the various vignettes and especially with Mount Randolph! He enjoyed the stories of the many locomotives, especially the GG1 number 4876 and the 1953 wreck of the Federal ... of which I have photos. He also enjoyed the J class 611.
Its always fun to share the layout!!
Excellent! A senior high student, no less. Was that due to the magic of trains, your magic, or, as is likely the case, both ? Teaching is a wonderful profession - it's amazing what we can accomplish, isn't it.
FrankM.
Yes Frank, teaching is an absolutely wonderful profession! It is an honor to teach others! In the case of my student wanting to see my layout .... several times I had shared photos and videos with him after the lesson had finished. He always seemed interested in the trains. When he was taking a music lesson at my home studio, this past Friday, he asked if he could see the layout. He's a graduating senior and was most eager about seeing the layout. Of course, I was more than happy to show him!
I'm very lucky in that I both perform and teach music ... both of which are my life's most loved passions. In addition to my private studio, I also teach music at at a public performing and visual arts high school. Every once in a while I have a student who becomes too serious about music, in the sense they become one dimensional.... always practicing their instrument. ( mind you this kind of student comes along every year at this kind of high school, and in general, I wish more of my students practiced more on a daily basis ) Whenever I observe that a student is becoming one dimensional ( ALL about the music and nothing else ) I feel its important to remind them that life is bigger than the music. After all, music is an expression of life's experiences. If one never experiences life in a broader context, one may find it difficult to effectively express their self while making music. I often let students know that in addition to music, I have other interests which I also feel passionate about ... such as my love of real trains and model railroading, going to art museums, practicing yoga & Qui gong, psychology & the creative process, hiking and biking in the outdoors, etc.
By showing students my hobby of model railroading ... I'm encouraging those super serious students to find a hobby ( one took up candle making .... and makes beautiful candles btw! Another took up meditation and biking ) and broaden their self and expand their creative potential as human beings. Even if these students don't become model railroaders, by allowing them to see photos/videos of my layout, letting them experience the actual layout itself, while hearing me enthusiasitcally tell them story's about the trains, at the very least they will have a better understanding of history, imagination and creativity, visual arts, and the pure fun & joy of model railroading.... and they will also know why we as model railroaders do what we do.
After all, our music is how we live life! Lets not die with our music still in us.
I see you are a fan of Dr. Wayne Dwyer .... as I am too!
brwebster posted:The unfortunate result of a Warp 1 Smoke Command feature. Turns an otherwise beautiful cabin into a Salvador Dali sculpture.
It looks like at least the crew stayed warm. I've read the stories on how those things got pretty drafty in the winter and the stoves didn't always do the trick...
brwebster posted:The unfortunate result of a Warp 1 Smoke Command feature. Turns an otherwise beautiful cabin into a Salvador Dali sculpture.
I decided to utilize what was left of the N5C and make a fantasy PRR crane tender this weekend.
A set of yard lights on top make the combo practical around the clock.
Still loads more to do...mostly detail and painting.
Bruce
Nice creative work with the N5C!!!
brwebster posted:I decided to utilize what was left of the N5C and make a fantasy PRR crane tender this weekend.
Nicely scrounged! ![]()
Mitch
paul 2 posted:BAR GP7 #63 That was a great video. I enjoyed watching. So much detail. Nice job on a great looking layout.....Paul
Paul,
Thank you very much.
Johan
Todd Knoll posted:Paul, I second that! Great video! Love the weathered cars along with the details. Great camera work as well!
Todd Knoll,
Thanks. I am glad you like it.
Johan
p51 posted:Todd Knoll posted:Paul, I second that! Great video! Love the weathered cars along with the details. Great camera work as well!
I agree fully.
Great video, and excellent model work!
Lee,
Thank you very much.
Johan
Coat 2 of 5 of polyurethane applied today on the Art Deco Std. Gauge layout table.
Coat 2 of 5 of polyurethane applied to the facing boards of my Art Deco Std. Gauge layout table.
M. Mitchell Marmel posted:
Congratulations, Mitch!!


Well with the weather being nice outside I had to get all the plants in I bought the day before so that took the morning and part of the afternoon. Took the wife out for a bit to eat. She has been a good CEO and has put up with a lot of me in the basement. But anyways I got the coat of white on the Masonite and the darker blue above it. I am waiting for it to dry and a bit later I'll see if I can put the coat of light blue on it all. In the meantime I think I'll head for the attic and run some trains. A pic of the work so far...............Paul
Attachments
Images (1)
I could of probably saved myself typing and posted this all at once but I just got the light blue on everything and now I can clean off the tables and decide where I want to place small and large industries and freight yards. Pic of the finished blue...................Paul

Attachments
Images (1)
Readjusted my top level, once again. Decided to go minimalist (less is better).
I took out the two half loops, and put in the wye, which ,add a great spot for the power company siding (everywhere else I had it the sign was facing the wrong way).
Then I moved my intermodal yard to the upper level, and am going with one "freight hub".


Attachments
Images (3)
I am still assembling this portable stamp mill...lots of little parts, that can work, with a belt to power it...I won't attempt that. I have a portable rock crusher done to go with it, and am waiting for both a steam tractor, horizontal boiler, and some other details to come, to finish the scene. Which will include a shed to shelter the tractor or boiler, whichever I decide to use. The floor of the shed is done...all to support the mine shaft house. Details and tractor should have been here already. This mine depicts a one-man-band, operating independently as they push a few skips of crushed ore out to a parked boxcar.
Mo985 posted:Readjusted my top level, once again. Decided to go minimalist (less is better).
I took out the two half loops, and put in the wye, which ,add a great spot for the power company siding (everywhere else I had it the sign was facing the wrong way).
Then I moved my intermodal yard to the upper level, and am going with one "freight hub".
Looking great Chris, when you going to start to cover the mountain?
3rd coat of 5 of clear polyurethane being done today on the facing boards of the Art Deco Std. Gauge layout table.
The other day I finally ran my MTH repro Lionel 408E pink/red electric engine. I had been so busy lately, it has been waiting on the track to take a test run on the big loop for weeks. Took a bit of video, but I'm not happy with the footage, so no posting of it here.
As promised, pics (and a couple vids) from Train Day at the Frisco Depot in Fort Smith.
Most towns are lucky to have ONE train day! Fort Smith had two! ;-)
I set up shop in the former stationmaster's office:

The trains charmed everybody...


The 1926 "Sand Hog" consist was in fine form and got lots of "oohs" and "aaahs"!

Is it real or Lionel? It's both!

Ask the man who owns one! 
The charming young lady from Channel 5:

And the resulting story:
http://5newsonline.com/2016/05/21/train-day/
More pics and video below!
Mitch
Attachments
Images (22)


Videos (2)


BAR GP7 #63 posted:Switching some cars at Cape Shark RR Yard
A short video. https://www.youtube.com/watch?v=qTcd03o7yvA
I saw the video the other day. Never had a chance to comment. Nice....Your layout nice too. Compared to what I have, I am nowhere in your league. Perhaps someday.
M. Mitchell Marmel posted:As promised, pics (and a couple vids) from Train Day at the Frisco Depot in Fort Smith.
Most towns are lucky to have ONE train day! Fort Smith had two! ;-)
I set up shop in the former stationmaster's office:
The trains charmed everybody...
The 1926 "Sand Hog" consist was in fine form and got lots of "oohs" and "aaahs"!
Is it real or Lionel? It's both!
Ask the man who owns one!
The charming young lady from Channel 5:
And the resulting story:
http://5newsonline.com/2016/05/21/train-day/
More pics and video below!
Mitch
Mitch, your becoming quite the celebrity. Just don't forget about us little guys.
Carey TeaRose posted:Tom and I got the coat of Minwax Express Color wood stain in Mahogany on all the facing boards of the Art Deco style layout table. It looks great! (sorry for all the train boxes underneath and the Barclay folks laying on paper napkins on the table messiness)
Polyurethane coat 1 of 5 next.
Carey, Fist congratulation on the big day.. Your layout has come together rather nicely. By the way. Any updates on the layout in your classroom?
suzukovich posted:Mitch, your becoming quite the celebrity. Just don't forget about us little guys.
Aw, I'd never become all hoity-toity towards you peons, er FELLOW MODELERS!
Besides, you can say you knew me when! ![]()
Mitch
suzukovich posted:BAR GP7 #63 posted:Switching some cars at Cape Shark RR Yard
A short video. https://www.youtube.com/watch?v=qTcd03o7yvA
I saw the video the other day. Never had a chance to comment. Nice....Your layout nice too. Compared to what I have, I am nowhere in your league. Perhaps someday.
suzukovich: Thank you very much. I really appreciate your kind words.
-Johan
It is really great seeing everyones progress stages on this thread from beginning to intermediate to detailing. Another bench work module done. 3 down 5 to go. Hopefully by this time next week all 8 will be done.
![DSC_0841[1]](https://ogrforum.ogaugerr.com/fileSendAction/fcType/0/fcOid/12129987997660671/filePointer/58024223245982457/fodoid/58024223245982453/imageType/LARGE/inlineImage/true/DSC_0841%255B1%255D.JPG "DSC_0841[1]")
Attachments
Images (1)
![DSC_0841[1]](https://ogrforum.ogaugerr.com/fileSendAction/fcType/0/fcOid/12129987997660671/filePointer/58024223245982457/fodoid/58024223245982453/imageType/LARGE/inlineImage/true/DSC_0841%5B1%5D.JPG "DSC_0841[1]")
Thinking of out-of-the-box ideas for supporting the upper circle of track on my Art Deco Std. Gauge layout. Saw this picture online- of an art deco pedestal table. My husband Tom can construct anything, we could have plexiglass in the center and the track sits on an outer wood 'ring'. The height would need to be a clearance of about 8-3/4" to clear my tallest engine (the MTH repro Lionel 408E) underneath.

Attachments
Images (1)
Nice going Bryan you are on a table building roll now. I throw in the towel. Your the best. Got a question for you. The frame work is superb. How do you level tables as you go...........Paul
The mahogany facing boards look very glossy and NICE with three coats of polyurethane. Maybe one more coat, maybe we're good.

Attachments
Images (1)
mike g. posted:Mo985 posted:Readjusted my top level, once again. Decided to go minimalist (less is better).
I took out the two half loops, and put in the wye, which ,add a great spot for the power company siding (everywhere else I had it the sign was facing the wrong way).
Then I moved my intermodal yard to the upper level, and am going with one "freight hub".
Looking great Chris, when you going to start to cover the mountain?
Thanks Mike, I haven't decided yet. I'm still in the "move stuff around" phase. I think I am going to wait until I decide what is going to go where, so........ 1.5-2 years maybe? ![]()
suzukovich posted:Carey TeaRose posted:Tom and I got the coat of Minwax Express Color wood stain in Mahogany on all the facing boards of the Art Deco style layout table. It looks great! (sorry for all the train boxes underneath and the Barclay folks laying on paper napkins on the table messiness)
Polyurethane coat 1 of 5 next.
Carey, Fist congratulation on the big day.. Your layout has come together rather nicely. By the way. Any updates on the layout in your classroom?
The classroom layout (as I was talking just today with one of the paraprofessionals I work with) is most likely going to have to leave the classroom- for good. That means sawing the two adjoining layout tables into pieces to get them out the door. All the houses of mine and the figures will have to be boxed up and carried out and stored. I may have some of the houses go on a high display shelf in my sewing/ladies parlor room. No point with less than three weeks left of school putting legs on it or working more with the wiring.
Finished assembling the portable stamp mill, and painted the wooden parts. Need to paint metal tomorrow, and, if I'm lucky, the steam tractor and the stationary steam engine will float in, giving me three power sources, with the Hart Parr gasoline tractor, to power this mill and the rock crusher. I am going to use belts from one of these to all of this, which I was going to put into an open shed I've started, but may need to make a larger one. Will see after all the equipment is here.


1. Track set up.

2. Add the chicken wire.

3. Trim Chicken Wire.

4. Set-up water Hydrocal & dish soap.

5. Set up work area.

6. Pour Hydrocal into the molds. Some are custom made molds.

7. Place the rock molds into position.

8. Placing the final molds into position.

Attachments
Images (10)


p51 posted:I used two HO scale single lane crossing sets to make a walkway from the flagstop at Winner to the passing track as it seemed a real depot would have that.
I'll be weathering here very soon as well among the tracks...
Once again looking good Lee. I like all the little ideas you come up with.
Train room Gary,
That's a lot of rock walls there on the layout! The old tried and true methods still work well. You can use old methods, new methods, or a mixture on a layout.
Dusted things off last night and ran Ivor a bit, towing a homemade track cleaning car in a bit of a work train. Fixed a sagging airship...
mike g. postedOnce again looking good Lee. I like all the little ideas you come up with.
Thanks a lot, Mike.
Mark Boyce posted:Train room Gary,
That's a lot of rock walls there on the layout! The old tried and true methods still work well. You can use old methods, new methods, or a mixture on a layout.
Thanks Mark for checking out the process. I have added two more photos.

Final inspection.

We use these Terri Cloths, mixed with the Hydrocal to re-enforce the Hydrocal. Something like re-enforced concrete.

Attachments
Images (3)


Crazy Week and its only Wednesday. I thought the weekend was hectic. Spent the day trying to do a brain dump. Made a video with my one of my latest purchases. Weaver NP RS 11. Ok it was relaxing for me.
Carey TeaRose posted:suzukovich posted:Carey TeaRose posted:Tom and I got the coat of Minwax Express Color wood stain in Mahogany on all the facing boards of the Art Deco style layout table. It looks great! (sorry for all the train boxes underneath and the Barclay folks laying on paper napkins on the table messiness)
Polyurethane coat 1 of 5 next.
Carey, Fist congratulation on the big day.. Your layout has come together rather nicely. By the way. Any updates on the layout in your classroom?
The classroom layout (as I was talking just today with one of the paraprofessionals I work with) is most likely going to have to leave the classroom- for good. That means sawing the two adjoining layout tables into pieces to get them out the door. All the houses of mine and the figures will have to be boxed up and carried out and stored. I may have some of the houses go on a high display shelf in my sewing/ladies parlor room. No point with less than three weeks left of school putting legs on it or working more with the wiring.
To bad you have to take it down.. I am sure the kids will miss it and but they also learned from helping you. That's a good thing. One more pic before it is gone.
suzukovich posted:Crazy Week and its only Wednesday. I thought the weekend was hectic. Spent the day trying to do a brain dump. Made a video with my one of my latest purchases. Weaver NP RS 11. Ok it was relaxing for me.
Great video, I love the NP and RS-11s were always a great looking locomotive, to me.
I installed a Lionel SC-2 TMCC switch & accessory controller. I won it on Ebay and it got here Monday. I removed the remote switches and I had to rewire the all the switches (4) for the SC-2. Once I got it all wired, then I had to program ID numbers for the switches. After dealing with some slight difficulties, I got it working. Now I can add the 4x6 extension and activate the switches without having to walk around the layout to get to the remote switches. Plus it's cheaper than buying command switch tracks.


Attachments
Images (12)
Got the passenger crossing looking much better and the power pole finished with transformer to run a power line to the country store.
Bought some bead pins at a local syore that sells beads that each have a loop at the end, will anchor the power lines that way to the pole and structure.

Attachments
Images (2)

Was taking care of some of the repairs from Saturday's Train Day when I noticed Norma Bates Kitteh on the layout, waiting for some trains to watch. Far be it for me to disappoint her!
Mitch
Attachments
Videos (1)

Lee, being a fan of high detail, I might be jumping the gun, but beats hindsight, here's a couple "lesser used" ideas you just might like.
 "Step it up?"
 ![]() .....don't "lag" behind
.....don't "lag" behind ![]() ...
...
Pappa ooomaa mow mow? ![]()

 Too much?
![]()
This might ensure there's no need for a bunch of white and green paint spatter![]()


Here's two red winged "birds" I could watch all day ...![]() and I better stop right there before the post ends up with ..The Trashmen
and I better stop right there before the post ends up with ..The Trashmen![]()
![]()
![]()
![]()
![]()
![]()
Lookin' great Lee![]()
My own layout? Last week I attempted to mow the lawn. Self propelled and started up by a pal, I still ended up "laid-out" on the green in pain, the Oxy remains in it's dark brown bottle, as I don't enjoy "melting" either ![]() .
.
Never thought I'd miss mowing it.![]()
Almost needless to say, I've missed working on the layouts too, so thanks to all for a week of vicarious living. Great timing after a short lull here![]()
Attachments
Images (5)


Rather than waste time waiting for overdue components ordered off the bay and from suppliers to float in, so I can finish this mine shafthouse complex, I have started building an old Wabash Valley Markle Mill (Simpson Grain Co.) elevator kit. This is a stick-built model; using waxpaper like an old model airplane kit.
Adriatic posted:Lee, being a fan of high detail, I might be jumping the gun, but beats hindsight, here's a couple "lesser used" ideas you just might like.
Lookin' great Lee
Thanks!
Birds on the wire won't work as they'd just flip over from being so top-heavy on the line. Berkshire's "EZ Line" is really just elastic string in the common colors you'd need for a layout, no way it'd support even a light plastic casting of a bird. But the grips on the sides of the pole are a good idea that I'd never thought of. I have small spikes that could work for that, so tonight I'll try to mount some to the third pole I made, so see how that'd work.
I do have some Wiseman bird castings, so maybe I'll try to put one on top of the transformer on the one pole that has one.
Back in the 30s and 40s, it was common to cut the tops of power poles at an angle to prevent nests like that, though. Beats me when they stopped doing that.
I fully intend on putting (painted) bird poop on roofs and high places on the layout when I'm further along with my campaign to flood the layout with small details.
But the grips on the sides of the pole are a good idea that I'd never thought of. I have small spikes that could work for that,
I used HO track spikes. Someone commented on the spacing. They're just eyeballed but pretty close to a scale 18" These are Balsa poles. Easy to stick spikes in
Attachments
Images (1)

Yep, that's exactly what I have and I can't wait to put these on the poles tonight. I'll be using fewer than the previous photo, as I don't think in the 30s or 40s, they'd have used that many.
My Dad bought a used power pole for our TV antenna about the time I was a toddler, and I remember wanting to climb it as he'd added those metal 'rungs' but being the smart man he is, he knew better than to place them at kid level. At 6' 7", Dad could start them around 5 feet or so if he ever needed to climb the thing. By the time I was tall enough to even try it without a ladder, my interest in climbing stuff was mostly behind me.
Thanks for the ideas, guys! ![]()
4th and last coat of polyurethane put on the facing boards of the Art Deco layout table yesterday. Aside from a bit of touch up to the black gloss painted legs- the construction and finish of this table is DONE!!
WOOHOO, wiring and playtime with all the Std. Gauge goodies on this is next!
p51 posted:Adriatic posted:Lee, being a fan of high detail, I might be jumping the gun, but beats hindsight, here's a couple "lesser used" ideas you just might like.
I fully intend on putting (painted) bird poop on roofs and high places on the layout when I'm further along with my campaign to flood the layout with small details.
Like I said, me jumping the gun is a great possibility with you and details ![]()
("He called the $h*^ poop", lol ![]() )
)
A bird of prey, seldom has buddies, and is good reason for the absence of most other birds....and I've always been very fond of them ![]()
![]()
Lags, & rungs also come in varieties. Line men used to carry extras to screw into the low section of the poles and removed them when done. There were through bolts too. Then there were also some steps, that slipped over the head of a large nail, or bolt head, sank to leave about 1/8" gap. Removable when the job was done, the nail/bolt was left in place. Poles also have date ID, treatment chemical ID (more on modern), and might have had wood type ID. From embossed nail heads (date nail) to "dog tags". Support wires that have the yellow plastic covers today? That cover would have been made of wood then. I remember getting some evil splinters from a very old one in Mich's U.P. (no its not always a RR ![]() ) Ice breakers of wood too (twists the cable in the wind to break off ice build up).
) Ice breakers of wood too (twists the cable in the wind to break off ice build up).
Samuel Morse started it all after some failures with underground telegraph wires.
Carey, You may like a trick I used in detailing my vintage VW's wiring, and later used it elsewhere.
For an example, take a piece of scrap wire, and wrap a single, gap-free layer, onto a pencil, pen, Philips screwdriver, etc. Carefully remove the coil of wire you've made from your "stick", grab each loose end, and stretch it out sightly for a fancy, curly, look. Your done.
It can be done anywhere the wire seems "unsightly", but also cannot be hidden. Even just loose ends feeding a lock-on or Whistle house. It's new found springiness, also helps contain loose lengths on the underside, that might otherwise droop into sight. Extra wire lengths also yield easy hook up, or "knock on deep, rich, wood"![]() , repair access.
, repair access.
Spread, its not a good electrical coil, no worries. Compact, it is a coil, but not strong. I've never had anything react to one, including some pretty sensitive digital equipment. I wouldn't let the coils become tangled though. I never checked, or thought too hard about it, but off-hand it seems they could, just maybe ,"cancel each other out", at least slightly, if intertwined . Plus it would look "sloppy" ![]()


Bus depot looks great! FedEx man was mighty good to you. I like what I have seen of Mianne bench work!
Bus depot looks great!
Still a little touch up on this and another 30 or so buildings but they keep getting moved around so final touch-up is when it's put in place.
Thanks
joe
Joe, great work on the bus depot!

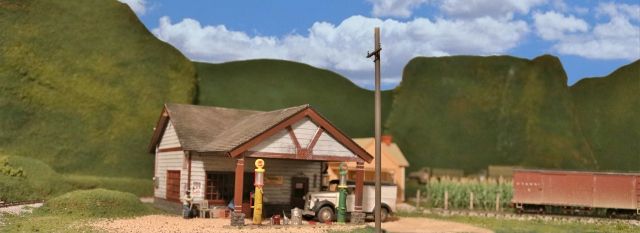
I added some HO spikes for foot holds on my main powet pole, I think it looks just right.
After thus photo, I added a third pole then strung all the wire. I took photos but you just can't see the wire in them. That EZ Line stuff works really well.
Attachments
Images (1)
Started construction on the upper loop. It will be set on piers about 8-3/4" to 9" above the mainline.

Attachments
Images (1)
Great video mate!.
Really liked it my style of action and the layout looks top of the class to. Give the man five stars!
Thanks for posting.
Roo in West Australia
Roo posted:Great video mate!.
Really liked it my style of action and the layout looks top of the class to. Give the man five stars!
Thanks for posting.
Roo in West Australia
Roo. Thanks for watching. I really appreciate your kind words.
Johan in South Finland.


p51 posted:suzukovich posted:Crazy Week and its only Wednesday. I thought the weekend was hectic. Spent the day trying to do a brain dump. Made a video with my one of my latest purchases. Weaver NP RS 11. Ok it was relaxing for me.
Great video, I love the NP and RS-11s were always a great looking locomotive, to me.
Lee, I got the idea of combining the RS11 with the Geeps from yard photos in MN from http://www.rrpicturearchives.net . I will admit I have a soft spot for the Alcoa's. Thanks for the like.
p51 posted:Got the passenger crossing looking much better and the power pole finished with transformer to run a power line to the country store.
Bought some bead pins at a local syore that sells beads that each have a loop at the end, will anchor the power lines that way to the pole and structure.
Both look good. Bird droppings on the pole and transformer.
"I fully intend on putting (painted) bird poop on roofs and high places on the layout when I'm further along with my campaign to flood the layout with small details"
That's attention to detail.
suzukovich posted:
Yep, that's the stuff I've been looking forward to, all the little detail things. I know lots of folks love the entire layout build, from the first 2X4 they cut. Not me, I haven't really enjoyed my layout much until I can run trains on the thing and even then not so much as I now do that it's looking more like a miniature world than small rolling stock on a giant wood platform.
I'm now at the point where I'm breaking out a lot of detail parts I've been slowly gathering for stuff like these power poles. I just placed some Wiseman garbage can castings on the layout, one I even stuffed with scale, "trash" and placed the lot on cockeyed so you can just barely see something in there. Mailboxes are going to come next. I even placed a couple of blue-star 'son in service' banners in the front windows of a couple of structures, as the layout takes place in WW2. I had even made a gold-star one denoting a KIA family member, but I just couldn't do it.
With Memorial Day upon us, I had an issue on details on the layout a few days ago. Someone said it'd be 'funny' if I modeled a couple of officers making a call on the (now) widow. I darned near punched him. I did that twice, myself, in the Army. It's not funny AT ALL, in any way (ironic nor 'haha' funny). I still have nightmares about having to make those visits. It's one of the few things that war movies are 100% right about, the wives really do react like they do in the movies, I found out the hard way. Besides, very few KIA notifications were made in person during WW2, as most came by messenger or the mail.
Your layout is coming along nicely. Fun to see the progress. I was a youngster during WW II and the blue star banners were an important thing at the time. I know if you saw a gold star it was always a sad shock and noted. I has a second cousin who was in the 14th Armored Div. in Europe. He came home and was a successful businessman. Still alive but not well. So much has been forgotten about the home front and what the whole nation endured. These far away conflicts are more remote, it seems. Thought about you today-I was looking at a dummy training shell for a 90MM gun dated 1955. Almost bought it but then thought of the train stuff I could buy with the $$.
jim pastorius posted:So much has been forgotten about the home front and what the whole nation endured. These far away conflicts are more remote, it seems.
I agree fully, there. I guess my layout is my small attempt to remind people. Frankly, I have too many automobiles (though most of trucks, which would be far more likely as commercial vehicles) and I'm thinking of boxing up a few of them and getting some wagon kits and horse figures as my parents say every farm there had horses and nobody had tractors during the war (or beforehand, either).
Both my parents were 7 years old when my layout takes place in 1943. They both remember the time very well, though they probably didn't fully grasp what a lot of it meant. Very little has been written on the effects of WW2 on the kids who lived through it stateside.
Adriatic posted:p51 posted:Adriatic posted:Lee, being a fan of high detail, I might be jumping the gun, but beats hindsight, here's a couple "lesser used" ideas you just might like.
I fully intend on putting (painted) bird poop on roofs and high places on the layout when I'm further along with my campaign to flood the layout with small details.
Like I said, me jumping the gun is a great possibility with you and details
("He called the $h*^ poop", lol
)
A bird of prey, seldom has buddies, and is good reason for the absence of most other birds....and I've always been very fond of them
Lags, & rungs also come in varieties. Line men used to carry extras to screw into the low section of the poles and removed them when done. There were through bolts too. Then there were also some steps, that slipped over the head of a large nail, or bolt head, sank to leave about 1/8" gap. Removable when the job was done, the nail/bolt was left in place. Poles also have date ID, treatment chemical ID (more on modern), and might have had wood type ID. From embossed nail heads (date nail) to "dog tags". Support wires that have the yellow plastic covers today? That cover would have been made of wood then. I remember getting some evil splinters from a very old one in Mich's U.P. (no its not always a RR
) Ice breakers of wood too (twists the cable in the wind to break off ice build up).
Samuel Morse started it all after some failures with underground telegraph wires.
Carey, You may like a trick I used in detailing my vintage VW's wiring, and later used it elsewhere.
For an example, take a piece of scrap wire, and wrap a single, gap-free layer, onto a pencil, pen, Philips screwdriver, etc. Carefully remove the coil of wire you've made from your "stick", grab each loose end, and stretch it out sightly for a fancy, curly, look. Your done.
It can be done anywhere the wire seems "unsightly", but also cannot be hidden. Even just loose ends feeding a lock-on or Whistle house. It's new found springiness, also helps contain loose lengths on the underside, that might otherwise droop into sight. Extra wire lengths also yield easy hook up, or "knock on deep, rich, wood"
, repair access.
Spread, its not a good electrical coil, no worries. Compact, it is a coil, but not strong. I've never had anything react to one, including some pretty sensitive digital equipment. I wouldn't let the coils become tangled though. I never checked, or thought too hard about it, but off-hand it seems they could, just maybe ,"cancel each other out", at least slightly, if intertwined . Plus it would look "sloppy"

thanks Adriatic for these ideas.. Hate the look of seeing 'unsightly' messy looking wires on the layout table.

dobermann posted:Finished this
Nice! The only thing I noticed was a lack of chicken wire or security bars over the windows, something I always saw in places like that...
Thanks Lee that's an excellent idea. I have some rabbit fence that will be perfect in the window
dobermann posted:Thanks Lee that's an excellent idea. I have some rabbit fence that will be perfect in the window
Glad you took that in the spirit it was intended. I've gotten a lot of great ideas from people (both in person and online) seeing things on my layout and suggesting details that just didn't cross my mind otherwise.
6 down 4 more to go; although the front 4 will be more difficult because it will be 2 tiered as that is where the subway level will be going.


Attachments
Images (2)
Add Reply
Sign In To Reply
