


Darlander, who makes those dwarf signals? Like those.

It has taken a couple of days, but I masked and sprayed the dark green on the remaining three (of 4) LIONEL 15" offset dome cars for my Northern Pacific North Coast Limited train per the Lowey liveried prototype.
USPS delivered two packages from Christine Braden: (1) a PW LIONEL F-3 B unit which she lettered previously but was damaged inadvertently and needed a minor repair; and, (2) three LIONEL vista domes which she masked/painted for NP NCL domes above, and a GN Empire Builder project.
Clifford, hopefully a dismantle to make way for a new layout?


 I got around painting and putting the trucks on tonight. I also did a mock up with the trailers I think it might work. Next up decals. Think I’m going to call it a day.
Attachments
Images (3)
@romiller49 posted:Clifford, hopefully a dismantle to make way for a new layout?
I agree Clifford!
Clifford, very nice picture of your layout, sorry to hear it’s going away and like rod miller asked, is there a new one going up to replace this one? If the answers no, please post a lot of pictures of your layout for our review as it’s a really nice work of art. Happy Railroading Everyone.
@Leroof posted:Darlander, who makes those dwarf signals? Like those.
I made them: see page 206, 4/23/16 - 10:04AM https://ogrforum.ogaugerr.com/...ayout-today?page=206
Cheers, dave
Hello all, thanks for the heartfelt encouragement. I started building the layout 22 years ago after my wife suffered complications during the birth of our son and daughter, Stephanie and Spencer passed away 2 days later. Greif, sadness, despair. Some months later I


 bought a steam engine at a garage sale , and thus begun a model railroading journey. After hosting 18 open houses and having met more than 600 people, I have decided that I am satisfied with the results. I have been diagnosed with a vestibular disorder known as MdDS. It takes a lot of effort to Play trains, as I am no longer able to crawl underneath for maintenance, or have a steady hand for painting etc. I would be happy to post updated photos of the layout. The finished size is roughly 24' x 18' plus a double main line of 24' x 40'. I have elected to sell all but a few of my favorite equipment and will be posting it on the forum shortly. What a great hobby, great people, and a therapeutic / healing journey for my wife and I. Here are a few pics, enjoy, and once again thanks for your positive comments. Regards, Clifford.

Attachments
Images (9)
For over a week I have been experimenting with pastel art powders. I weathered the Pennsy stone walls from Scenic Express. Sprayed with Rustoleum Matte. Yesterday and this morning I glued the Weathered Pennsy stone wall sections to the inside tunnel walls. Today I glued in the stone seam sealers...The flexible ScenicExpress Pennsy walls work very well around my tunnel wall turns. I used the Woodlands Tack Foam glue with clamps to secure the walls until dry.
Tonight I filled in the bare spaces with the ballast to make the tunnel floor complete. I also glued into the tunnel entrances the boarded support structures also from ScenicExpress.
In the new week I will begin painting the exterior Pennsy stone walls.
Attachments
Images (5)


@CLIFFORD posted:Hello all, thanks for the heartfelt encouragement. I started building the layout 22 years ago after my wife suffered complications during the birth of our son and daughter, Stephanie and Spencer passed away 2 days later. Greif, sadness, despair. Some months later I
bought a steam engine at a garage sale , and thus begun a model railroading journey. After hosting 18 open houses and having met more than 600 people, I have decided that I am satisfied with the results. I have been diagnosed with a vestibular disorder known as MdDS. It takes a lot of effort to Play trains, as I am no longer able to crawl underneath for maintenance, or have a steady hand for painting etc. I would be happy to post updated photos of the layout. The finished size is roughly 24' x 18' plus a double main line of 24' x 40'. I have elected to sell all but a few of my favorite equipment and will be posting it on the forum shortly. What a great hobby, great people, and a therapeutic / healing journey for my wife and I. Here are a few pics, enjoy, and once again thanks for your positive comments. Regards, Clifford.
Clifford, I am so sad for you! 😢Beautiful layout!
Whilst rummaging through my junk trucks box, I found an old Scout motor. The E-unit was wrecked, so I pulled it off and decided to get the little indefinite hotwired.

The wire from the rollers had cracked insulation but was otherwise sound, so I slipped some shrink tubing over it and wired the motor up! The brushes were missing, so I pulled the brush plate, cleaned the holders and commutator, put new brushes in and with a bit of oil, the little thing runs like a champ!

While taking the pics, a Kitteh who will remain nameless decided to get into the act...


Anyhoo, I can return this to the truck box knowing it works just fine!

Mitch
Attachments
Images (5)
perhaps "Cat Cam" mode. Looks great Mitch, well done. What do you use for camera stand/smartphone mount?
I did a test fit of the retaining walls for the back corner. Looks like everything will fit just fine.

I will have to move this trestle support a bit.


I carved the foam into it's basic shape and started assembling everything onto the base. I'm going to use plaster cloth to cover the foam and then I can add ground cover, trees, etc.

I still need to build a temporary platform to climb onto the layout so I can reach the back. I've been able to work with one hand up till now but two will be required for the final placement and finish work. ![]()
Bob
Attachments
Images (5)


Looking really good @RSJB18! Looking forward to seeing how you cover and detail the foam portion as I would like to try that on my layout.
Scenery project finally underway on my layout. Doing small patches at a time. Happy with the results thus far!
Attachments
Images (1)

@Chris1985 posted:Looking really good @RSJB18! Looking forward to seeing how you cover and detail the foam portion as I would like to try that on my layout.
Me too Bob. Keep us posted
Clifford, I am with everyone else. What a great looking layout and I am so glad the build was able to help you and your wife to heal! Best of luck to you and your wife with whatever you do next!
Bob, your retaining wall and foam work look wonderful back in the corner! I am guessing your going to put some type of road under your track threw the tunnel? I will keep watching.
I have been spending the last couple days trying to fix my Lionel 182 crane with a 162 controller. I got the motor running better and the coil for the swing works great. But for some reason the coil that is used to pull the arm in to engage the gear for the hook up and down does not seam to have enough power to pull it in enough to engage. I have checked continuity from switch to coil and it says it should be fine when I push the button. I am lost and have been searching the forum and net for answers!
Well I hope everyone has a great day, I hope you all find time for fun on your layout and with your trains!
I tried to improve one of the corners of the layout. It was covered with just blended turf as seen in the extreme up right corner under the trees. Now there is a dirt path and what is supposed to be the edge of a parking area, along with some greenery.

Attachments
Images (2)


NS Nice work around the tower!
Brings up my next question, who made your yard tower?


 This morning I added some HO Decals and installed my scratch built Hitches. Now it’s done time to add some trailers
Attachments
Images (3)

 Yesterday I received a second Lionel passenger coach 6-15558 for my local train, modeled after the Eastern Region NY Zone 1 train list provided by Rob's PRR website. So now I can mix and match PRR cars for different local trains with just 4 cars. Today I am running a daily, Washington to Harrisburg #555, a MS60, BM70 followed by two coaches, headed up by an Atlantic.
Attachments
Images (2)
@mike g. posted:NS Nice work around the tower!
Brings up my next question, who made your yard tower?
It is an older model made by MTH.
Today I finished my skyscraper scene a la this post from way back in 2013. Thank you, @Jim Policastro for the inspiration. I hope I didn't usurp too much of your work! ![]()


Attachments
Images (3)
I usurped plenty of work from Jim. Always liked his buildings and intersting layout.
Today project: Built new platform for Chicago Great Western’s Gladbrook Iowa Steelox depot. Used 1/2 birch and 1/8 hardwood. Plan to paint gray as concrete.


Attachments
Images (4)


Clifford. Your layout is just beautiful hang in there.
Re-learned how to solder today by hard wiring all the Fastrack curve sections that make up the compound O44.5 end curves of the inner loop. Soldered the feeders also. There have been no connection problems but adding some prevention during the build. Also carpet under the hollow roadbed decreased the high pitch, skating sound significantly.


Attachments
Images (2)


Videos (1)

@Miggy posted:perhaps "Cat Cam" mode. Looks great Mitch, well done. What do you use for camera stand/smartphone mount?
Generally, my two hands, occasionally resting an elbow on the table or on a knee.
Me camera is a GE X5, a decade or so old but still does the job! ![]()
Mitch
@pennsynut posted:I usurped plenty of work from Jim. Always liked his buildings and intersting layout.
Thanks, guys. Always happy when I can provide some inspiration. ![]()

Jim
Attachments
Images (1)

 Added the mudflats this evening calling these two done
Attachments
Images (1)
Worked on the aluminum casting I got from the Age Of Steam Roundhouse over the past couple of days...

I drilled the holes last night to match some 1/4" by 3/4" celvis pins. Going to run picture wire through the holes in the pins, onto a hook on the wall.

Then, I painted it in a dark steel spray paint and will let that sit for a couple days.

Black paint will cover that once it really dries over a couple of days, and then I'll rub that paint off some edges while it's wet, and then add a light touch of rust weathering powders as the real plates were cast iron.
Attachments
Images (3)
Lots of great projects everyone.
Yesterday, I finished connecting all my track wiring temporarily until my two AIUs come in to my Local Hobby/Hardware Shop. Nothing special to see, but it all checked out okay. Next up is the @mike g. Mike G. Lift Bridges! I think I have all the parts necessary; but will probably have to pick up something at the hardware store when I go to pick up my GarGraves flex track for my new shelves. I guess that's two things up!!!
Lee, You could go online to NAPA, cut out and re-size their logo, and add it to the mudflaps. Those trailers do look great!
Former Member
I wired up about 25% of my lights today. I still need to do the accessories. There is about half of the layout shown in this video:
Attachments
Videos (1)

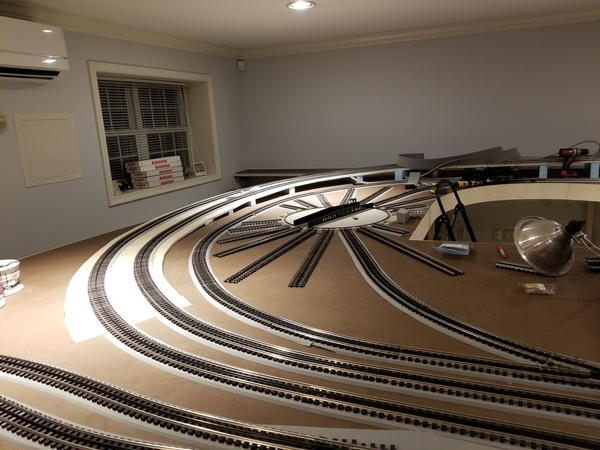
Worked on adding my turntable, got a bunch of the tracks down, a couple more to go. I could only fit a 24" TT in, but it'll be useful for much of my stuff.
Attachments
Images (1)

How are you getting such a uniform road bed? It looks like you're cutting homasote board.
NFL playoffs 😁😄
And in the "timing is everything" and "if it weren't for dumb luck (bad luck?), I'd have no luck at all" categories... this evening, after a long weekend building my skyscrapers, I decided it's time to subscribe to the digital magazine. (I had been a paper version subscriber for many years, "back in the day" when that was the only option.) Wouldn't you know, the first page I see is some very interesting ways to build and decorate... wait for it... skyscrapers! Ugh! Oh, well, now I have some new ideas if I ever decide to renovate them!
Add Reply
Sign In To Reply
