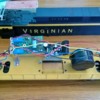
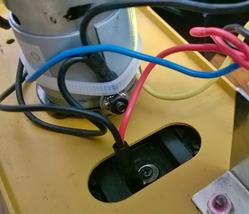
Wanting to get my hands dirty on a conversion and wanted to make sure that I didn't let all the smoke out of the new board, I am new to this conversion stuff so was looking for help. The loco at hand is an old Williams EF-4 rectifier BLK/GLD with True BlastII sound. I have an ESU 50200 command center and want to upgrade this loco to an Loksound v4.0 54399 decoder. There are dual motors and my first question is are they isolated? I believe the brushes are isolated but not sure. Second question is do I tie these motors together and solder them to the main motor contact on the loksound decoder or separate and place one on the motor aux tab?? Third question is I see on the ESU schematic that there is a left and right track power, on the loco the red and black wire are tied together and screwed to the center rail pickup, Do I just solder these to the +/- terminals on the decoder which doesn't seem right to me?

Thanks for any help, it is much appreciated. I searched the forums and did not find my answer. If this is already here please point me in the proper direction.

Thanks and God Bless

Merry Christmas

DanWP_20171219_002

Attachments

Images (1)
  • WP_20171219_002
Last edited by The Salty Smith
Original Post

Replies sorted oldest to newest

you need to test with a meter to see what is tied together.

separate the pick-ups from the center rollers as the + and the wheels should be your-.

If not sure, put an inline quick blow 3 amp fuse for security. That doesn't protect everything. You still need to test with a meter, after your wired to make sure you don't have things shorted or crossed.

Last edited by Engineer-Joe

The motors are almost certainly isolated from the chassis, but as Engineer-Joe says, check with a meter.

I consider the center pickups 'positive', and the return via chassis/wheels 'negative'. The pair of positive leads should be tied together and soldered to either the Left Track or Right Track pad on the board. It doesn't matter which you use. The negative leads should be tied together and soldered to the other Track pad.

Similarly, both yellow motor leads should be tied to the 'Motor +' pad, and the blue leads tied to the 'Motor -' pad. Again, it doesn't really matter which leads go to which pad - you can define 'forward' in the decoder configuration to match the physical hookup.

I have that decoder installed in a number of my engines, including one I just recently installed in a Williams GP9. I think you will like it.


Thank you guys for the information, very big help indeed. After checking with the meter it looks like the motor is isolated. My lack of electronics knowledge just leaves me a bit confused. I know the red goes to positive track pad and the black to the negative track pad, my concern is that "hard to see in picture" the red wire and black wire are connected to a screw stud that connects to the center track pick up both front and back trucks, the red goes directly to the board while the black goes to front and rear light bulb then connects to the board. I guess my confusion is that I had assumed the black wire would be attached to on set of wheels and not bound to the red and same location. I know I'll get it sorted out after this first one or may be I should just stick to making trees and buildings..lol


Thanks for helping a beginner out

it's hard for me to tell using just your pic as I don't have these brand of engines.

I wouldn't worry about specific color codes as every manufacturer does things different. I have seen black wires actually tied with a wire nut right to a red wire. That is because in two rail use, the color is just a guide. 

In three rail, usually the red is the + and comes from the center rail. That usually goes straight to the board's track pick-up + on the board. 

I would run your own wires to each bulb and run the wires from the trucks right to the board. Remember your installing command and when the engine was designed for conventional use, things need to be changed. Make sure your board can drive regular bulbs as many new brands are designed for LED use now.

Williams used the double pick up wire to send one to reverse unit and the other to the bulb (track Power).  The chassis ground comes off the motor frame.

If your wiring in the lights, you may have to isolate those.  I do not know your decoder so follow those instructions.  But a Williams is pretty basic and yes you need to ignore wire color and follow where they come from and go.  G

Here is a pic of the motor on my GP9. The black wire soldered to the motor housing is the chassis ground.

Capture

As others have said, the wire from the pickup to the bulbs is track power for the bulbs and only suitable for the original electronics. You will need to remove that for the DCC install. All of your lights will be controlled by the decoder and should not be tied to either the positive track pickup or the chassis ground.


Attachments

Images (1)
  • Capture

In 2 rail, the decoder mfgs say put the red wire on the decoder from the pickups on the enginer side and the black input to the decoder from the pickups on the other side.    This is only a guide so the default forward direction is forward.    It is easy to change with CV 29.

The inputs should go to the decoder and all outputs to lights should come from the decoder.    Generally based on NMRA standards for ALL compliant decoders, the blue wire out of the decoder (there may be 2) are the common to the light funcitons.    The white wire is the front headlight, and the  yellow wire is the rear headlight.     The grey and orange wires out of the decoder go to the motor(s).    The suggestion is the orange wire to the motor brush on the engineer side to obtain default forward.    Of course with 2 motors, one probably turns the other way.

Thank you for the responses and for answering my newbie questions. Just for confirmation THOR73 your motor set up is almost exactly like mine. WP_20171220_001


So the black and red wires bottom center picture are my track power. The black and red are tied together and screw via stud to the center pick up on middle rail. The red ties directly to the original board while the black loops back to the lights then back to the motor on that stud then on to the board. What you are saying is to eliminate that black wire from the light circut "run new separate wires from the decoder to the lights, I understand that" then leave the black wire from track power to the stud and connect that to the - terminal on the board and the red to the + terminal. I want to leave that black wire connected to the red on the center pick up and take those to my board, correct? not eliminate that black wire center stud to chassis ground and connect directly off the chassis ground stud on that motor?

To add the 3 amp fuse should I put in on the red wire to the decoder or not worry about the fuse? Thanks for all the help I know I am making this harder than it needs to be just trying to eliminate a $160 electronics lesson..lol

Attachments

Images (1)
  • WP_20171220_001

NOTE you need two wires into the decoder.    All other wires come out of the decoder.    One wire to the decoder comes from center rail pickups and one from the wheels contacts or loco frame.     The Williams wire colors do not matter and may be confusing you!     My comments referred to the standard colors  used on decoders.    

I had a chinese built loco a few  years ago with factory DCC and they used red wires for everything - soldered them to onces out of the decoder!


If I'm seeing this correctly, remove the wire on the motor that touches the motor shell. Make sure that wire only goes to the terminal, and not the shell of the motor (Touching? ) I try and use heat shrink around the motor wires and all others. If the leads get bent, they won't short. The speaker is another example where this commonly happens when things get crushed in.

 Wire tie ( or use other wire keepers) all your wires to keep them straight and from getting pinched.

 If you want the fuse, I would put it in the red wire going to the decoder from the center rail pick-ups. Tony's Train exchange told me that tip years ago.

Edit: I run 2 rail and the chassis is usually isolated. I guess in three rail, using the chassis saves wires?

Last edited by Engineer-Joe

Well I pulled the old control board out and installed the new loksound board. Not the neatest install, my goal was to get it up and running then work on getting it cleaned up since this was my first one. I had a few minutes before I had to close shop for the day but on the test track I fired up the ESU command station and entered in as a new loco, it picked the decoder up immediately however I only have sound, no lights and no movement. The sound is awesome but not sure why I have no movement or lights etc, guess tomorrow I will attempt to figure out what is going on. I guess the good news is that I didn't blow the fuse

Problem solved after much thought, I realized that I was pulling my power only from the center rail and disconnect my black wire and connected that to the stud off the chassis. Now I have power, movement and sound but the lights are not working but that should be minor issue. I have been wanting to test this new ESU command station for many months and all I can say right now that this is awesome. This old EF-4 has never ran or sounded so good. 

Well now back to the bench to see what is up with the lights and tidy this install up and replace the shell. Thanks for all the help and answers, this was a huge help.

Dan

You probably don't want to power the decoder with #38 awg wire. Might eventually melt the insulation on the wire if it draws too much current.  There are AWG v. Current charts that you can google for safe current consumption.  I use #28 for most everything except power to the decoder/motors.  

Potentially overkill, but I wire the decoder and the motors with this #22 super flexible wire.  Might find it for cheaper somewhere else… https://www.ebay.com/itm/Lione...-locos-/201987134260

As for the lights…yea hopefully you have a LokProgrammer. I don't know what the default is as I always program the decoder with a new full throttle firmware and program it before usage.  Expensive programmer, but it will make your life much easier in that regard once you get over that learning curve too.  Read the manual.  It mostly makes sense. Ensure you wire the LEDs correctly according to the diagrams and you should be fine.  There is also a software setting to light incandescent lights if I remember correctly, but I suggest LED's with a proper resister.  I use 2.2Kohm or so. Buy the LEDs and resistors for cheap off ebay.

Thanks Davejfro I thought that wire was a bit small but that is what is recommended from tonys trains and one of the support guys from tonys told me to use that wire, I ran the loco a good part of the day and those wires never got hot however I feel a bigger gauge will be better and I will rework this install with heavier wires when I go to change out the bulbs for LED's  I have a good supply of LED's and resistors from a couple years ago when I was making head tracking units for flight sims.

I do not yet have the LokProgrammer but will have by the end of January. I have a good bit more grant money coming in for my project and will be purchasing about 8 more decoders and the programmer now that I know I can do this upgrade.

Tomorrow I will pull the shell of a few of the other locos I wish to upgrade and see what wire they use and get a closer match, that 30# wire is just too fine and hard to work with.

Just a shout out to Tonys Trains as I called their support this morning with a question, answered the question myself while telling him what was going on but he gave me some very good advise and help to go forward with. This ESU command station is amazing.

Better safe than sorry for the current flow, especially under load/stall conditions. 

That wire might do just fine in HO/N, but I would beef up any path to the to the motors, so that includes the wires to the motors from the decoder and path from the wheels to the decoder.  The L is a 3A-continuous decoder, so if you ever actually need that much juice, I would make sure whatever wire you use can handle that for however long you think you might run it. A chart would tell you the minimum for that.

https://www.powerstream.com/Wire_Size.htm

Chassis power column.  You will see that the 38 gauge wire doesn't handle much.  You'd want at least 24awg to the decoder/motors. LED's/speakers are more than content with that 38 gauge stuff, since you're probably not connecting more than 2 LED's to any function output.

Congrats on your success so far!

And I second that shout out to Tony.  I started working with them 20 years ago when I switched over to DCC on my On3 models.  Tony actually sent me a demo sound decoder from a brand new company, Soundtraxx, to test out and I fell in love with digital decoders right away.

I am currently trying Lionel's Legacy controller with an Electric RR decoder and sound board, but I also have a Digitrax DCC decoder that I might put in the loco instead.

My main goal is to get the slow, steady speed performance out of my 3-rail gear that I get out of the 2-rail stuff and whoever does that better will get the rest of my hobby money. :-)

Ron


RAKING I am supper impressed with the Loksound decoder the sounds are awesome and control features and just amazing but the speed control and the adjustability I can program into it for the stops it makes at different locations are just aw inspiring. I have never before been able to creep so slow, all my locos are going to get this upgrade in time $$.  Merry Christmas.

Thanks!  My current test beds are two older Lionel GP-9s.  If I can get them to run properly with the Digitrax/Soundtraxx combo, I'll give the Loksound a try when I have the money.

$$ are a big issue. I have half a dozen Sountraxx decoders sitting around and can use them to create the sound if I simply put a higher capacity decoder under the hood to drive the motor.  Yes, it sounds a bit "kludgy", but this worked fine on the 2-rail locos and there is plenty of room under the shell for two decoders and a nice speaker.

Ron

I am getting there!  This morning I converted the AC Lionel motor in one of my GP-7s to run on DC power.  I set up a breadboard circuit with a silicon rectifier and a bunch of test clips.  It looks hideous, but I ran the unit with a small HO transistor power pack all day with no problems.  In fact, the Lionel motor runs smoother and quieter on DC power.

Tomorrow, I'll cut the DCC decoder into the circuit and see how it works.  If everything hangs together, I'll go ahead and do a permanent installation with the Soundtraxx board.

I have a lot of money invested in DCC and it always ticked me off when I had to pull out the old Lionel Tranmaster transformer for Christmas.  Thanks to you guys, I finally got off my duff and solved the problem.

Merry Christmas and Thanks!

Ron

PS - That is a very nice video. Those units sound great and run very well!


Last edited by RAKing

Here it is I made a little video to show the sound and motion of the loksound V4.0 54399 decoder. Take note my track is just laying in place nothing is fastened and I only have 4 drops to the bus so this is very early stages of the build, lots of buildings etc that I know are not scale but gives people someting to look at and I use them as place markers as I am working. I did not replace the speaker in this old Williams and it is still in the can so it sounds boxxy a bit but I can only imagine how it will sound with 2 proper speakers installed in the future.  here is the link to the video.https://youtu.be/UW_MfEoT2Sg


Add Reply

Post

OGR Publishing, Inc., 1310 Eastside Centre Ct, Suite 6, Mountain Home, AR 72653
800-980-OGRR (6477)
www.ogaugerr.com

×
×
×
×
Link copied to your clipboard.
×
×