
Hello Fellow Lionel Collectors,

I am repairing a Lionel 3512 Fire Car, and in need of some assistance.

Can anyone supply me with some photos of different views of the extension ladder complete with its parts, please?

The diagram in the Greenberg Repair Manual does not do any justice of where the parts go exactly.

I would greatly appreciate it.

Thank you.

John T. aka Johnbrandt


Last edited by John T.
Original Post

Replies sorted oldest to newest

   I only have a childhood memory of it. I'd need to at least see what you have there to stand a chance.  Sometimes (often?) answers don't come fast. Some posts do get missed too, but nobody is ignoring you or anything fyi. I usually wait a day or two to "bump" (frowned on). Not everyone can be online every day anyhow.

  The Lionel site may have something that would help as those were remade in this era. Don't count on the number being the same. Use Fire car, firefighter, etc. as a search term. Some parts change, but for the most part stay the same.

If I recall, the ladder was two parts, top snaps into tabs on the lower, the lower was geared with a crank(?). The boom axle held it to the base or it snapped in vertical grooves. The swing pivot had a press on sheet metal star nut (like a Radio flyer wagon axle, or icbm launch car pivot). Washers and such?.....????.  

I also had the engine (oops , that was the repop, not sure about the car, but the number for the car might work if not remade)

I'm pretty sure you'll likely get a better answer soon, hang in there.  If you can't figure out the site I'll try to help, but my system doesn't like their site too much. I'm hoping your's fares better.

  My ladder didn't attach to the body by rivet and had no coil spring there that I recall. The slide retainers were four pairs of 1/2"-ish tabs, not full rails like that. 

But I'm also wondering if mixed memories are from another toy, the Mercury cherry picker, or if I had a "one off".  I do recall the cherry picker and fire ladder car were not the same. I couldn't fix the cherry picker with the fire ladder car for some reason.  I need to dwell on this.....

  My fire equipment came in a HUGE Mercury set. The KW in the set was a one off with gears like a prewar Z on B throttle so pulling both to you shut it off. It actually had a seperate transformer coil for each throttle too. Every other KW, clockwise on both handles is on, CC is off. I still mess up B throttle on my replacement if I dont think first.  It also had an odd transformer for the fire equipment's line, a 65w(?) with a tall metal case like a prewar whistle controller, silver metal handle like a tiny verson of a Marx, and thin red fiber button in a slot off to one side (direction or horn?) I've not seen another like that since.  I have to assume the set was at least partially assembled from "the closet", a room of pre-production prototypes, functional but not all "normal" builds. The KW was taken when Gramps collection was sold (despite being told to leave it; not for sale. I got my other stuff back, but that "freind of the family" rooked me on that "didn't know what I was talking about" (theif, he knew the value)

bmoran4 posted:

I presume this is what is in your Greenberg book:


I can see the rope goes to  the bottom of the extension ladder,and over the pully. the spring goes to the lower section after the two or three winds on the windlass for grip. The ladder crank goes through the windlass at the boom pivot, windlass between rails, and elevation crank on the other side match the gears, clicker over the non gear side of the elevation gear, it's spring pulling as positioned. Exact point for that short spring should be apparent. The rope spring may go to a lower ladder rung, brace, or loop. Which rung/brace should take a slight bit of checking the extensions travel. 

The eyelet rivet into spring, that assembly into the ladder and body, set on the underside. The spring will help keep the ladder and base from snapping if bumped. Over setting the eyelet is to be avoided for sure, or that "play" will be lost. The spring could also, just maybe, be hidden inside/under, at the eyelet set and still perform, but the diagram does not reflect that mounting. There may not be room between body and flatcar.

I'll need to review this text myself again later, I just realised my blood sugar is very low, I'm almost "drunk" right now.

  Feeling a little more stable(off &on) and my post makes good enough sense to me aside from a few points(*).

(*1)  Three rope wraps mentioned might be wrong

(*2) both rope ends will connect to the top ladder.

Hey, there is an overhead head here...   https://www.tandem-associates....ns_3512_flat_car.htm

The text refers to Lionel Service Manual 

In Mercury Cherry Picker pics I found, the system looks the same to me fyi.

 Best I can do. Let me know if you'd like more input, but I'll just follow from here unless I find better. I'm looking over some other goodies from that Mercury set.

Good luck.

Last edited by Adriatic

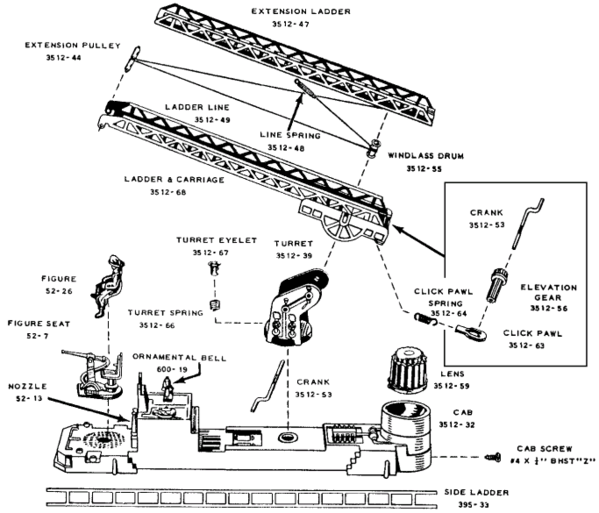
I'll give it a shot. The service manual is a simplistic view of the ladder rigging that is more complex than what it seems. It shows how the parts are arranged, but not how to accomplish it. You will need 3 things, a cold one, patience, and tweezers. I took apart one of mine to restring.         

Picture one is the string with spring detached.

Picture 2 is with the spring removed from the line, feed it through the 4 rung from under-neigh.

Picture 3 is the small loop is fed through the larger loop.

Picture 4 and 5 draw line tight.

Picture 6 drape line over the plastic pulley. This is the weak link and snaps in two easily with age. Insert top ladder.

Picture 7 feed line on back of ladder to red turret..

Picture 8 Now this is where it gets a little difficult. You need to feed the line in the small narrow slot between the ladder rung and the pulley, you'll need your tweezers. Wrap 1 and 11/2 times around the winding pulley. then out the back part of the ladder in the rear slot.

Picture 9 shows how it should look.

Picture 10 shows ladders and line. This where you re-install the spring in the small loop and feed between the 2 ladders.

Picture 11, you will need your tweezers to feed the spring and line between the 2 ladders. Work from under side. The spring is stretched 2 ladder rungs past the relaxed position on the spring. This will give the line enough tension to grab the crank pulley to raise and lower the ladder.

Picture 12 bottom view. The crank should raise and lower the ladder. The ladder should extend about 4/5's of its length. If the winding pulley slips, you can add a slight bit of oil on the edges of the ladder that ride on each other to reduce friction.

I hope this helps. It's not a easy process. Good luck.

Attachments

Images (12)
  • picture 1: line and string
  • picture 2: line and going through moveable (top) ladder.
  • picture 3: small loop fed through large loop.
  • Picture 4: tighten line so it looks like this
  • Picture 5
  • picture 6: slide moveable ladder into stationary ladder
  • Picture 7: feed line back to undercarrage
  • Picture 8: feed line through pulley
  • Picture 9: 1 1/2 times around pulley
  • Picture 10: re-install spring in small loop and feed.
  • Picture 11: spring and line in correct position
  • Picture 12: bottom view of ladder assembly

I'm going to have to make the same fix so thanks to John T. for bringing it to the forefront and Chuck, Adriatic and others for providing assistance.  

An additional issue I'll have is the melted rubber band that makes the light "flash" on the back.  

These are towards the bottom of my priority list however but will have to archive.


Kirk R.

Well Guys (especially Chuck Sartor),

The repair was a success.  The car works as good as new.

A big thank you goes to Chuck Sartor for the photos he has posted.  All I had to do was follow each one step by step one after the other.  Did not take long to do the repairs.  The only frustrating part was attaching the spring to the ladder at the final step.  BUT, it was worth it.  You have been a big help, Chuck, and again I thank you.

Below are photos of the fruit of the labor.DSCN5364DSCN5365DSCN5367

Attachments

Images (3)
  • DSCN5364
  • DSCN5365
  • DSCN5367

Add Reply

Post

OGR Publishing, Inc., 1310 Eastside Centre Ct, Suite 6, Mountain Home, AR 72653
800-980-OGRR (6477)
www.ogaugerr.com

×
×
×
×
Link copied to your clipboard.
×
×