


unbelievable what I see here what a work, real craftsmanship. Are you go completely to Proto 48? and do you have a layout. That 9000 is a lot of work are you go to super it or is it only the wheels. Pretty awesome that is you are a very very good builder nice to see this...
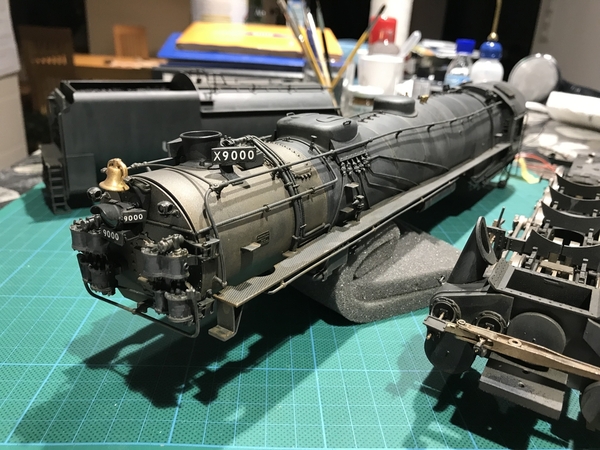
Thanks, Ed! Kind words from a master! Yes, I go full p:48, it's quite a difference once you get more used to it. At first I thought what do I need that for. But now I'm quite happy with the new look of the rail sitting more narrow under the trains. Also do the trucks look great when they have the sleeker bolsters. My layout consists of a bench for test tracks until I get the layout room prepared. That particular locomotive will not be detailed much more since I have already weathered the boiler in a way I am very happy with. I hope to get sand lines on the brake shoes and equip the engine with smoke. Thanks again!
Very impressive. Adding the pilot and trailing trucks will introduce additional forces on the drivers. I personally fear your minimum radius operationally will need to be at least twice your test radius.
Best of luck.
...Couldn't have been something easy...... ;<![]()


Very very impressive looks real, beautifully done.
Sarah,
That is not just a little awesum . Who makes that smoke unit? I guess it must interface with DCC. Very neat. - J J
Impressive smoke Sarah! Most smoke units look like someone stuck a punk (remember those) down the stack, LOL! Yours is very realistic looking. Now if "they" could just invent black and dark grey smoke............
Regards,
Peter
Awesome !!
Tom
Yeah, if you're gonna have a smoke unit.....have a SMOKE unit. Really impressive.
Thanks!
J J Davis, that unit is of German make, used for One Gauge locomotives. But it easily fits into O scale engines.
https://www.km-1.de/html/nachrustrauchentwickler.html
I modified it to team up with a ESU Loksound decoder, should you need help, I can share my method.
Hi Sarah
I too would like to know your method of incorporating that smoke unit into your model I would greatly appreciate it if I were included
Steve
Love the smoke and sounds!
I can distinctly hear that third cylinder on that U.P. 9000. Nice job.
Sarah, Great work! Enjoy following this thread with your updates!
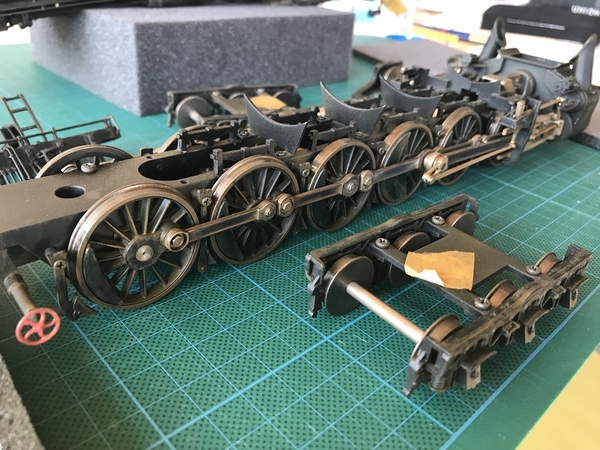
Mechanically she‘s finished! All wheels flanged on 72“ radius test track. There‘s still a radius reserve in the layout of the running gear.
The undersized wheels of the lead truck have been replaced with scale wheels. Lead truck received ball bearings to minimize irritation of the first driving axle in curves. It‘s super smooth now and the wheels look much better at their 30“ diameter.
I‘m really happy with the outcome. All following engines will have shorter wheelbases.


Attachments
Images (3)
Videos (1)

This is awesome! It looks great and the smoke looks real!
What kind of mill/tools are you using for this?
@BillYo414 posted:This is awesome! It looks great and the smoke looks real!
What "smoke"?
What kind of mill/tools are you using for this?
@Hot Water posted:
It was in a video a few posts up. It showed the chuffing effect.
Stunningly great job Sarah! Your attention to detail is astounding! I look forward to seeing more of your work.
Wow...you should be very proud.
Mark in Oregon
Yeah - that is spectacular. Share your weathering secrets?
@bob2 posted:Yeah - that is spectacular. Share your weathering secrets?
Yes, please do... ![]()
Mark in Oregon
Thanks!
Bob2 and Mark, the weathering was carried out with acrylic paints and very few chalks.
1) a brown overspray with highly thinned acrylic paint, I use Revell but the brand does not matter. This is the only moment when an airbrush is used. All Components are disassembled so you can roll the mechanism in your booth and for better handling. It is important to apply more of the brown on the lower portion of the model, becoming lighter towards the roof. Oh look how crude the wheels are! ![]() We will have to change that later
We will have to change that later ![]()
2) The color is then modulated with a flat brush and isopropanol alcohol, at that time I used methylated alcohol. they both re-activate the color and you can brush most of it away, creating streaks. I try to leave more over the rivets and generally on the lower portion of the model. Attention here - the alcohol might eat up the decals, they have to be sealed carefully. The sealant should resist the alcohol, of course - I will make tests before I weather an other. All the factory painted plastic models like Atlas and Intermountain cars have no problem with alcohol.
3) Seal your brown layer with a clear coat. Krylon Matte Finish or anything that protects against the next coat.
4) The most important step is to apply a THIN wash of a light grey with your brush. I use pure thinner to wet the model before applying to avoid drying edges, they can ruin the job. All of this can be modulated with alcohol but I find it easier to apply it nicely in the first place. This step is subject to really developing your own technique and to use your HO corpses for test runs.
It's all about removing paint and shoving it around. Once you're happy the components go back together and some pigments are added. At that time I had no concept of soot and grime on a steam engine, today I would add more black pigments around the stack and on the roof.

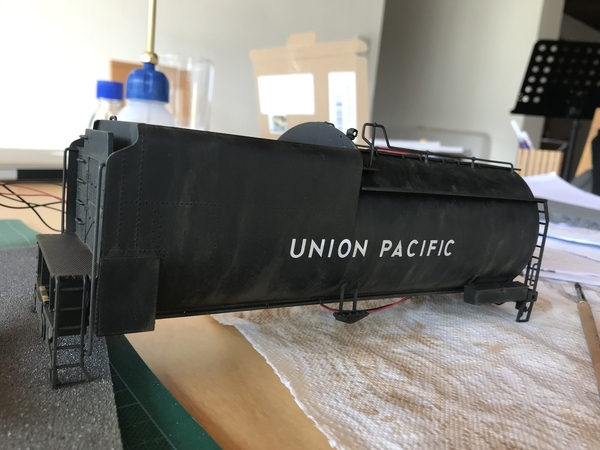
All the side rods received some burnishing on the outside. This locomotive ran through Nebraska at 60 mpH and is now going to be serviced at Cheyenne, Wy. The shine of the rods would have looked still too fresh with just the above weathering.

I wished I had converted the engine to p:48 before all the weathering. That way around would have been much easier.
Attachments
Images (5)


Videos (1)

Golly...gee whiz...holy cow...wow! ![]()
Thanks so much for posting these great photos and video; and most of all, for sharing your technique.
You are an artist in the truest sense of the word. ![]()
Mark in Oregon
Sarah, Amazing and delightful You are a true craftsman and artist !! Thank you for sharing your inspirational work. Please keep us updated.
Tom
Very, very nice. I guess what drives me crazy modifying complicated models is taking apart and reassembling over and over ! You have some patience!
I took apart a Great Northern 4-6-0 E-8 I scratch-built years ago to finally illuminate the headlamp, and for the life of me could not remember the clever ways I hid some of the fasteners. to remove the headlamp to carve out the inside , I had to take apart everything but the axles on the frame --the cylinder block had to come loose because the boiler is attached as one , and the drive is hidden by sliding the motor and half the gearbox into the boiler before attaching to the frame . The wires interfered, so I had to modify the motor mount and forward weight.---And your big engine has twice the number and size plus five times the electronics! Yikes!
So I reassembled it for the fourth time (during construction it may have been assembled 150 times), then put it on the track. Great !!! it now has lights and .....smoke !!! So cool, but there is no smoke unit ..... OK, time to take it apart again --I think I accidentally stripped a wire when slipping the weight in and it shorted .
So, anyway, great work Sarah !
Regards, J J


Very very nice , Sarah!!! I'm going to order one of the smoke units because of this-it looks fantastic! Oh, and by the way, your layout is great too- I could swear the shimmering silver lake and water fall by the bridge is real !, but the black rock formations may be a little too glossy-- a grinder and rough disc should fix that in a few minutes. #:<![]()
You know you built a great model when it even looks awesome next to the kitchen sink!! Haha
That thing is really amazing! And inspiring. Makes me want to learn some of the upgrades you can do to a locomotive. It's never really crossed my mind before.
Sarah, Magnificent !! Just amazing to watch. Looks, sounds and operates just like the real engine. I am glad you have shared your work with us, thank you. Absolutely First Class.
Tom
Very Nice. The weathering came out great and it runs as good as it looks.
Sarah, in watching the video of the uncoupling. Can you elaborate on how you did it. Looks like a thread running through the spring is pulling It open ? I’m guessing a small solenoid or a servo motor. I know Kadee makes one but it’s in G Scale.
Sarah - What was the source of your crew men in the cab? Particularly like the fireman with his gloves rolled up in his hand.
You should be contributing your work to Gene Deimling's "Gene's P48 Blog", too. Your locomotive is so well done, that it looks like it is ready to take a manifest to North Platte, out of Cheyenne! You are in the top tier of modelers.
@Dave_C posted:Very Nice. The weathering came out great and it runs as good as it looks.
Sarah, in watching the video of the uncoupling. Can you elaborate on how you did it. Looks like a thread running through the spring is pulling It open ? I’m guessing a small solenoid or a servo motor. I know Kadee makes one but it’s in G Scale.
That's exactly right – I use the uncoupling kit (HO) by www.precimodels.com/en
It works just fine with the old Kadee #805 and next time I'll try it on a #745 scale coupler. It will be a bit more challenging to connect the thread.
Great work and shots. Thanks for sharing this process with us.
Beautiful! I have enjoyed this thread immensely.
Since this is the "O gauge Railroading" forum a quick question. Why Proto 48 ( 1/4 inch scale) vs. 17/64 inch scale?
As I understand it, the purpose of Proto 48 is to bring the track gauge in scale to 4 feet 8 1/2 inches, which is the prototype gauge in North America and Europe.
Of course 1/4 inch scale on O gauge track, which has a gauge of 1 1/4 inches, is a scale 5 feet in 1/4 inch scale, which is too wide. The too wide track gauge can affect the appearance of the models. Thus, track gauge in Proto 48 must be around 1.1766 inches (or 1 22/125 inches) to bring the the gauge to 4 scale feet 8 1/2 scale inches. But, this track gauge is no longer O gauge.
However, O gauge track in 17/64 scale does scale to 4 scale feet 8 1/2 scale inches. Why not keep O gauge track and just proportion everything to 17/64?
Both approaches accomplish the same goal of having a track gauge of 4 scale feet 8 1/2 scale inches, but only one keeps O gauge.
Hopefully not opening a can of worms.
WBC,
The answer, I would guess, is that switching to Proto 48 involves primarily trucks (on rolling stock) and drivers/diesel trucks and related equipment on locomotives. Switching to 17/64ths scale involves almost (if not) everything else being adjusted since 1/4 scale is what most manufacturers build.
Chuck
Sarah, really owesome to see this you are one of the best and all that work you put in it and that sound beautiful. You know exactly what you do and admire it very much. This is more than fantastic![]()
@PRR1950 posted:WBC,
The answer, I would guess, is that switching to Proto 48 involves primarily trucks (on rolling stock) and drivers/diesel trucks and related equipment on locomotives. Switching to 17/64ths scale involves almost (if not) everything else being adjusted since 1/4 scale is what most manufacturers build.
Chuck
That‘s right! I already have a ton of equipment and I just trade in track and trucks or convert them. Really the only thing are the steam locomotive drivers.
It‘s all readily available nowadays for those diesel guys. Easy. But you need to keep your trackwork level and incorporate gentle easements for curves and changes in elevation - OW-5 is maybe a bit more forgiving here.
Wow Joe, that were many thoughts! Yes, I see modellers of the various fields more as a big family and ofcourse everybody has a favorite sibling.
As for the track I gave hand laying a try using Jay Criswell‘s code 125 rail, ties and plastic tie plates. The ballast is made by Roco of Austria, it‘s HO and just the right size. The rest of the wooden board was covered with ordinary gravel from a road in the fields.
I brushed every individual tie with a wire brush to create individual grooves. Then they were individually stained with india ink of various intensities. Rail weathering with brown acrylic paint and an enamel wash with MIG rust washes.
I‘m glad you like it! :-)
The first pic shows wet ballast in place after scenic glue was applied.


Attachments
Images (3)
Add Reply
Sign In To Reply
