Hi Everyone,


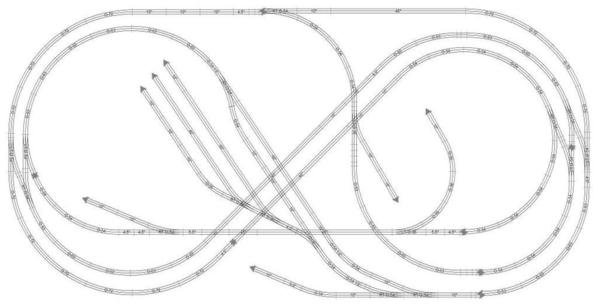
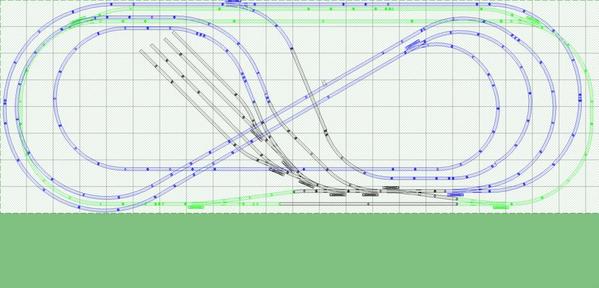
I have been on a hiatitus for a while with switching jobs and moving (all of my trains are still in boxes), but now I have a the space and opportunity to build the Atlas HO layout I wanted to build back in the 80's.   I have recreated it in Atlas O in a 8 x 14 space using the suggestions John Armstrong gave in his book Track Planning for Realistic Operation for that layout.  I have also included the provisions for Lionel accessories to "feed" each other.  For instance, at the bottom of the layout, there are two stub sidings that are aligned.  These will contain the Lionel Culvert Loader and Unloader accessories.  Some of you may remember a CTT article last summer where these accessories where separated but connected by a hidden ramp.  I plan to do something similar here.


I know this is a loop-runner, island layout, but it fits my space and what I want from a layout just fine.    I can't wait to begin construction!


Happy Model Railroading and Happy Holidays!


Larry


ps. I used SCARM to design the layout.


GGN

Attachments

Images (1)
  • Granite Gorge and Northern in Atlas O
Original Post

Replies sorted oldest to newest

The idea for the green line was a subway scene but staging would also work.  If you are seriously thinking about this layout do a Google search.  There are many different variations, scenery ideas, pros and cons.  Many have built this layout, all HO of course.  This layout always fascinated me so I did this design to teach myself RRT.  My conclusion was an around the walls layout would be a better use of the space and the 4' reach to the center could be a problem.      

I have been slowly working on it (my plate is pretty full these days).  I have most of the track that I need.  I have a few switches left to purchase.   Even though I had a couple of computer generated track plans (one in SCARM and one in Atlas' discontinued Right Track Software) I decided to not purchase all of the track at once.  I'm glad I did.  I found some ways to improve the track plan as I was laying the track.  Very minor changes, but something definitely worth noting to those who are in the track planning stages.  Word of advice - Don't get lost in the details.


The layout consist of 2 - 45" x 90" and 2 - 36" x 90" modules that are bolted together so that the seams make the letter H.  This will help in hiding the seam for the waterway (not sure if it will be a small harbor or a canal at this time).


I will also be using the Woodland Scenic Subterrain System so that the modules are light if they need to be moved.


One more note... In order to make the track plan work I had to modify the two 45 degree crossings.  I did that with a Zona saw.  I was able to cut all three rails at the same time which makes for a nice fitted cut.   


I will post some photos of it tonight.

Originally Posted by SeattleSUP:

Could you post your SCARM file? I like the layout and would like to try and modify to fit my space. 

Hi SeattleSUP,


I can't find the SCARM file I used.  Basically, I started with the two 45 degree crossings and went out (6) 10" pieces to the right of the right most 45.  All of the inner curves are O-54 and the couple of outer curves are O-63.  There is one O-72 curve in the top right hand corner (reference the drawing above).  All of the switches are O-54, except two O-36 LH on the right hand side that feed stub sidings.  If you are still interested in a drawing, let me know and I could draft one up for you. 


Larry

Post
The Track Planning and Layout Design Forum is sponsored by

AN OGR FORUM CHARTER SPONSOR

OGR Publishing, Inc., 1310 Eastside Centre Ct, Suite 6, Mountain Home, AR 72653
800-980-OGRR (6477)
www.ogaugerr.com

×
×
×
×
Link copied to your clipboard.
×
×