Well it looks like i ll have a few trains running for the family coming over for the Christmas get together.

Thanks to all for the kind words.!!

D&D----Its called OBSEESSSSSSED like most of you crazy train nuts on here. I took off work for the last two weeks, and yes Mountain Dew not coffee. I get motivated around 3 and stay up until 3.

Russell --used homasote ripped for road bed 1/2 inch.

Springo--The flexible facad is temp but it is masonite and 1/4s.


Thanks Guys for the nice thngs you said.


I took all the foam sheets outside. I cut them 4-5 inches wide with the jigsaw. Takes about 10-15 min max to chop up a sheet. I did 3-4 at a time. Brought the strips inside. Once inside you have 2 options, If the 8ft long pieces will bend to the angle you want simply glue and screw it down with 3 inch screws. The first row will bite good. The next couple rows I used 3 inch screws and 16 penny nails to hold each row to the next. If you cant bend it that tight simply cut the ends at various intervals with a drywall knife. You omly have to get it close. The more you have to beat it up later, the better. Stack them 3-4 high. I used low expanding foam like mortar between bricks when stacking the foam.(very small amount) Then I would put heavy wire spools on them for weight as they dried.Maybe 30 min.

Take a cats paw or any tool like it and beat the foam up , taking big and small chunks out of it. The more chunks the better it will look later..

Wait until you have an entire day for the grinder.GLOVES AND MASK. If you have complainers in the house tell them to leave for the day,If you are only going to do small sections at a time nobody will be bothered.
Take the grinder and start horizontally making groves. the closer together the better. Try not to cross the line above or below the one you just made. Intersecting them is good but not X" ing them
You ll get the knack of it.

I did approx 30 ft x 12" each day. You will smell it upstairs during this process if you do more than 30 min at a time. But dosnt stay long.

Painting:
As for painting, i went and bought a 80.00 electric wagner sprayer. Regular cheap choclate brown water based paint and sprayed the whole thing(everything) in 2 days.
No primer etc...

Hope this helps

Here are a few more pics. Sorry about the quality. Hopefully i ll get a real camera for Christmas.

Backdrop still hasnt arrived, but Turntable has.

Gonna finish the basic ground cover first, then like I said earlier wait until after Christmas to take my time and detail it up.



Last edited by Patrick H
Thanks guys !! I have 60 of the N&W MTHhoppers 8 atlas now. And Mark yes i seen the ones on the bay, Im watching to make an lower offer later. 130 is what i ve been payin. I think that is plenty for now. I think the front 12 will now have to weighted to not flip coming up around the mountain 2.2% grade.

Of course theirs always the shows.LOL
quote:
Originally posted by SoCalStu:
I was wondering why it is so hard to find the pink extruded foam out here in CA. You must have cleaned out the factory inventory! LOL Ever count how many 4x8's it took?


Funny you menmtioned that, back in August or sept I posted a complaint about how the pink stuff was being replaced with that NASTY purplish pink stuff. So you see I have a little of everything.

IMHO from best to the worst that you can buy for easy carving . BLUE BEST Green OK Purply is just terrible,

I did call owens corning and they said Canada enviromental laws forced them to change the formula. NO MORE PINK
quote:
Originally posted by L.I.TRAIN:
Patrick
Looks like this thread will have a long life span. How was operating the layout as you noted earlier that you had holiday company and planned to run the layout.


Happy New Year!!

The Christmas party went well, So when most of them came to the bottom of the steps they said HOLY ****. Even though its no where near done they got the idea.
They have seen the other layouts Ive done over the years at my old houses but I think this time they get the train obsession. LOL

I ll post some more progress soon for those who are interested .

recieved the turntable and backdrop.

I am attatching the backdrop to the hardboard first then will bend it to the contour around the top of layout to eliminate all the corners.

i have 4 kids alot of Christmas and Holiday running.


Pete--- Later in the week, maybe a little one.
Last edited by Patrick H
quote:
Originally posted by bigtruckpete:
Absolutely amazing!!! It would be cool to see a little video action now that you have some scenery work done.
Thanks for keeping the photo updates coming!


I really am not ready for video Pete ,the layout is very very raw yet, not even ballasted or any finished sections,but heres a video of a small section of the layout i did my best,(hope you dont get a headache).


When I installed the basement lights I left 2 switchable wires in the ceiling- 1 for direct lighting right over certain sections of the layout and also another extra switched wire for ceiling exhaust fans. Not sure if ill need the fans yet. So my lighting is still very poor.


Last edited by Patrick H
Patrick,
Excellent work and impressive progress, as always. We'll never tire of your updates.

quote:
When I installed the basement lights I left 2 switchable wires in the ceiling- 1 for direct lighting right over certain sections of the layout and also another extra switched wire for ceiling exhaust fans. Not sure if ill need the fans yet. So my lighting is still very poor.
In case this may be of help, here is what I am doing for lighting in my train room, which is about 33-ft x 38-ft; not quite as large as yours, from what I can tell based on your very nice pictures.

Due to the HVAC duct and beam enclosure (38-ft x 6-ft) and the stairs, the ceiling is divided into three sections that are 12’ x 38’, 16’ x 20’, and 13’ x 33’. For these areas I have, or will have (I already wired them) a total of 14, 4-ft x 2-ft troffers with 4-32W bulbs each. I will also have 12 spot lights.

Of the 14 fluorescent lights, six lights are controlled by one switch (actually three, 4-way switches that are at the stairs and the walkout doors, and at the multiple switch panel), and the remaining eight lights are controlled by two separate switches, four on each switch.

The spot lights are ‘hidden’ from ‘normal’ sight behind the duct enclosure, and are controlled by four switches. (The basement has 8’8” clearance under the engineered joists, and I am installing the suspended ceiling at 8-ft.

I am using the spiral bulb spotlights as I don’t like the heat generated by the normal incandescent spotlights, but they cannot be dimmed; hence the multiple switches. I have these spotlights elsewhere as well and they work fine; save for the 30 seconds or so it takes them to come fully bright.

Instead of dimming, for different light levels, each bank of six spot lights is controlled by two switches: Two lights on one switch, and four on the other switch. This will allow me to select no lights, or two, four, or all six for four different levels of spot-lighting.

And please, do keep posting your updates Smile

Alex

(added) While the fluorescent lights (directly overhead) create no shadows, the spot lights (along one side) will, and this may be used for special effects when taking pictures; that is, with or without shadows.
I dont know how to do the multiple quote thing,
(tell me)


Al
, yes your MILLHOUSE RIVER STUDIO sweet turntable is in. I was wondering how you knew where to weld them ears on the the turntable so that when i mounted it down tight it was perfectly flush all the way around.

Alan Dave and wiz--,

Thanks for the kind words,
i am perplexed as to how many think that i am killing myself building this. Besides the 2 weeks before Christmas marathon, I only spend a couple hours 2-3 days a week down there. The hardest thing i think is to stay in phases.

Steve --
Im only 3.5hrs from Smyrna, let me know which building your bringing up so i can plan it into the layout.LOL


Alex --
I sorta get your idea , pics or drawing would be helpful.After the backdrop I would like to discuss and get some feed back on the lighting, what and where etc this week. I am going to work on the backdrop today . My original intent was to glue it to the hardboard first then instal all at once. Unforntunitely whil testing the first pieces I used a rubber contact glue (as recommended)that left big air bubbles and when bending the board it wrinkled.
So what i decided to do is use 2 sided carpet tape. I am running the carpet tape along the top of the hardboard then pressing the backdrop on that and letting it hang straight. I feel any kind of glueing etc will turn this into a giant nightmare and mess. Whats really befuddles me is the manufacturer of the backdrop is still "experimenting with the best way to hang this stuff" Because of the grades i wasnt exactly sure about backdrop placement,height etc.., However the people who say put the backdrop in FIRST if you can, take their word for it. At least i finished basement before starting. Wink


Last edited by Patrick H
Patrick,

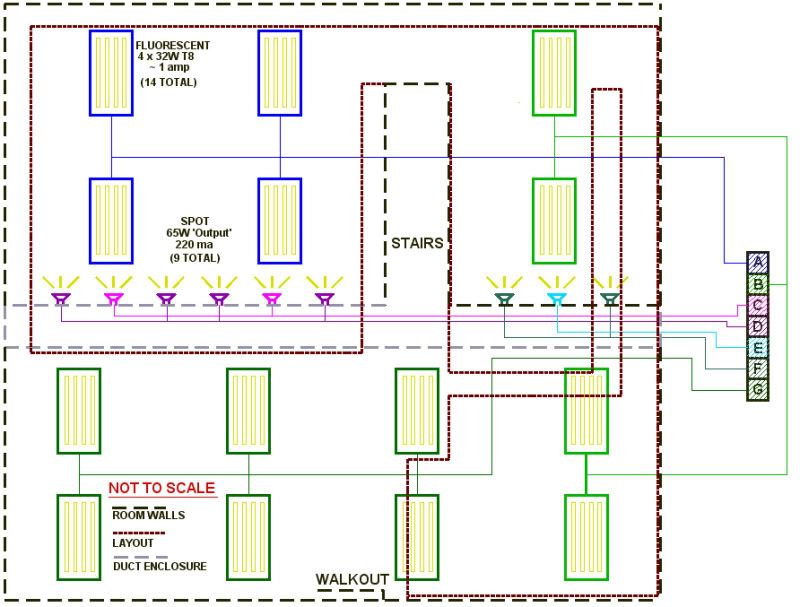
This is a sketch of how I am doing my lighting. I have used these components before and they have worked fine. I used the same fluorescent troffers in the basement in my last house (much smaller) as well as in the other rooms in this basement, they work well and installation could not be easier. The current draw is just under one amp for each, and the light output is he same or better than the older 4 x 40W fluorescents. Each troffer costs $49 at HD.

I have some of the spot lights (nine instead of the 12 I mistakenly stated earlier) installed already, and their light output appears to be more than sufficient, but I am not done yet. They only draw 220 ma each.

The total current draw for the 14 fluorescent plus the 9 spot lights is around 16 amps, and I have two 15 amp circuits to supply them.


As shown in the sketch:
(Room is 33-ft x 38-ft)
Switch A controls four fluorescent lights outlined in dark blue.
Switch B controls four fluorescent lights outlined in light green.
Switch C controls two spot lights outlined in pink.
Switch D controls four spot lights outlined in purple.
Switch E controls one spot light outlined in light blue.
Switch F controls six fluorescent lights outlined in dark green. These are the main lights, the ones a person would turn on/off when entering or leaving the room, and cab be turned on/off with a switch at the stairs, and the walkout door, and at the switch panel.

Hope this helps.

Alex

PS. Your backdrop looks fantastic! And I agree; better to try to do it before the layout, and obviously, finish the basement first!
Post
The Track Planning and Layout Design Forum is sponsored by

AN OGR FORUM CHARTER SPONSOR

OGR Publishing, Inc., 1310 Eastside Centre Ct, Suite 6, Mountain Home, AR 72653
800-980-OGRR (6477)
www.ogaugerr.com

×
×
×
×
Link copied to your clipboard.
×
×