fairly new to hobby. Going to have three switches back to back to back. Is there a easy way to figure out which track gets the insolated pin
Original Post


|
|
fairly new to hobby. Going to have three switches back to back to back. Is there a easy way to figure out which track gets the insolated pin
Replies sorted oldest to newest
What switches? Fastrack or older tubular?
Also, even if just a napkin drawing showing us your diagram of how they are back to back and further, what you might want to isolate could get you a more detailed answer.
Similar topic https://ogrforum.ogaugerr.com/...22-switches-in-a-row
Regardless of the type of switches, the pins don't move from their intended, factory positions for the non-derailing feature to work.
Pulling steel pins from or adding steel pins to adjoining switches may be necessary, and depending on your configuration of power districts in conjunction with your switch array, you may find that you have up to 3 insulating fiber pins at the juncture of two given switches.
how would you recommend configuring these
I'm not 100% sure of your question about the insulating pin. Are you trying to ensure non-derailing operation, or create an insulated "block", i.e., an isolated section of track to park a train, etc.?
If you post your full track plan, I could try to recommend where the insulated blocks go.
Re: non-derailing... generally, a train approaching a switch from the non-points side will cause the points to automatically align to the direction the train is coming from. I could be wrong, but I don't believe that connecting multiple switches back-to-back would change that built-in functionality.
I don't believe that he is trying to create an isolated power block. I think that when he is looking at the instructions of how to install one switch, he can see that there are insulated pins required in designated places.
I think that what he is asking is, that if he puts three switches together, as shown in his layout, does this change the normal instructions of where to install insulated pins.
Much like myself, I think that he is building his layout by hooking track pieces together to create whatever he wants, and is not trying to follow a pre-designated track plan. In doing this, I ran into similar admittedly novice questions, but I was happy with the result.
In sum, I think he is just asking how to hook these up so that his train runs and the switches don't burn up. :-)
Perhaps there are two different anwers to do this. One in which the automatic derailment features work, and one in which the automatic derailment features don't work.
If anyone can approach it from this premise, and furnish him with answers to those two options, I think he will be happy.
I would supply those answers, if I only knew how. :-O
Mannyrock
thanks manny yes im just trying to make everything work, If the auto derailment feature works great. Thanks
@Ohio Jeff posted:...If the auto derailment feature works great...
You don't really have a choice with those models, the pins must be placed correctly for them to work at all.
Thanks Rob. I will try them later see if they work
For your consideration: depending on the equipment you are running you may get derailments with the train going through the switch and coming out onto a curve track. I had that frustrating situation and it was remedied by installing a piece of straight track. It was necessary to alter the track geometry but it removed a frustrating situation.
Jay
Worked on it some yesterday. When i drove through first switch train stopped. tested and on power to the track. Didnt have a lot of time so hopefully will get to it tonight
Insulated pins go according to Lionel's diagrams, on the turn-out section the insulating pin goes in the top rail,( the beginning curve part), Likewise the other insulating pin goes in the top rail of the thru rail ( the straight part). Do the same for the oppsosing or " oncoming" turn -out. I think you'll find that adding a straight section beween ( as others have pointed out), may help. I'only had one layout that had directly opposing switches , and it was a hassle to get it insulated just right .

@Ohio Jeff posted:fairly new to hobby. Going to have three switches back to back to back. Is there a easy way to figure out which track gets the insolated pin
BTW, looks fantastic
@redbarchetta81 posted:Insulated pins go according to Lionel's diagrams...
That's for O27. He has two types of "O" switches - 022 & the ill-fated 23010/23011,(which have an odd arrangement of pin placement depending on whether the whole switch is used or not).
I"m going to draw the track tomorrow. i"m sure that will help clear up somethings
Rob,
I've been using these switches, 23010/23011 for 20 years W/the extensions Direct voltage, through an SC-1 and the (ins) pin config is the same. I'm aware that that is for the non-derailing feature, but I did some years ago do the opposing direction. I can't remember the pin config. Not being obstinate, just " been there...done that...
@redbarchetta81 posted:I've been using these switches, 23010/23011 for 20 years W/the extensions ...
If using the extensions, no further insulating pins are needed except as required by adjoining 022 switches.
It is roughly total 36 feet long 4 foot down the middle with 7 feet by 7 feet on each end
Dont mind the mess. Me and the 9 year old grandson were working on it and building a mountain for his HO layout
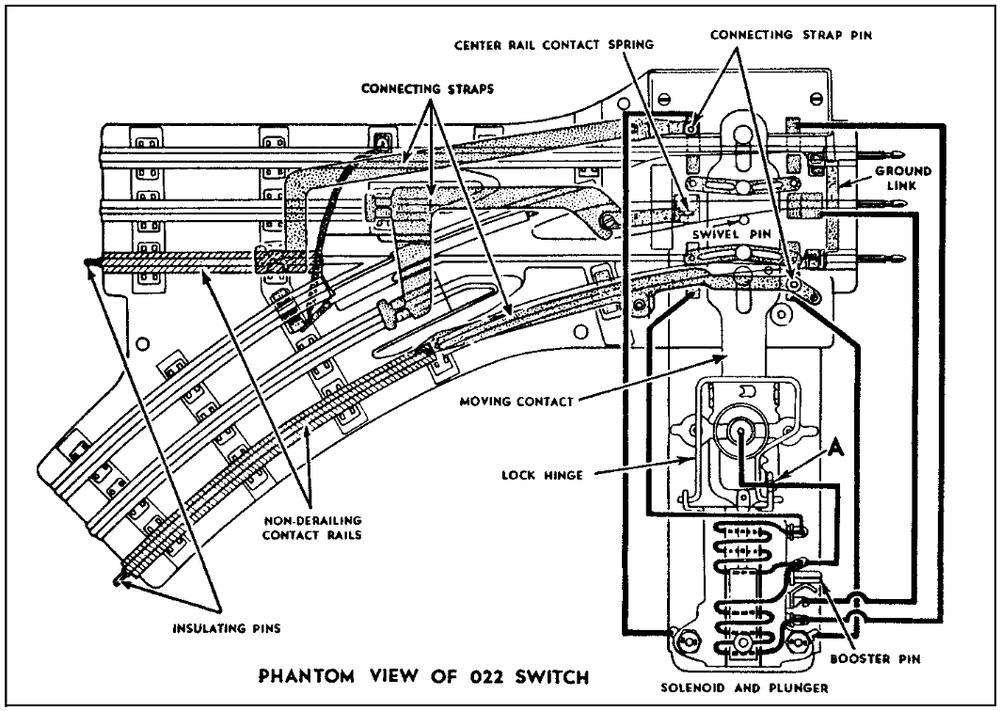
I copied this text from 2011on C.T.T.A ......... Put insulating pins in both control rails of every turnout. This will include putting insulating pins in both outside rails where turnout 1 connects to turnout 2 and where turnout 3 connects to turnout 4. Here is a picture of an 022 turnout that shows where the control rails are. http://pictures.olsenstoy.com/cd/swt/stc022a.pdf. (Unfortunately, this link is dead).
Not saying this is why your engine stopped, but in this one image that you shared you may be losing your ground. Look at the drawing way at top here for where pins go and compare to the picture shown here. On the curved connection both outside rails at the connection point are separated by dummy pins, thus stopping ground from passing thru. I don't know the makeup of these switches so maybe there's some connection not obvious to me.
Obviously if you have two 'loops' separated from each other than each switch will have ground from the loop it's connected to. Since you are only starting, maybe all of the wiring is not yet in place which COULD result is lost ground
walt

Here is your solution to running the opposed 022 switches you have: attach an extra ground wire to the " U" post on your transformer, then attach the other end to the outside rail of one of the switches. when you face them directly, they are out of "phase". Once you add the extra wire to the outside rail,
 this completes the ground.
I'll add pics of the pin placement shortly.
Certainly, hope this helps!


@redbarchetta81 posted:Here is your solution to running the opposed 022 switches you have: attach an extra ground wire
Just connect the ground binding posts together on the 022 switches(screw "2" on the 23011/23010) to fix drops in outside rail continuity.


@redbarchetta81 posted:Here is your solution to running the opposed 022 switches you have: attach an extra ground wire to the " U" post on your transformer, then attach the other end to the outside rail of one of the switches. when you face them directly, they are out of "phase". Once you add the extra wire to the outside rail,
this cmletes the ground.
I'll add pics of the pin placement shortly.
Certainly, hope this helps!
Thanks for your suggestions.
You're right on track here but I'll suggest, hopefully politely, that you need to be very careful with two phrases you've used in your description of a solution to the OP's problem, "Ground" and "Out of Phase", in order to avoid confusion.
First, for Lionel's first 90 years the term "Ground" was often used as a synonym for "Common" when speaking of wiring AC-Powered electric trains, and that's how you've used the term here. However, since the introduction of TMCC/Legacy (1990's) it's a good idea to take it back to its original meaning. To do otherwise in our modern era can cause confusion, and has, including many times here on the OGR Forum. "Ground" should now only be used for the electrical connection from the TMCC/Legacy Base's wall wart, via the third pin on the side that plugs into your wall outlet, to what is otherwise known as earth ground. It is recommended to use "Common" instead when you are referring to the AC return on the layout, especially when its shared by several sections of track (blocks), operating tracks, operating accessories, turnouts, or lighting circuits (street lamps, yard lamps, etc.). The two leads from a transformer are thus "Hot" and "Common", but not "Hot" and "Ground".
Next, "Out of Phase" applies only to the situation where two or more transformers (AC Power Sources) are used in tandem to power a layout, or sections of a layout. When those outputs are electrically connected together, whether intentionally to increase the amount of current supplied by doubling up, or unintentionally through the connections between track sections (blocks), operating tracks, operating accessories, turnouts, or lighting circuits (street lamps, yard lamps, etc.) that are being powered separately, the outputs of the two transformers can fight each other, if they're not in phase, resulting in a short circuit, overheating, and fuses blowing, or circuit breakers opening. Since we only see one transformer in your photos, and everything is apparently powered only from that one, there cannot be an "Out of Phase" situation, anywhere in what's pictured.
Thanks again for your suggestions. The OP should be able to solve their problem simply by studying your hookup. @ADCX Rob's comments will help as well.
Mike
Hi Mike, and thanks for the info. (I too am still " un-learned") in some Lionel basics, and you clarified the " out -of -phase" subject for me. I learned so hard about the TMCC ( original) 20 years ago by the " snap-Crackle & Pop" followed by a tendril of smoke not originating out of the smoke unit... from poking around under Locomotive shells.
Today is a lesson for me, and maybe you can help me understand why when you run a short straight piece of track in between the two (W/pins in correct positions), you don't need a ground wire, but when directly facing each other, you do? (Again, pins in correct positions.)
Thanks everyone for your input. I've been in basement all morning cleaning up the whole train area. i trade the one 022 switch out so the 3 together were all the same. seems to have helped. I can get a train to go thru them but the one is only staying straight. when a train tries to go thru it will jump back a fore and derails the train some times.
@redbarchetta81 posted:..why when you run a short straight piece of track in between the two (W/pins in correct positions), you don't need a ground wire, but when directly facing each other, you do?
The steel crosstie(s) in the short section carries the outside rail current from the "live"(non-trigger) rail of the adjoining switch without a gap/drop in continuity. The effect is much more pronounced in equipment with traction tires that have 1-2 wheels further insulated from the rails.
Thanks, Rob, for clarifying.! You guys know your stuff !..:-)
There's the pin placement for the Insulating pins.

thanks
Just one quick observation, more related to redbarchetta's photos than Jeff's original post... When you use the 23010 / 23011 switches to make a "crossover" between mainlines, IMO you should omit the extensions. That's why Lionel redesigned their O31 switch and made the diverging curve a removable piece. If you include them, that creates a very obvious S-curve with an unrealistic appearance, and can also cause operational problems.
You might have to slide one of the switches a bit further down the mainline, or adjust track spacing to get the tracks to line up. However a crossover between mainlines will look and work better without the extensions. With O22s we didn't have any choice, now we do!
Ted S,
This was only a "testbed" set up on my deck to see for myself that it would take for the curves on both switches as well as the short straight pieces to " set to default" the mods, ( and pins) to operate. I knew they would do it, I just had to test my " theory" on it.
I am however thinking that when I get my Clinchfield 4-6-6-4 Challenger (Lion master) for Christmas that I'm going to work in a couple of spur lines on my "0" gauge tubular layout under the tree.
Thanks for your input (as well as everyone 's). You guys are really helpful, and I say that with the upmost honesty& sincerity!
Is all of this extra wiring and stuff required because Jeff is using brand new lionel 022 switches? I only use the old style 022, and I have the exact same configuration of two switches in my layout as shown in the pictures, and I didn't do anything but cross wire the poles, and use the insulated pins a shown in Rob's picture, and they always worked fine, including the non-derailment feature.
Mannyrock
Access to this requires an OGR Forum Supporting Membership
