


The two bridges are a great look! That was a good find!
Michael, Jeff, Bill, thank you!
Yes, I do know of places with nearby bridges like that. At first I wasn’t sure about it, but then I liked it.
Jeff, a padded room would be beneficial. Maybe just lock me up in one. 😉
Mark, when my wife started dropping things it was usually an early sign she was "with child". I think you are beyond that stage like me.
As you know I have 3 bridges on my layout. I sometimes forget to reset/replace the other two when I am test running. One day I almost had the crash into the canyon because the track led to the floor. Fortunately the engine ran off the track and stopped before making the plunge - hanging there looking into the chasm. I would have been a most unhappy fellow if that had happened. Very close call. Jeff
64 is beyond that stage,
That could have been a disaster! I need to interlock shutting off power when the bridges are up.
Things are looking good Mark, Great find with the Atlas bridge. I think it looks good in place and now that your getting closer to raising and lowering the bridges, you probably already know but I wanted to point out that the Atlas bridge cant go all the way to 90% unless you have some method to keep it from going further past 90% to prevent damage to the bridge.
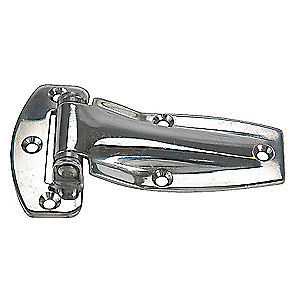
Thank you, Mike!! I didn't think about that when I was considering buying the bridge, but once I got home and set it on the layout, I realized it. A year ago, Tom Gilly@N&W from the River City 3Railers suggested the hinge below.
MARLBORO Stainless Steel Profile Strap Hinge, SS,5-5/8 In. L, 4PRA8
$21.50
 Here is his comment:
"The trick to making sure your track doesn't bind is to ensure that the hinge pin is above the top of the rail. That way when you lift the bridge, the first motion separates the rail. Mounting low, and the first motion closes the gap between the rails.
The hinge we used on Geezer Gorge is like:
eBay item number:
253001448111"
I searched the Forum and found some photographs of their "Geezer Gorge" modules, one with a deck girder bridge and one with a through truss bridge. When I saved and enlarged the photographs, I could see how it raises the swing up bridges. I don't know if it will be enough to get near 90%. If not, I will have to build out a bit to get something that works. (Incidentally, I learned some things about the search function I didn't know. It helps if you enter the member's profile name besides the search words. I never tried that before. It would have saved me a lot of time this morning.) ![]()
![]()

Gilly and Peter showing this one off!


I ordered two of the hinges and eBay claims they should arrive Friday, so hopefully I'll have them by sometime next week. I'll work on the lower bridge for now.
Attachments
Images (4)


Mark, I had to draw this one out to see that anything below the hinge pin would separate when lifted. However, I thought the original design had a hinge point below the deck such that one end came up into contact with one side and the other came down. That seemed a more elegant way to hinge the bridge as opposed to the big hinges on top of the layout. Green represents the track.


Attachments
Images (2)


More elegant way for sure, Jeff!! Actually, it is in effect what we are doing with the lower bridge that has the linear actuator attached to it. The pivot of the hinge is a long bolt that is secured to wood frame on both sides of the bridge, then the bridge frame has holes in it with bushings to turn around the bolt making the hinged joint. The upper bridge could be set up the same way with some more creative carpentry. I was just going to put a hinge on it to not have to go through it all again, though I should be getter at it by now. The one problem is there is a switch for the other passing siding right at the edge of the walk through opening, just like there is the switch on the lower level on the other side of the walk through. That would keep me from having the track section that goes down into the table.
As an aside, whenever I have the lower bridge down and working on it, I keep rolling from side to side of it on my 'scooter' as I'm calling it now. I have thought, maybe I should just make the table solid, and just 'scoot' seated and slightly duck to get back and forth. ![]()
Mark, I suggest you keep going with the lift method and not the scooter. You know one day you will get old and not able to scoot and duck under! LOL
Mike, Thank you for not saying I am old already!! ![]()
You are right. Build it now for future benefits. ![]()
Just scootin' through life ! ![]()
I finally got both my lift up bridges working. I am following Mike g.'s design. I'm very thankful he shared drawings and photographs with me. I have not done any wiring yet. The linear actuator is powered by my old Lionel DC Type 0100 variable DC power supply I bought to run my HO train back in the late '60s. In the video I am holding the smart phone camera and controlling the supply so I don't crash into the ceiling. I have not turned the track power on since I started this project, so don't worry about crashing trains into the gorge.

I mounted the Atlas Pratt Truss bridge following a video by Eric Siegel from 2008. His was not motorized, but I used the same setup for the hinges and the alignment on the other end. I would have liked the piers for the Atlas Pratt Truss bridge to be not so hefty, but thought I should make them that way to give good support and make a logical base for the hinge mounts.


Next up will be wiring power, limit switches, and track power.
Attachments
Images (6)


Bridge destroys man's roof. Details at 11!
Nice job Mark!
@MartyE posted:Bridge destroys man's roof. Details at 11!
Nice job Mark!
Bridge crashes through ceiling into wife's sun room. WISR Radio reporter Dave Malarkey (actual name) reports: Wife hits husband on head with skillet. Butler Township Police clamed domestic squabble. Police don't get involved since they don't want to wear a skillet on their heads.
Thank you very much, Marty!!
Really cool, Mark! ![]() Lots of planning and building are yielding fantastic results.
Lots of planning and building are yielding fantastic results.
WOW Mark that works nice and smooth! Is that the extent of how high you can go or are you just playing it safe? Either way it looks good, if you can go higher you can always step down the arm that raises the Atlas bridge so the lower one can go up higher! Just a thought. Like I said nice work!
Mark,
Great work! You're timing was great as I was a bit worried that you might have some ceiling damage. The Atlas bridge looks good. I am contemplating painting one of mines just to change from the normal black. The bridges are so fragile that's why it hasn't been done yet.
Dave
Very impressive Mark, looks great
Congratulations sir, enjoy the fruits of your labors.
Thank you JD, Mike, Dave, Chris, Steve.
Mike, No it will raise up higher, it still had 5 inches clearance. I couldn't see how far it was when I was operating the camera, so I stopped it with plenty of room. Here it is raised up with about a half inch clearance. It would be nice to be a little farther, but I am able to get through without any trouble. I need to straighten the cross arm anyway, since it is slightly cockeyed. (like everything on this layout) ![]() I can try moving it and see what I like best. Thank you.
I can try moving it and see what I like best. Thank you.


Attachments
Images (2)


Mark,
Pretty clever how you raise both bridges via the lift. Job well done!
Charlie
@Mark Boyce posted:I finally got both my lift up bridges working.
WOW!!! I'll say you did!!!!! Nice Work Mark! Very, Very NICE!
Awesome!
Now, how ya gonna handle the scenery? ![]()
BTW, despite Atlas' advertising, the bridge is a Warren Truss. Here is a link to the Bridgehunter page on the actual prototype:
Impressive! Looking forward to the video of trains crossing the bridges, followed by the bridges lifting!
Very nice work, Mark, and I'll bet you aren't even from Georgia Tech!
Thank you Charlie, Dennis, Steve, Bob, John.
Mike gets credit for the plan. I'll bet he got his done in a whole less time than I did mine.
I think I may go back to calling both bridges simply truss bridges as I was before purchasing the Atlas truss bridge. Play it safe again. ![]()
I am defiantly looking forward to seeing trains run through the bridges. .
John, the Ramblin Wreck from Georgia Tech? You are right, I am not.
Wow!!!! Aren't you the clever cleaver!!! Very nicely done bit of engineering, Mark!
Seriously - congratulations!!!
![]()
![]()
![]()
![]()
![]()
George
Thank you George!!
I forgot to address the comment about scenicing. I have ideas for part of it that will be very plausible. There still is some scenery ideas to work out
@Mark Boyce posted:John, the Ramblin Wreck from Georgia Tech? You are right, I am not.
Actually, I was referring to the Helluvan Engineer part![]()
![]()
Mark, now that you have the bridges functioning I would suggest that you might employ a maintenance crew working in the vicinity. With some metal materials you could have a welder(s) and inspectors on the scene.
Like I said Mark, looks great! As for my bridge it took me quite a while to get everything figured out. Fires I tried weights and cables and that was a fail. Then I seen a actuator for a driveway gate and thought I can make that work! But it still took me a while!
Mark
If we had honorary rewards, I'd nominate you for Civil Engineering. ![]()
Thank you, John, Bob, Jay, Mike, Keith, Dave!
John, now I get it. I forgot Georgia Tech was known for engineering. If you had referred to Penn State, I may have gotten it.
Bob, I had looked at the bridge online and discounted it as a candidate since it was so long, but when I saw it at the show in Canfield, I changed my mind. Yes, it is impressive. It may overwhelm the small layout, but I just need to put in a lot of good scenes to give some balance.
Jay, I could have a maintenance crew installing the parts I got from Palallin to fix the top of the shorter bridge. That would be interesting.
Mike, I assumed you had to do some trial and error too. On the Eric Siegel video, his is a manual lift up, but he uses fishing line and weights under the layout to balance the 48-inch Atlas bridge when in the up position, though he did not show the weights under the layout. Here is the link to the video if anyone cares to look. Eric Siegel Lift Up
Keith, ![]() Now lets see if I can come up with all the wiring and contacts since my background is in electronics and network engineering. My whole 43-years of working was implementing ideas other more innovative engineers came up with, so it is a bit intimidating. I may have an Excedrin headache before it is all over.
Now lets see if I can come up with all the wiring and contacts since my background is in electronics and network engineering. My whole 43-years of working was implementing ideas other more innovative engineers came up with, so it is a bit intimidating. I may have an Excedrin headache before it is all over. ![]()
That's awesome! And those bridges look so good together.
Mark if you still think you might need to purchase a set of high quality narrow profile hinges, I found these about a year ago for my swing up gate. These are Heavy Duty 316 Stainless Steel and mount with #10 screws. I chose them for both the narrow and compact dimension 1" wide by 4 " long total, so I could scenic around them without too much trouble.... plus they are serious heavy duty hinges with virtually no "slop".... Chris... Here's a link their web page for the marine grade strap hinges.
https://www.unicornstainless.c...vy-duty-strap-hinge/

Attachments
Images (3)


Thank you Bill and Chris.
Chris, those are nice hinges. Thank you for the link!!
Wonderful work Mark! I’m still lurking around, had some life stuff come up so train room has been on pause. I’m gonna look into your bridge some more, I want a lift up instead of lift out myself now haha.
@chris a posted:Mark if you still think you might need to purchase a set of high quality narrow profile hinges, I found these about a year ago for my swing up gate. These are Heavy Duty 316 Stainless Steel and mount with #10 screws. I chose them for both the narrow and compact dimension 1" wide by 4 " long total, so I could scenic around them without too much trouble.... plus they are serious heavy duty hinges with virtually no "slop".... Chris... Here's a link their web page for the marine grade strap hinges.
https://www.unicornstainless.c...vy-duty-strap-hinge/
Chris, great looking hinges but I am a little confused. I see the gap between the hinge blocks, the gaps between the bench top, but I do not see any gaps in any of the rails! You have to be best at hiding thing in plain sight! LOL
Add Reply
Sign In To Reply

