Nice kit Mark. It’s coming along nicely. The weathering looks terrific, great job.
Andy


|
|
Nice kit Mark. It’s coming along nicely. The weathering looks terrific, great job.
Andy
Thank you, Andy! I got a little more done last night.
Looking good Mark, sorry I would have commented sooner but with working with you and Bill on the AIU problem, then the 3 day weekend and a house full of family and grandkids I wasn't able to get to my computer and hate typing on my smart phone.
But I think your doing an outstanding job and it is going to look wonderful on the layout! I will keep my eyes open for upcoming updates! ![]()
Thank you, Mike! You have been quite busy! I don't like typing on a smart phone either. I'm very slow.
I mentioned earlier that I wondered if the walls of the fire house kit would need bracing. They certainly do. With painting, they bowed slightly. I have been scrounging up stock to do that since it wasn't provided in the kit. The intent is that two 1/16" thick layers have no support except at the corners, and the two roof sections just plop down on top of that. I did finish installing all the windows into the walls and they look pretty good.
As is often the case, I forget why I went into a room. How about forgetting why I went into a store? Yes, it happened yesterday!
I ventured down to visit Mum and Dad at the personal care home yesterday, and had two reasons for continuing on after the visit to the hobby shop a couple miles farther. One reason was to make an inquiry. The second was to buy some stock to brace the walls of the fire house kit. After I had been home for a while, I realized I had looked around the store but never even thought about the kit. Whoops!
I am at the point I need to brace the walls before continuing the kit, so I decided to mock up an area I have been thinking of ever since the mainline rebuild started. With two mainlines and two inclines, I lost the space where I was going to place the Idaho Hotel that I purchased from forum member Myles "Trainman2001" My thought is to put it on a raised area right inside the door and adjacent to the track just coming off the double track bridge. I'm thinking it would be like the Shady Rest Hotel from the old television show "Petticoat Junction" Here is an idea.... ![]()
![]() -take your pick.
-take your pick. ![]()


I know, the hotel is sitting on the edge of the cliff. Since it is a mock up, I didn't cut anything to fit the curve that would be in the final scene.
Looking at it from the door entrance, since I am thinking I could have the station scene below with some string lights so it can be seen and there would be plenty of room to separate the two views.


I'm sure Jeff will notice the new 3-bay hopper in the first photograph that is standing in for the Cannonball. I broadened my horizons since it is the only non 2-bay hopper I own. Maybe someday, I will buy something other than boxcar red and WM oxide red. ![]()
@Mark Boyce posted:As is often the case, I forget why I went into a room. How about forgetting why I went into a store? Yes, it happened yesterday!
I ventured down to visit Mum and Dad at the personal care home yesterday, and had two reasons for continuing on after the visit to the hobby shop a couple miles farther. One reason was to make an inquiry. The second was to buy some stock to brace the walls of the fire house kit. After I had been home for a while, I realized I had looked around the store but never even thought about the kit. Whoops!
I am at the point I need to brace the walls before continuing the kit, so I decided to mock up an area I have been thinking of ever since the mainline rebuild started. With two mainlines and two inclines, I lost the space where I was going to place the Idaho Hotel that I purchased from forum member Myles "Trainman2001" My thought is to put it on a raised area right inside the door and adjacent to the track just coming off the double track bridge. I'm thinking it would be like the Shady Rest Hotel from the old television show "Petticoat Junction" Here is an idea....

-take your pick.
Been there, done that..... on both counts......![]()
![]()
Mark, wow a BLUE box car and a YELLOW caboose! What were you thinking? ![]()
The area looks a little tight as is. The station looks fine below , not sure the background building makes sense there. Can you overhang the building area into the walkway a few inches to create the illusion of spaciousness? I am thinking a building like that needs a few trees, grassy area and flower garden. Will that be the first area seen when you enter the room?
Making some nice progress Mark, looking good. I like that hotel, but no room on the layout for me. The turntable is a nice addition, but it takes lots of real estate.
I live with sticky notes! As I need something, I immediately write it down or I can guarantee forgetting it.
Gene
Thank you, Bob, Jeff, Gene! So it isn’t just me!! 😄
Jeff, yes, the area is tight, as is every area on the layout. I can push it out a little, but the aisle between the layout edge and the wall is 28”. Yes, I agree that trees and gardens would be the way to go with scenery. It is right inside the door, so it is the first thing to see. I thought it would give something of interest before seeing the big bridges.
Ah ha, Jeff, you noticed! 😄 The blue boxcar is one with the voltmeter built into each side, so it is a ‘novelty car’ to me. I picked the blue Westinghouse car since Westinghouse is a Pittsburgh company. The yellow caboose is decorated for Chessie with the Western Maryland WM as Chessie did along with B&O and C&O. That merger took place when I was finishing high school, so the B&O blue started disappearing on local tracks and we started seeing WM red, white, and black before everything was repainted.
Gene, I use lots of sticky notes, but failed to write one for the hobby shop. This time my mind was more on Mum and Dad, I think. They are 92. Mum has dementia and is confined to a wheelchair. Dad is wasting away, and in fact was taken to the hospital the next morning; yesterday. They are doing tests today. I’ll be going back down, so should be able to stop by the hobby shop soon. I work on the kits when I can’t sleep at night.
Thank you for every response!!
Mark,
Praying for your parents health.
Joe, I appreciate it so much! Believe me, Mum and Dad would appreciate it as well!!
Most folks don’t have both parents live so long, but it is tough for them no matter their age. After our youngest daughter turned 30 last month, I realized Mum and Dad were 30 when I had my first memories of them. They have been blessed with long and healthy lives.
Oh, I wanted to add that the Idaho Hotel is a bigger building than I had planned for a country hotel/inn. When Myles offered two or three of his kit built buildings for sale to make room for more of his fantastic scratch builds, I just had to get one. I really admire his work, photo descriptions of his processes, and how he shares every mistake he makes and how he gets out of a jam. It was also good to meet him and his wife in person for delivery of the hotel.
Mark, sorry to hear about your parents. Your mind was thinking of what was most important!
Gene
The hotel building is a very nice structure. Can't wait to see this scene finished. Push forward my friend.
Thank you, Gene and Joe!
Mark, great progress and fine work as we have come to expect on your layout. That hotel is going to look tremendous, what a great idea to include it on your layout !
Parents with long lives are a blessing. Prayers for their improved health and many more happy memories.
Sorry to hear about your parents Mark, but both into their 90's is nothing to sneeze at. My in-laws are 89, 87 respectively and both still in good health and still living in the same house my wife grew up in. We count our blessings every day.
Bob
Good morning Mark, I like the placement of the hotel and if it was me and had room, I would just cut a curved section of foam to match the track, so you don't have to move the hotel into the walkway.
I am sorry to hear about your parents and they are in our prayers! It is nice that you have had this amount of time with them.
Thank you, Eddie, Bob, Mike!
I was looking at the hotel trying to imagine what it would look like as Mike suggested with the shelf and foam around the curve. I think it would be okay, but there is only one way to know for sure.
Jeff, I forgot to comment that the warehouse is only there to hold up that end of the shelf for the mockup. I would do something different on the lower level.
Thank you for the comments and prayers for Mum and Dad.
It's only been a few days, but I got a good bit done a few minutes here and a few minutes there. I had to drive right past the hobby shop when I made my first trip to see my dad in the hospital on Friday, so I picked up some K&S 1/4" square tube stock to reinforce the walls. I cut it to length and glued it on with E6000, a product our older daughter pointed out a number of years ago. After clamping and letting it set, the walls were no longer bowed and ready to put together.


After painting the supports to match the interior paint, assembling the walls was pretty easy. They all have tabs that fit into slots in the base that is scored like poured concrete. As you can see, I don't have the best of tools for clamping and weighting, but this worked nicely. ![]()
![]()

Here is the building with the roof sections press fitted onto the walls. I had to widen all the slots with a small file to get everything to fit.


The instruction sheet calls the square section on top of the main building a "watch tower". I'm no fireman, but I think it is a tower for hanging hoses to dry, and should be positioned something like this.

I also think the only photograph of the prototype included in the instructions shows this. As can be seen in the photograph below, this structure was built in 1894, so I am guessing they had wagons equipped for fighting fires inside. I'm going to shingle the roof with a nice diamond patterned card stock shingle that was provided in the kit. I won't attach the upper structure until I do some investigation onto where it should be positioned.

A truck like my '36 Mack would fit nicely and still leave room for hanging hoses and storing other tools and equipment. I would be glad for any feedback on the positioning of the upper structure that I think is for hanging hoses to dry.
As an aside, Dad was taken back to the personal care home yesterday. It was determined that arthritis in his upper spine is pressing on his esophagus making it hard to swallow food, and some was getting in one lung. He is much improved, but weak. He will have to eat finely chopped food (I don't know, maybe for life), since they can't risk anesthesia for surgery at his age. He is always so gracious even when ill. He showed me by example how to be a proper man and continues to show me how to live into old age, if I live that long. Thank you for thoughts and prayers.
Mark, first, sending prayers for both your parents. Second, I would cut several pieces of curved foam, largest at the bottom to the smaller at the top, maybe make it look like jagged rock that was blasted away for the track rails to get put in, then grade up slightly to the hotel for a forced perspective look. Third, I'm not a expert but I believe you are right that you would want the tower to be up at the back end of the firehouse to have hoses hanging out of the way from the trucks and personnel needing to get around inside. It all looks great. 4th, if I don't write something down I'll forget by the time I get to the store, if I remember which store I wanted to go to. You're certainly not alone!😁
@Mark Boyce I’m liking that fire station, nice job so far. A few times during my builds I had to use a variety of soup cans for weights. When in need you use what’s available.
Gene
Mark,
That building is coming out awesome. I really like the colors.
Glad to hear your Dad is improving. The power of prayer.
Mark, everything looks great. My prayers for your parents.
my 2.5mos old granddaughter fell asleep in my arms and after a little cat nap myself I was reading your post and did some searching. I'm doing this on my phone and I found a similar picture of the fire station, and it might provide some additional perspective (hard to tell on my phone, but it seemed to provide a little more view of the roof line). Maybe the location is near where the hoses were on the truck to make hanging them easier.
I'm sorry, but I'm new to posting pictures, I hope this works: 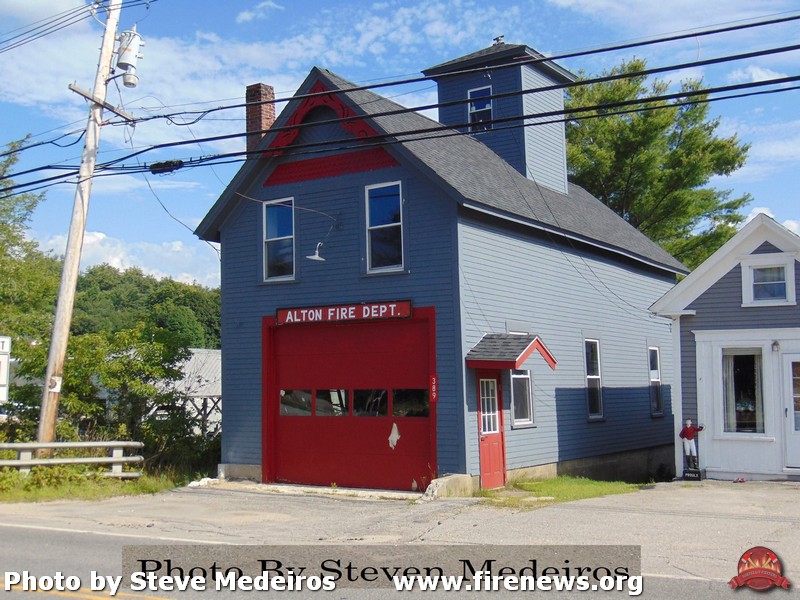
Here's the main page where I found it:
http://www.firenews.org/nh/a/alton/altonnh.html
Keep up the good work! Better go, grandma (aka my wife) says our granddaughter has to wake up - guess my rest time is over! 😀
@Mark Boyce posted:It's only been a few days, but I got a good bit done a few minutes here and a few minutes there. I had to drive right past the hobby shop when I made my first trip to see my dad in the hospital on Friday, so I picked up some K&S 1/4" square tube stock to reinforce the walls. I cut it to length and glued it on with E6000, a product our older daughter pointed out a number of years ago. After clamping and letting it set, the walls were no longer bowed and ready to put together.
After painting the supports to match the interior paint, assembling the walls was pretty easy. They all have tabs that fit into slots in the base that is scored like poured concrete. As you can see, I don't have the best of tools for clamping and weighting, but this worked nicely.

Here is the building with the roof sections press fitted onto the walls. I had to widen all the slots with a small file to get everything to fit.
The instruction sheet calls the square section on top of the main building a "watch tower". I'm no fireman, but I think it is a tower for hanging hoses to dry, and should be positioned something like this.
I also think the only photograph of the prototype included in the instructions shows this. As can be seen in the photograph below, this structure was built in 1894, so I am guessing they had wagons equipped for fighting fires inside. I'm going to shingle the roof with a nice diamond patterned card stock shingle that was provided in the kit. I won't attach the upper structure until I do some investigation onto where it should be positioned.
A truck like my '36 Mack would fit nicely and still leave room for hanging hoses and storing other tools and equipment. I would be glad for any feedback on the positioning of the upper structure that I think is for hanging hoses to dry.
As an aside, Dad was taken back to the personal care home yesterday. It was determined that arthritis in his upper spine is pressing on his esophagus making it hard to swallow food, and some was getting in one lung. He is much improved, but weak. He will have to eat finely chopped food (I don't know, maybe for life), since they can't risk anesthesia for surgery at his age. He is always so gracious even when ill. He showed me by example how to be a proper man and continues to show me how to live into old age, if I live that long. Thank you for thoughts and prayers.
Good looking structure.
Mark, glad to hear your Dad is doing better. Mine just turned 92 and is still active and at home.
That’s a really nice looking kit. I’ve been changing up my layout a bit. Going for a more rural, countryside look. Rather than a brick and mortar look. This looks like something I could squeeze in somewhere. Just a question on the doors. Can they be positioned so they are opened ? Looks like the perfect structure near the layouts edge to feature some interior detailing.
The kit looks great Mark!
The buildings are nicely done, Mark.
Best wishes for both your parents. My prayers are with you.
Peter
Thanks for posting how you did the building. Looks great! Looking forward to seeing it complete.
Gary P, Gene, Joe, Steve, Dave K, Dave C, Lance, Peter, T-Bone1214!!
Thank you everyone for prayers for my Mum and Dad!
Gary P, I do like your idea of cutting the foam to build up a cut for the railroad then a hillside to the hotel!
Joe, thank you about the colors. I like the very light gray better than the dark gray that shows in the Prototype photographs!
Steve, thank you for the prototype photograph with the better angle for our purposes to determine where the tower should go. You shared it correctly. I took a look at the Website and even looked up Alton Bay on Google Maps. I'm with you on naps, though we still don't have any grandchildren to watch. In fact, sometimes I think I nap too much, but my wife doesn't mind.
Dave C, you noticed I didn't put the doors on yet. I have been debating on how to do it so they could be open, even if it was to only show the front of another truck. As the photographs show, they warped also and need some trim for straightening, which could be used as trim for the windows and bracing on the interior sides. After that, I could just them into the open position.


I might add here I started to putting on the diamond shingles last night. I only did three rows using white glue as the instructions suggest. To get the white glue on thin enough so it doesn't squash out onto the shingles when pressed down, it was already drying when I put on a row of shingles. When I did get it to stick, it dried before I could get the strip in the final position, needing to move it only the width of the stock. I thought about trying a glue stick my wife has. I also thought of abandoning the shingles that came with the kit and using some dark gray '3-tab stick on shingles' that I bought from Bolinger Edgerly Scale Trains (BEST) after putting their lighter gray 'slate shingles' on the Thomas WV station. Wow I see by the postmark that I bought these over a year ago already! I also bought some of their 'aluminum/tin/lead' flashing. I don't mind admitting my hands just can't handle some work anymore whether I am using tools or not. When I look at my scratchbuilt N-scale buildings from 30 and more years ago, I am amazed I was able to do that small work at one time! ![]()
Dave, I might add that I am with you on the more rural small town look with less brick buildings and smaller buildings since I don't have a lot of room. I have some 'built up' buildings and on kit built building that I am seriously considering putting on he 'for sale or trade' category. For the most part, they look great but take up too much room.
Thank you again for all the great comments!! Have a great day!!
You're doing a splendid job on the fire house! Can't wait to see the finished job.
Myles! Thank you so very much!! As I just mentioned, dexterity is slowly leaving me. Finding ways to compensate reminds me of your posts where you describe how you get out of jams. ![]()
Miniature door hinges are available on the 'bay and may help in assembling the doors so that they are open. You'd have to figure out and search for the right size and material, like brass, but they exist.
Search for "doll house door hinges".
Mark, I glue a lot of things with Micro Marks PSA Adhesive. Mostly window glazing. I have used it on shingles if they come in a kit and need to be glued on. The best part is you can apply it with a brush and just walk away for a bit and let it set up. It will remain tacky. Works good if your like me and don’t always get things straight the first time. As advertised. Nothing oozes out when you give everything a final press. It’s on the pricey side and unfortunately it looks to be out of stock at the moment.

Mark, I got Doll House Hinges and Door Knobs on the A and used them to create doors with Basswood for my Menards 2 Bay Engine House that will open and close. It gets cold up here in the winter at Phillips Junction in Slackerville, Western Upstate NY!😁 I actually got the idea about the cut and grade up to the building from what used to be my grandparents house. The original state highway used to run up the hill in front of their house, then the state blasted out the rock on the far side of the road, leveled it out, and moved the road over so it no longer ran up the hill. The property still had a grade up about halfway to the house before starting to flatten out in front of the house. The state left the old road in place from the west side of the house to use as their west driveway and regraded the east side entrance from the new road so they could still use it. As we all know and have seen many places where rock was blasted away to make a cut for roads and especially trains to travel through hills.
Thank you, Richie, Dave, Gary!
Richie and Gary, the dollhouse hinges are a good idea. I never put the doors on my Carolina Craftsman Kits 2-stall enginehouse either. I will have to look for some.
Gary, your enginehouse doors look great! That is a great example from real life. Thank you!
Dave, that sounds like a great product. I will keep an eye out for it.
I tried 3 different types of glue, and all three didn't work well. Two soaked through the thin cardstock provided, and two dried too fast when applied very thin to avoid some squishing out when the shingles were pressed lightly. I checked the 3-tab stick-on shingles I have, but there aren't enough for this building. Instead of ordering one more pack, I ordered enough dark gray diamond shingles from Bolinger Edgerly Scale Trains (BEST).
In the meantime I am going to cut some trim to fit a gap between the top of the side walls and the roof. There is a small gap which I realized when paining the wall sections, but forgot about it by the time I started shingles. I decided to do it this way instead of trying to trim the angled end walls before gluing them together and messing it up. ![]()

Besides that I an put on the little roof over the man door and search for hinges and door handles. I'll leave the roof so it can be removed to detail and light later. I want to get some things built and scenery going before I do much detailing.
@Mark Boyce posted:Thank you, Richie, Dave, Gary!
Richie and Gary, the dollhouse hinges are a good idea. I never put the doors on my Carolina Craftsman Kits 2-stall enginehouse either. I will have to look for some.
Gary, your enginehouse doors look great! That is a great example from real life. Thank you!
Dave, that sounds like a great product. I will keep an eye out for it.
You're very welcome Mark. I just held rectangle sheets of Basswood in place inside from the back door, traced the openings with a pencil, cut them with a knife, trimmed to fit at track top level and opening. Primed, spray painted, let dry, then used a butane lighter outside to smoke up the doors for a weathered effect. Drilled holes to screw in Hinges and Door Knobs, then put super glue on the screws as I screwed them into place. I thought it came out pretty good. Glad you like it too. My hands are bad too so if I can do it, you can too! Good luck!
Regarding your "Time out" dilemma. It happened to me the other night. One thing I do when I think about it is to save the copy so all I have to do it reproduce the pictures and not have to remember what I wrote. Then I just paste the text and add the pics.

Access to this requires an OGR Forum Supporting Membership

