
Thank you, Gene, T-bone1214, Ted, Dave, Mike!!

T-Bone, the cheese grater and coffee grinder sound like good ideas.  I don't have either.  I guess I am a minimalist when tools are concerned.

Ted, your examples of the Mig Ammo paint do look great!

Dave, yes, I guess it is becoming my own monster.  Yes, I do plan some interior detail due to the good sized windows and doors an it's planned location near the layout edge.  What goes is is still to be determined.

Mike, I have heard of making the chalk wet for weathering, but haven't thought of it in a long time.

Good morning Mark! Sorry I haven't commented lately but I have been watching your wonderful work and I think thigs are looking great! I hope to get there one day!

From where I sit now it just seems so far away!

I will keep watching and chime in when I can!

Please take care and keep up the wonderful work!

Mark, great work on the building. The concrete can be tough to get just right. I think it looks good, but you are the one that has to be happy with the results. I use Pan Pastels weathering powders and have found that a little goes a long way. But again, if you find the chalks are better for you, then that’s the way to go. I like the detail you’re providing with the build. The building will be a great addition when you’re done, keep up the great work.

Andy

Thank you, Mike, Andy, 42trainman, Darrell!

Darrell, yes it is growing on me.  I was looking too closely at it.  When I moved over to the layout where I plan to park it, I liked it.  I'm with you and others.  The color Dennis recommended is right on for aged concrete. 

42trainman, Well Job did have his moments; but thank you.  I have heard people comment on my patience since I was a teenager; which was long, long ago. 

Andy, I think I am going to buy some Pan Pastels.  I do not like to weather much, since I like things to look like they are well maintained.  However, concrete, stone, and other like structures just keep on with no maintenance so after a while they need weathering.

Mike, I can sympathize.  I spent about 20 years when the girls were growing up without a layout.  I got on various email groups, bulletin boards, forums, and always felt sad spending my time fixing toys, going to music practices and performances, and umpteen girls basketball practices and games.  Holly played for 13 years, and I don't like basketball.    I prefer baseball.    However, it was all worth it!  Holly teaches private lessons and performs as a soprano and harpist.  Heidi is an artist working in some very seldom seen art mediums.  They are in their 30s and are responsible, well adjusted adults with great husbands!

The Mig Ammo Terraform thin concrete arrived yesterday.  The color is great for newer concrete, but I was surprised how gritty it is.  Ted, you did show me.  I painted it on the inside walls of the lowered floor section.  The difference in color between it and the Krylon Desert Bisque spray makes this look like concrete that hasn't seen any weather.  That is good.  I did find it too rough, so I sanded and filed down the rough edges when dried and popped the lowered floor back in.  This photograph shows the difference between the two.  The bisque is seen on the top of the foundation and the new paint on the interior wall.  I like it.

20240204_002224480_iOS

Attachments

Images (1)
  • 20240204_002224480_iOS

The building is coming along nicely Mark. Looks good.

I have a set of powders that I've tried a few times. One thing I have found it that they tend to disappear when topcoated with a clear matte spray. I haven't tried sealing- weathering- and sealing though. I've added a couple drops of water to moisten the powder before applying.

NOTE:  ebay link deleted per TOS.  Bob....please review the TOS.

Some acrylic washes may help tone down the foundation too. Think of the splash up from the ground and how the base will be darker than the top.

Bob

Last edited by OGR CEO-PUBLISHER

Morning Mark, I think it looks just fine! Remember it is a coffee building and its going to get dirty so just throw a little grime to it and call it good! Either way you have been doing such an amazing job on this building it make me want to get a Dennis building! Just to see how I could do! LOL

Thank you, Bob, Mike, Jay!

Bob, I know what you mean about weathering, shading being hidden by matte spray.  Maybe you should spray before and after as you wondered.    Yes, the mud splatter at the base is a good plan!

Mike, Yes, it does make sense to make it grimy; like Dennis' example.  Dennis' instruction sheets are top notch!  The instructions make it easy to identify all the parts.

Jay, Coffee grounds is a good idea.  I actually thought that was where Mike was going to go when he reminded me it is a coffee building. 

I made a little more progress on the interior of the Sanky Wanky Coffee Co kit.  I decided to see if I could get a removable second floor built before deciding on where to put interior walls.  This is mainly because I wanted to do something, and this part I knew what I wanted.  Confused yet?     I used some 1/8" x 1/8" styrene stock that I had on hand for the braces on 4 walls.  I decided since I was going to use some 1/8" thick styrene for the second floor sub-floor, I didn't need the braces to go the whole way to the corner.  No, this wasn't any calculation; I only had this much 1/8" x 1/8" styrene.    I did this on all 4 walls.

20240205_234532469_iOS

Here is the 1/8" subfloor resting on the braces.  To do this, I had to keep the end wall not glued to the structure, so I could slip it off and slide the floor in from the side.  You can see the window backings are in the way to slip it out.  I think I recall Myles 'Trainman2001' had a similar situation where he made a two-piece floor split down the middle to get it in and out. 

20240205_010309725_iOS 1

Here is the floor with the same Northeastern stock I used for the first floor.  I think it looks passable.

20240206_022433994_iOS

Notice in the last photograph that I have installed the brick strips at the top of the two long walls.  I did this waiting for other glued parts to dry because reading on, that is the next step in Dennis' instructions.  He states that the roof assembly has to be pushed up from the underside of the building and these act as stops for the roof.  All 4 walls will be capped with strips painted to look like concrete. 

Since I glued the ground floor flooring into place, but left the brick walls unglued I can still install the roof assembly from the underneath.  That is good.  However, since I would need to build interior details on these floors before covering everything over, I could do that with the second floor sitting on the workbench then slip the whole thing into the building before attaching the 4th wall permanently.

Rubin's question about lighting must be considered before putting it all together.  I wouldn't be able to take the roof off this building like my other buildings for troubleshooting if lights go out.  Maybe I should just concentrate on accumulating some details for the interior and building some interior walls and doors, and then a "light" will come on as to how to do the lighting.    Bad pun.

Thank you for taking a look, and any suggestions are appreciated!!

Attachments

Images (3)
  • 20240205_234532469_iOS
  • 20240205_010309725_iOS 1
  • 20240206_022433994_iOS

Thank you, T-Bone1214, and Jay!

Jay, I have thought about something like you mentioned to pull out second floors from buildings like you suggested for other buildings.  Since this building has extra strips around all four sides that show bricks on the sides of the walls facing the roof, I don't think that would work.  That is why I thought of not gluing the end wall into place.  I do not think that would be very practical for moving the building and to seal the joints from escaping light.  There is always a new twist to each project.  That can cause more headaches, but make them more enjoyable as well.

Yes, I should check on lighting ideas, just as I need ideas for interior details.  I envision this building as a warehouse where coffee is off loaded from trains and then loaded onto trucks for local and regional delivery.  The product could be moved from larger containers to smaller containers for delivery.  It seems that most of the interior detail would be crates and boxes.  That would possibly be good enough to convey something is going on inside the building.  Yes, I would need a few employees as well.  I will have to research ways to make a lot of crates and boxes since buying ones on the market could easily be more expensive than the building kit itself. 

Mark, the last structure I built featured an outside enclosed staircase. I had a plan as to where it would go. But plans can always change. I really didn’t want to glue it in place and excavate terrain to get it to sit right. I glued a small piece of thin steel inside the staircase and glued a rare earth magnet to the buildings inside. Place the structure and then the staircase and the magnet holds it in place. You can get fairly small magnets. You may be able to come up with something that will let you make that end wall removable so the flooring can all stay in place.

Being a detail junkie. It can get expensive. Especially buying multiple castings such as shipping crates. With the arrival of 3D printing. You don’t read much today on plaster casting details. While still an investment. If you had one casting of crates to work with to make a mold off of.  You could create a rubber mold and pop out as many castings as you need. Hydrocal can be removed from a mold in about 20 minutes. While it’s curing you can work  on other projects. Or if your like me. Time for another cup of coffee.

Mark- I was going to suggest magnets like Dave did to hold a wall panel in place. The angle could go on both walls of the main structure to catch the magnets.
This would serve to block any light from leaking out of the seam too.
For interior details, look for an image of a crate/ crates and print on cardstock and make your own.

https://www.istockphoto.com/photos/shipping-crate

Bob

Thank you for the replies, Dave, Zac, Bob, Rubin!!

Dave, I like the magnet idea!  It sounds much like how Lionel uses them on diesels to hold the covers for switches.  I am thinking I would put the wiring bus/conduits on the opposite end of the building from the end that is removable.  I can finagle something.  Our older daughter has made molds to make multiple doll parts.  She poured some kind of polymer so the arms and legs could be flexible.  Anyway, I saw how the process went, and yes lots of cups of coffee! 

Zac, it seems they have every kind of company in New York.  That is a great photograph!  For some reason I love anything from before I was born in the mid '50s.  I hadn't thought of anything other than coffee beans or ground coffee for the business.  I'm thinking since I am trying to model small town West Virginia that would still work best, but I always appreciate ideas since I am not very good at thinking outside the box. 

Bob, I really like that web site you linked.  Looking through the windows from a foot or two away I would never think they are cardstock.  Wat a massive variety!  I had been thinking of cutting blocks of wood and painting them.  On the first page, I saw some that would make good small crates and even some cardboard boxes.  I think the intermodal containers I saw towards the bottom of the page are out though! 

Rubin, I agree the building in Zac's photograph has great graphics and fits my time frame, but a company like that would need supporting structures.  Since this is going to be a foreground building with a curve just beyond, flats wouldn't work out.  The kit itself is so large for my small layout, that is the only spot where it would work.  I ended up with more track than I originally planned! 

Looks great Mark! I also used straws as electrical conduit to hide wires. Below is a photo of card stock I used for one of my loading docks, thanks to Bob and his wonderful link!

IMG_20210407_134111520

I just sat them back about half an inch from the opening as I was making this a building flat!

I hope everything else is going well and you're staying safe and healthy with the little misses!

Attachments

Images (1)
  • IMG_20210407_134111520

Thank you, Mike, Dave!

Mike, I remember your straw conduits.  The loading dock looks great!  I'm still looking over printable crates and boxes from the link Bob gave me.  I did order a couple of detail parts, one of a man with a manual pallet lift and crate and one bending over open boxes.  Those will give me some workers doing something, and hopefully I can do the rest the cheap way.  I still need to look at lighting.  I know Bob and others have used a lot of Evans Designs.  The wiring won't be a problem.

Dave, yes we do.

Ted, I did save some 'cardboard boxes', printed and assembled one for a trial.  Not bad looking in the window with the desk lamp shining to brightly on the top.  Now I need a bunch more.

20240217_205255515_iOS

20240217_205306579_iOS

Bob, I'm still looking at the crates since you can only copy 10 on the free trial.

I finally got something more done on Scenery Hill.  It is pretty rough looking, but a start.  I found I had trouble as I moved along painting, that I was picking up strings of the batting with the soaked paint brush.  The picked a bunch of little paint soaked fiber balls off the part under the hotel after the paint dried.  Working with the scenery chest high, I couldn't tell until it dried over night that I had missed a bunch of spots.  That can be fixed.  The variants in grade are just 1-inch Styrofoam under another layer of batting.  All in all, it's not bad for a first try.  I broke my misting bottle for soaking down the ground foam to add more.  I need to buy some more varieties of ground foam as well.

20240217_210416826_iOS

Eventually, here will be rock cuts along the track that is covered with blue tape.

20240217_210427635_iOS 

As an aside, the name Scenery Hill just came to me this afternoon.  There is a place called Scenery Hill south of Pittsburgh along US Rt 40, The National Road.

Attachments

Images (4)
  • 20240217_205255515_iOS
  • 20240217_205306579_iOS
  • 20240217_210416826_iOS
  • 20240217_210427635_iOS

Hi Mark,

Your scene is coming along so incredibly detailed with an overall continuity of purpose. Great job!!!! I like the name Scenery Hill also, that reminds me when we first got our yellow Lab puppy, she would always go up the side of the driveway and use that area as her bathroom. My wife always would joke about being careful while walking around poop hill.  LOL Great Job Mark!

@Mark Boyce posted:

Bob, I'm still looking at the crates since you can only copy 10 on the free trial.

I finally got something more done on Scenery Hill.  It is pretty rough looking, but a start.  I found I had trouble as I moved along painting, that I was picking up strings of the batting with the soaked paint brush.  The picked a bunch of little paint soaked fiber balls off the part under the hotel after the paint dried.  Working with the scenery chest high, I couldn't tell until it dried over night that I had missed a bunch of spots.  That can be fixed.  The variants in grade are just 1-inch Styrofoam under another layer of batting.  All in all, it's not bad for a first try.  I broke my misting bottle for soaking down the ground foam to add more.  I need to buy some more varieties of ground foam as well.

20240217_210416826_iOS


As an aside, the name Scenery Hill just came to me this afternoon.  There is a place called Scenery Hill south of Pittsburgh along US Rt 40, The National Road.

Sometimes these limits will expire after 24-48 hours. Try again another day. If the images can be downloaded, then you can save them to your computer and print to your hearts content.

I like the name Scenery Hill too.

Bob

Thank you, Gene, Ted, John, Bob, Rubin, Myles!

Ted, Yes I have the same trouble with files.  Even when I put them in a folder, then a year later I think, "What folder did I put them in?"    Those terms for parts of a Main Street building are great!  Some I already knew, some I learned from Myles, and a couple are new to me!

Bob, I will try what you mentioned on the site you shared with the crates cutouts.

Rubin, I purchased the Idaho Hotel from Myles when he was looking to free up some space in his downtown for some 'urban renewal" namely some of his wonderful scratchbuilt buildings.  As far as the backdrop goes, I have it here but took it down for two reasons.  One, to finish painting it, since it was the tail end of a painted backdrop I bought from another forum member and had a section of the Masonite left unpainted since it was hidden by a three dimensional hillside.  The other reason was so I didn't get the already painted part messed up with my scenery work.  Since I hadn't originally planned for scenery at this level, I will have to position it higher on the wall as well.

20231003_204025823_iOS

Myles, yes I need to smooth out the 'ground' before putting down a nice lawn, driveway, and gardens around the Idaho Hotel.  It's a long awaited start. 

Attachments

Images (1)
  • 20231003_204025823_iOS

Mark I think your doing a wonderful job with your Coffee building and your landscaping is wonderfully done! 1 head of warning, the more trees the more leaves you will have to rake and Myles is correct you need a smoother lawn unless you plan on getting one of those GR Mowers that eat everything! LOL

Keep yp the great work and please keep posting so I can keep learning!

Thank you, Mike!

Not to worry, Myles and Mike!  Since I sold Dad's 1951 Gravely when we sold the old homestead back in 2019, I decided to get landscapers in.  The Gravely handled worse terrain than what you saw in the photograph, if you could find someone like Dad who was man enough to handle the machine!!    It was a rare sunny February day today, so they did the first overlay of topsoil and grading at the Idaho Hotel site.    More to come.

@Mark Boyce posted:

Thank you, Mike!

Not to worry, Myles and Mike!  Since I sold Dad's 1951 Gravely when we sold the old homestead back in 2019, I decided to get landscapers in.  The Gravely handled worse terrain than what you saw in the photograph, if you could find someone like Dad who was man enough to handle the machine!!    It was a rare sunny February day today, so they did the first overlay of topsoil and grading at the Idaho Hotel site.    More to come.

WOW your paving crew is brave! I cant wait to see how it turns out! I remember one day when I was working for the Roads Department they had us paving in the snow! LOL

Wow, Mark! I am just getting caught up on your progress. Love the interior floor of the Coffee Co. I just received my order of MIG concrete paint so eager to play around with it. Yours looks great. If you haven't already you need to ask Santa for a 3D printer. Makes making those interior details really slick. There are so many free files for printing various things on OGR's 3D file area and on the internet. Has made a huge difference for me. Don't have to buy everything anymore. Scenery on Scenery Hill looks wonderful. It's always a work in progress. I have to do some, leave for a while then come back. I see different things and have different ideas when I return to it after a few hours or a day. Keep up the good work. Thanks for the update!

Thank you, Mike, Andy, Mike, RJ!

Mike g, yes these paving guys around here are like school bus drivers when I was growing up.  Not much stops them!    I put down two coats of vinyl spackle over the hotel site, letting the first coat dry thoroughly before the second coat.  I could stand to scrape away some ground foam and extend the hotel lot a little more on the left front.  You can see they won't need the Gravely or your GR Mower when done. 

20240221_221042341_iOS

This is a good time to show a photograph of the backdrop section I pulled down since @rubin asked about it.  Our artist daughter gave me a wide selection of acrylics that should match the colors the original artist used.  I will also need to adjust the mounting brackets for the backdrop since the layout level on this section is about 8 inches higher than originally designed.  I'll need to chop off part of the blue sky since it would go higher than the 7' 4" high ceiling.

20240221_221151622_iOS

Andy and Mike LT1Poncho, I received the detail parts I ordered less one.  The one with the man moving crates with a hand lift is out of stock and they gave me a refund.  Drat!  That was my favorite.  Regardless, here is what I got.  The unpainted crate on the left looks to be 3D printed, since I can see the striations on the bottom.  The men at cardboard boxes are from molds.  They actually take up more floor space than I was thinking, which is a good thing for me.

20240221_001634600_iOS

Three more crates on the rail side dock.  I think I could put these on the docks and make some more cardstock printed ones inside.

20240221_001643033_iOS

Mike, Yes, I can see a 3D printer would be handy to have for detail parts.  With as many details as I want to make for my empty buildings and exteriors, I could probably find free drawings on the OGR and other libraries to pay for the printer over time.  I guess I need to be real good to impress Santa. 

RJ, I'm glad to see you back!  I hope you have been well!!

Attachments

Images (4)
  • 20240221_221042341_iOS
  • 20240221_221151622_iOS
  • 20240221_001634600_iOS
  • 20240221_001643033_iOS
Last edited by Mark Boyce

I'll add here that I was in historic Zelienople yesterday and stopped at CT McCormick Hardware for some additional containers of Woodland Scenic ground foam.  Of course I had to take a look at the rolling stock on the shelves.  This new Atlas PS1 boxcar followed me home.  I saw so many RF&P cars and engines for that matter during my years working for Virginia Power.  I want to make sure Jeff @ScoutingDad sees this car.  Yes, it is BLUE!  It isn't boxcar red, which always looks brown to me. 

20240221_223424495_iOS

Attachments

Images (1)
  • 20240221_223424495_iOS

Floppy disks?  You guys are youngsters.

My first project in the commercial world was the writing of a program (in DECSystem-10 assembler) of a paper tape reader to input data arriving in 8-bit packed image mode.  Yeah, that was arcane even in 1980. 

Mark - are you using joint compound or vinyl spackle?  Vinyl spackle is flexible and likely to be more forgiving than joint compound (that can crack under normal expansion / compression).  Just FYI.  Ohio River shorelines on the Panhandle are made using vinyl spackle for that reason.

George

Last edited by G3750

Thank you George!

I didn’t know the difference.  Here’s what I am using.  I take it that it is vinyl because I can compress the thickest glob of it with my finger, and it returns to shape.

IMG_5988

Programming?  I was never exposed to programming.  My background was in electronics hardware and starting at about age 40 as a computer user.  Dumb users!  😉

Attachments

Images (1)
  • IMG_5988

I have an update on the Sanky Wanky kit and the Idaho Hotel-Scenery Hill area.

I finally found photograph of warehouse boxes that I liked and printed out for the upper floor.  I sliced to size and glued to thick stock.  I didn't like the look of the print in the middle of the floor as it would make the area look half empty, so I printed another sheet, glued sections to each end of the section as long as the interior of the building, then folded it back to make it look like boxes are stacked near the middle two windows on either side.

20240229_221005166_iOS

20240229_221052086_iOS

The sections are not glued, but just sitting in place while I size up any other ways I could do it.

20240229_221058898_iOS

Notice too that I cut the double doors in half and glued them in place so they can show more of the lower level interior.  I decided how I can run wires for lighting (which I haven't even started to research what to buy) with very little cutting.  More on that when I get to it.

On to scenery.  Here are a couple photographs of the Idaho Hotel lawn and driveway.  I need to purchase a different color material for the dirt road.  One color labeled 'earth' took on a slight green hue.  Two others don't look quite right either.  I may have to build up the lawn to match all the layers of driveway before it's done.    It's a start.  My daughter gave me some flowering bushes that I am going to plant in front of the long porch and I'll get some more shrubs and trees as I go on.  I just sat the backdrop section in place for the photographs to show what I have and what needs painted since that was brought up before.  Yes, it is a little high as you can see through to the wall on the slope to the right.

20240229_221341822_iOS

20240229_221416066_iOS

Incidentally, the LED lamp closest to the hotel blew out, so I adjusted the next closest one for the photographs.  They are so hard to push in and twist to get in and out, that I didn't swap another in service LED to that spot for the photographs.  I ordered a pack of 6 yesterday.  There goes some funds I had earmarked for scenery. 

20240229_224422347_iOS

Attachments

Images (6)
  • 20240229_221005166_iOS
  • 20240229_221052086_iOS
  • 20240229_221058898_iOS
  • 20240229_221341822_iOS
  • 20240229_221416066_iOS
  • 20240229_224422347_iOS
Last edited by Mark Boyce

Looks good Mark.

The gap in the backdrop could be hidden by another hill with trees and shrubs.

I have a load of light brown sand that I co-worker gave me. It's good for dirt but it's too light brown so I usually do a brown wash over it after the glue dries. I left the original color on the hill to the left of the tunnel.

2021-02-26 07.09.05

Same sand in the yard toned down with a dark brown wash.

2022-01-30 15.50.38

Attachments

Images (2)
  • 2021-02-26 07.09.05
  • 2022-01-30 15.50.38
Last edited by RSJB18

Good morning Mark, Things sure are looking good I like how the interior of your coffee building turned out.

The hotel area is coming along nicely and a few more flower and shrubs should look perfect! As for the dire driveway, I know this might be more then you were thinking, but for my dirt work on my old layout I took dirt from my yard sifted it down to as small as I could and then cooked it in the oven to kill anything that might be growing. LOL To apply it I put down some white glue dirt and water and glue mixture again. You cant beat the real stuff! LOL

  Mark, I’ve built a few dirt roads. I’ve used Mike’s method but I believe I used sifted real gravel. I’ve also used Woodland Scenics fine buff ballast mixed in with some of their earth. Pretty much a lot of my scenery was in place before Scenic Express came along. So most of what was done was referencing Dave Frary’s book on scenery and using home grown recipes.

I use to watch a lot of Allen Keller VHS tapes when I started. Dick Elwell who had a fantastic New England themed RR. . Offered one tip in the construction of dirt roads. After everything was good and dry. He went over the road with sandpaper wrapped over a block of wood. It would tone the road down color wise and take the coarse harshness out of it by I guess. Scuffing some of the ballast material off the surface.

@Mark Boyce posted:

I have an update on the Sanky Wanky kit and the Idaho Hotel-Scenery Hill area.

I finally found photograph of warehouse boxes that I liked and printed out for the upper floor.  I sliced to size and glued to thick stock.  I didn't like the look of the print in the middle of the floor as it would make the area look half empty,  ...snip... 20240229_221052086_iOS

Don't forget to leave some room/aisles/ whatever for the material handling equipment.

Another thought: A freight elevator to get material to and from the second floor.

It is progressing very well. The Hotel is a great-looking building!

Mark,

You may also want to dedicate part of the ground floor to an office and counter area. You could do this with backlit images or with 3D models of desks, chairs, bookcases etc that are found in doll house  catalogues. You can also find miniatures of all kinds of joists and equipment that might be useful for the warehouse. I’ve got a whole raft of models of table saws, drill presses and other equipment for a factory that I will return to after I’ve made more progress on my layout.

Both of your structures are looking great !

Rubin

Thank you, Bob, Mike, Dave C, Myles, Rubin, Dave, Peter!

Bob, good suggestion.  I could certainly put in trees and bushes to hide the gap.  I need to revise my brackets holding the backdrop if I am to leave it at a higher level than the original position.  If I do that, I will need to put another small backdrop between the original table top and the lift up.  Or, since I have more painting to do, I could paint another mountain/hillside higher than what is there now and put the backdrop where it originally was.  That would cover both problems.  I'm starting to lean that way; but who knows?   Your brown solution worked out well!

Mike, real dirt.  Baking dirt.  You took me down memory lane.  How many times did we walk into my grandma's house to that distinctive aroma? odor? scent?  Who needed potting soil from the hardware store, when you could just dig some out of the compost pile, and bake it?  I do have two dirt piles from my drainage ditch work two years ago that I could dip into for some scenery!

Dave C, those are all good ideas for dirt patches and roads.  After typing out the last message and posting photographs, it occurred to me I am doing this all wrong.  Certainly a sizable mountain hotel set in the mid 50s would have a gravel lane and parking area to keep the guests' cars out of the mud.  I have a selection of gravel and ballast from my HO days that could work for a gravel road.  I will certainly be putting in some dirt roads later on the layout, so all your suggestions will help.

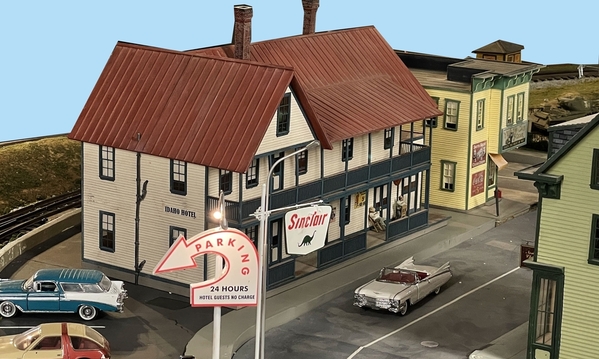
Myles, I have you to thank for the star of the scene!!  It still looks great!  With moving the hotel back and forth, I can attest to the fact that it is built rock solid.  It is a testimonial to the care you gave to make sure everything was glued tight.  I know it will hold up to moving on the rare occasion I need to lift up the base to access track below!  Thank you!!

Dave, I have been thinking about how they would move freight between floors and of course move it along each floor.  As far as adding an elevator, I am thinking it may not be seen from the windows, but I do need to have some workers and equipment right inside a few windows.

Rubin, I am thinking the single story portion could be a supervisor's office, and the area with the lower floor and door that a person could walk in or even drive a truck in could be a sales counter.  I just need to start looking for items to use.  The dollhouse detail parts is a great idea for some of those things.

Peter, I'm always glad you take a look knowing you have so many irons in the fire!

@Dave_C posted:

Great looking scene Mark.  The balcony needs some rail fans with that view. I really like the tree. Is this something you made ?  I see the roots at the base. Something you don’t normally see with commercial trees.

Thank you, Dave!  Jeff @ScoutingDad made the tree.  He did a great job.  Yes, rail fans will be there when word gets out!

@RSJB18 posted:

That really looks great Mark. Real statement piece as you come into the train room.

Bob

Thank you, Bob.

I’m a tree junkie. Layouts well populated and I’ve made them a variety of ways over the years. This one got my attention because it’s different from anything I have. I like variety in my trees.

  Jeff did a great job on it.  I’m guessing maybe twisted wire to for the armature seeing there’s visible roots. The flocking has a nice airy look to it. Nicely done.

@Mark Boyce posted:

Here's the Idaho Hotel scene with freshly graveled lane and parking area and fertilized lawn for a greener tint.  There is still a lot to do.

20240308_005306572_iOS

20240308_005320409_iOS

20240308_005212208_iOS

I'm in the process of matching colors that daughter Heidi gave me to finish the backdrop.

As Bob mentioned that is a great statement piece. You have to feel great about your accomplishment. Congratulations!

Jay

Mark, nice job on the hotel scenery. Now a little work on the backdrop and you will have an eye carcher. I take it you got a pin in the base? 

Guys the tree is a wire arbor, coated with latex and then wood putty. Then spray painted. I used painted furnace filter material to form the tree shape and then used Super Leafs. The tree is about a foot tall. I am working on several fabrication methods to get the look I want but also does not require days to build. Very pleased to see Mark using it alongside the nicely done hotel. Jeff

Thank you, Dave C, T-Bone1214, Mike LP1-poncho, Jay, Bob G, Jeff, George, Gene, Rubin, Bill, Myles, Mike G, Darrell, Richie!

Whew!  I hope I got everyone.  I am truly overwhelmed!  Thank you everyone for the support!

Dave, I want to learn how to make some distinctive trees as well.

Jeff, thank you for answering Dave's question on how you did it!  Actually, I was able to balance the tree just about where I want it to take the photographs.  It still hasn't fallen since last evening when I put it there.  I do intend to drill a hole in the base and put a finishing nail in for a pin.  I have lots of them, and don't have any other use for them. 

Rubin, I hope you get to this point soon.  I have wanted to get back to building scenery for years myself.

Myles, I don't even remember how the scene looked in the town on your layout, but thank you again!

Mike, yes it needs to be dog friendly and perhaps also some wildlife nearby.

I do think the scene looks inviting as well.  I wanted something like railroads built in the late 1800s to entice more passengers to ride the trains, but now serve as a getaway and railfan location.  I certainly have to get at finishing that backdrop.  The scene really needs it now.

Also, the scenery is quite flexible when I take the hotel, cars, tree off the layout so I can lift the lift up to get to the tracks below.  I need to get this done, so I can remove the newspaper protecting the lower tracks below so I can run trains on the lower tracks.

Last edited by Mark Boyce

Thank you, Myles!  Now I remember your scene and that you moved the hotel for the Hopper House.  I agree with Ted, the Parking sign is great!  I remember it as well.

Moving the hotel makes me wonder if I ever saw a model scene of a crew moving a building.  I Don’t recall one.  About 15 years ago, they moved a Victorian house about a block and a half up Main Street Butler, then turned a block from Main to the prepared location.  The house went right past our church.  Our younger daughter Holly’s ma-in-law videoed the day from an upstairs window of the church.  That would be quite a unique scene to model.  No, I’ll not tackle it!  😄

@Mark Boyce posted:


As an aside, the name Scenery Hill just came to me this afternoon.  There is a place called Scenery Hill south of Pittsburgh along US Rt 40, The National Road.

Lovely little spot with a whiskey rebellion era tavern that unfortunately was heavily damaged in a fire about a decade ago.

Only trains I knew of THROUGH the town would have been stagecoach wagon trains on the National Road, but overlooked Cokeburg, PA to the north AND Marianna, PA to the south. Both coal/coke patches on the PRR Ellsworth Branch.

@Greg Nagy posted:

Lovely little spot with a whiskey rebellion era tavern that unfortunately was heavily damaged in a fire about a decade ago.

Only trains I knew of THROUGH the town would have been stagecoach wagon trains on the National Road, but overlooked Cokeburg, PA to the north AND Marianna, PA to the south. Both coal/coke patches on the PRR Ellsworth Branch.

Greg, Yes indeed on the Whisky Rebellion.  I did not know about the fire.

Thank you for the scoop on the stagecoaches on the National Road!  They had a route from Pittsburgh to Erie that went right through here in Butler.  There is so much great history out there!

I really enjoy these discussions of local and U.S. history I’m an avid reader of history and part of my layout will reflect downtown Cleveland’s West 6th Street, where many buildings still in use date to the 1860’s. It’s northern end led to the now demolished PRR downtown station, which was essentially on the same site below downtown ( albeit rebuilt and expanded) from 1860-1960, when it was demolished. The Pennsylvania never was willing to use the much grander Cleveland Union Station, a.k.a. Terminal Tower, although an entrance was reserved for it during the construction.

i’m still trying to think through how to scenically incorporate graphic references to Brooklyn, New York, and Cleveland, where I’ve lived most of my life I’m looking at some Cleveland photo backdrops, but I haven’t reached any decisions yet. Time will tell…

Rubin, It is always a challenge to decide what to include in a layout out of the many things we would like to include.  Also, how to depict what we do show comes into play.

I have the backdrop painted and in place resting on the lower brackets to se how I like it.  I think it turned out pretty good.  I included a few scenic items like the small Woodland Scenics trees, some bushes, and a little produce stand our daughter gave me for Christmas a year ago. 

20240315_203443430_iOS

20240315_203459148_iOS

20240315_203515846_iOS

20240315_203530137_iOS

20240315_203540278_iOS

20240315_203712083_iOS

There is a lot more I can add to the scene, but I decided to stop for now.  I wanted to uncover the tracks below so I can run trains over the lower area for the first time since last fall.  Also, I'm going to try to finish the Sanky Wanky Coffee Company building.

Thank you for looking.

Attachments

Images (6)
  • 20240315_203443430_iOS
  • 20240315_203459148_iOS
  • 20240315_203515846_iOS
  • 20240315_203530137_iOS
  • 20240315_203540278_iOS
  • 20240315_203712083_iOS

Mark,

The scene really is coming along nicely. I really like how it's coming "alive" as you add more details. With all of the creative things you have done, I really like the road leading up to the area. I'm not sure if you posted it before but this the first I've seen it. I think you have a good idea in taking a break. It's nice to just take a step back and admire your work while running the trains. I also found that this is where fresh ideas pop into my mind to enhance something and add more detail.

Well done,

Dave

Thank you, Dave luvndemtrains, Bob, Dave darlander, LT1Poncho, Ted!

Dave, I'm glad you like the road.  I had been back and forth with that, since the road has to squeeze between the track and backdrop.  Once I roughed in the road, I had thoughts of just taking it off layout.  However, I decided to keep it and tie the hotel into the to-be-built town to the right.  I know of places where lanes and even paved roads come very close to mainline tracks, so it makes sense.  I will probably glue some ground foam to the area between the road and the backdrop or even glue to the backdrop itself in the future.  I am not going to attempt to paint a road onto the backdrop for sure.

I did run a couple trains last night.  I had no trouble with the track or switches, except for user error forgetting to throw a switch.  I did work with an older TMCC engine consulting the manual for some help.  That's for another story.

Thank you, Jay!

@LT1Poncho posted:

@Mark Boyce I love the backdrop. Can’t wait to see it extended and blended in. Nice scene!

I forgot to comment on your comment about the backdrop being extended.  Initially, I was going to leave a gap in the backdrop where each of the windows are.  This one opens to the laundry in the original part of the house.  Now that I built the upper level, the view isn’t from the laundry is obscured somewhat and will be more when I put buildings in.  I’m thinking of extending the backdrop up partially, but leave an opening at the top since the heating/air conditioning vent is there.  We will see. 😊

I feel your pain. I'm running the trains so infrequently that I forget the switch alignment protocols. I have to run around and visually check each switch before I do anything since I don't trust myself.

Boy, can I relate. With my earlier layout having been wired beck in the nineties and than having been dismantled now for four years, just trying to remember how to do things and wondering how to wire in a bad knees/ hips friendly way after its all been down for years is really somewhat daunting. And that doesn’t count the wondering about how my now 30 year old DCS AND TMCC equipment will work. I had planned on replacing it all with new Lionel Base 3 and DCS TIU setups, but who knows when they will appear, if ever and how buggy they will be.

Thank you for commenting, Myles, Mike, Rubin!

Myles, I checked switch alignments also, but forgot one that had been covered with newspaper.  Sure enough, I ran into a stationary train.  Fortunately, I didn't see any damage.

Mike, I'm glad to see things coming together at least in one small area.  There's no deadline here like when I was employed.

Rubin, Yes, it is one thing to reassemble a layout that has been dismantled.  It is quite another to get everything wired again even if we don't want to make any control improvements.  I did it with an N scale layout years ago.  I was limber then, so back, hips, and knees weren't a consideration then.  Now they are paramount.  I ordered the MTH WTIU when first offered, knowing it would be a while.  As time passes, I wonder occasionally how it will work out.  I'll stick with my TMCC Cab 1 for the few TMCC engines I have.

I thought I forgot to answer another question here, but looking back it must have been asked on the Trackside Photos thread where I posted one photograph this weekend.  I'll go back there and look, but will answer it here.  Someone asked if I was going to paint rails and ballast.  Ballast is in the plans, but I like to ballast after the basic scenery is complete, base, paint, ground cover.  I think it makes a cleaner look for a well maintained ballasted ROW.  I have never painted rails before, but admit track looks so much better with the rails painted and all the parts kind of blended together including ties.  NJCJoe did a great job on his covering everything, and I mean everything except the track with plastic before spray painting all his track.  Beautiful!  I keep putting off the decision to actually do it even though I bought a new air mask and kept a copy of the colors he used.  The more I put off the decision, the closer I am to letting the decision to become a No because it would become impractical to do it. 

Last edited by Mark Boyce

I don't have a lot new to share except a few photographs and a video a Forum member asked me for in an email.  You might notice I removed the produce stand in favor of a very north woods scene (that is void of trees)   The video is a new one of the BL-2 I upgraded to PS3 a few years ago pulling a coal drag.

20240325_195728365_iOS

20240325_195737521_iOS

20240325_195746084_iOS

20240325_195752440_iOS

I have nothing new on the coffee company building as my wife needed to block off access to the workbench for a project she was doing the last week.  Access was restored last evening, so I am good to go getting back to the Sanky Wanky!!

Attachments

Images (4)
  • 20240325_195728365_iOS
  • 20240325_195737521_iOS
  • 20240325_195746084_iOS
  • 20240325_195752440_iOS

Nice video. You have an interesting and complicated track plan. I noticed that when the train made that turn in the foreground underpass that your clearances are quite tight on the train's left side. I am assuming you've tested this with longer rolling stock. I hate those tight clearances. So do the real railroads. The Pennsy couldn't run the centipedes east of Harrisburg due to curve radii. The darn things got stuck in the zoo curve in Philly. Life imitating art. My centipedes crashed into the tunnel portal when I finished the mountain. I thought I had all that figured out before plastering. It wasn't the first unit. It was the front of the rear unit that crashed. Not as bad as the ship in Baltimore. I had mounted the portal at the rail's center, but it actually needed to be shifted a tad to the outside of the curve. You haven't put in any portals yet, but keep it in mind.

Mark, things sure are looking great on your layout! You sure have a nice smooth-running train and the grades you have seem to be very easy for the motive power you have! I like the hotel on the hill, but you might think about a little gaurd rail by the parking! LOL You know some guest just have one to many!

@Mark Boyce posted:

I don't have a lot new to share except a few photographs and a video a Forum member asked me for in an email.  You might notice I removed the produce stand in favor of a very north woods scene (that is void of trees)   The video is a new one of the BL-2 I upgraded to PS3 a few years ago pulling a coal drag.


I have nothing new on the coffee company building as my wife needed to block off access to the workbench for a project she was doing the last week.  Access was restored last evening, so I am good to go getting back to the Sanky Wanky!!

Mark, it’s nice to see some train action again, thanks for sharing.

Gene

Thank you, Randy, Dave, Mike, Bill, Bob Golfs, Myles, Bob, Mike G, Gene, Poconotrain!

Dave, This Bigfoot is after the hotdogs roasting on the open fire!    Good thing the fire ranger is going on duty.

Mike, the open hill scene is just temporary while I think of something else to put there. 

Bill, all the engines are able to pull trains up the grades, which I wasn't sure of.  I am quite pleased since I'm not the most exacting carpenter and track fitter.

Bob, yes there is more crammed in than I ever thought I could.

Myles, I checked every engine and my longest cars (18" passenger cars) underneath.  I did have to grind away the side of one of the supports around the bend from where the tunnel portal will be.  The middle of the passenger cars scraped going into the curve.  I can certainly believe there were places the Centipedes couldn't go.  I certainly will keep it in mind again when putting in portals.

Bob, I knew you would comment on the BL-2! 

Mike, I think some drivers could go over the precipice sober much less after having too many.    I have in mind building 'guard rails' like they had at a local park growing up.  They were about 9" thick logs resting on similar posts sunk into the ground and fastened with steel straps.  They were still varnishing them periodically back then.  Very rustic looking.  They must have dated back to the CCC days in the '30s.  Which I guess from the '30s to the '60s wasn't that long a time difference.  Ouch!

Gene, yes it is nice getting all that painters tape and newspaper into the garbage can.

Thank you, Ted!  I have been pleased how the different elevations of track have turned out.  Believe me, there has been a lot of fine tuning!!!!    Now I can run just the top loop or the bottom loop as well.  It certainly wasn't what we planned going into construction, but I am pleased with it considering the space requirements.  On to more scenery and structure building! 

@Mark Boyce posted:

Thank you, Ted!  I have been pleased how the different elevations of track have turned out.  Believe me, there has been a lot of fine tuning!!!!    Now I can run just the top loop or the bottom loop as well.  It certainly wasn't what we planned going into construction, but I am pleased with it considering the space requirements.  On to more scenery and structure building! 

Mark',

I am quite impressed with what you have done'.. I will be building a new layout shortly, and may incorporate some of your ideas.  Of course I'm going from a full basement with a full size layout to a restricted smaller area'.. So, the elevation theme may be a real asset for me'..  I will keep you posted'.  And Thanks in advance for the great idea I have not thought about'... 👍😁

@Mark Boyce posted:

I don't have a lot new to share except a few photographs and a video a Forum member asked me for in an email.  You might notice I removed the produce stand in favor of a very north woods scene (that is void of trees)   The video is a new one of the BL-2 I upgraded to PS3 a few years ago pulling a coal drag.

20240325_195728365_iOS

20240325_195737521_iOS

20240325_195746084_iOS

20240325_195752440_iOS

I have nothing new on the coffee company building as my wife needed to block off access to the workbench for a project she was doing the last week.  Access was restored last evening, so I am good to go getting back to the Sanky Wanky!!

Love the pics and the video!

Peter

Thank you, Ted and Peter!

Ted, I'm glad you will be able to start your new layout soon.  I actually moved into a slightly larger space, but my last layout was N scale.  So, in effect, I have really had a hard time compressing in a larger scale.  I think the biggest takeaway from building this layout is that modern engines can pull reasonably long trains up 5% grades with curves.  Trains don't look the best at those grades, but if this is as much space as a modeler has, it can be done.

Peter, I think though it is a small layout, there are a lot of points of interest.  Once I get more scenery and buildings on the layout, I hope it will be even better.

Thank you, Ted and Darrell!

Ted, I started in HO, then switched to N, then was going to build another HO layout, but it never happened.  So, the last layout I built was in N-scale.  I too switched to O for the reasons you did.

Scratch built "Boyce Homestead" scene in N-scale.  I find it hard to believe I actually did that at one time. 

20231015_231806920_iOS20231015_231908755_iOS

Darrell, I will mention again that Myles Trainman2001 built the Idaho Hotel kit, but it does take a lot more to build a scene around it.  Our older daughter bout me the campsite figures and most recently Sasquatch.  I was looking at the almost bare hill and thought, "why not" until I get some trees in place.  I have had the fire tower for quite a while, so that makes the scene.

Attachments

Images (2)
  • 20231015_231806920_iOS
  • 20231015_231908755_iOS

Thank you, George, RJ!

I was able to get back to the Sanky Wanky Coffee Company kit the last couple days.  I completed some stand-in interior backgrounds of crates that were shown before on the second story and some more crates and piles of sacks on the first floor.  On the first floor, I positioned them so there would be enough room to maneuver a scale fork lift or at least a hand operated lift in aisles when viewed through the open doors.  I made a little ramp down from the dock level floor to the walk out level as well.  I left that ground level area open to allow me to put in three dimensional items when I get them.  Locating three dimensional items and paying for them will take a little time. 

Here is a view of the second story that can only be viewed through windows which I made a month ago.

20240403_155118831_iOS

Here are views from the removable end wall.  I corrected the angle of the square section after taking the photograph.

20240403_155123186_iOS

The second floor was slid in for this photograph.  Note the crates on the second floor look pretty good from the side windows with the chimneys covering the center white section holding the two long rows together.

20240403_155214641_iOS

Here are two quarter angle views of the building with the removable end wall in place.  I did not weather the roof yet, since the roof elevator penthouse and long roof ventilator haven't been installed yet.

20240403_155313328_iOS

20240403_155342532_iOS

As with the three dimensional details, I still haven't shopped for lighting.  I'll want something that resembles mid-century incandescent lighting.  I have figured a way to run wires, but am waiting until I actually decide on the products to use.  That is the benefit of making a way to get into the interior of all my buildings since I haven't detailed or lit any of them yet.  I can see between some details and lighting, I could have as much money in a building as it took to initially buy the kit. 

Right now I am waiting for the glue to dry on the roof elevator penthouse and ventilator sections.  Therefore, I hope to have more to post later this week.

Attachments

Images (5)
  • 20240403_155118831_iOS
  • 20240403_155123186_iOS
  • 20240403_155214641_iOS
  • 20240403_155313328_iOS
  • 20240403_155342532_iOS

Mark, that really came out NICE. The Brennan kits all seem to have character and really stand out. I can totally agree with buying detail items. You start adding to your basket. Doesn’t seem like your spending much at $4.00 an item. Till you hit checkout and have spent $100. Years ago Berkshire Valley was at all the shows in the northeast. It was easy to get carried away.

@Mark Boyce posted:

Thank you, George, RJ!

I was able to get back to the Sanky Wanky Coffee Company kit the last couple days.  I completed some stand-in interior backgrounds of crates that were shown before on the second story and some more crates and piles of sacks on the first floor.  On the first floor, I positioned them so there would be enough room to maneuver a scale fork lift or at least a hand operated lift in aisles when viewed through the open doors.  I made a little ramp down from the dock level floor to the walk out level as well.  I left that ground level area open to allow me to put in three dimensional items when I get them.  Locating three dimensional items and paying for them will take a little time. 

Here is a view of the second story that can only be viewed through windows which I made a month ago.

20240403_155118831_iOS

Here are views from the removable end wall.  I corrected the angle of the square section after taking the photograph.

20240403_155123186_iOS

The second floor was slid in for this photograph.  Note the crates on the second floor look pretty good from the side windows with the chimneys covering the center white section holding the two long rows together.

20240403_155214641_iOS

Here are two quarter angle views of the building with the removable end wall in place.  I did not weather the roof yet, since the roof elevator penthouse and long roof ventilator haven't been installed yet.

20240403_155313328_iOS

20240403_155342532_iOS

As with the three dimensional details, I still haven't shopped for lighting.  I'll want something that resembles mid-century incandescent lighting.  I have figured a way to run wires, but am waiting until I actually decide on the products to use.  That is the benefit of making a way to get into the interior of all my buildings since I haven't detailed or lit any of them yet.  I can see between some details and lighting, I could have as much money in a building as it took to initially buy the kit. 

Right now I am waiting for the glue to dry on the roof elevator penthouse and ventilator sections.  Therefore, I hope to have more to post later this week.

Congratulations Mark on your accomplishment. That building has a great deal of character and charm. Your layout is transforming quickly.

Jay

Nice looking building Mark; well done! Will you leave the one end so it is removeable, for future changes/additions? That would make pretty good sense.

For lighting you could consider warm white 2835 led strip lighting, same as is commonly used for passenger car lighting. A strip along the ceiling of each long aisle would look good, and imitates old school incandescent lighting quite well. White strip leds are pretty good at representing fluorescent lighting IMO. Power can be provided by a simple buck converter allowing you to dial in the intensity that you like best. I have recently converted a few buildings over to this style lighting and am quite happy with it. YMMV.

Rod

Thank you very much, Myles, Dave, Dave C, Gene, T-Bone1214, Jay, Poconotrain, Rod!

Dave C, For sure!  I would easily be emptying the shopping cart when buying online.  At shows, it could be embarrassing when the vendor gives the total price.

Rod, Yes the end wall will be removable as is the second floor.  I will have to go back a couple pages to recall the little magnets that ere suggested to keep the end wall secure when installed.  My other buildings have removable roofs and in on case the two floors separate to get into both floors.  In those cases gravity keeps everything together.  Thank you for the ideas about interior lighting.

I agree with everyone, the Dennis Brennan kit is really well thought out and produced.

Poconotrain, maybe my experience will give you encouragement to get the Hap Hazard kit out of the box and start it. 

T-Bone1214, I decided to show where the Coffee Co will reside on the layout.  I have the braces in place to hold the plywood up that it will rest on but not the plywood, so I mocked it up.  I hadn't done that since I measured to decide if I could fit it on the layout.  It will be on the other end of the double track bridge from the Thomas WV station.  It is also diagonal from the Idaho Hotel.  I had to build out that area to put the building at that level.  Also, you can see the elevator door and vent which are not glued down yet.  The roofs are all stick on tarpaper.  Quite nice.

20240404_234136088_iOS

I'll have enough space to get a truck in to this dock before the plunge to the "river' below.

20240404_234154195_iOS

This door opens to ground level.

20240404_234203722_iOS

20240404_234210810_iOS

There's the dock for rail service.

20240404_234314509_iOS

20240404_234337353_iOS

I threw in a photograph of the little station vignette under the hotel.

20240404_234351950_iOS

Attachments

Images (7)
  • 20240404_234136088_iOS
  • 20240404_234154195_iOS
  • 20240404_234203722_iOS
  • 20240404_234210810_iOS
  • 20240404_234314509_iOS
  • 20240404_234337353_iOS
  • 20240404_234351950_iOS
Last edited by Mark Boyce

Mark; that building is going to look great right where you have it. And the buildout to accommodate it looks like it shouldn't disrupt things too badly. Nice idea.

Love the roof access stairwell, adds a great deal of realism. And the clerestory, nice. I put a 3D printable roof access stairwell on the OGR 3D site; it can be printed and added to any building with a flat roof.

Love the sasquatch; looks right at home!

Rod

Thank you, Rod, Bob!

Rod, Yes I would call it a roof access stairwell too.  Dennis calls it an elevator penthouse, which is what Frank Ellison called it in the article from way back that Dennis so thoughtfully included in the box.  I can't see having an elevator for roof access, but can see having stairs thus the sloped roof that Dennis designed.  Regardless, your 3D printable roof access file is a great little detail that we see so much in real life, but often not included on model buildings.  I would used the term "clerestory" also, but again Dennis uses Frank's term "ventilator".

Our older daughter gave me Sasquatch for Christmas, a metal casting intended for gaming use.  He's great!  However, I had no idea what color real Sasquatches are, so I just chose a dark brown I had on hand. 

I am finding there are a lot of details from the gaming industry that model railroaders can use.

Bob, Yes indeed for anyone who had one too many!    On the truck entrance, I will put up some kind of guardrail remembering @mike g.s concern at the hotel.  Now the ground level door will go out to the edge of the layout.  Oh well. 

@Rod Stewart posted:

Nice looking building Mark; well done! Will you leave the one end so it is removeable, for future changes/additions? That would make pretty good sense.

For lighting you could consider warm white 2835 led strip lighting, same as is commonly used for passenger car lighting. A strip along the ceiling of each long aisle would look good, and imitates old school incandescent lighting quite well. White strip leds are pretty good at representing fluorescent lighting IMO. Power can be provided by a simple buck converter allowing you to dial in the intensity that you like best. I have recently converted a few buildings over to this style lighting and am quite happy with it. YMMV.

Rod

Rod, I forgot to comment that I have a roll of warm white LEDs and 4 buck converters I haven't even used yet.  I must confess, I had to look up YMMV.  How long has that phrase been out there? 

@Rod Stewart posted:

Mark; just thinking, that truck pit would likely be where a truck would back in, right up to the floor, for easy level loading by forklift or pallet jack. So any railing at all would/should only be along the sides of the pit I would think?

Also, you maybe want a couple of pallet jacks, like the one I put on the 3D site a while back?

Rod

Pallet jack!  That is the device I couldn't recall what to call it.  Thank you!

@Mark Boyce posted:

Thank you very much, Myles, Dave, Dave C, Gene, T-Bone1214, Jay, Poconotrain, Rod!


T-Bone1214, I decided to show where the Coffee Co will reside on the layout.  I have the braces in place to hold the plywood up that it will rest on but not the plywood, so I mocked it up.  I hadn't done that since I measured to decide if I could fit it on the layout.  It will be on the other end of the double track bridge from the Thomas WV station.  It is also diagonal from the Idaho Hotel.  I had to build out that area to put the building at that level.  Also, you can see the elevator door and vent which are not glued down yet.  The roofs are all stick on tarpaper.  Quite nice.

Mark, you have said you have some challenges with using tools due to "limitations". Looking at what you do, its hard to believe you have them, looks like a PRO did this. Really nice work.

Let me know what kind of pine trees you would like for the camp area.   Jeff

@Mark Boyce posted:

Thank you very much, Myles, Dave, Dave C, Gene, T-Bone1214, Jay, Poconotrain, Rod!

Dave C, For sure!  I would easily be emptying the shopping cart when buying online.  At shows, it could be embarrassing when the vendor gives the total price.

Rod, Yes the end wall will be removable as is the second floor.  I will have to go back a couple pages to recall the little magnets that ere suggested to keep the end wall secure when installed.  My other buildings have removable roofs and in on case the two floors separate to get into both floors.  In those cases gravity keeps everything together.  Thank you for the ideas about interior lighting.

I agree with everyone, the Dennis Brennan kit is really well thought out and produced.

Poconotrain, maybe my experience will give you encouragement to get the Hap Hazard kit out of the box and start it. 

T-Bone1214, I decided to show where the Coffee Co will reside on the layout.  I have the braces in place to hold the plywood up that it will rest on but not the plywood, so I mocked it up.  I hadn't done that since I measured to decide if I could fit it on the layout.  It will be on the other end of the double track bridge from the Thomas WV station.  It is also diagonal from the Idaho Hotel.  I had to build out that area to put the building at that level.  Also, you can see the elevator door and vent which are not glued down yet.  The roofs are all stick on tarpaper.  Quite nice.

20240404_234136088_iOS

I'll have enough space to get a truck in to this dock before the plunge to the "river' below.

20240404_234154195_iOS

This door opens to ground level.

20240404_234203722_iOS

20240404_234210810_iOS

There's the dock for rail service.

20240404_234314509_iOS

20240404_234337353_iOS

I threw in a photograph of the little station vignette under the hotel.

20240404_234351950_iOS

Thanks for the visual Mark! That's a tight space but I'm sure with your imagination it's all going to come together nicely!!

Thank you, Rod, Jeff, T-Bone1214, Bob!

Rod,  I do recall that thread, now that you pointed it out.   Thank you for the link.

Jeff, my trouble is mostly with power tools.  I can only use the circular saw for rough cuts.  Even using a fence, the saw tends to drift on a slightly wavy course.  Jig saw; forget it!  I gave away my old one in favor of a newer one my dad bought that has several speeds.  I can't control it on any speed on any grade of plywood.  I can use hand tools better, but sometimes I drop the pliers or tweezers in favor of my fingers. 

Pine trees!  I'm partial to white pines myself.  I loved the white pines that were beside the one-room cabin we stayed in when I was growing up.  Thank you!

Bob, if I can provide some inspiration, I believe I have given something back to this forum for all the inspiration and information I have gained.

T-Bone, You gave me the inspiration to work on a more permanent base for the Sanky Wanky.  The last couple evenings, I topped the walls and chimneys with the 'cement' tops.  The only thing left are 2 stacks or flues for each chimney.  I forgot to paint the styrene tubing that is in the kit.  It is to be warmer and less wind tomorrow, so I hope to finish spray painting then.  I also built the wooden steps to the office door.  They came out nicely, but that was a prime example of where my poor fingers worked better than tweezers.  I started to try to build a jig, but gave up on that and 'freehanded' it.  Well, I'm sure there would be a few boards in most real steps that are a scale inch off here or there.    I still need to paint the thin edges of the roof details and a little weathering of the tarpaper and gray walls.

Today, I cut a piece of 3/8" plywood I still had on hand; no telling how old that stuff is.  I wanted straight cuts, so I clamped it down and cut nice straight cuts with the old hand saw.  A few screws, and there is the basic form.

20240406_185541422_iOS

20240406_185549515_iOS

20240406_185718487_iOS

20240406_190050553_iOS

20240406_185806815_iOS

Also, a short video of the buildings on either side of the Great Bridge.

Attachments

Images (5)
  • 20240406_185541422_iOS
  • 20240406_185549515_iOS
  • 20240406_185718487_iOS
  • 20240406_190050553_iOS
  • 20240406_185806815_iOS
Last edited by Mark Boyce

Mark, you have done a stellar build with Sanky Wanky! As you noted, I have used Ellison's terminology throughout my instructions. And, I have wondered why he chose some of the names he had used. I believe Frank was using more descriptive terms so his audience had an understanding of  their purpose and placement. Hence, a clerestory became a roof ventilator. So, his description of what appears to be a common roof access stairwell is actually an elevator penthouse. You'll note that Frank's instructions show the penthouse centered directly over the freight dock entry. The penthouse door is the way to get at the hoist motor and pulley mechanism. The elevator would have provided pass through access from the freight dock to the first floor. And as a  side note, elevator shafts often have exterior windows for light.

Anyway, that's my story and I'm sticking to it.

Last edited by DennisB

I knew you would pull it off!! Looks great with the buildings on either end of the bridge. It looks like scenes here in Bucks County PA where we have older smaller steel bridges connecting PA to NJ. There are a lot of these bridges and on either end there's old brick buildings used as restaurants or fresh market places. We'll done!

Last edited by T-Bone1214

Thank you, Dennis, T-Bone!

Dennis, yes I realized I had slipped the roof into place backwards after the glue had dried.  I saw I was going to damage the roof if I tried any harder to pry it loose, so decided to live with it.  Oh well.    Yes, I see how Frank Ellison designed the building with the idea that crates or pallets could be pushed in the door and right into the freight elevator.  You cleared it up and now; the elevator penthouse terminology makes total sense to house the mechanism.  I agree with your interpretation of his terminology.  Good thinking.  It has been a great kit to build!  Lots of fun and well worth the price! 

T-Bone, I'm glad you like the overall scene.  It was not planned, it just kind of grew like in real life.    Yes, here in Butler County, it reminds me of a place called Iron Bridge that my grandma spoke of where the bridge crosses Buffalo Creek, a tributary of the Allegheny River.  The PRR had a branch line that followed Buffalo Creek and it is now a bicycle/walking trail.  I use it for walking now that I can't ride bicycles like I did with our daughters.  I miss those bridges, used for railroads and highways, which are being replaced with boring reinforced concrete bridges. 

@Mark Boyce posted:
You cleared it up and now; the elevator penthouse terminology makes total sense to house the mechanism.  I agree with your interpretation of his terminology.  Good thinking.  It has been a great kit to build!  Lots of fun and well worth the price! 

Mark- elevator penthouses serve a few functions, house equipment, and provide head room above the top floor for the car. The top of an elevator car typically needs a couple feet clearance. Hydraulic elevators need less than traction/ cable type.
We have 2 old 1928 buildings with sloped roofs on campus. When they installed elevators in the 1990's they didn't add penthouses, so we have 4 story buildings with 3 story elevators.

The buildings look great around the bridges.

Bob

Hi Mark, as you know I have been on the road and have made it to Missouri!

I have to say you are doing an amazing job on your layout and the swanky coffee shop is looking great! I like how you take your time and dont rush things1 i really need to learn that skill! LOL

Well needless to say we are now looking for that wonderful train room with attached home! LOL It is nice to have the trip over and be able to get on my computer to check in!

Take care and I will check in again soon!

Thank you, Mike!  It bears repeating once more, I am glad you made it safely to Joplin!! 

On the Sanky Wanky, I did paint the extra couple parts I had forgotten and installed them.  I don't like how my chimney flues/stacks turned out, so I removed them and will try again.  The weatherman expects several days of rain again, so I hope to get back at it and even work on the new sides for the lower lift-up girder bridge.

Mike, I'm sure it is similar for railroaders as it was for us power and telecom employees.  It's harder to work on electrical equipment in the rain than snow.  You really have to be paying attention to where everything is so the equipment doesn't get wet.  It doesn't matter as much if you do.     Rain, snow, cold, heat, all just makes the given task harder for that day!  I certainly was thankful when I moved into an inside job when I was 51.  51!  Woah!  That was quite a while ago!! 

Mike, thank you!  Yes, besides cosmetics, I need to tweak the lower bridge some.  It has been binding a bit all winter.  Even though I have climate control including a dehumidifier, I'm wondering if it will get worse this summer.  Therefore, I may be doing a bit of an overhaul.  It certainly has worked well using your plan and Plexiglas parts!!!    That deserves a two thumbs up!! 

@Mark Boyce posted:

Mike, I'm sure it is similar for railroaders as it was for us power and telecom employees.  It's harder to work on electrical equipment in the rain than snow.  You really have to be paying attention to where everything is so the equipment doesn't get wet.  It doesn't matter as much if you do.     Rain, snow, cold, heat, all just makes the given task harder for that day!  I certainly was thankful when I moved into an inside job when I was 51.  51!  Woah!  That was quite a while ago!! 

Mike, thank you!  Yes, besides cosmetics, I need to tweak the lower bridge some.  It has been binding a bit all winter.  Even though I have climate control including a dehumidifier, I'm wondering if it will get worse this summer.  Therefore, I may be doing a bit of an overhaul.  It certainly has worked well using your plan and Plexiglas parts!!!    That deserves a two thumbs up!! 

Thanks Mark, I am glad the Plexiglas parts are working for you! The bad news is that the scraps I had left over got left behind in Washington State, I guess I will have to find some new stuff! LOL

I haven't been totally idle on the Sanky Wanky Coffee Company.  I realized I had glued more parts together than I had wanted to before installing lights, and found the glue held tight enough that I was going to break something trying to get it apart.  This is mainly referring to the roof.  I finally solved the problem by making a slide in ceiling for the second floor like the ceiling/floor I made to separate the two floors.

20240428_212249366_iOS

Each ceiling got two strips of LEDs, this shows one before I jumpered the two strips together at the end that is slid in first.

20240428_212306665_iOS

Here I drilled some holes so the wires could be fished down the inside of one chimney.

20240428_212239726_iOS 1

Here I am testing the lighting using one of the LED boards from Rod Stewart for passenger cars.  I have quite a few of them.  Yes there are places where light is leaking out and I haven't addressed the one story office section.  The wiring is still held together with alligator clip leads, but things don't look half bad.

20240428_233748216_iOS

20240428_233758113_iOS

Attachments

Images (5)
  • 20240428_212249366_iOS
  • 20240428_212306665_iOS
  • 20240428_212239726_iOS 1
  • 20240428_233748216_iOS
  • 20240428_233758113_iOS
Last edited by Mark Boyce
@Mark Boyce posted:

I haven't been totally idle on the Sanky Wanky Coffee Company.  I realized I had glued more parts together than I had wanted to before installing lights, and found the glue held tight enough that I was going to break something trying to get it apart.  This is mainly referring to the roof.  I finally solved the problem by making a slide in ceiling for the second floor like the ceiling/floor I made to separate the two floors.

20240428_212249366_iOS

Each ceiling got two strips of LEDs, this shows one before I jumpered the two strips together at the end that is slid in first.

20240428_212306665_iOS

Here I drilled some holes so the wires could be fished down the inside of one chimney.

20240428_212239726_iOS 1

Here I am testing the lighting using one of the LED boards from Rod Stewart for passenger cars.  I have quite a few of them.  Yes there are places where light is leaking out and I haven't addressed the one story office section.  The wiring is still held together with alligator clip leads, but things don't look half bad.

20240428_233748216_iOS

20240428_233758113_iOS

Great Job Mark as always you seem to figure a way out of any corner you get boxed into! As others have said, you will no doubt plug the light leaks and what a great job you will do!

Thank you, Dave, Bob, Mike G, John, Mike Poncho!!

Yes digging out of a jam can be challenging, but rewarding when an idea starts to come together.  I was short on ideas, but couldn't think of a way to describe the issues to ask for help on the Forum.  The way the roof is inserted in this model being actually glued underneath the inner brick work at the top made it a given that I wouldn't be able to make it removable when the model was completed.  Looking back, I think the ceiling was almost necessary to easily install the LED strips.  Otherwise I would have had to support (hang) them on the thin roof trusses.

As I said before, Dennis Brennan did a great job of designing a kit that really mimics Frank Ellison's original, but with modern materials and techniques.  Frank didn't provide an interior, so Dennis didn't either.  I think the kit is great for someone like me who desires a basic building to make a start, and then each builder can add highlights, or additions either interior or exterior as desired.

LT1Poncho Mike, I was thinking of using some kind of tape to seal off the light leaks.  I had some idea of where they would be while I was building, but putting light inside is really necessary to find them all. 

Now that I'm rested from some yard work, I hope to get back at the Sanky Wanky this evening. 

@Mark Boyce posted:

I haven't been totally idle on the Sanky Wanky Coffee Company.  I realized I had glued more parts together than I had wanted to before installing lights, and found the glue held tight enough that I was going to break something trying to get it apart.  This is mainly referring to the roof.  I finally solved the problem by making a slide in ceiling for the second floor like the ceiling/floor I made to separate the two floors.

20240428_212249366_iOS

Each ceiling got two strips of LEDs, this shows one before I jumpered the two strips together at the end that is slid in first.

20240428_212306665_iOS

Here I drilled some holes so the wires could be fished down the inside of one chimney.

20240428_212239726_iOS 1

Here I am testing the lighting using one of the LED boards from Rod Stewart for passenger cars.  I have quite a few of them.  Yes there are places where light is leaking out and I haven't addressed the one story office section.  The wiring is still held together with alligator clip leads, but things don't look half bad.

20240428_233748216_iOS

20240428_233758113_iOS

That’s very impressive Mark and excellent problem solving. That’s an eye catching structure.

Jay

Thank you, Gene, Jay, Myles, Ted, Poconotrain, Peter!

Myles, I like to think that reading your detailed descriptions of problems you have had to work out have helped me think better than I used to. 

Of course there are so many others on the forum who have posted problems and suggestions that have helped me to think through things better.

Ted, the strip LEDs are really handy for lighting the inside of a building, just like lighting a passenger car.  I would have handled it differently if I only wanted certain rooms lit and others dark.  On this building I thought if they are working after dark, then the whole building would be lit, so that made it easy. 

That raises a question.  Should I assume the owner and secretary went home so the single floor office would be dark?  Or am I over analyzing things and should just light everything? 

@Mark Boyce posted:


...

As I said before, Dennis Brennan did a great job of designing a kit that really mimics Frank Ellison's original, but with modern materials and techniques.  Frank didn't provide an interior, so Dennis didn't either.  I think the kit is great for someone like me who desires a basic building to make a start, and then each builder can add highlights, or additions either interior or exterior as desired...


Now that I'm rested from some yard work, I hope to get back at the Sanky Wanky this evening. 

Mark, you absolutely nailed my intent. This allows me to provide these kits at a reasonable price, making them available for anybody. I love hearing about what you and others have done with my kits. Tapping into one's creativity is what this hobby is all about!

By the way, routing the wires through the chimney is brilliant. Had I thought of that, I would have predrilled the hole. Kudos, Mark!

Last edited by DennisB

I finished wiring the LEDs permanently.  I drilled a hole in the 'concrete' base at a spot that is covered up by the chimney.  Then I attached the Rod Stewart LED module that converts AC to DC with double sided sticky tape to the under side of a brace for the first floor.  The two wires that come out from underneath will eventually go through a hole in the plywood the building is on and connect to the AC source.  I forgot to take photographs of the hole in the base or the underside showing the module.  I am not flipping the building over again, but this photograph will give a good idea of what I am describing.

20240504_175251156_iOS

Here are a couple photographs showing no light seeping out.  Tape works wonders.

20240503_234107867_iOS

That's a Menards truck with the high beams on.  I just have it plugged into an adapter for now.  When I place it and a couple others permanently, I'll have to add some resistance. 

20240503_233626445_iOS

The Sanky Wanky Coffee Company is done for now.  The extra kit parts, instructions, and extra 'coffee sacks and crates' cutouts are tucked away in the original box.  I need to do some site work, which isn't much since it will be gravel driveway, some weeds, and then the three dimensional objects as I get those.  Folks have mentioned 3D printing.  I don't have access to a printer and one isn't in the budget, but I will get the objects as time goes on. 

Addendum:  As I was typing I would add another AC feed for a couple LEDs in the office when I get office furniture, it came to me how to wire it using the existing module.  I'll have to flip the building on its side to do it, so I can get to the module.  Keep your fingers crossed I don't break anything in the process!    Tune in again; Same bat time, same bat channel!! 

Attachments

Images (3)
  • 20240504_175251156_iOS
  • 20240503_234107867_iOS
  • 20240503_233626445_iOS

For Pete's sake, Mark!  What was so hard about lighting the office area???  I'm really laughing at myself! 

You know, if I hadn't started writing about it, I may have not seen the easy solution staring me in the face.  That is why I didn't just delete everything in my post before Randy's comment before I even posted it.

So, I did turn the structure on its side and can show you the mess underneath.  It ain't pretty, but By Jove it works!

20240504_193507607_iOS

On the photograph above, I'll start at the bottom.  You can just make out the base of the chimney resting on the old tee- shirt.  I drilled a hole in the base right beside the perpendicular styrene scrap I used as a back for the depressed floor area.  Those two wires are soldered to the input of Rod's module that is attached to that perpendicular with double-sided tape.  The output is wired to the Wago connectors that I taped one on top of the other.  The horizontal and two diagonal floor braces are scrap styrene that wasn't as wide as the kit's bracing.  That was quite handy because it let me put the wires over them without drilling more holes.  In the upper right, I drilled a hole through the floor right at the corner of the singe-story part of the building that I am calling the office.  I put in a three LED section of LED strip taped to the removable roof and soldered two wires to that.  Here is the results.

20240504_195306203_iOS

I can just see a bit of wire in the upper right of the foreground office window.  I'm not fooling with it.  I will be removing the roof someday to put in furniture and a worker or two.

Thank you for taking a look!!!

Attachments

Images (2)
  • 20240504_193507607_iOS
  • 20240504_195306203_iOS
Last edited by Mark Boyce

Mark your lighting looks spectacular; very nice work. Good to know that one of the lighting modules worked well for you. and as you know, you can adjust the output down if you ever decide you need to.

One easy way to tone down the menards truck lights is to build a male-female adapter using the same 2.1/5.5 plugs Menards does, and wire about a 470 ohm resistor in one side of the middle of it. Easy peasy. Sorry I don't have a picture handy to post that shows what I mean, but you probably figured it out.

Rod

Add Reply

Post
The Track Planning and Layout Design Forum is sponsored by

AN OGR FORUM CHARTER SPONSOR

OGR Publishing, Inc., 1310 Eastside Centre Ct, Suite 6, Mountain Home, AR 72653
800-980-OGRR (6477)
www.ogaugerr.com

×
×
×
×
Link copied to your clipboard.
×
×