I'm installing PS2 in my Williams USRA 2-8-2.  At the moment I'm waiting for the postman to deliver the kit, but I have some parts left from my last conversion and thought I'd at least get the motor and flywheel started.


I had to wrap a piece of double-sided tape around the 25.0mm flywheel to get it bigger, and used the 27.7mm kit tape on top of that.


Now the problem, the Mabuchi motor is 36mm diameter, that's 5.5mm bigger than the flywheel (on 1 side) and if I add the thickness of the tach holder it makes the tach reader approx. 9mm away from the flywheel.  The tach holder for the other type motor is too short to fit the large Mabuchi motor.


Any ideas what to do?  I have a few, but involves making a new tach reader holder or modifying one that came with the kit.

Original Post

Replies sorted oldest to newest

I'm hitting it better now that I tell myself before each swing to (after watching the LPGA women play)...hit it like a girl   Those women can hit a ball almost 300 yards on average.  They have the smoothest swings in the world.


I'm finding out that converting the Williams 2-8-2 isn't quite a walk in the park.  1st thing I'm having to do (after removing all the old electronics) is to enlarge the areas where the new PS2 stuff goes, like the plug on the rear of the boiler.  Then I have to make something to hold the plug in place because the rear of the frame isn't as wide as the PCB, therefore the PCB holes don't fit.  It's not hard to do, just adds on additional time.


I don't know what you guys charge to do conversions, but it's probably not enough .  I can see a standard rate for converting MTH engines where not much has to be altered (drop-in replacement), but other brands most certainly warrant more $$$.


Good thing is the Vanderbilt tender is plenty roomy enough to house everything I need to put in there.  I can put the speaker on the slope back wall of the coal bin and have already drilled holes for the sound to come out.


I'm not hooking up the smoke unit and probably won't hook up the charging jack.  But I do need to add marker lamps to the front of the engine.


As far as sound files, I found a USRA 2-8-2 that should give me what I need.  Does anyone know the drive wheel diameter of the MTH USRA engines?

The smoke shouldn't be that bad, I don't routinely bother with the charging jack for my stuff.  I've had to enlarge the tether hole for most non-MTH installs, as well as chop the connector board down so it'll fit.  I take the diodes off and install them in-line in the wiring.


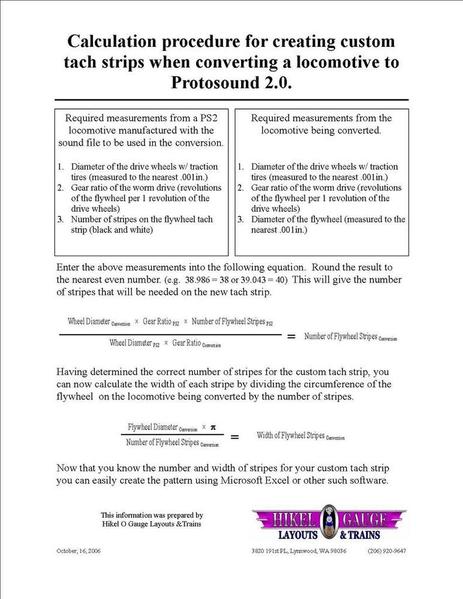
I first look for a Premier sound file, as they will have enabled more of the lighting features as a rule.  As far as the wheel diameter, you also have the gearing to consider.  If you're trying to get this to do scale mph, I think Dave Hikel came up with a chart to help you configure custom tach tapes, and a bunch of different custom tapes were also posted here.  Here's the chart, I'll bet the tapes are on his site.


custom-tach-strips-for-speed-matching-ps2-conversions

Attachments

Images (1)
  • custom-tach-strips-for-speed-matching-ps2-conversions

But I do need to add marker lamps to the front of the engine.


Bob, since you're a 3RS guy, you won't need to hook up any classification lights on the front of the boiler (marker lights go on the rear of the tender, and they probably don't need to be hooked up either).  A locomotive hauling freight would generally have dark class lights.  Markers would only be lit if the loco was running light with no train or was operating as a pusher on the rear of a train.


Last edited by Bob

John,


I looked at Dave H.'s calculation table, but didn't see one that fit, but I will look again.  The driver diameter on this engine is 1.3265" and the gear ratio is 21:1.


I enlarged the opening at the rear of the engine to get the clearance I needed for the connector board.  I put a piece of electrical tape down first to make sure nothing would short plus I checked it with my ohmmeter.


Playing around with the motor I made a .016" brass "L" shaped bracket to hold the tach reader.  The bracket mounts to the motor bracket on the chassis and utilizes the 2 screws that hold the motor in place.  I cut off the small square piece of tach reader housing off of an old tach reader housing and super glued it to the brass "L", followed with some JB Weld.  I'll be at work while that dries today.  I used the 27.7mm tach tape on the flywheel, after wrapping a thin piece of double-sided tape used for mounting things on autos, around the flywheel.


I temporarily installed the tach reader and I think all I need to do is bend the top of the "L" up/down to get the .030" gap.  I noticed a slight wobble on the flywheel, hope that doesn't pose a problem.  The only way is to run it and find out, it might not be enough to cause problems.


I was going to cut off the wiring for the smoke unit and fan, I don't like having unneeded wires in the way (I have removed all the smoke units from all my engines).  Is this a good idea?


I'll re-use the existing center roller wires, no need to disassemble the engine just for that.  As soon as I get home I'll assemble the motor/tach reader and wire the motor.  I need to locate a spot for the ground wire going to the chassis frame.


Can the smoke unit or fan unit wiring be used for the marker lights?  If not, does that mean running wires from the tender, outside of the cable loop, to add marker lamps?

The headlight is easy, probably need to slip a piece of heat shrink over the rear of the bulb so it'll be snug in the housing.


After that I can re-assemble the engine and start on the tender!

Originally Posted by Bob Delbridge:

I'm hitting it better now that I tell myself before each swing to (after watching the LPGA women play)...hit it like a girl   Those women can hit a ball almost 300 yards on average.  They have the smoothest swings in the world.


I'm finding out that converting the Williams 2-8-2 isn't quite a walk in the park.  1st thing I'm having to do (after removing all the old electronics) is to enlarge the areas where the new PS2 stuff goes, like the plug on the rear of the boiler.  Then I have to make something to hold the plug in place because the rear of the frame isn't as wide as the PCB, therefore the PCB holes don't fit.  It's not hard to do, just adds on additional time.


I don't know what you guys charge to do conversions, but it's probably not enough .  I can see a standard rate for converting MTH engines where not much has to be altered (drop-in replacement), but other brands most certainly warrant more $$$.


Good thing is the Vanderbilt tender is plenty roomy enough to house everything I need to put in there.  I can put the speaker on the slope back wall of the coal bin and have already drilled holes for the sound to come out.


I'm not hooking up the smoke unit and probably won't hook up the charging jack.  But I do need to add marker lamps to the front of the engine.


As far as sound files, I found a USRA 2-8-2 that should give me what I need.  Does anyone know the drive wheel diameter of the MTH USRA engines?


Bob, I am converting a Brass Big Boy and I am sure I have an easy 40 hrs working on it.  First you have to disassemble and evaluate placement.  Tender is pretty easy, but as you mention, I needed to custom fit the PCB in the engine, custom mount the tach reader.  I usually disassemble the wire harness and cover wires in black heat shrink as it is routed through engine so wires are not visible, add a fan smoke unit in place of the sleuthe, in this case customize the funnel, swap to a smaller fan motor, manufacture a bracket and than trial and error fit it in a confined space that has to be reachable for maintenance.


As far as your engine markers.  Normally you can't run them separately because the steam kit only gives you a headlight.  Since your not running smoke you will have 3 extra wires available.  So you could tap in to the 8 pin connector for markers and use it through the harness in place of the smoke wires.


I usually leave the original Marker LEDs and just convert it to a series set up.  I add a 150 ohm resistor if I am going to run them off the headlight circuit.


Now if you want smoke in the engine let me know, I have MTH units and can fit one in for you.  G

You can use the smoke wire for the markers if you are certain you don't ever want smoke, you'll have to move any wires on the tender side as well from where they're currently connected.  There are actually two unique wires for the smoke, the fan (green) and the smoke heater (red), so you actually have an extra wire that you could do something like cab lights with.  As long as the sound file you pick has those enabled, you can control them both from the remote.


PS: I see George beat me to it.


Originally Posted by gunrunnerjohn:

You can use the smoke wire for the markers if you are certain you don't ever want smoke, you'll have to move any wires on the tender side as well from where they're currently connected.  There are actually two unique wires for the smoke, the fan (green) and the smoke heater (red), so you actually have an extra wire that you could do something like cab lights with.  As long as the sound file you pick has those enabled, you can control them both from the remote.


PS: I see George beat me to it.


Smoke is brown, Red is center rail AC power:-)  G

John, Yes the 5VDC for the fan.  Since it was a marker he is driving he has the 5V available.  You are correct that there are 2 control lines available.  G


PS Those wiring diagrams in the instruction are hard to follow, so I marked wire and connector color on one book I used as a reference book.  I kept adding notes as I started.   After a while you remember it all.  G

Thanks guys!  When I get home tonight I'll take a look at the wiring on the tender board.  Is the smoke/fan voltage good for the marker lamp LEDs (they are LEDs right?)?


If I do use the smoke/fan wires and the voltage is good, is there any reason the wires in the tender have to be moved to another terminal on the board?  (I'm in a hurry a think I didn't read your comments accurately)

Bob,  You need to look at the engnine markers and how they are powered.  The Brass 90's version engines I have worked on have a CV board using 6V to power the sleuthe smoke, and use a 150 ohm resistor to drop voltage/limit current for the LEDs.  Your head light may also be a 6V bulb.


If so, yes the gray smoke fan wire is 5VDC and same source as the Marker LED use.  You need control, so I would move the green wire out of the tender 4 pin connector and place it in the correct spot in the 8 pin connector for front marker control.  You may have to pull a jumper wire out of the 8 pin.  At that point the front and rear markers will be controllable via DCS.  G

Originally Posted by Bob:

But I do need to add marker lamps to the front of the engine.


Bob, since you're a 3RS guy, you won't need to hook up any classification lights on the front of the boiler (marker lights go on the rear of the tender, and they probably don't need to be hooked up either).  A locomotive hauling freight would generally have dark class lights.  Markers would only be lit if the loco was running light with no train or was operating as a pusher on the rear of a train.


Thanks Bob, I didn't see your post at first.


I planned on NOT hooking up the tender marker lamps, hoping to use them on front of the engine.  And like John said, I have the lamps mounted on the front, might as well put them to use.


George and John, I'll digest all this info and present a plan soon.  When I do please look it over for me.


I think I'll get it running first, then worry about moving the wiring around to support front marker lamps and maybe a cab light.  From all the photos I've seen of the Seaboard Vanderbilt tenders, I've never seen any marker lamps on the rear and didn't account for them when I built the tender.


I don't plan on using smoke ever again.  Used it for a while, but since I can't smell much anyway (lost my sense of smell a few years back) and don't like to clean the messy residue off my layout I think I'll pass.

I got the engine wired up today and hooked up my 2-8-0 tender to make sure things worked as planned.


It worked (I got the motor wired right the 1st try!), but I could hear rubbing as it went down the track.  When I took the boiler shell off I saw rub marks on the tach tape   It still runs fine, but it looks like the dog ate it.  Not sure if I should just pretty it up with a marker pen or put on a new tape (which I don't have)


I mounted the speaker in the tender, on the sloped plate of the coal bin.  I had to cut away a piece of the round tender body to clear the speaker mounting lugs/screws.

John, I think a cable zip-tie was rubbing against the flywheel, causing the rub marks.


I noticed in this kit the tach tape set has a flat finish to it, the 1st kit I got had a glossy set of tapes.  What should I use to attempt cleaning this (flat) tape with?


What should I use to restore the white areas of the tape?


The Vanderbilt tender was built from a piece of PVC pipe.  I have a 1/16"x1/2"x6" long piece of brass inside, the truck screws thread into it.  Is that enough metal for the heat sink?  It'll also be used as ground.


The PVC part of the tender has a styrene channel on the bottom with another piece of brass between it and the trucks, giving me a flat, metal surface to mount the trucks on and additional weight:


If the tape is sufficiently damaged, you may be better off just replacing it.  The Hikel brothers created this set of tach tape sheets for custom installations, you can get about any spacing you desire.  I've also included their computation sheet so you know how many strips/inch you should have for scale speeds.  Just print the sheet you want to use on gummed paper, cut out your tach tape, and apply it to the flywheel.


Your brass pipe is plenty of heatsink.


Attachments

Bob, The new kits shifted to a different paper.  DHS may have some tach tapes if you need one.  I would try a black marker and liquid paper eraser or white paint if you have it.


I was going to say, the thickness of tach tape causing interference is quite a close tolerance on a flywheel:-) 


Heat sink will be fine.  G

I hooked most of the wiring harness up, but have some questions.


(Check my wire colors, I'm partially color-blind) (How did I ever get into electronics at NNSY? )


On the 12-pin plug:


Pins 1(pink)&10(blue) - go to the smoke switch, which I will not be using


Pins 2(purple)&4(green)- go to the rear backup light, the majority of the Seaboard Q3 class didn't have backup lights from what I can determine, so I will not be using this


Pin 3 - open


Pin 5(purple)- goes into the main harness plug going to the engine


Pins 6(yellow)&7(white)- speaker


Pins 2(purple)&8(brown) - go to the rear coupler, I use Kadees so these are not used


Pin 9 - open


Pins 10(blue), 11(gray), 12(red) - go to the volume pot, which I will not add.


The volume pot wires are bare on the end.  Do you recommend removing the pins from the 12-pin connector or putting heat shrink over the ends and tying the wires back into a bundle?  If I need to keep them, should I tie the 3 wires together of keep them separate?


Same goes for the smoke switch, rear backup light, and rear coupler plugs.  Should I remove them from the 12-pin connector or tie them up?


So, all I'm currently using are 3 wires out of the 12-pin plug, the 2 speaker wires and the one wire going to the engine (pin 5).


What do you use to remove pins from the connectors, a straight pin/needle?


George, you said you don't normally use the charging jack.  Do you cut the jack off and reconnect the wires to the 2 connectors (battery and board ends)?


I still need to look over what ya'll said about the wiring in order to have the front marker lamps wired and working.

I looked over Dave Hikel's data on making tach tapes and feel there's too many parameters that nobody can possibly know unless you have every MTH engine ever made.  There's no way I can determine what the wheel diameter, gear ratio, and number of flywheel stripes are for a given engine if it's not already listed in his database.


I looked on MTH's site at some of their USRA 2-8-2 engines (20-3051-1, 20-3052-1, 20-3053-1), but nowhere does it tell you what wheel diameter and gear ratio they are.


The 27.7mm tach tape (that came with the kit) 99% fit on the flywheel, but the last white stripe was a bit narrower than the rest.


I'll have to do more measuring to see if another tape can be used.

Here's where I am:


I've removed all the wires going to the 8-pin connector.


I moved the green wire from the 4-pin connector to pin 4 of the 8-pin connector


I moved the gray wire from the 4-pin connector to pin 8 of the 8-pin connector.


(this leaves only the brown wire in pin 3 of the 4-pin connector)  which goes to the red plug (smoke unit) and is not used.


The gray and green wires (now in the 8-pin connector) will be used to power/control the front marker lamps, thru the green (ex-fan unit) plug.

Bob,  that should work, the markers use 5V, the gray wire from the 4 pin is 5VDC to the engine, then a second wire comes off it at the PCB to feed tach too.


So you could leave the gray in the 4 pin, but move the green as you did.  If you turn off markers with DCS and loose speed control, or have speed control issues, I would move the gray back to the 4 pin slot.   G


SUCCESS!!!


I managed to get the sound file loaded (in 6 minutes) with zero problems.


I used one of the upgrade sound files (p021pusramikadoall020401afin_3v.mth) for a USRA 2-8-2 and it sounds great, might be because I have the speaker mounted on the sloped surface of the coal bunker and no coal in it yet (I had to take it out to fix something).


The marker lights don't appear to be working, I may have to upload another file that supports them, maybe (pr_usra_2-8-2_010720d_final.mth).  If I can't get them to work, I'm not too concerned, from what I've read anything but off, white, or green for the front are the only conditions actually used (and I have red lights that came with the kit).


I'll play around with it today and see how I like my new SAL Q3 Mike

Post
The DCS Forum is sponsored by

OGR Publishing, Inc., 1310 Eastside Centre Ct, Suite 6, Mountain Home, AR 72653
800-980-OGRR (6477)
www.ogaugerr.com

×
×
×
×
Link copied to your clipboard.
×
×