
I've got this wasted little room that the previous homeowner used for her "crafts". It's 8x10.5 foot and I've decided to use this to do the little around the wall point to point that I've always wanted. It's in O27 because I have more of that than I can shake a stick at (help, it's attacking!) and is what all my rolling stock is in.

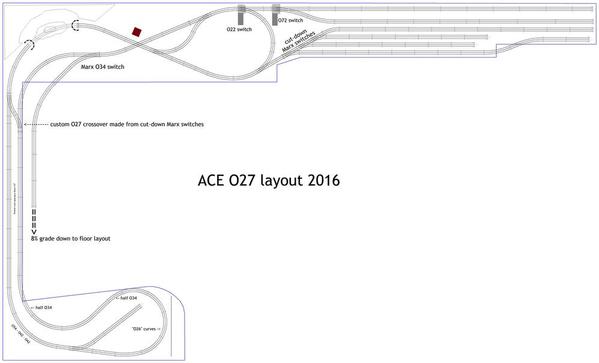
The SCARM file is attached. I've got no idea how to do gradients but most of this will be pretty level on a shelf with the exception of the bridge in the corner (giant trestle??) and there's not that much room for any tbh. I might do the reverse and keep the track level but slope and scenic everything around it. I'd like to keep it high so I can mount my clockwork layout on drawer guides underneath the benchwork too. Having trouble getting a few tracks on the reversing loops dialed in just right but they should fudge in just fine.

Any pointers? TIA.

Attachments

Images (1)
  • wasteroom
Files (1)
Last edited by SteamWolf
Original Post

Replies sorted oldest to newest

Jan posted:

I don't think you have room for any  elevation change of more than an inch or so, but you can have the ground drop away so the the bridge could span s river or canyon.

Jan

Yeah, that's what I thought too. Drop that about 2' and create a huge canyon or something. Probably going to have a river elsewhere as well for my little girder bridge to sit across. Other than that I'm probably going to have to figure out how to make the reversing loop switches non derailing. 

I like the overall plan with reversing loops, industry sidings on each end, passing siding in between, and space for a trestle is awesome. 

Just brainstorming with you...I would consider revising the sidings within the loops.  a) the "S" curves that are in the original plan are difficult to navigate, especially with light weight tradional rolling stock. b) the "S" curves eat up more space, limiting the usable siding.  I included a picture of similar sidings that we have on our modest layout (031 tubular).   Another tip to be aware of is the actual footprint of the switch.  Some of the 027 switches have a large rectangular footprint that are sometimes difficult to place adjacent to one another.

The crossover switches within the passing siding at the top aren't really necesary.  I would remove them which would allow for more scenery or structures.

Lastly, I would consider completing the loops on each side (blue) so you could run more trains at one time.  You have a nice plan without doing that, but I have found it fun to juggle 3 trains: one on each loop and one waiting on the passing siding.  Bring one train from one of the loops to the open passing siding, pull the waiting train onto the open loop, lather, rinse, repeat.  It keeps you active and on your toes, but also allows you to sit back and relax and let 2 of them loop if you want. 


2020-01-27 09_28_14-Photos


Attachments

Images (1)
  • 2020-01-27 09_28_14-Photos
Last edited by JD2035RR
JD2035RR posted:

I like the overall plan with reversing loops, industry sidings on each end, passing siding in between, and space for a trestle is awesome. 

Just brainstorming with you...I would consider revising the sidings within the loops.  a) the "S" curves that are in the original plan are difficult to navigate, especially with light weight tradional rolling stock. b) the "S" curves eat up more space, limiting the usable siding.  I included a picture of similar sidings that we have on our modest layout (031 tubular).   Another tip to be aware of is the actual footprint of the switch.  Some of the 027 switches have a large rectangular footprint that are sometimes difficult to place adjacent to one another.

The crossover switches within the passing siding at the top aren't really necesary.  I would remove them which would allow for more scenery or structures.

Lastly, I would consider completing the loops on each side (blue) so you could run more trains at one time.  You have a nice plan without doing that, but I have found it fun to juggle 3 trains: one on each loop and one waiting on the passing siding.  Bring one train from one of the loops to the open passing siding, pull the waiting train onto the open loop, lather, rinse, repeat.  It keeps you active and on your toes, but also allows you to sit back and relax and let 2 of them loop if you want. 


2020-01-27 09_28_14-Photos


I see what you mean about the s curves inside the reversing loops. And I do like the idea of having a looped layout at one end, probably the one on the right, maybe a little 3x5 like the one attached (just modified) was kind of the original plan, was just a pita to draw in SCARM. Also I'll be mainly using old 1121electric and 1024 manual switches. 

The crossover part at the back was originally just a rhombus passing siding, but I filled it in a little more, maybe as if a small midpoint town or industry was on that section. 

I'm not exactly sure I've got the dimensions of the room right either tbh, sure seems like 8x10 filled in fast. 

Attachments

Images (1)
  • x350274
Last edited by SteamWolf
old_toymaker posted:

I have been trying to develop a new plan for the area I have, It is a little larger than yours but the same design would fit great with some modifications of course I hope you don't mind me using your original and modifying it. please keep us posted on your progress.

Please take it! Keep me posted on what you come up with too! 

Very good suggestion  what I have now is very fat and hard to reach in  some places. The baseboard is what is there now only with out the cutouts in the corners. I want to add cutouts in the corners and place switches within reach that is no more than 40" that is about the absolute farthest I can do. wasteroom

I was planning on removing the 12' wall and going all the way to the end of the basement but I don't think that will happen unless I get the addition I wanted.so I am planning for the smaller area and still using some of my big bridges.

Attachments

Images (1)
  • wasteroom

Update because I played with the track plan a little more. It's got a loop, fixed sidings, a spot where locomotives could be serviced but still retains the core point to point. 

I've come across guys listing goals for their layouts on here. This one doesn't really have goals per se, Just something that makes use of an otherwise useless room, gives me something to do constructing it, is fun to run and provides enough different activities and entertainment to not immediately become boring. I also pulled the track away from the walls just a bit to keep it scenic-able behind. I'm going to reference this thread in another post that has everything to do with the room and construction, so that's another thing entirely coming up, starting with de-papering a wall.

Revision #1 attached.

Attachments

Images (1)
  • wasteroom
Files (1)

Here's an idea to improve operations and eliminate the unnecessary rhombus at the top of your plan.  Remove all four of your crossover switches in the middle of your passing siding, and then reconnect the two sides using just one straight piece of track in each passing siding leg.  Then use the four switches to create two two-track interchange yards, one on the outside of each side with a loop.  Now, your railroad can be a connector between two Class 1 railroads while still serving some industries along its tracks.

Chuck

PRR1950 posted:

Here's an idea to improve operations and eliminate the unnecessary rhombus at the top of your plan...

Chuck

I like my rhombus! That took a lot of mental power to put together. I was envisioning more of a shortline aspect to the railway too, I could put another interchange on the bottom of the other reversing loop as well, or down the one side where there's no extra action.

Ugh. So. The whole drywall/paint thing is nearing completion. I just have to re-scrub and paint the one wall tonight that the paper was on and put another coat on the ceiling. In the process of all this, I also fixed two other windows. Great way to learn how to mud drywall. 

I think I'm going to sit on this layout design for a little while to make for sure it's what I want to do, then build it. Once everything is painted and cleaned up, I can put track down on the floor and see if it all makes sense. 


Attachments

Images (3)
  • IMG_20200205_220933
  • IMG_20200205_220924
  • IMG_20200205_201437
Last edited by SteamWolf

Well fellas, it's back to the drawing board. The doors on the room swing in, not out. The reverse loop on the left sadly has to go. I've already created a 4x8 sheet benchwork that I could expand on along the walls. More pondering is required... But I did manage to finish painting the room that everything will be in. It looks quite nice too! 

Last edited by SteamWolf
SteamWolf posted:

Been doing some work on the dumb room. I swear, this guy was just the best homeowner... 

The wallpaper basically removed itself, thank god. Very little glue was used. Drywall installation around window today... 

Ouch !   I'm having trouble unseeing that wallpaper.....LOL

Add Reply

Post
The Track Planning and Layout Design Forum is sponsored by

AN OGR FORUM CHARTER SPONSOR

OGR Publishing, Inc., 1310 Eastside Centre Ct, Suite 6, Mountain Home, AR 72653
800-980-OGRR (6477)
www.ogaugerr.com

×
×
×
×
Link copied to your clipboard.
×
×