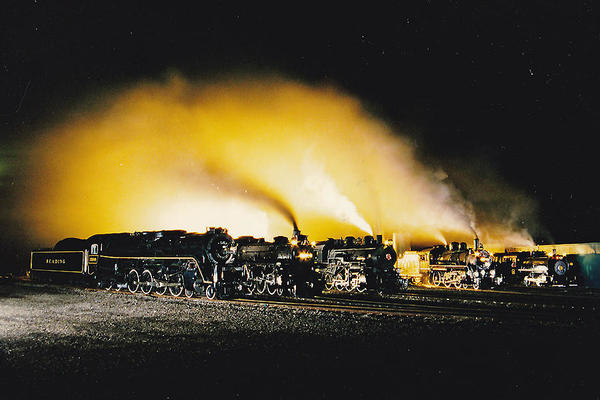
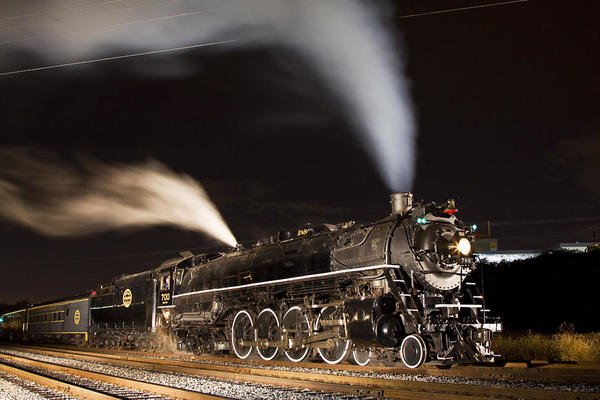
Hi everyone!

I am looking for some tips from (preferably experienced) photographers and videographers on how I should shoot potentially my first professional night photo shoot. A local railroad near my university is holding a nighttime photo shoot this coming Saturday.

I am relatively an intermediate videographer and photographer. Unfortunately, I did not find out about this event until today. I do not have my camera with me, BUT I do have my camcorder that has both still and video functionality. I am planning on buying a cheap tripod to break myself in on this week as well.

Again, any tips are welcome. I want to get the most out of this opportunity!

Thanks for the help!

Original Post

Replies sorted oldest to newest

One word...TRIPOD! You absolutely MUST use a tripod for good night photography. If you buy a cheap tripod, you will be disappointed.

A solid, sturdy tripod is the difference between good shots and junk.

  • Set your camera ISO to 400
  • Put your camera in full MANUAL mode.
  • Set the aperture to f8 to f11.
  • Set the shutter speed to whatever speed it needs to give you a good exposure. The shutter speed will be long, perhaps several seconds, which is why the tripod is needed. If it happens to be a windy night, a flimsy, cheap tripod will not stay still. Your shots will be blurred.
  • Shoot a few test shots and look at the results. Choose a shutter speed that gives you an image you like.
  • Last, and most important, POST SOME OF THE PICS HERE!  
Last edited by Rich Melvin

Night Photo Shoots tend to work one of two ways.

The first option is the old style, where they will tell everyone to open the shutters, and then for 30 seconds to a minute or so, people will hand-throw flashes on the equipment.  Then, the command will be given to close the shutter.  I've seen this done with flashbulbs, and newer flash equipment.

Option B is using high-powered flood lights, which allows people to do their own shots.

Regardless of which way they do the scene, they will tell you what settings to use.  Organizers expect a combination of regulars and people that have never done this before.  Usually, the settings are ISO 200 or 400 and f8.  You can always ask the people near you for their settings.

As to the question of shutter speeds, shutter speed is really only dependent on if they use a static light source.  At that point, it's down to how high you can crank the ISO on the camera, and the effect you want.  I've seen people shoot a moving train at 15mph with ISO 10,000 and about 1/200 shutter speed.  Of course, 90% of the cameras can't do that.  Presuming you have the ISO capability, a longer shutter speed (meaning counting in seconds) will give you more "wispy" steam.  A shorter shutter speed will freeze motion.  It's a bit of a personal preference at this point.


Now, for the bad news...Lighting.  If the museum is doing the first option with flashbulbs, any stills you get from a video camera will be basically useless, as only parts of the scene/locomotive will be lit at any one time, and the light bursts are fractions of a second.  You'll never time it right, and it will look odd--at best.

If they use static lights, you might be able to get something worthwhile out of the scene, depending on the capabilities of a video camera.  Most video cameras have very limited controls for still photo options.  Your best results will be early in the evening when there is still a bit of the blue hour twilight color in the sky.

Best option--if this is available to you--is to get someone to mail you your still camera.  Also, see if the camera will accept a cable release.  If it accepts one, and you don't have one, purchase one.  Normal procedure is to turn the shutter speed to the "bulb" setting, and using the cable release to control the shutter.  That way, you can precisely control how long to leave the shutter open, and you won't hit/move the camera at the beginning and end of the shot. 

One more thing....make sure your focus is on manual.  Night shots play havoc with auto focus.  General rule of thumb is to set it to infinity and back off just a hair.  The other way to do it is to zoom in on something you want in focus (a headlight or number plate is usually a good target), and lock the focus.  Oh, and bring a flashlight.  It helps immensely setting camera settings, leveling tripods, and navigating the darkened scene safely.

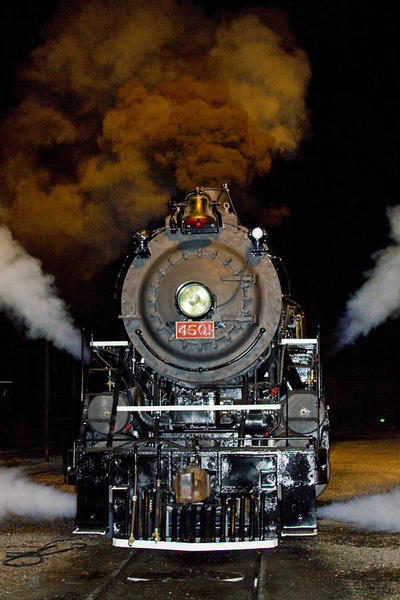
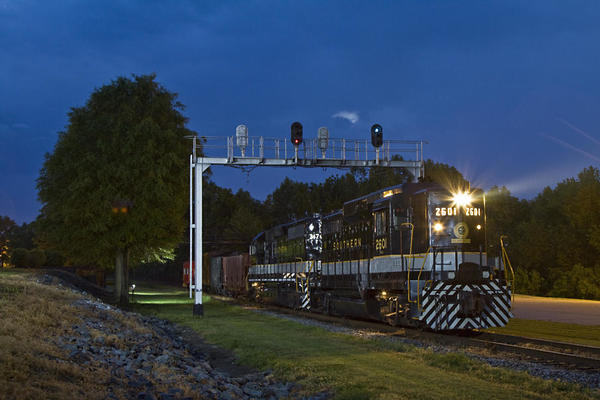
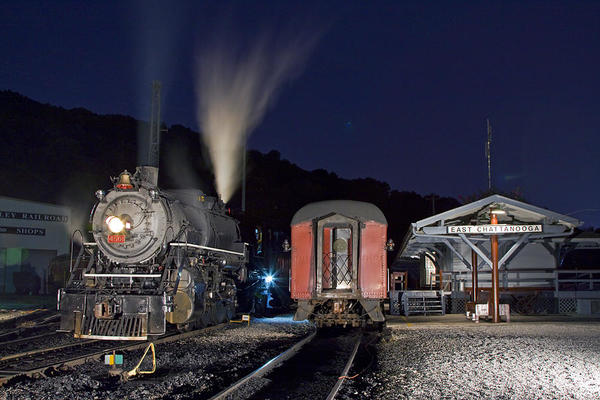
I've attached a few pictures taken over the years to see what is available.  You'll see a mixture of static lighting and flashbulbs used.  Both can give equally good results.

Hope this makes some sense.  If it doesn't, I'll try to explain a bit more.

Best of luck,

Kevin

Oregon NightsIMG_85884501 1st Move Under Steam Sept 2014Alta SnoutsBuffalo Creek & Gauley nightsEast Chattanooga 01Morgan Run LineupIMG_7813

Attachments

Images (8)
  • Oregon Nights
  • IMG_8588
  • 4501 1st Move Under Steam Sept 2014
  • Alta Snouts
  • Buffalo Creek & Gauley nights
  • East Chattanooga 01
  • Morgan Run Lineup
  • IMG_7813

  It will depend to a large extent on how the flood lights light up the subject and the steam.  For example

  this picture

http://www.railpictures.net/vi...d=292185&nseq=11

   was a 4 second exposure at ISO 100 and f3.5

whereas this one

http://www.railpictures.net/vi...d=507827&nseq=22

was 1/4 second ISO 200 and f2.8

I usually start with whatever exposure my metering suggests (and for night shots it is almost always wrong), take a picture, look at it on the camera view screen, and, assuming the result isn't either a picture of a solar flare or an available light shot taken inside a coal mine, bracket either side of the result in terms of speed or f-stop or both.  If it is too extreme - too light - move to a shorter exposure time and re-try or too dark - move to a longer exposure and re-try.

  The good news is that with a formal set-up for a night shoot there will be plenty of time to run a bracketing series of exposures for any given framing of the image.

  One additional item - DO NOT use image on the camera view screen to judge how a picture will look or to drive decision to keep or delete - keep them all and wait until you can download them and look at what you have on a computer screen.  More than once, a picture that didn't look all that hot on the camera view screen has turned out to be a real gem.

Hi Kevin,

Thanks so much for the help! Unfortunately, from the information given by the operators of the railroad they will have an operating steam locomotive, but it will not be moving since it has a broken part that needs to be fixed over the winter. Essentially a big steam heater for them currently according to the employee. Additionally, he said that usually their night photo shoots involve setting up the scene and exposing the cameras which I think means there are no floodlights.

That being said could you elaborate on what the terms mean with regard to shutter speed like ISO. I really am interested on getting more involved in producing professional quality railroad pictures like you have but I am a complete novice at what you are speaking about.

I also will probably look into getting a professional camera over the winter. What camera (relatively cheap for a hobbyist) would you recommend for both still quality and video capability. I've heard good things both about Canon and Nikon but I would love to hear your opinion.

PennsyPride94 posted:

Hi Kevin,

Thanks so much for the help! Unfortunately, from the information given by the operators of the railroad they will have an operating steam locomotive, but it will not be moving since it has a broken part that needs to be fixed over the winter. Essentially a big steam heater for them currently according to the employee. Additionally, he said that usually their night photo shoots involve setting up the scene and exposing the cameras which I think means there are no floodlights.

That being said could you elaborate on what the terms mean with regard to shutter speed like ISO. I really am interested on getting more involved in producing professional quality railroad pictures like you have but I am a complete novice at what you are speaking about.

I also will probably look into getting a professional camera over the winter. What camera (relatively cheap for a hobbyist) would you recommend for both still quality and video capability. I've heard good things both about Canon and Nikon but I would love to hear your opinion.

You HAVE to have an external light source to do night photography.  Could be floodlights, could be flashes of some sort.  Ambient light will not give acceptable results, so they have to provide some version of lighting the scene for their session.  Specific questions should give the answer of what kind of lighting they are using.

As far as ISO, shutter speed and such...I'll try to explain without getting too technical.  There are three ways to control the amount of light entering a camera.  ISO, Shutter Speed, and aperature (also referred to as F-stop).  All three have pluses and minuses, and I'll try to cover that also.

ISO goes back to the film days, where it was ASA.  It was simply the speed of the film.  The higher the number, the faster the film, and the more light would reach the sensor at any given setting (shutter speed or aperature).  The downside of this is that at a certain point high in the range, you started getting grain in the image.  How much grain is acceptable is a personal choice.  Even in the world of digital, you still get grain.  Cheaper cameras will give more grain at lower ISO values because they are older/cheaper sensors.  The newer the camera, the better the sensor, and the less grain at higher ISO values.  I have a Canon 50D (which is a great camera--and it shot most of those photos that I posted), but pushing it past ISO 800 gives you a tremendous amount of grain in the image.  The top end cameras these days can shoot up to ISO 7000 or higher with minimal grain.  Needless to say, that gives you a tremendous amount of latitude in low-light situations in regards to shutter speed and aperature.

Shutter speed is simply how long the camera shutter is open and allowing light to be displayed for an image to be recorded.  For moving subjects in the bright sunlight, you might need 1/500 of a second (or more) to freeze motion.  In low light levels (like night photography), you have to leave the shutter open long enough to properly light the image, which is in the terms of seconds or longer.  5 seconds, 30 seconds, or even minutes in some situations.  It's a balancing game.  Leave it open too long, and you risk overexposing and blowing out the image.  Too short, and you lose detail in the dark areas, or blurring moving objects.  If you want to shoot a moving train at 1/500, you have to control your exposure by either ISO or aperature.

Aperature is how wide the point of light is that reaches the image.  It also controls depth of field, which is how much of the image is in focus.  Low numbers give a very narrow depth of field (in other words, if you intentionally want part of the image in focus and part out of focus).  Higher aperature settings (closer to f8) will put more of the image in focus.  Of course, the trade off is than f8 requires much more light to expose than f2.4.  Thus, you have to balance that with a longer shutter speed or a higher ISO.

Now, as far as cameras....  I'll be the first to admit that I don't have very much experience at all with low end cameras.  These days, a lot of the camera bodies are similar, and they will basically all do the same thing.  The main differences is in sensors (see the ISO comments), and lenses.  When it comes to camera lenses, you pretty much get what you pay for.  I don't remember if it was you or someone else who asked the question, but recently, there was a thread on cameras, and Kent had some very good advice.  Shouldn't be too far back in the archives.  Get a used camera body that is decent, and put the money towards the lenses.  You're better off having decent glass that covers wide angle to telephoto than spending a lot of money on a camera body.  The lenses will hold their value a lot longer.  That technology doesn't change nearly as fast as upgraded sensors.

As far as Canon vs. Nikon, it's a point of personal preference.  You can get great images off of both brands.  Try both, pick which one you like, and stick with it, as the lenses are not interchangeable.

One more piece of advice.....even if you don't get any useful pictures out of the event, go to the night photo session.  See what people are using, and talk with them.  Ask them what they think about their camera.  Most people are very friendly.  If it works for them, it will probably work for you, and you will probably get some pretty good advice also!

Kevin

I've been shooting trains at night for 15 years, and for the past ten years using flash (NOT flood lights.)  I've just returned from Back East where I shot a moving steamer on two nights.  I am primarily a night photographer in winter.  I have some thoughts.


1.  This isn't hard at all.  You need to put the camera in manual mode and use the meter bar in the viewfinder.  No program mode is going to accurately meter here as it will try to lighten the exposure to daytime levels.  Use the in-camera meter as a base, and then start subtracting exposure.  (Maybe as much as --2) 

2. I use a Nikon D800E, the same camera I shoot weddings with.  NOTHING, I repeat,  NOTHING is cheap about pro cameras.  Even more important than the camera are the LENSES!  My camera is worth about $1,500;  I have about $10,000 in lenses, and my tripod & head go for $800 (used) on ebay.  (Also have $6,000 worth of flash.)  Nothing is cheap about pro gear.  Biggest beginner mistake:  putting big money on a camera and then going cheap on lenses.

3. For a reasonably priced camera that will easily do the job, look at the Nikon D7200.  It's a near-pro camera.  It's Sony sensor will do better with night shots than any Canon camera.  The Sony sensors have much more dynamic range than the Canon sensors, and for this kind of shooting that makes a difference.  Shoot NEF (RAW) and process using Lightroom or PSE.    You will also need superb lenses, either a 17-50mm f2.8 zoom or a Sigma 20mm f1.4 & Sigma 35mm f1.4 ART lens.  (I typically use a Nikon 24mm PC-E lens, but those are about $2K.)  You really don't need a "pro" camera for this.  Parked trains are VERY easy.

4. Find out what ISO will give you the image quality with the most noise you will tolerate.  For the D7200 that's generally around ISO 2000.  For my D800E I rarely go over ISO 3200.  (Most of my shots are ISO 800.)


5. Focus.  This can be difficult.  Focus on any point of light on the engine, remembering that half of your DoF falls in front of focus point and half in back of it.  If no lights on the train, place a small flashlight pointed at camera on the engine, focus on that, then remove the flashlight.  Camera on tripod, of course.

6.  You absolutely need to practice for at least four nights before going on an outing.  

7.  Either be looking through the viewfinder of the camera or cover it with your thumb or hat when taking a shot so stray light won't enter.

8.  To get rid of ghosting, move the camera position around until it disappears.

9.  If there is no light put on the engine, I'd start with ISO 1600 and f2.8, 1/30s.  Look at your histogram and adjust from there.  With floodlights, start with ISO 800 and f4.  General rule:  keep ISO as low as you can, don't go over f8 or under f2.8 if that's possible.  For shutter speed, try 5s if no lights, and and 1/30s if there are flood lights.

10. Consider bringing a good flashlight and use Light Painting technique.  This is HIGHLY effective!


11.  The train isn't moving.  This is very easy to do IF you know your camera, understand exposure, and PRACTICE.  Most of my night shots involve MOVING trains, and this many orders of magnitude more difficult!


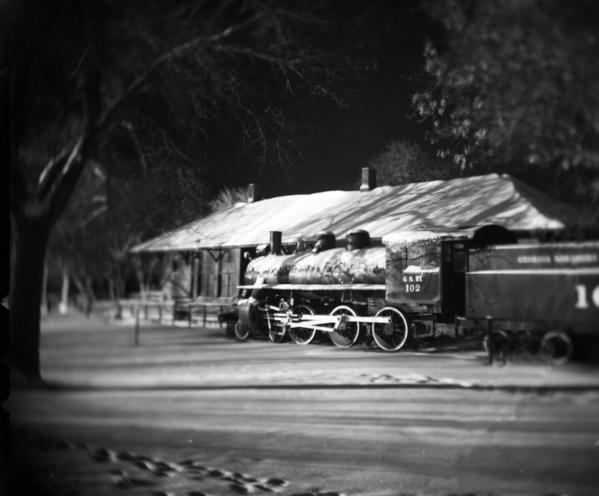
While "trains on the hoof" (moving trains) are more my thing, I've often wanted to do one of these railfan nights using my 1926 Gundlach Korona 5x7 with vintage lenses from the 1920s, ISO 400 film.  Since the engines aren't moving, this is not hard.  I'd meter with an incident light meter as I did in the below shot.


Below photo was taken using a Chamonix 045n camera (4x5,) using ISO 400 film, and an f2.8 lens made in 1845.  Even photo gear made 100+ years ago can do these kinds of shots easily.  I used two small Nikon SB-25 flash fired using the Open Flash technique.         It's not hard unless..............the trains are rolling.

Second photo is UP 3985, rolling 60 mph through Holden MO.  I used about eight huge flash and radio triggers.
RossCurieMUP3985holdBW


Attachments

Images (2)
  • RossCurieM
  • UP3985holdBW
Last edited by Two23
PennsyPride94 posted:

I am planning on buying a cheap tripod to break myself in on this week as well.

Again, any tips are welcome. I want to get the most out of this opportunity!


 A cheap tripod is  HUGE, HUGE mistake.  It's more important than the camera for this!!!!!!  Buy a decent tripod AND ballhead on ebay, used ones go for ~$500.   A cheap tripod is like flushing money down the toilet.  I also buy a dedicated "L" plate for my cameras as well, anther $125.  Look for a used Gitzo 1325 (or Gitzo 200 series) and a GOOD used ballhead such as AcraTech, Markins, RRS, even Photoclam.  Don't forget an Arca Swiss style QR plate, preferably a dedicated one.


Kent in SD

Two23 posted:

10. Consider bringing a good flashlight and use Light Painting technique.  This is HIGHLY effective!

Kent,

I was hoping you'd chime in here.  The light painting does work very well.  Actually, that Sumpter Valley 19 shot (without the snow) was done with a flashlight.  It was only about 2-3 passes to get that, and it was amazingly even light.

Any suggestions on what flashlight works best?  I think the guy mentioned it was a police flashlight.  I asked him, but without anything to write it down on (and having a real flashbulb go off accidentally about 2ft from my eyes soon after taking this shot), there was no way I was going to remember the specific model.

Thanks,

Kevin

kgdjpubs posted:
Two23 posted:

10. Consider bringing a good flashlight and use Light Painting technique.  This is HIGHLY effective!


Any suggestions on what flashlight works best?  I think the guy mentioned it was a police flashlight.  I asked him, but without anything to write it down on (and having a real flashbulb go off accidentally about 2ft from my eyes soon after taking this shot), there was no way I was going to remember the specific model.


I've been using some new LED flashlights.  The small one is a Minmag AA with LED, bought from Walmart for about twenty bucks.  It would easily do a parked engine.  I also have a Coast (brand) light, about 1075 lumens, bought at Walmart for ~$56.  It's VERY powerful!  The LED lights are pretty close to daylight balanced so you don't need to adjust color temp much if at all.   Below photo taken with the Coast light, camera on tripod, shutter speed was 5s.  The scale of these fish is huge!  About 60 ft. tall.  I stood off to the side when using the light, to create more interesting shadows.


Back to cameras.  Really, any camera can take photos of a stationary engine.  I could do it with my 1904 Kodak Brownie.


Kent in SDFish Out of WaterM

Attachments

Images (1)
  • Fish Out of WaterM
Last edited by Two23

This is one of the reasons I like digital photography. The learning curve for this back in

the film days was very expensive..and you had to wait sometimes a week for the film

to be developed. Not so with digital..put that card in the computer, look at the photos,

the file info is imbedded in the image, this  results are a very short learning curve...love it!

Ed

Plenty of good advice offered in the above posts.

1)  As a former camera shop owner, I would recommend Nikon brand.

2)  Also recommend you find a local camera shop and patronize them, same as you would your local train shop. They can recommend equipment and provide a wealth of technical information tailored to your needs. 

3)  Repeating from earlier advice - don't go cheap on the tripod or the lenses. Try to buy "faster" lenses if possible. Lenses with wider lens openings let in more light, which means your shutter speed will be higher (faster) and blur will be reduced or eliminated. 

4)  Print you best photos, don't let them just take up space on a hard drive. Even if it's just a few 4x6 prints for yout desk, better still print an enlargement for your wall - a 16 x 20 print is less than $20 dollars, a few dollars more if you mount the photo, and an inexpensive frame can be found at any craft store.

5)  Post your photos here so we can enjoy them as well. 

Good luck!!


Add Reply

Post

OGR Publishing, Inc., 1310 Eastside Centre Ct, Suite 6, Mountain Home, AR 72653
800-980-OGRR (6477)
www.ogaugerr.com

×
×
×
×
Link copied to your clipboard.
×
×